Answered step by step
Verified Expert Solution
Question
1 Approved Answer
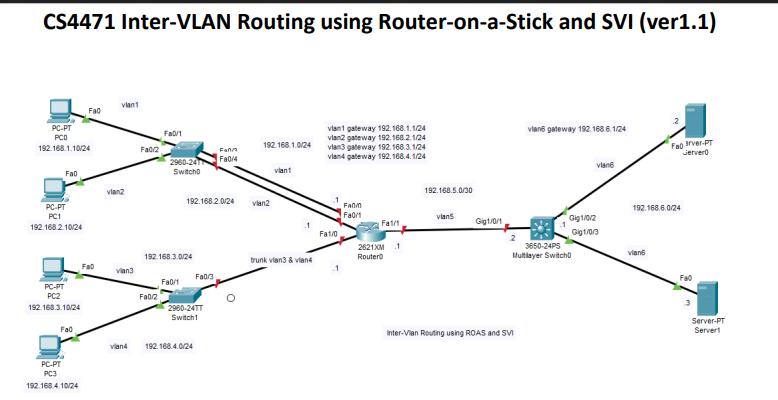
1. (1pt) Use Cisco Packet Tracer to create the network shown above. Submit a screenshot of the network your created. 2. (1pt) Configure the


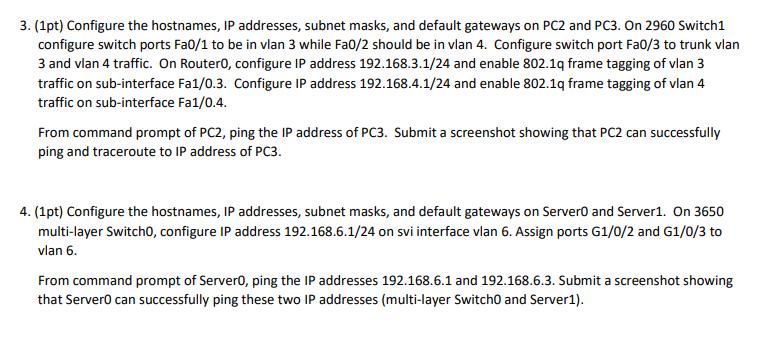
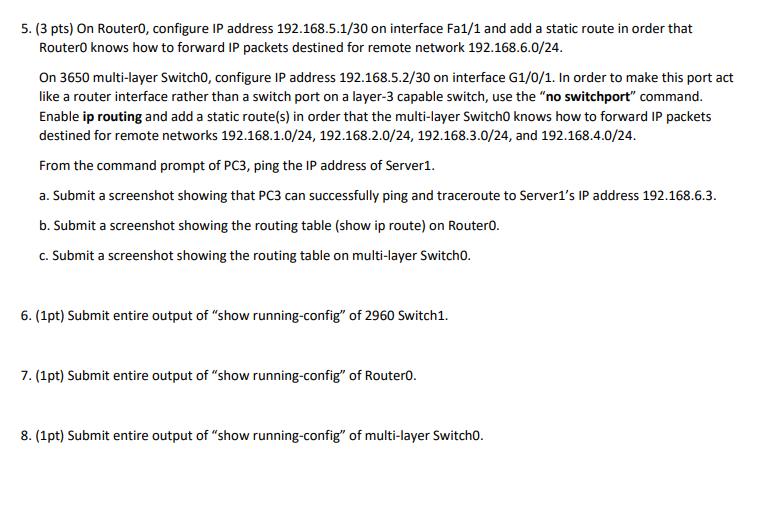
1. (1pt) Use Cisco Packet Tracer to create the network shown above. Submit a screenshot of the network your created. 2. (1pt) Configure the hostnames, IP addresses, subnet masks, and default gateways on PCO and PC1. On 2960 Switch0 configure switch ports Fa0/1 and Fa0/3 to be in vlan 1 while Fa0/2 and Fa0/4 should be in vlan 2. On RouterO, configure IP address of interface Fa0/0 to be 192.168.1.1/24 while interface Fa0/1 should be configured with IP address 192.168.2.1/24. From command prompt window of PCO, ping the IP address of PC1. Submit a screenshot showing that PCO can successfully ping and traceroute to the IP address of PC1. 3. (1pt) Configure the hostnames, IP addresses, subnet masks, and default gateways on PC2 and PC3. On 2960 Switch1 configure switch ports Fa0/1 to be in vlan 3 while Fa0/2 should be in vlan 4. Configure switch port Fa0/3 to trunk vlan 3 and vlan 4 traffic. On Router0, configure IP address 192.168.3.1/24 and enable 802.1q frame tagging of vlan 3 traffic on sub-interface Fa1/0.3. Configure IP address 192.168.4.1/24 and enable 802.1q frame tagging of vlan 4 traffic on sub-interface Fa1/0.4. From command prompt of PC2, ping the IP address of PC3. Submit a screenshot showing that PC2 can successfully ping and traceroute to IP address of PC3. 4. (1pt) Configure the hostnames, IP addresses, subnet masks, and default gateways on Server0 and Server1. On 3650 multi-layer Switch0, configure IP address 192.168.6.1/24 on svi interface vlan 6. Assign ports G1/0/2 and G1/0/3 to vlan 6. From command prompt of Server0, ping the IP addresses 192.168.6.1 and 192.168.6.3. Submit a screenshot showing that Server0 can successfully ping these two IP addresses (multi-layer Switch0 and Server1). 5. (3 pts) On Router0, configure IP address 192.168.5.1/30 on interface Fa1/1 and add a static route in order that RouterO knows how to forward IP packets destined for remote network 192.168.6.0/24. On 3650 multi-layer Switch0, configure IP address 192.168.5.2/30 on interface G1/0/1. In order to make this port act like a router interface rather than a switch port on a layer-3 capable switch, use the "no switchport" command. Enable ip routing and add a static route(s) in order that the multi-layer Switch0 knows how to forward IP packets destined for remote networks 192.168.1.0/24, 192.168.2.0/24, 192.168.3.0/24, and 192.168.4.0/24. From the command prompt of PC3, ping the IP address of Server1. a. Submit a screenshot showing that PC3 can successfully ping and traceroute to Server1's IP address 192.168.6.3. b. Submit a screenshot showing the routing table (show ip route) on RouterO. c. Submit a screenshot showing the routing table on multi-layer Switch0. 6. (1pt) Submit entire output of "show running-config" of 2960 Switch1. 7. (1pt) Submit entire output of "show running-config" of RouterO. 8. (1pt) Submit entire output of "show running-config" of multi-layer Switch0. CS4471 Inter-VLAN Routing using Router-on-a-Stick and SVI (ver1.1) PC-PT PCO 192.168.1.10/24 Fa0 PC-PT PC1 192.168.2.10/24 PC-PT PC2 192.168.3.10/24 FaQ FaQ PC-PT PC3 192.168.4.10/24 Fab viant vian2 vian3 Fa0/2 Fa0/1 Fa0/2 2960-241 Switcho 192.168.3.0/24 Fa0/1 192.168.2.0/24 Fa0/3 2960-24TT Switch! vian4 192.168.4.0/24 Fan Fa0/4 192.168.1.0/24 vlan2 viant trunk vian3 & vian4 vian1 gateway 192.168.1.1/24 vlan2 gateway 192.168.2.1/24 vian3 gateway 192.168.3.1/24 vlan4 gateway 192.168.4.1/24 Fat/0 1 FAM Fa0/1 Fat/1 2621XM 1 Router 192.168.5.0/30 vians Gigt/0/1 vland gateway 192.168.6 1/24 3650-24PS Multilayer Switch Inter-Vian Routing using ROAS and SVI vlan6 Gig11012 Gig111 Fad Brver-PT Jervero 192.168.6.0/24 vian6 Fa Server-PT Server
Step by Step Solution
There are 3 Steps involved in it
Step: 1

Get Instant Access to Expert-Tailored Solutions
See step-by-step solutions with expert insights and AI powered tools for academic success
Step: 2

Step: 3

Ace Your Homework with AI
Get the answers you need in no time with our AI-driven, step-by-step assistance
Get Started


