Answered step by step
Verified Expert Solution
Question
1 Approved Answer
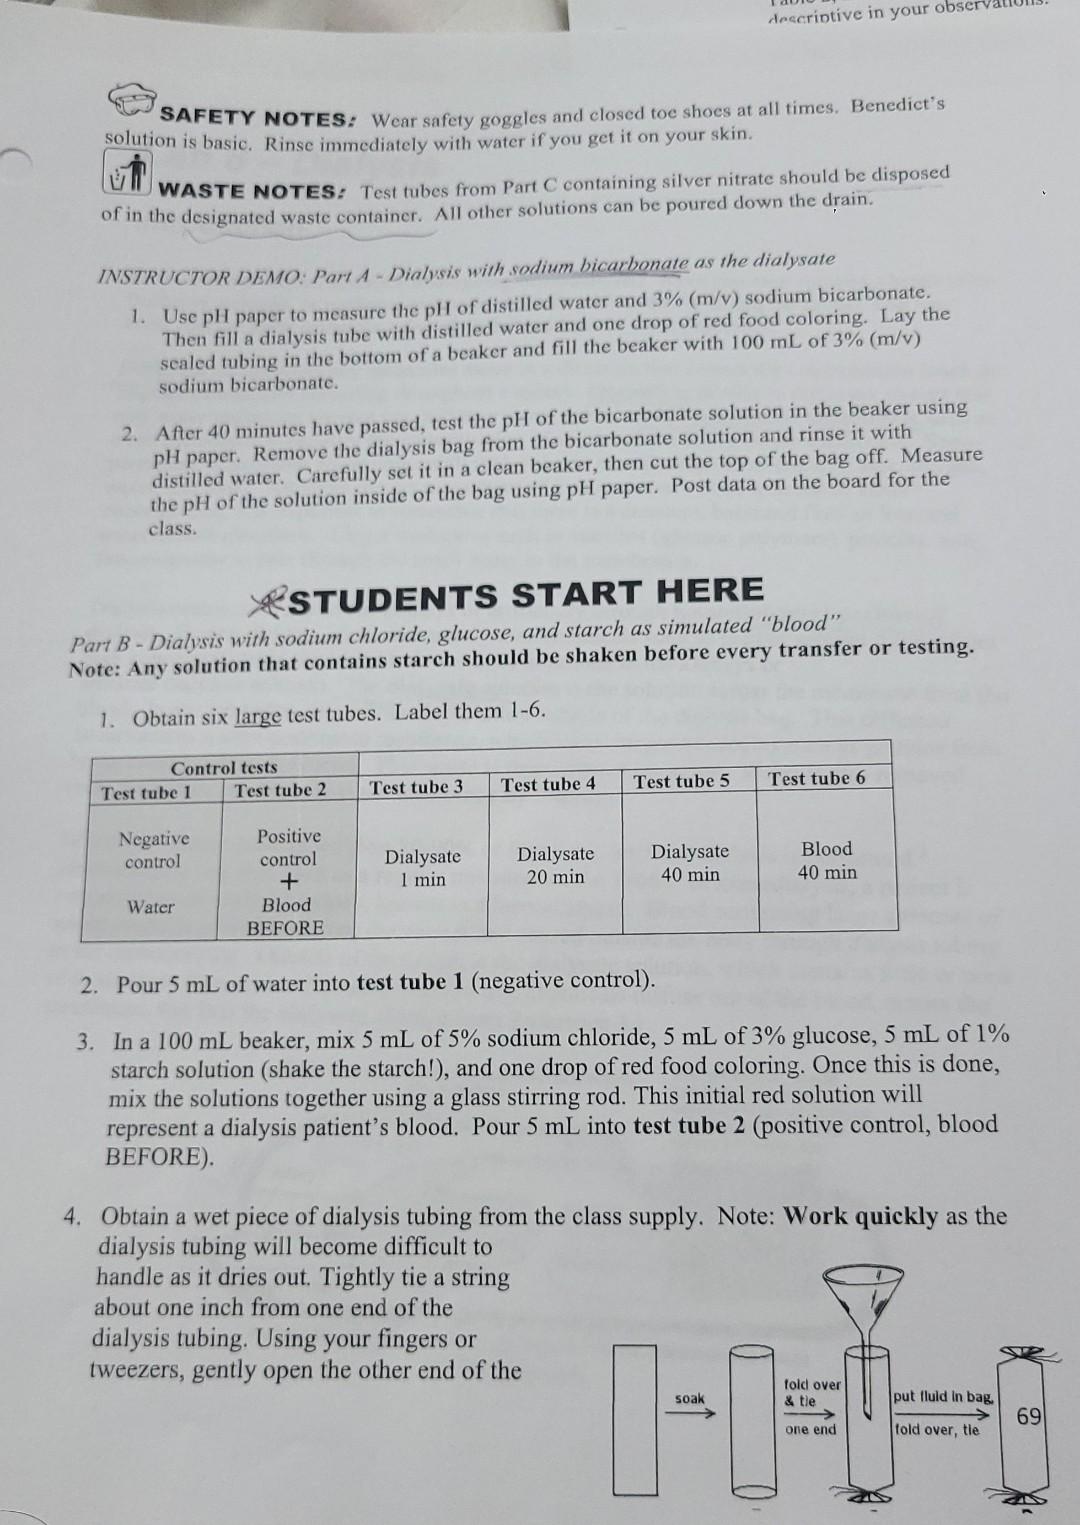
2. Read Parts B and C. What is the negative control for this experiment? What solutes are present in the negative control? 3. Read Parts


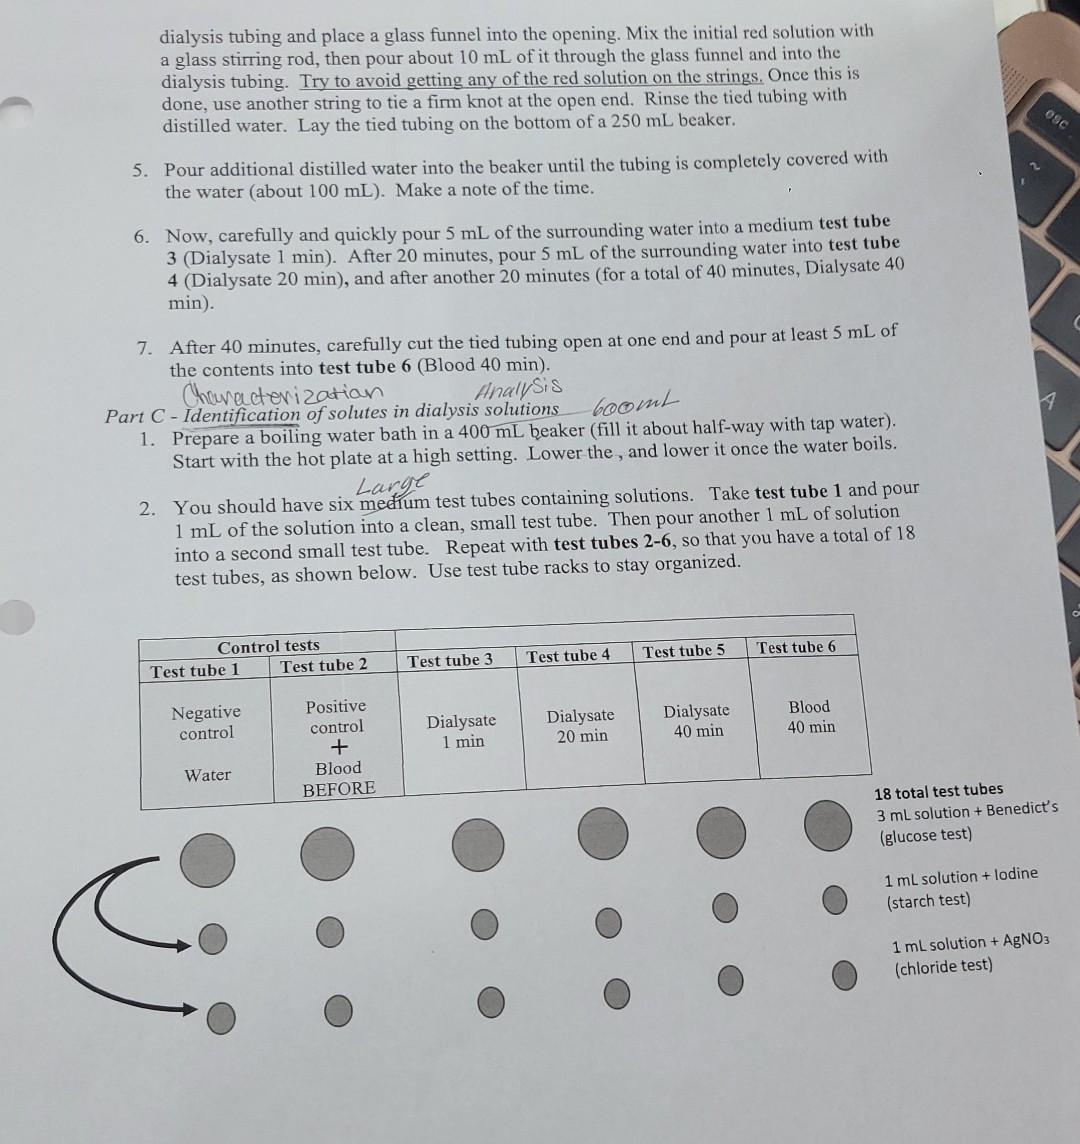
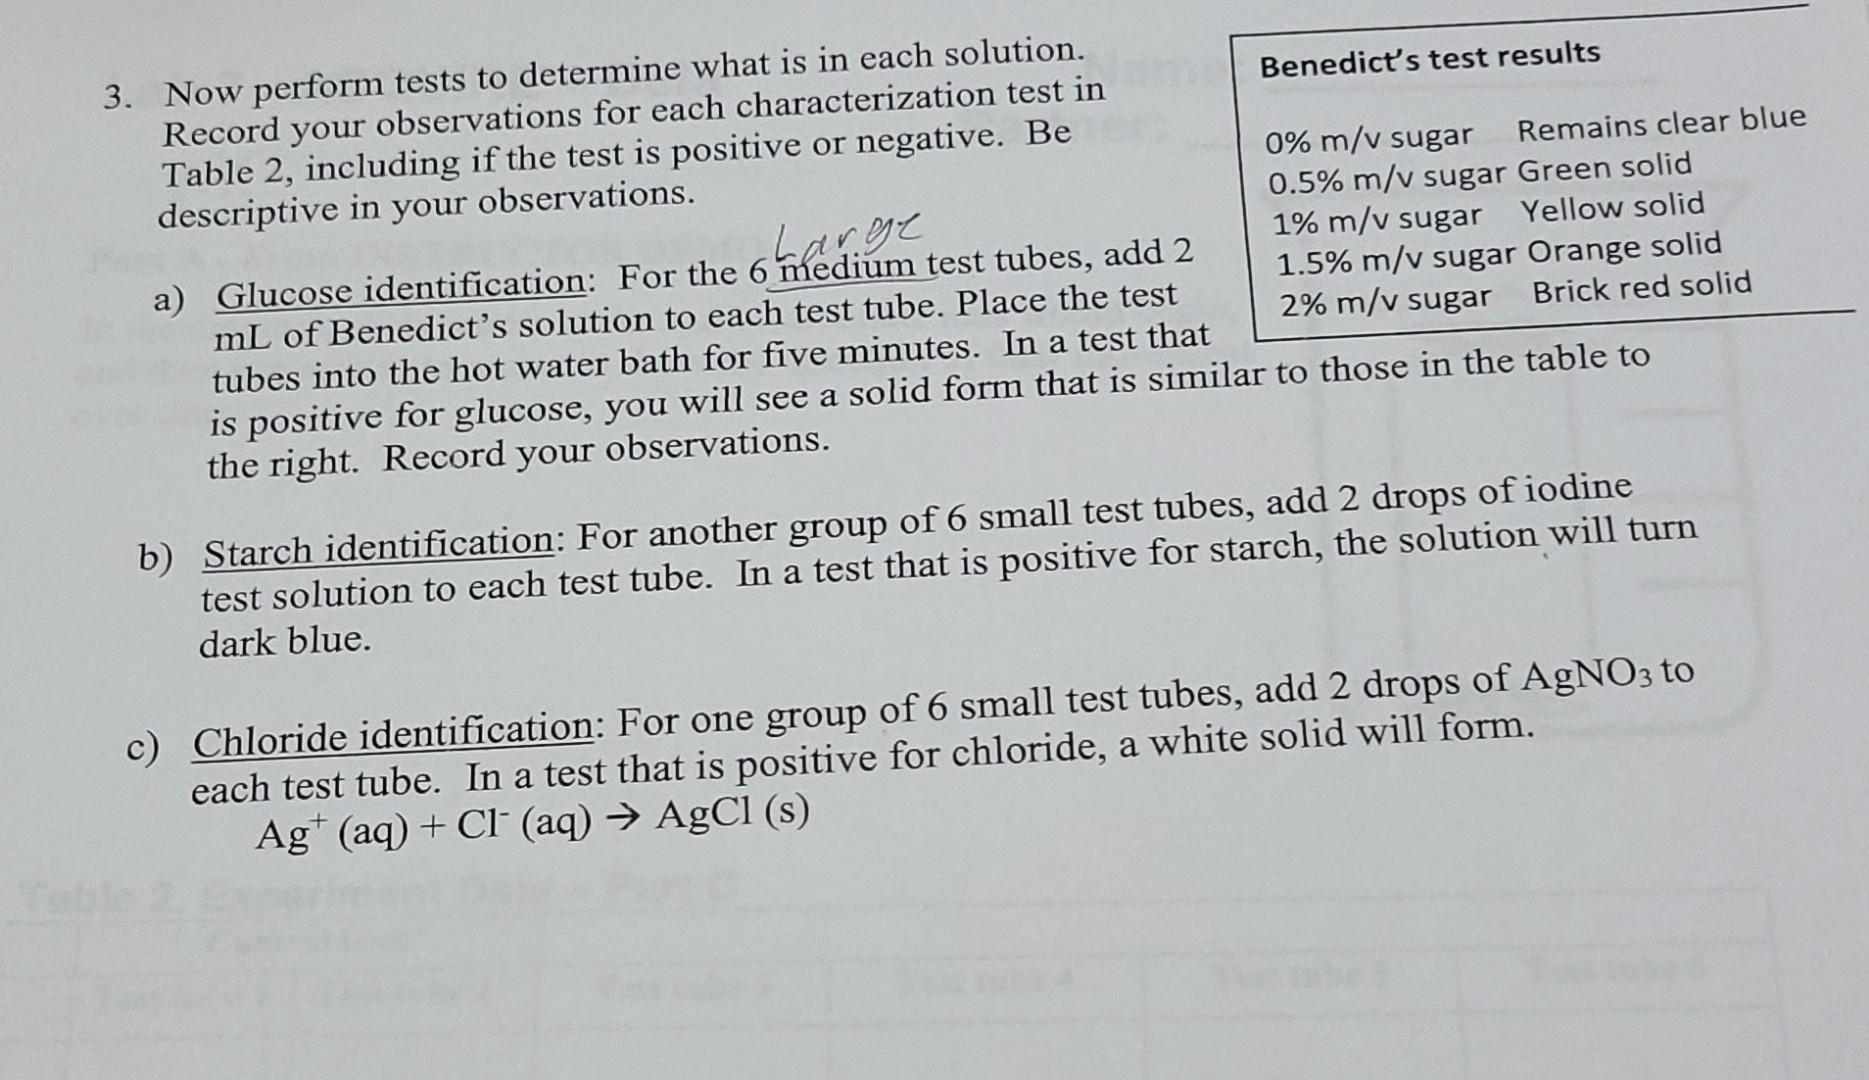
2. Read Parts B and C. What is the negative control for this experiment? What solutes are present in the negative control? 3. Read Parts B and C. What is the positive control for this experiment? What solutes are present in the positive control? descriptive in your observatio SAFETY NOTES: Wear safety goggles and closed toc shoes at all times. Benedict's solution is basic. Rinse immediately with water if you get it on your skin. lut WASTE NOTES: Test tubes from Part C containing silver nitrate should be disposed of in the designated waste container. All other solutions can be poured down the drain. INSTRUCTOR DEMO: Part A - Dialysis with sodium bicarbonate as the dialysate 1. Use pH paper to measure the pll of distilled water and 3% (m/v) sodium bicarbonate. Then fill a dialysis tube with distilled water and one drop of red food coloring. Lay the scaled tubing in the bottom of a beaker and fill the beaker with 100 mL of 3% (m/v) sodium bicarbonate. 2. After 40 minutes have passed, test the pH of the bicarbonate solution in the beaker using pH paper. Remove the dialysis bag from the bicarbonate solution and rinse it with distilled water. Carefully set it in a clean beaker, then cut the top of the bag off. Measure the pH of the solution inside of the bag using pH paper. Post data on the board for the class. STUDENTS START HERE Part B - Dialysis with sodium chloride, glucose, and starch as simulated "blood" Note: Any solution that contains starch should be shaken before every transfer or testing. 1. Obtain six large test tubes. Label them 1-6. Control tests Test tube 1 Test tube 2 Test tube 3 Test tube 4 Test tube 6 Test tube 5 Negative control Positive control + Blood BEFORE Dialysate 1 min Dialysate 20 min Blood 40 min Dialysate 40 min Water 2. Pour 5 mL of water into test tube 1 (negative control). 3. In a 100 mL beaker, mix 5 mL of 5% sodium chloride, 5 mL of 3% glucose, 5 mL of 1% starch solution (shake the starch!), and one drop of red food coloring. Once this is done, mix the solutions together using a glass stirring rod. This initial red solution will represent a dialysis patient's blood. Pour 5 mL into test tube 2 (positive control, blood BEFORE) 4. Obtain a wet piece of dialysis tubing from the class supply. Note: Work quickly as the dialysis tubing will become difficult to handle as it dries out. Tightly tie a string about one inch from one end of the dialysis tubing. Using your fingers or tweezers, gently open the other end of the soak folcl over & tle put Iluld In bag 69 one end told over, the dialysis tubing and place a glass funnel into the opening. Mix the initial red solution with a glass stirring rod, then pour about 10 mL of it through the glass funnel and into the dialysis tubing. Try to avoid getting any of the red solution on the strings. Once this is done, use another string to tie a firm knot at the open end. Rinse the tied tubing with distilled water. Lay the tied tubing on the bottom of a 250 mL beaker. esc 5. Pour additional distilled water into the beaker until the tubing is completely covered with the water (about 100 mL). Make a note of the time. 6. Now, carefully and quickly pour 5 mL of the surrounding water into a medium test tube 3 (Dialysate 1 min). After 20 minutes, pour 5 mL of the surrounding water into test tube 4 (Dialysate 20 min), and after another 20 minutes (for a total of 40 minutes, Dialysate 40 min). boomt 7. After 40 minutes, carefully cut the tied tubing open at one end and pour at least 5 mL of the contents into test tube 6 (Blood 40 min). Characterizatian Analysis Part C - Identification of solutes in dialysis solutions 1. Prepare a boiling water bath in a 400 mL beaker (fill it about half-way with tap water). Start with the hot plate at a high setting. Lower the , and lower it once the water boils. Large 2. You should have six medium test tubes containing solutions. Take test tube 1 and pour 1 mL of the solution into a clean, small test tube. Then pour another 1 mL of solution into a second small test tube. Repeat with test tubes 2-6, so that you have a total of 18 test tubes, as shown below. Use test tube racks to stay organized. Test tube 5 Test tube 6 Control tests Test tube 1 Test tube 2 Test tube 4 Test tube 3 Negative control Dialysate 20 min Dialysate 1 min Dialysate 40 min Positive control + Blood BEFORE Blood 40 min Water 18 total test tubes 3 ml solution + Benedict's (glucose test) 1 ml solution + lodine (starch test) 1 ml solution + AgNO3 (chloride test) Large 3. Now perform tests to determine what is in each solution. Benedict's test results Record your observations for each characterization test in Table 2, including if the test is positive or negative. Be 0% m/v sugar Remains clear blue descriptive in your observations. 0.5% m/v sugar Green solid 1% m/v sugar Yellow solid a) Glucose identification: For the 6 medium test tubes, add 2 1.5% m/v sugar Orange solid mL of Benedict's solution to each test tube. Place the test 2% m/v sugar Brick red solid tubes into the hot water bath for five minutes. In a test that is positive for glucose, you will see a solid form that is similar to those in the table to the right. Record your observations. b) Starch identification: For another group of 6 small test tubes, add 2 drops of iodine test solution to each test tube. In a test that is positive for starch, the solution will turn dark blue. c) Chloride identification: For one group of 6 small test tubes, add 2 drops of AgNO3 to each test tube. In a test that is positive for chloride, a white solid will form. Ag+ (aq) + CI+ (aq) AgCl (s)
Step by Step Solution
There are 3 Steps involved in it
Step: 1

Get Instant Access to Expert-Tailored Solutions
See step-by-step solutions with expert insights and AI powered tools for academic success
Step: 2

Step: 3

Ace Your Homework with AI
Get the answers you need in no time with our AI-driven, step-by-step assistance
Get Started


