Answered step by step
Verified Expert Solution
Question
1 Approved Answer
2. The diameter of a nozzle body is indicated by the designer in the drawing as D=6 mm + 0.03 mm. According to the test
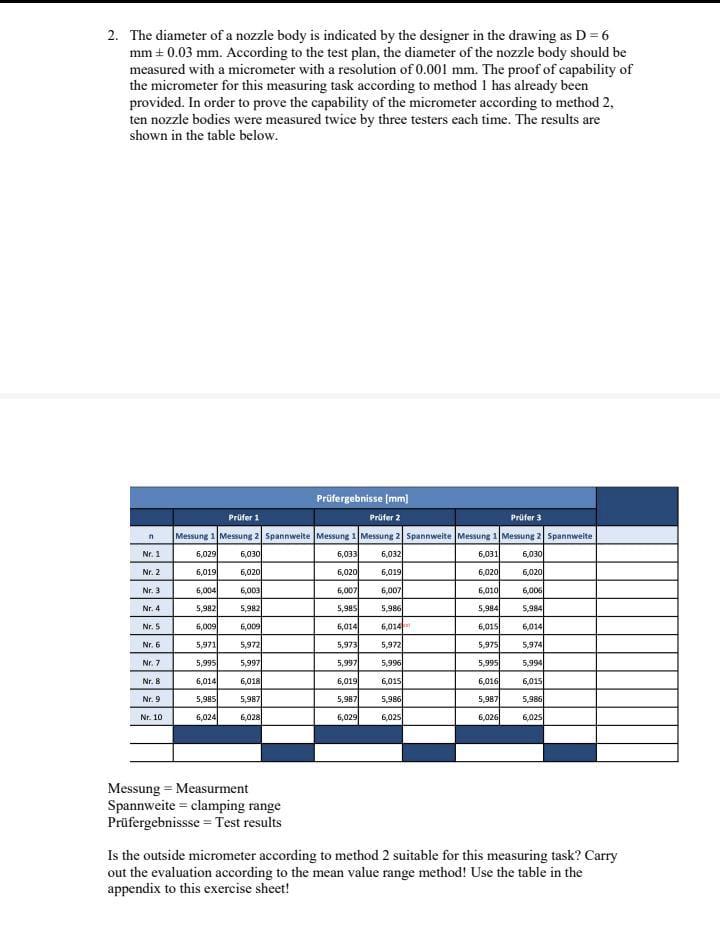
2. The diameter of a nozzle body is indicated by the designer in the drawing as D=6 mm + 0.03 mm. According to the test plan, the diameter of the nozzle body should be measured with a micrometer with a resolution of 0.001 mm. The proof of capability of the micrometer for this measuring task according to method I has already been provided. In order to prove the capability of the micrometer according to method 2, ten nozzle bodies were measured twice by three testers each time. The results are shown in the table below. n Nr. 1 Nr. 2 Nr. 3 Nr. 4 Prfergebnisse [mm] Prfer 1 Prfer 2 Prfer 3 Messung 1 Messung 2 Spannweite Messung 1 Messung 2 Spannweite Messung 1 Messung 2 Spannweite 6,029 6,030 6,0331 6,0321 6,031 6,030 6,0191 6,020 6,0201 6,019 6,020 6,020 6,004 6,003 6,007 6,007 6,010 6,006 5,992 5,992 5,995 5.986 5,994 5,994 6,009 6,009 5,014 6,014 6,015 6,014 5,971 5,972 5,973 5,922 5,975 5,974 5,995 5,997 5,997 5,996 5,995 5,994 6,014 6,018 6,019 6,015 6,016 6,015 5,985 5.987 5,987 5.986 5,987 5,986 6,024 6,028 6,029 6025 6,026 6.0251 Nr. 5 Nr. 6 Nr. 7 Nr. B Nr. 9 Nr. 10 Messung = Measurment Spannweite = clamping range Prfergebnissse = Test results Is the outside micrometer according to method 2 suitable for this measuring task? Carry out the evaluation according to the mean value range method! Use the table in the appendix to this exercise sheet
Step by Step Solution
There are 3 Steps involved in it
Step: 1
Get Instant Access to Expert-Tailored Solutions
See step-by-step solutions with expert insights and AI powered tools for academic success
Step: 2
Step: 3
Ace Your Homework with AI
Get the answers you need in no time with our AI-driven, step-by-step assistance
Get Started