Question
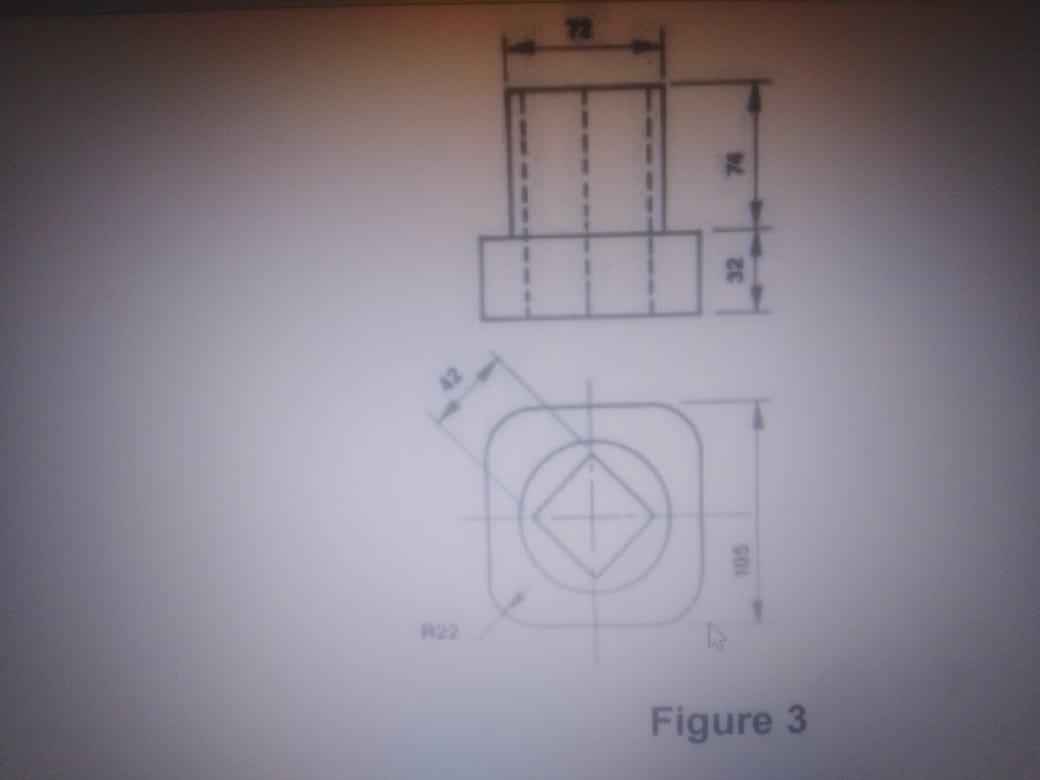
Figure 3 below shows the front view and below the front view is the top view of an object. Draw the object in ISOMETRIC PROJECTION.
Figure 3 below shows the front view and below the front view is the top view of an object. Draw the object in ISOMETRIC PROJECTION.
i. Use a scale of 1:1.
ii. Do not show hidden detail.
iii. Do not show dimensions.
iv. Add title and scale for both views.
v. Assume any dimension not given and indicate clearly.
vi. Work must be neat and tidy.

R22 Figure 3 GOL
Step by Step Solution
3.48 Rating (148 Votes )
There are 3 Steps involved in it
Step: 1
Isometric view of the ...
Get Instant Access to Expert-Tailored Solutions
See step-by-step solutions with expert insights and AI powered tools for academic success
Step: 2

Step: 3

Ace Your Homework with AI
Get the answers you need in no time with our AI-driven, step-by-step assistance
Get StartedRecommended Textbook for
Physics for Scientists and Engineers A Strategic Approach with Modern Physics
Authors: Randall D. Knight
4th edition
978-0134092508, 134092503, 133942651, 978-0133942651
Students also viewed these Civil Engineering questions
Question
Answered: 1 week ago
Question
Answered: 1 week ago
Question
Answered: 1 week ago
Question
Answered: 1 week ago
Question
Answered: 1 week ago
Question
Answered: 1 week ago
Question
Answered: 1 week ago
Question
Answered: 1 week ago
Question
Answered: 1 week ago
Question
Answered: 1 week ago
Question
Answered: 1 week ago
Question
Answered: 1 week ago
Question
Answered: 1 week ago
Question
Answered: 1 week ago
Question
Answered: 1 week ago
Question
Answered: 1 week ago
Question
Answered: 1 week ago
Question
Answered: 1 week ago
Question
Answered: 1 week ago
Question
Answered: 1 week ago
Question
Answered: 1 week ago
Question
Answered: 1 week ago
Question
Answered: 1 week ago
View Answer in SolutionInn App


