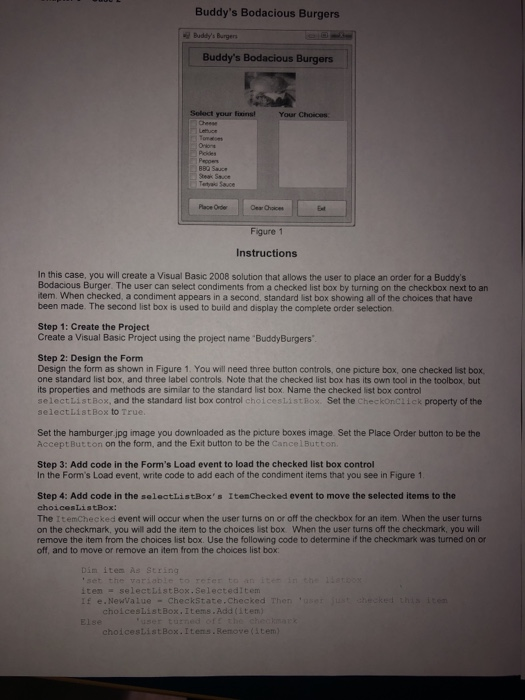
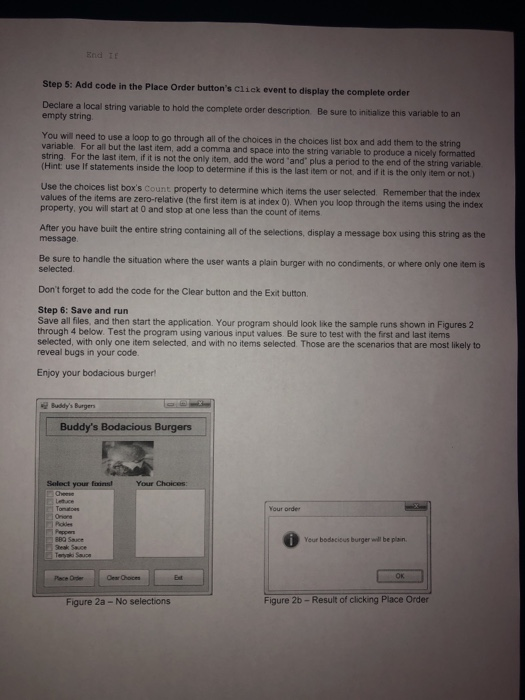
Buddy's Bodacious Burgers Budity's Burgers Buddy's Bodacious Burgers Your Choices Place Order Figure 1 Instructions In this case, you will create a Visual Basic 2008 solution that allows the user to place an order for a Buddy's Bodacious Burger. The user can select condiments from a checked list box by turning on the checkbox next to an item. When checked, a condiment appears in a second standard list box showing all of the choices that have been made. The second list box is used to build and display the complete order selection Step 1: Create the Project Create a Visual Basic Project using the project name "BuddyBurgers Step 2: Design the Form Design the form as shown in Figure 1. You will need three button controls, one picture box, one checked list box one standard list box, and three label controls. Note that the checked list box has its own tool in the toolbox, but its properties and methods are similar to the standard list box Name the checked list box control selectListBox, and the standard list box control choiceslistBox. Set the checkOnClick property of the selectListBox to True. Set the hamburger.jpg image you downloaded as the picture boxes image. Set the Place Order button to be the Accept Button on the form, and the Exit button to be the Cancel Button Step 3: Add code in the Form's Load event to load the checked list box control In the Form's Load event, write code to add each of the condiment items that you see in Figure 1 Step 4: Add code in the selectListBox.Itenchecked event to move the selected items to the choicesListBox: The ItemChecked event will occur when the user turns on or off the checkbox for an item. When the user turns on the checkmark, you will add the item to the choices list box When the user turns off the checkmark, you will remove the item from the choices list box. Use the following code to determine if the checkmark was turned on or off, and to move or remove an item from the choices list box: Dim item As String check this item ItemSelect tistBox.SelectedItem If e. NewValue - CheckState. Checked Then choicesListBox.Items.Add(tem Else choicesListBox.Items. Renove (item) Step 5: Add code in the Place Order button's Click event to display the complete order Declare a local string variable to hold the complete order description Be sure to initialize this variable to an empty string You will need to use a loop to go through all of the choices in the choices list box and add them to the string variable. For all but the last item, add a comma and space into the string variable to produce a nicely formatted string. For the last item, if it is not the only item, add the word "and" plus a period to the end of the string variable (Hint: use If statements inside the loop to determine if this is the last item or not, and if it is the only item or not.) Use the choices list box's Count property to determine which items the user selected Remember that the index values of the items are zero-relative (the first item is at index 0) When you loop through the items using the index property, you will start at O and stop at one less than the count of items After you have built the entire string containing all of the selections, display a message box using this string as the message Be sure to handle the situation where the user wants a plain burger with no condiments or where only one tems selected Don't forget to add the code for the Clear button and the Exit button Step 6: Save and run Save all files, and then start the application. Your program should look like the sample runs shown in Figures 2 through 4 below. Test the program using various input values. Be sure to test with the first and last items selected, with only one item selected, and with no items selected. Those are the scenarios that are most likely to reveal bugs in your code Enjoy your bodacious burger Buys Burgers Buddy's Bodacious Burgers Seled you for Your Choices Your bodacious burger beplan Figure 2a - No selections Figure 2b - Result of clicking Place Order


