Answered step by step
Verified Expert Solution
Question
1 Approved Answer
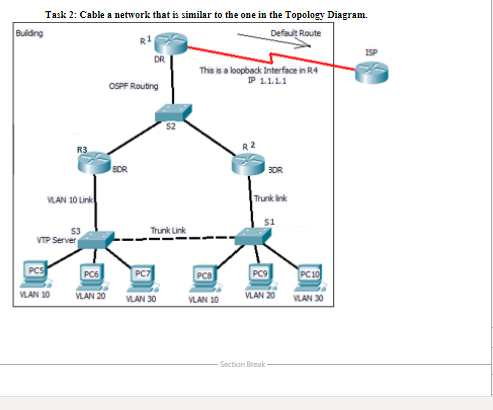
Building Task 2: Cable a network that is similar to the one in the Topology Diagram. Default Route R3 VLAN 10 Link $3 VTP


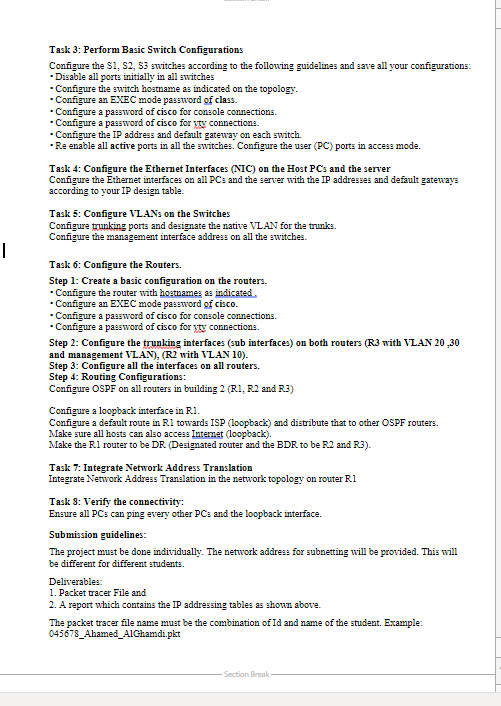
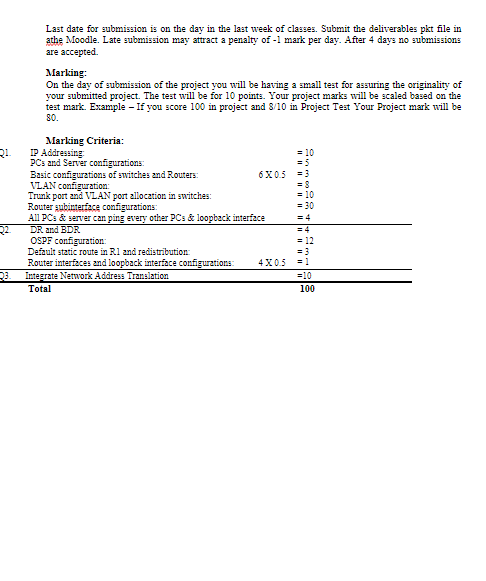
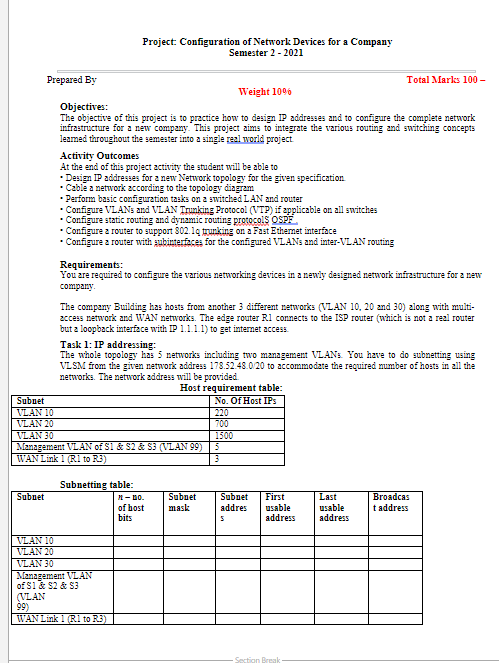
Building Task 2: Cable a network that is similar to the one in the Topology Diagram. Default Route R3 VLAN 10 Link $3 VTP Server VLAN 10 PC6 VLAN 20 R BOR OSPF Routing DR Trunk Link PC7 VLAN 30 This is a loopback Interface in R4 IP 1.1.1.1 PC8 VLAN 10 R2 Trunk link 3DR $1 PC9 VLAN 20 -Section Break PC10 VLAN 30 Task 3: Perform Basic Switch Configurations Configure the S1, S2, S3 switches according to the following guidelines and save all your configurations: *Disable all ports initially in all switches * Configure the switch hostname as indicated on the topology. Configure an EXEC mode password of class. Configure a password of cisco for console connections. Configure a password of cisco foryty connections. *Configure the IP address and default gateway on each switch. *Re enable all active ports in all the switches. Configure the user (PC) ports in access mode. Task 4: Configure the Ethernet Interfaces (NIC) on the Host PC's and the server Configure the Ethernet interfaces on all PCs and the server with the IP addresses and default gateways according to your IP design table. Task 5: Configure VLANs on the Switches Configure trunking ports and designate the native VLAN for the trunks. Configure the management interface address on all the switches. Task 6: Configure the Routers. Step 1: Create a basic configuration on the routers. *Configure the router with hostnames as indicated. Configure an EXEC mode password of cisco. Configure a password of cisco for console connections. * Configure a password of cisco foryty connections. Step 2: Configure the trunking interfaces (sub interfaces) on both routers (R3 with VLAN 20,30 and management VLAN), (R2 with VLAN 10). Step 3: Configure all the interfaces on all routers. Step 4: Routing Configurations: Configure OSPF on all routers in building 2 (R1, R2 and R.3) Configure a loopback interface in R.1. Configure a default route in R1 towards ISP (loopback) and distribute that to other OSPF routers. Make sure all hosts can also access Internet (loopback). Make the R1 router to be DR. (Designated router and the BDR to be R2 and R.3). Task 7: Integrate Network Address Translation Integrate Network Address Translation in the network topology on router R.1 Task 3: Verify the connectivity: Ensure all PCs can ping every other PCs and the loopback interface. Submission guidelines: The project must be done individually. The network address for subnetting will be provided. This will be different for different students. Deliverables: 1. Packet tracer File and 2. A report which contains the IP addressing tables as shown above. The packet tracer file name must be the combination of Id and name of the student. Example: 045678_Ahamed AlGhamdi.pkt Section Break Q1 22. Q3. Last date for submission is on the day in the last week of classes. Submit the deliverables pkt file in athe Moodle. Late submission may attract a penalty of -1 mark per day. After 4 days no submissions are accepted. Marking: On the day of submission of the project you will be having a small test for assuring the originality of your submitted project. The test will be for 10 points. Your project marks will be scaled based on the test mark. Example - If you score 100 in project and 8/10 in Project Test Your Project mark will be 80. Marking Criteria: IP Addressing: PCs and Server configurations: Basic configurations of switches and Routers: = 10 = 5 6X0.5 =3 = 8 = 10 = 30 = 4 VLAN configuration: Trunk port and VLAN port allocation in switches: Router subinterface configurations: All PCs & server can ping every other PCs & loopback interface DR. and BDR OSPF configuration: Default static route in R1 and redistribution: Router interfaces and loopback interface configurations: Integrate Network Address Translation Total = 12 4X0.5 =1 =10 100 Prepared By Subuet VLAN 10 VLAN 20 Subuet VLAN 10 VLAN 20 VLAN 30 Project: Configuration of Network Devices for a Company Semester 2-2021 Weight 10% Objectives: The objective of this project is to practice how to design IP addresses and to configure the complete network infrastructure for a new company. This project aims to integrate the various routing and switching concepts learned throughout the semester into a single real world project. Activity Outcomes At the end of this project activity the student will be able to *Design IP addresses for a new Network topology for the given specification. Cable a network according to the topology diagram Perform basic configuration tasks on a switched LAN and router * Configure VLANs and VLAN Trunking Protocol (VTP) if applicable on all switches Configure static routing and dynamic routing protocols OSPF Configure a router to support 802.1q trunking on a Fast Ethernet interface Configure a router with gubinterfaces for the configured VLANs and inter-VLAN routing Requirements: You are required to configure the various networking devices in a newly designed network infrastructure for a new company. 700 VLAN 30 1500 Management VLAN of S1 & $2 & S3 (VLAN 99) | 5 WAN Link 1 (R1 to R3) 3 The company Building has hosts from another 3 different networks (VLAN 10, 20 and 30) along with multi- access network and WAN networks. The edge router R1 connects to the ISP router (which is not a real router but a loopback interface with IP 1.1.1.1) to get internet access. Task 1: IP addressing: The whole topology has 5 networks including two management VLANs. You have to do subnetting using VLSM from the given network address 178.52.48.0/20 to accommodate the required number of hosts in all the networks. The network address will be provided. Host requirement table: No. Of Host IPS Subnetting table: Management VLAN of $1 & $2 & $3 (VLAN 99) WAN Link 1 (R1 to R3) Total Marks 100- M-10. of host bits Subnet Subnet First addres usable mask S Last usable address address Section Break Broadcas t address
Step by Step Solution
There are 3 Steps involved in it
Step: 1

Get Instant Access to Expert-Tailored Solutions
See step-by-step solutions with expert insights and AI powered tools for academic success
Step: 2

Step: 3

Ace Your Homework with AI
Get the answers you need in no time with our AI-driven, step-by-step assistance
Get Started


