Question
CIS-336: Lab 3: Building the Physical Model LAB OVERVIEW Scenario and Summary The lab for this week addresses taking a logical database design (data model)
CIS-336: Lab 3: Building the Physical Model
LAB OVERVIEW
Scenario and Summary
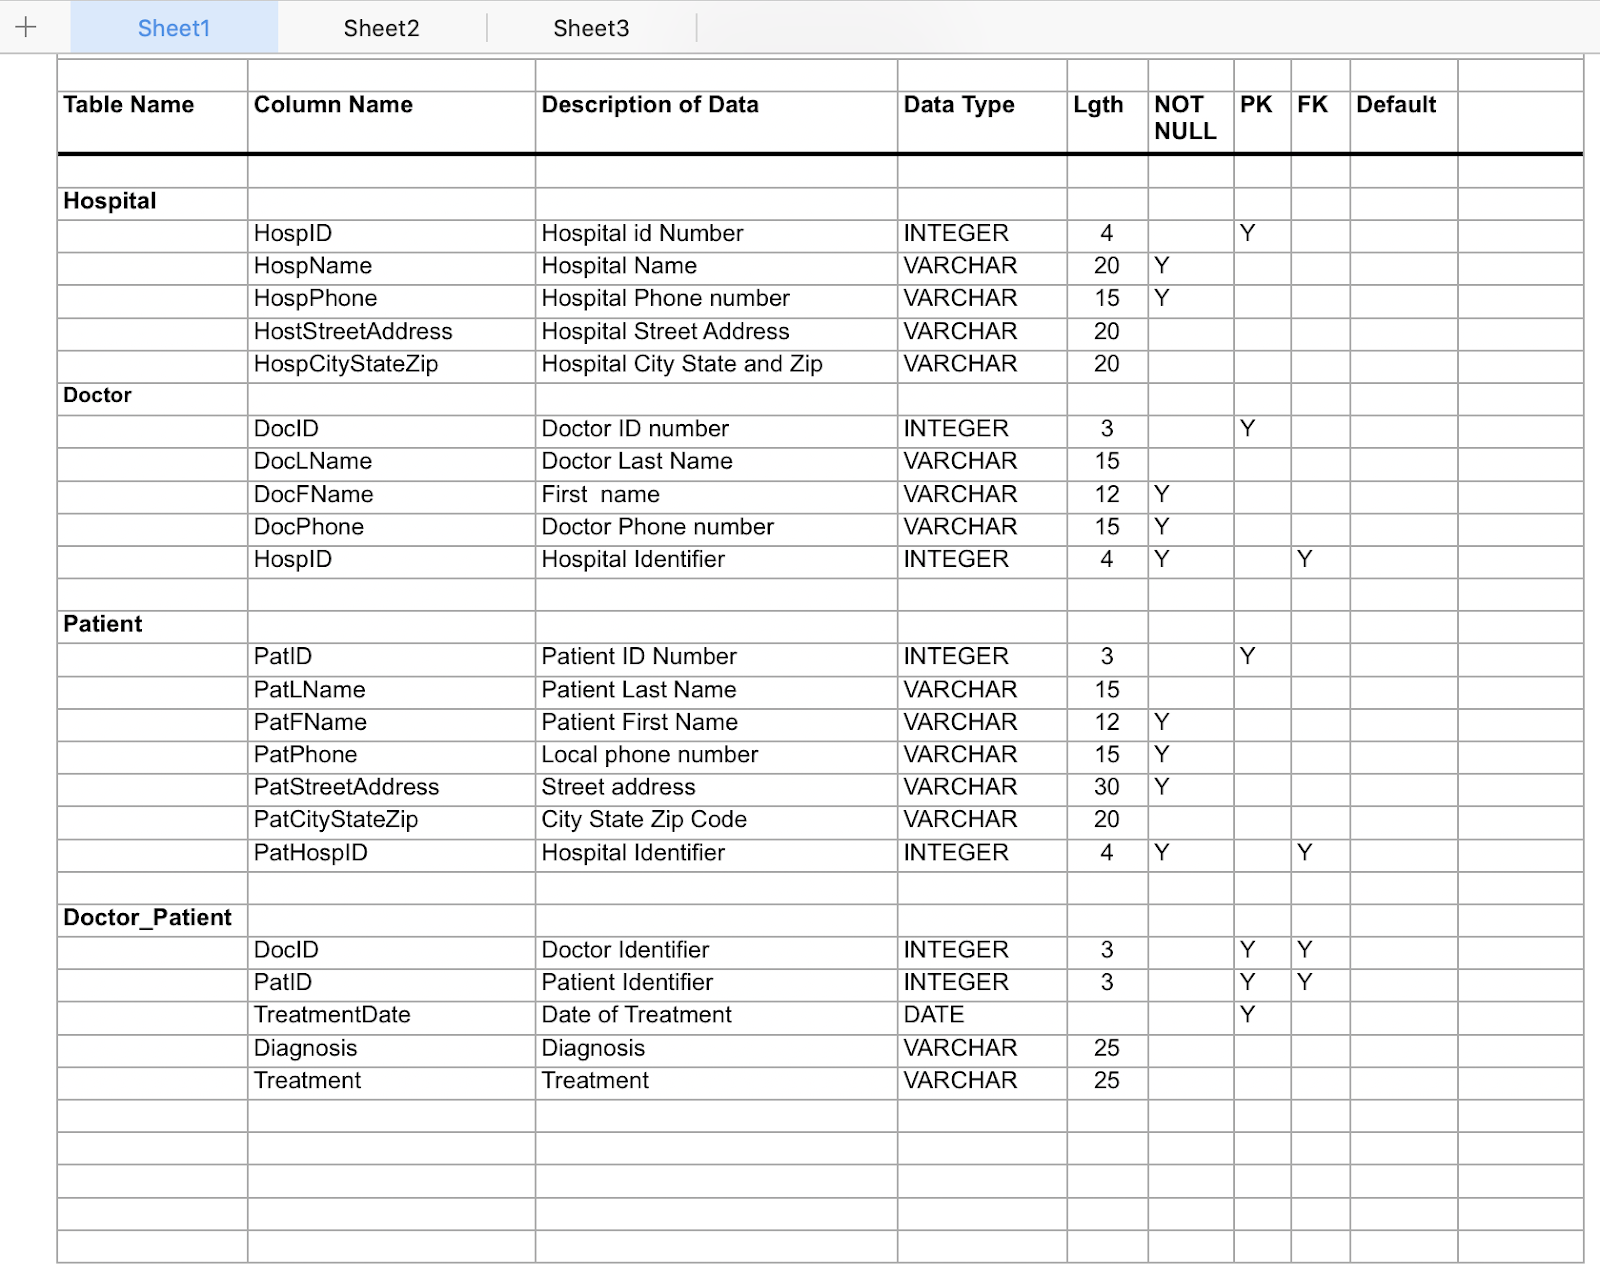
The lab for this week addresses taking a logical database design (data model) and transforming it into a physical model (tables, constraints, and relationships). As part of the lab, you will need to download the zip file titled CIS336Lab3Files. This zip file contains the ERD, Data Dictionary, and test data for the tables you create as you complete this exercise.
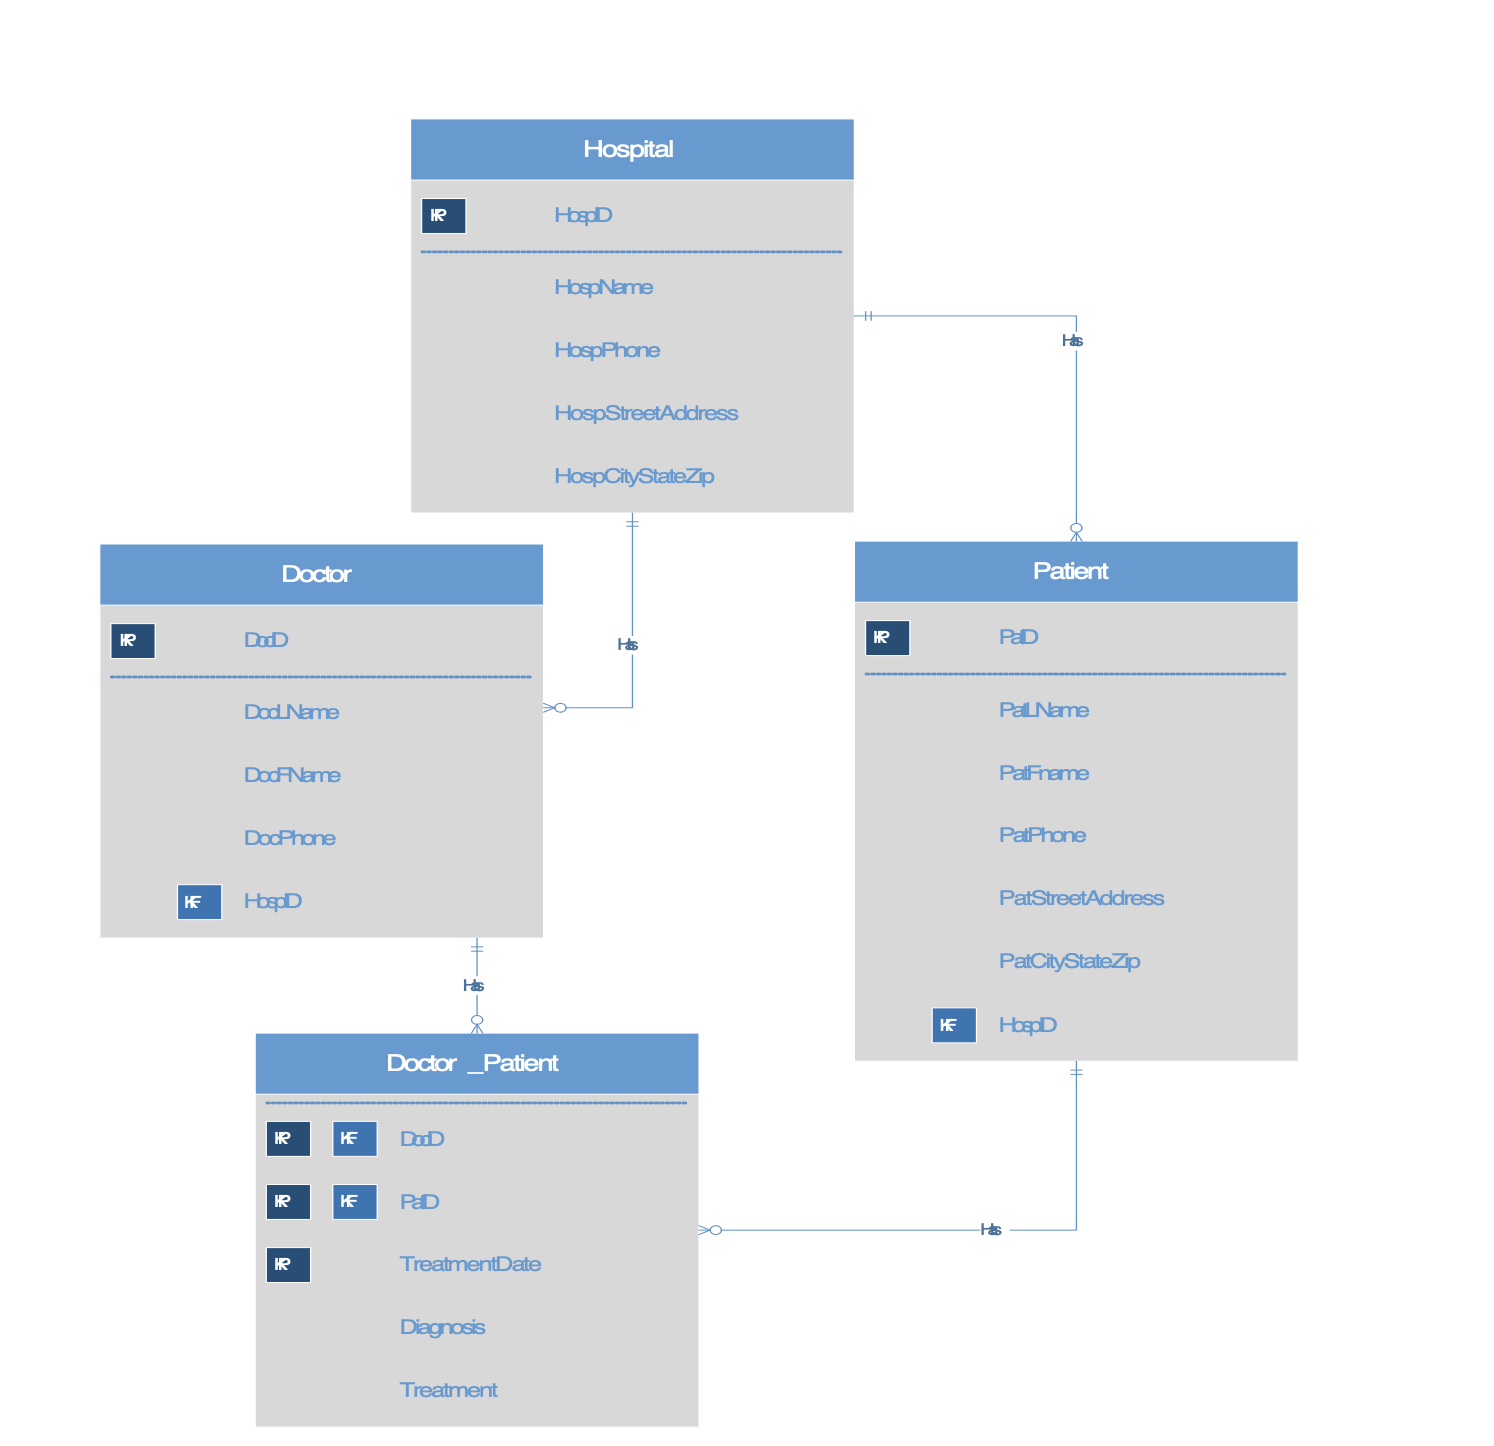
Your job will be to use the ERD Diagram found below as a guide to define the table structures and constraints using both CREATE TABLE and ALTER TABLE statements. Once this has been done, you will need to write the INSERT INTO TABLE statements to insert the data provided into the table. The data should verify that the constraints you have created are valid and define the correct referential and data integrity constraints asked for. Lastly, you will write SELECT statements to query the tables and verify the data was populated. Please use exactly the data provided, without addition, deletion, or alteration except as directed, as your results may be evaluated against expected results generated using this exact data set.
Narrative/Case Study
For this lab, you will be creating SQL statements to build a series of relational tables, using SQL CREATE statements in a script file format for the Student Database. You will then populate those tables through the use of INSERT statements with sample data.
You will need to create a script file and name it YourName_Lab3.txt containing the following code.
- The drop table statements listed later in the specifications of this lab.
- The CREATE TABLE statements required to build the four tables.
- The INSERT statements necessary to insert all of the sample data.
- Four select statements to verify that the data is in the tables and accessible.
To help you accomplish this task successfully, you are being supplied with the ERD Diagram which follows, and the exact data to be inserted into each table.
The following guidelines are being provided to help assist you in creating your script file.
- Use the names for the tables and columns as listed in the ERD. Do not change them as it will affect your grade.
- Creating Constraints
- Create all NOT NULL constraints as indicated in the ERD.
- Create all PK constraints as indicated in the ERD.
- Create all FK constraints as indicated in the ERD.
- Create all of the tables and all of the constraints before populating any of the tables with data.
- Because FK constraints will be in place when the insert statements are executed, you will need to consider carefully which tables must be created before others in order to ensure that FK constraints are not violated.
- The data for one table intentionally contains a record containing an FK constraint that is not resolved by a record in the parent table. This orphaned record has been included as an exercise for you to find. Because this record has an unreconciled FK constraint, it cannot be successfully inserted. You will need to delete or comment out the insert statement for this one record in order to produce a script that runs without errors.
- ALL character strings must be enclosed in single quotes. This includes alpha strings and alphanumeric (remember that any formatting within a numeric string makes it alphanumeric).
- If you are inserting a NULL, do not enclose the word NULL in single quotes, as this will insert the word NULL into the row. To insert a null you simply use the word NULL.
Deliverables
The deliverable for this lab will include the following in ONE WORD document.
- Your SQL script that creates your tables and populates your tables.
- Your SELECT statements for each of the four tables and the four output screenshots from those select statements of your four tables.
Refer to the following ERD in constructing your solution.

LAB STEPS
STEP 1: The DROP Statements
A DROP TABLE statement must appear in your script file, prior to the SQL statements for creating the table in question. This will allow you to run and re-run your script file as often as you need to. The very first time you run your script the table does not exist, so the IF EXISTS clause causes the statement to be ignored. Thereafter, the table will be deleted, ensuring that your CREATE TABLE statement creates the table fresh and clean, with only the attributes present in the current revision of the CREATE statement. Here is an example of one of the four DROP TABLE statements you will need to create.
DROP TABLE IF EXISTS `Doctor_Patient`;
STEP 2: The CREATE TABLE Statements
Next, define the CREATE TABLE statements for the four tables that you are to create based upon the ERD (provided above) for this lab. Be sure to follow the guidelines given above on how and where to create the different types of constraints for each table. This will include PK, FK, and NOT NULL constraints.
STEP 3: The INSERT Statements for the Data
The third step is to create the insert statements to insert the sample data into the tables created in Step 2. The data for each table is contained in text files, named for the table whose data it contains. Modify the format of the data (e.g., date formats and add or eliminate quote marks) as needed to craft your insert statements, but do not change the inherent value of the data.
STEP 4: The SELECT Statements
The next step of the lab will be to create the select statements to verify the data was inserted correctly. You should have four select statements; one for each table. The command is SELECT * FROM Table_Name; For example, to select all columns from the Doctor table, the command would be SELECT * FROM Doctor;
Be sure to save all of the above statements in your script file.
STEP 5: Testing and Verifying Your Script
Now we come to the point of verifying that your script file works by creating all of the tables and inserting and selecting all of the data. Your script should execute without errors, and select the entire contents of each table in turn. Inspect your query results to ensure that each column and row from each of the tables is as expected. Correct and repeat testing of your script until no errors occur, and the results match expectations.
CREATE FOUR SCREENSHOTS OF THE OUTPUT; ONE FOR EACH SELECT STATEMENT. YOU WILL COPY AND PASTE YOUR FOUR SCREENSHOTS TO YOUR FINAL DELIVERABLE WORD DOCUMENT.
You may also use the DESCRIBE command to display the table structure of each table, and verify that PK and NULL constraints have been properly created. The SHOW CREATE TABLE statement is useful for displaying the SQL that would regenerate a given table, which is a useful way for checking that FKs have been properly created.
Examples:
DESCRIBE DOCTOR;
SHOW CREATE TABLE DOCTOR;
Cis336 Lab #3 Input Data
Data for Hospital TABLE
(HospID, HospName, HospPhone, HospStreetAddress, HospCityStateZip)
1000,Riverside,718-555-5555,101-09 120th St.,Newark NJ 07123
1001,Mt. Sinai,201-555-5555,7000 Boulevard East,Lodi NJ 07452
1002,Bergen,718-555-5555,144-61 87th Ave, Fairlawn NJ 07347
Data for Doctor Table
(DocID,DocLName, DocFName, DocPhone, HospID)
501,Wojick,Thomas,783-456-3456,1000
502,Schorin,Nina,904-237-3456,1000
503,Pertez,William,456-340-4569,1001
504,Morris,Anita,894-239-5823,1001
505,Smythe,Grace, 903-239-1948,1002
506,Frantzen,Samuel,201-395-4556,1002
507,Jones,Alex,818-345-4033,1003
Data for Patient Table
(PatID,PatLName,PatFname,PatPhone PatStreetAddress, PatCityStateZip, HospID)
300,Smith,James,456-304-4534,100 Main St,Lodi NJ 07456,1002 301,Reynolds,Frank,456-334-4541,5456 High St,Fairlawn NJ 07456,1002 302,Tesla,Nick,456-856-343,1334 Central Ave.,Lodi NJ 07456,1001 303,Franklin,Bernard,790-222-2323,400 East St,Ridgewood NJ 07456,1000 304,Stein,Julie,201-343-4564,2340 Southern Blvd.,Hackensack NJ 07567,1000 305,Richards,Sigmund,201-453-7894,1 North St,Lodi NJ 07456,1002 306,Smithers,Sally,201-345-4453,8010 Hermosita Dr.,Glenrock NJ 07456,1001 307,Roberts,Mary,456-892-4534,251 Doremus Ave.,Ridgewood NJ 07456,1001
Data for Doctor_Patient Table
(DocID, PatID, TreatmentDate, Diagnosis, Treatment)
501,304,1/30/2017,Broken left knee,Surgery
502,303,1/30/2017,Pneumonia,Intravenous vitamin C
506,301,1/30/2017,Cancer,Chemotherapy
506,300,1/30/2017,Heart attack,Surgery
506,300,2/01/2017,Post surgery recovery,NULL
503,306,2/10/2017,Concussion,Prescription drugs
503,306,2/16/2017,NULL,NULL
501,307,2/16/2017,Ulcer,Surgery
502,304,2/16/2017,Stiff left knee,Physical therapy
502,305,2/17/2017,Cancer,NULL
501,303,2/18/2017,Infection,Antibiotics 501,303,2/19/2017,Infection,Colloidal silver

Hospital uR HbapD HospName Has Doctor Patient IR uR PalL Name PatFhame PatPhone MF Doctor Patient uR uR Diagnosis Treatment Sheet1 Sheet2 Sheet3 Table Name Column Name Description of Data Data Type Lgth NOT PKFK Default NULL Hospital HosplD HospName HospPhone HostStreetAddress HospCityStateZip Hospital id Number Hospital Name Hospital Phone number Hospital Street Address Hospital City State and Zip INTEGER VARCHAR VARCHAR VARCHAR VARCHAR 4 20 Y 15 Y 20 20 Doctor DocID DocLName DocFName DocPhone HosplD Doctor ID number Doctor Last Name First name Doctor Phone number Hospital ldentifier INTEGEFR VARCHAR VARCHAR VARCHAR INTEGER 3 15 12 Y 15 Y 4 Y Patient PatID PatLName PatFName PatPhone PatStreetAddress PatCityStateZip PatHosplD Patient ID Number Patient Last Name Patient First Name Local phone number Street address City State Zip Codee Hospital ldentifier INTEGER VARCHAR VARCHAR VARCHAR VARCHAR VARCHAR INTEGEFR 3 12 Y 15 Y 30 Y 20 4 Y Doctor Patient DocID PatID TreatmentDate DiagnoSIS Treatment Doctor ldentifier Patient ldentifier Date of Treatment DiagnosIS Treatment INTEGER INTEGER DATE VARCHAR VARCHAR 3 3 25 25
Step by Step Solution
There are 3 Steps involved in it
Step: 1

Get Instant Access to Expert-Tailored Solutions
See step-by-step solutions with expert insights and AI powered tools for academic success
Step: 2

Step: 3

Ace Your Homework with AI
Get the answers you need in no time with our AI-driven, step-by-step assistance
Get Started


