Question
CODE IS HERE : JUST DO THE TO DO'S PARTS : STEP 1 : ------------- package qa.edu.qu.cmps251.layouts; import java.awt.Color; import java.awt.Dimension; import javax.swing.JButton; import javax.swing.JFrame;
CODE IS HERE : JUST DO THE TO DO'S PARTS :
STEP 1 :
-------------
package qa.edu.qu.cmps251.layouts;
import java.awt.Color;
import java.awt.Dimension;
import javax.swing.JButton;
import javax.swing.JFrame;
import javax.swing.JPanel;
import javax.swing.UIManager;
public class Step1 extends JFrame{
JButton blueButton, redButton, yellowButton;
JButton greenButton, blackButton, whiteButton;
JPanel panel1;
public static void main(String[] args)
{
Step1 s = new Step1();
s.setVisible(true);
}
public Step1()
{
super("STEP 1");
initializeButtons();
setLookAndFeel(); //ignore this one
setDefaultCloseOperation(JFrame.EXIT_ON_CLOSE);
setSize(500,250);
panel1 = new JPanel();
//You may modify code below this line
panel1.setLayout(null); // change this line
greenButton.setBounds(10, 10, 90, 90);
blueButton.setBounds(120, 25, 90, 90);
redButton.setBounds(330, 5, 90, 90);
yellowButton.setBounds(30, 120, 90, 90);
blackButton.setBounds(228, 69, 90, 90);
whiteButton.setBounds(330, 120, 90, 90);
panel1.add(greenButton);
panel1.add(blueButton);
panel1.add(redButton);
panel1.add(yellowButton);
panel1.add(blackButton);
panel1.add(whiteButton);
setContentPane(panel1);
}
private void initializeButtons()
{
blueButton = new JButton();
redButton = new JButton();
yellowButton = new JButton();
greenButton = new JButton();
blackButton = new JButton();
whiteButton = new JButton();
blueButton.setBackground(Color.BLUE);
blueButton.setForeground(Color.WHITE);
redButton.setBackground(Color.RED);
redButton.setForeground(Color.WHITE);
yellowButton.setBackground(Color.YELLOW);
greenButton.setBackground(Color.GREEN);
blackButton.setBackground(Color.BLACK);
blackButton.setForeground(Color.WHITE);
whiteButton.setBackground(Color.WHITE);
//for compatability with Mac OSX
blueButton.setOpaque(true);
redButton.setOpaque(true);
yellowButton.setOpaque(true);
greenButton.setOpaque(true);
blackButton.setOpaque(true);
whiteButton.setOpaque(true);
greenButton.setText("GREEN");
blueButton.setText("BLUE");
redButton.setText("RED");
whiteButton.setText("WHITE");
yellowButton.setText("YELLOW");
blackButton.setText("BLACK");
Dimension size = new Dimension(90,90);
greenButton.setPreferredSize(size);
blueButton.setPreferredSize(size);
redButton.setPreferredSize(size);
whiteButton.setPreferredSize(size);
yellowButton.setPreferredSize(size);
blackButton.setPreferredSize(size);
}
/**
* You can ignore this method. It is used to get Mac OSX looking the same as Windows
*/
public void setLookAndFeel() {
try {
UIManager.setLookAndFeel( UIManager.getCrossPlatformLookAndFeelClassName() );
}
catch (Exception e) {
// TODO Auto-generated catch block
e.printStackTrace();
}
}
}
------------------------------------------------------------------------------------------------------------------------------
STEP 2 :
--------------
package qa.edu.qu.cmps251.layouts;
import java.awt.Color;
import java.awt.Dimension;
import javax.swing.JButton;
import javax.swing.JFrame;
import javax.swing.JPanel;
import javax.swing.UIManager;
public class Step2 extends JFrame{
JButton blueButton, redButton, yellowButton;
JButton greenButton, blackButton, whiteButton;
JPanel panel1;
public static void main(String[] args)
{
Step2 s = new Step2();
s.setVisible(true);
}
public Step2()
{
super("STEP 2");
initializeButtons();
setLookAndFeel(); //ignore this one
setDefaultCloseOperation(JFrame.EXIT_ON_CLOSE);
setSize(500,250);
panel1 = new JPanel();
//You may modify code below this line
panel1.setLayout(null); // change this line
greenButton.setBounds(10, 10, 90, 90);
blueButton.setBounds(120, 25, 90, 90);
redButton.setBounds(330, 5, 90, 90);
yellowButton.setBounds(30, 120, 90, 90);
blackButton.setBounds(228, 69, 90, 90);
whiteButton.setBounds(330, 120, 90, 90);
panel1.add(greenButton);
panel1.add(blueButton);
panel1.add(redButton);
panel1.add(yellowButton);
panel1.add(blackButton);
panel1.add(whiteButton);
setContentPane(panel1);
}
private void initializeButtons()
{
blueButton = new JButton();
redButton = new JButton();
yellowButton = new JButton();
greenButton = new JButton();
blackButton = new JButton();
whiteButton = new JButton();
blueButton.setBackground(Color.BLUE);
blueButton.setForeground(Color.WHITE);
redButton.setBackground(Color.RED);
redButton.setForeground(Color.WHITE);
yellowButton.setBackground(Color.YELLOW);
greenButton.setBackground(Color.GREEN);
blackButton.setBackground(Color.BLACK);
blackButton.setForeground(Color.WHITE);
whiteButton.setBackground(Color.WHITE);
//for compatability with Mac OSX
blueButton.setOpaque(true);
redButton.setOpaque(true);
yellowButton.setOpaque(true);
greenButton.setOpaque(true);
blackButton.setOpaque(true);
whiteButton.setOpaque(true);
greenButton.setText("GREEN");
blueButton.setText("BLUE");
redButton.setText("RED");
whiteButton.setText("WHITE");
yellowButton.setText("YELLOW");
blackButton.setText("BLACK");
Dimension size = new Dimension(90,90);
greenButton.setPreferredSize(size);
blueButton.setPreferredSize(size);
redButton.setPreferredSize(size);
whiteButton.setPreferredSize(size);
yellowButton.setPreferredSize(size);
blackButton.setPreferredSize(size);
}
/**
* You can ignore this method. It is used to get Mac OSX looking the same as Windows
*/
public void setLookAndFeel() {
try {
UIManager.setLookAndFeel( UIManager.getCrossPlatformLookAndFeelClassName() );
}
catch (Exception e) {
// TODO Auto-generated catch block
e.printStackTrace();
}
}
}
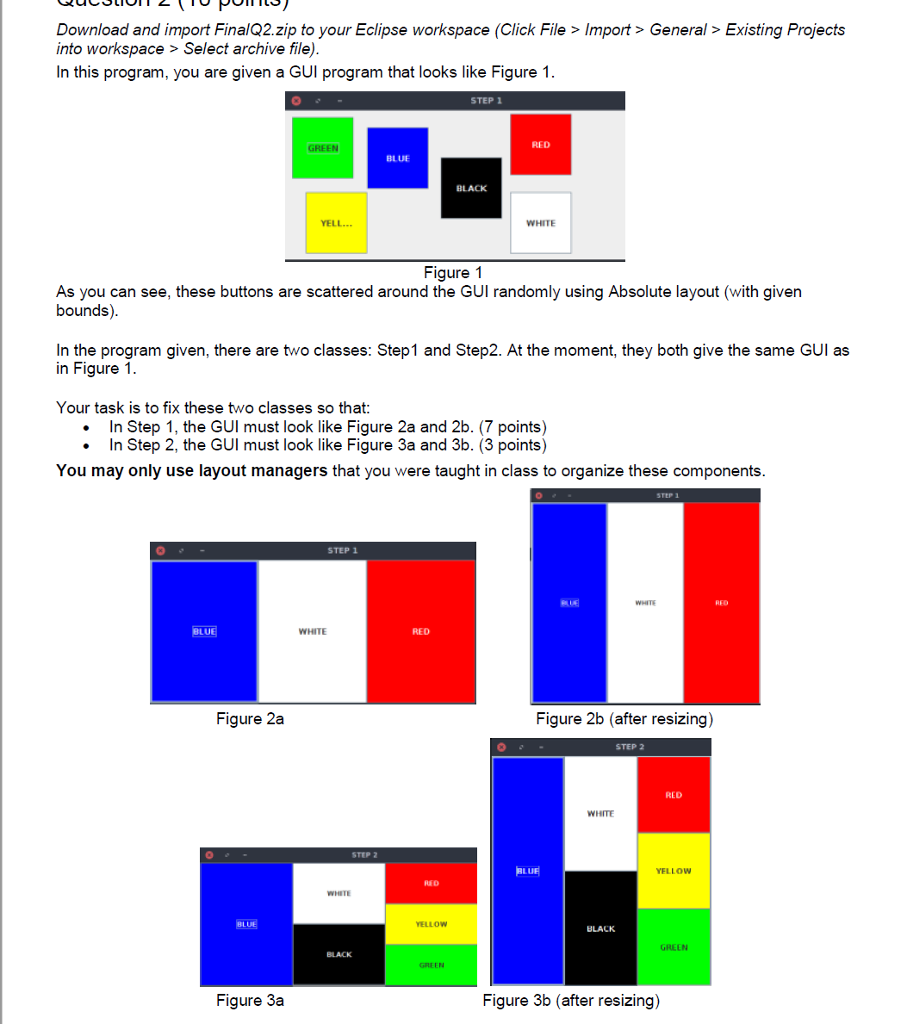
Download and import FinalQ2.zip to your Eclipse workspace (Click File>Import> General >Existing Projects into workspace> Select archive file) In this program, you are given a GUI program that looks like Figure 1 STEP 1 RED GREEN BLUE BLACK YELL. WHITE Figure 1 As you can see, these buttons are scattered around the GUI randomly using Absolute layout (with given bounds In the program given, there are two classes: Step1 and Step2. At the moment, they both give the same GUI as in Figure 1. Your task is to fix these two classes so that: In Step 1, the GUI must look like Figure 2a and 2b. (7 points) In Step 2, the GUI must look like Figure 3a and 3b. (3 points) You may only use layout managers that you were taught in class to organize these components STEP 1 BLUE WHITE RED Figure 2a Figure 2b (after resizing) STEP 2 RED WHITE STEP 2 YELLOW RED WHETE BLUE ELLOW BLACK GREEN GREEN Figure 3a Figure 3b (after resizing)
Step by Step Solution
There are 3 Steps involved in it
Step: 1

Get Instant Access to Expert-Tailored Solutions
See step-by-step solutions with expert insights and AI powered tools for academic success
Step: 2

Step: 3
Ace Your Homework with AI
Get the answers you need in no time with our AI-driven, step-by-step assistance
Get Started