Question
Complete task A and task B by reading MyBank Retail Customer Services Functional Specification Document MyBank Retail Customer Services Functional Specification Introduction MyBank
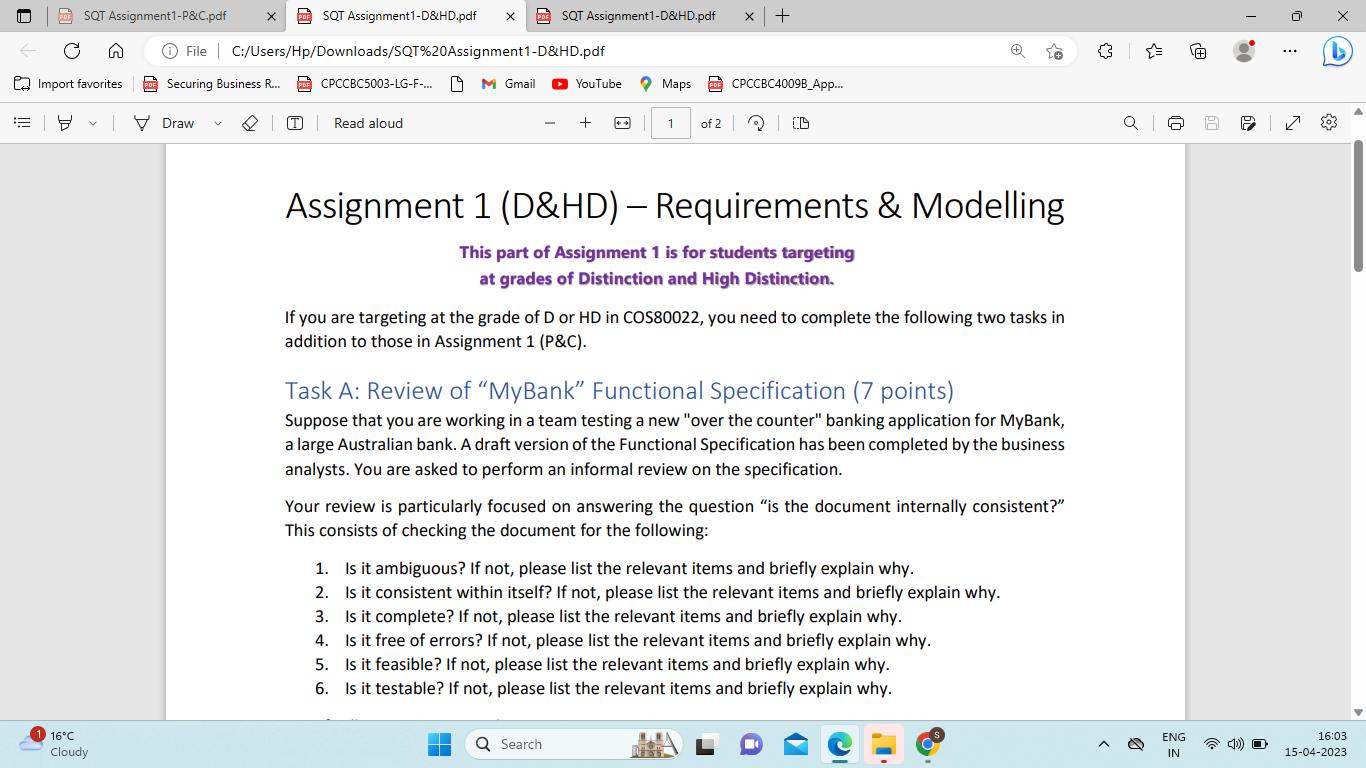
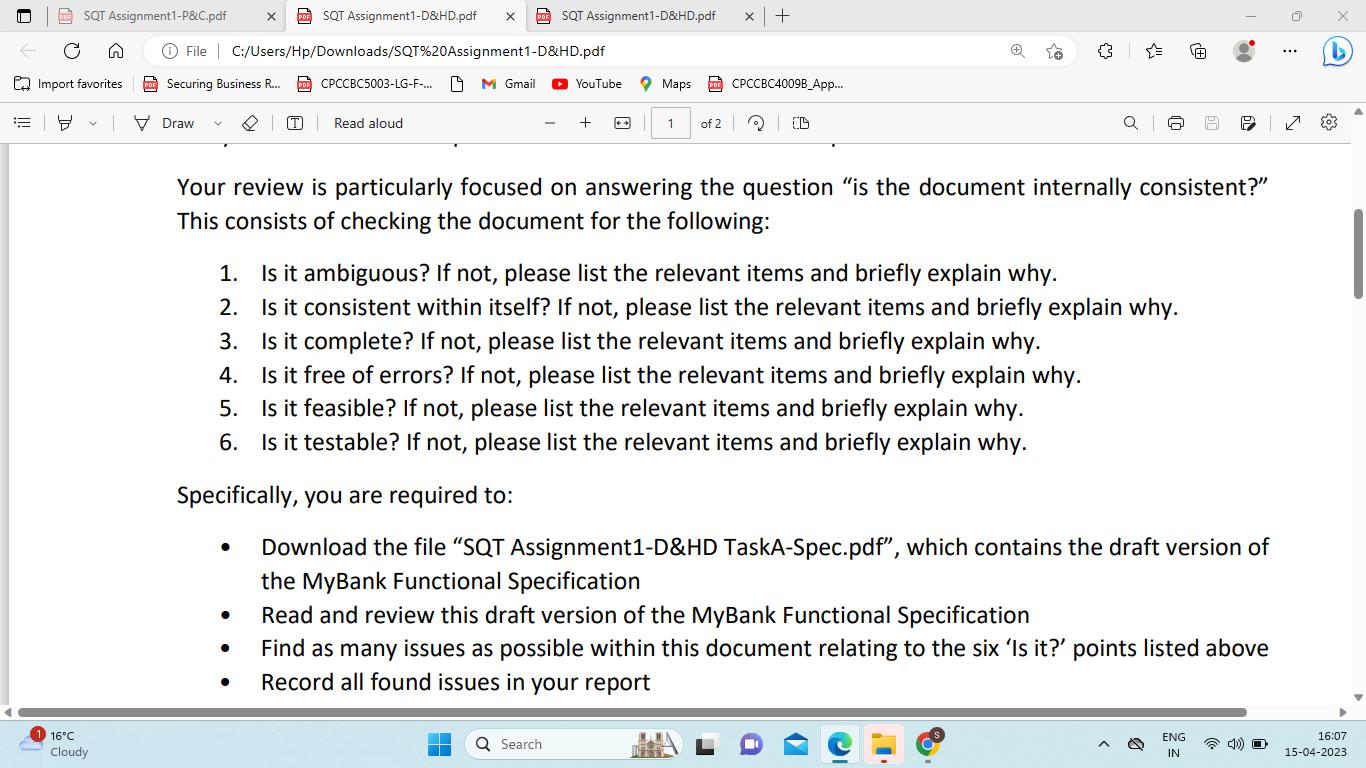
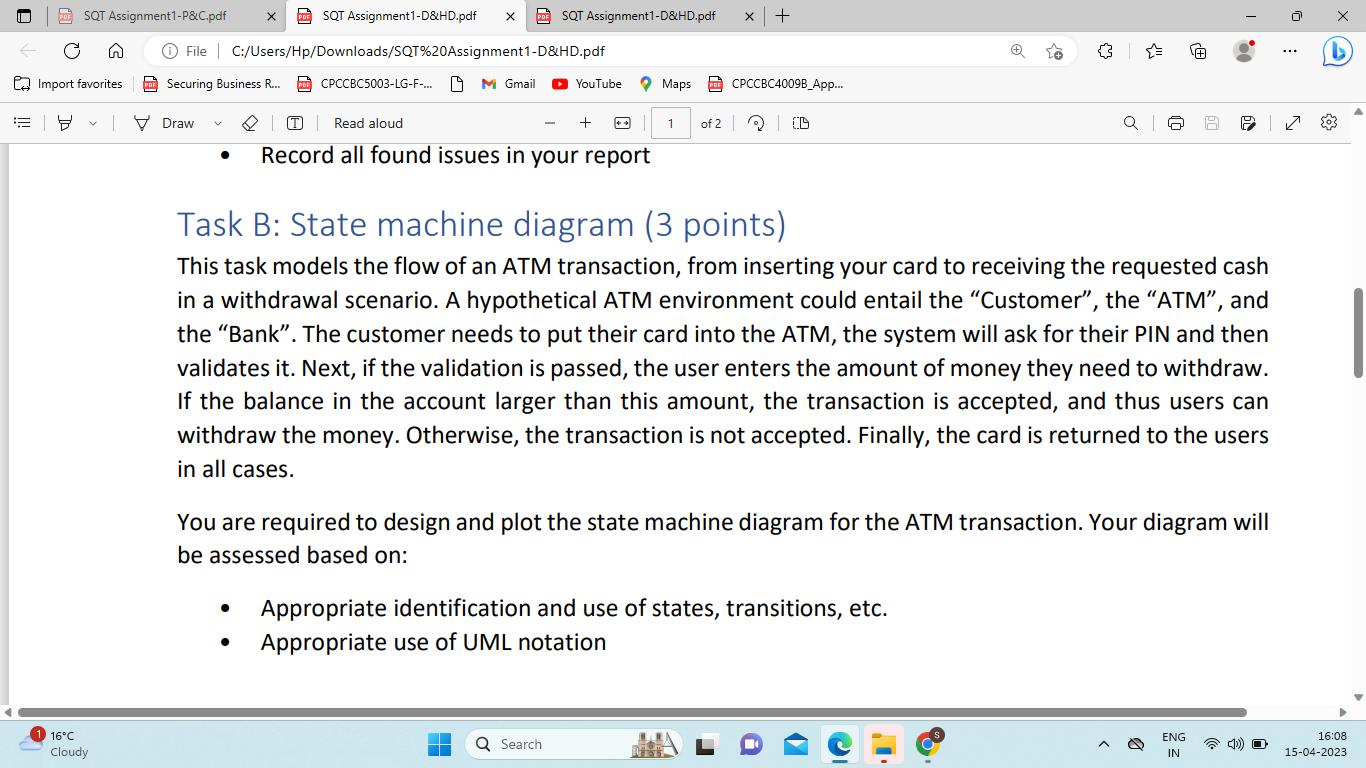
Complete task A and task B by reading MyBank Retail Customer Services Functional Specification Document
MyBank Retail Customer Services Functional Specification
Introduction
MyBank has grown to become one of the nation's leading financial institutions, and this growth allows us to focus on new, national lines of business, continuing product innovation, and enhanced customer service.
MyBank offers a full range of financial services to commercial and business customers, and consumers. It is the world's second largest SupaCredit/MasterBank issuer, the third-largest bank lender to small businesses, a leading national automotive lender, and one of the top 25 managers of mutual funds. A leader in the retail market, MyBank operates more than 150 banking centers and a nationwide network of ATMs.
The Corporation operates national lines of business, which include the retail, commercial banking, investment management and trust, and credit card organizations. Other line and support areas also operate on national platforms. This structure helps us serve customers and manage resources more effectively.
MyBank's philosophy is to hold the leading market position in the major markets it serves. The Corporation continues to expand its market share by offering a range of innovative, high-quality products to its diverse customer base.
1.1 Scope of the System
Following a recent business and systems investigation and the creation of a User Requirements document specifying the business requirements for the new system, proposals for a new system have been submitted to the Directors of the Board. The business requirements have been further broken down into a functional specification defining the functional requirements of the new system, screen layouts (GUI Front-end Interfaces), business rules, constraints and security.
The system will be for use by the business users exclusively; no customers will have access to the system. Each user is allocated an authorisation code; the authorisation code determines the user privileges concerning access to the system. The user will log onto the system and have access to certain screens according to their privileges (read, write or read only). Users will log on to the system by entering a user name and a password.
Once logged on the user can then:
- x Create customer by entering customer details.
- Complete online credit check.
- Identify the customer as a bona fide customer (proof of identity and address details).
- Enter employer references.
- Set up an overdraft facility.
Customers can deposit money over the counter. Deposits are made with cash, foreign currency, cheque and all nationally recognised credit cards. Deposits can be made to any account held by the customer.
Customers can withdraw money over the counter providing they have a MyBank Bankers card, a nationally recognised credit card and/or specified forms of proof of identity (eg passport, drivers licence, household bills with customer details included).
The business user is able to search the system database to locate a customer's details by their surname and initial(s), the first few characters of the surname and initials, the customer's home phone number, the customer's address details, and the customer's postcode.
The business user can read a balance statement from the screen, and or print a copy or number of copies of a balance statement. Not all the above functionality will be included in the first release of MyBank Retail Customer Services system. (Please refer to the Deferred Features in section 4).
1.2 Definitions, Acronyms and Abbreviations Business User:
Customer:
RCS:
DVN:
WVN:
ACN:
2. General Description
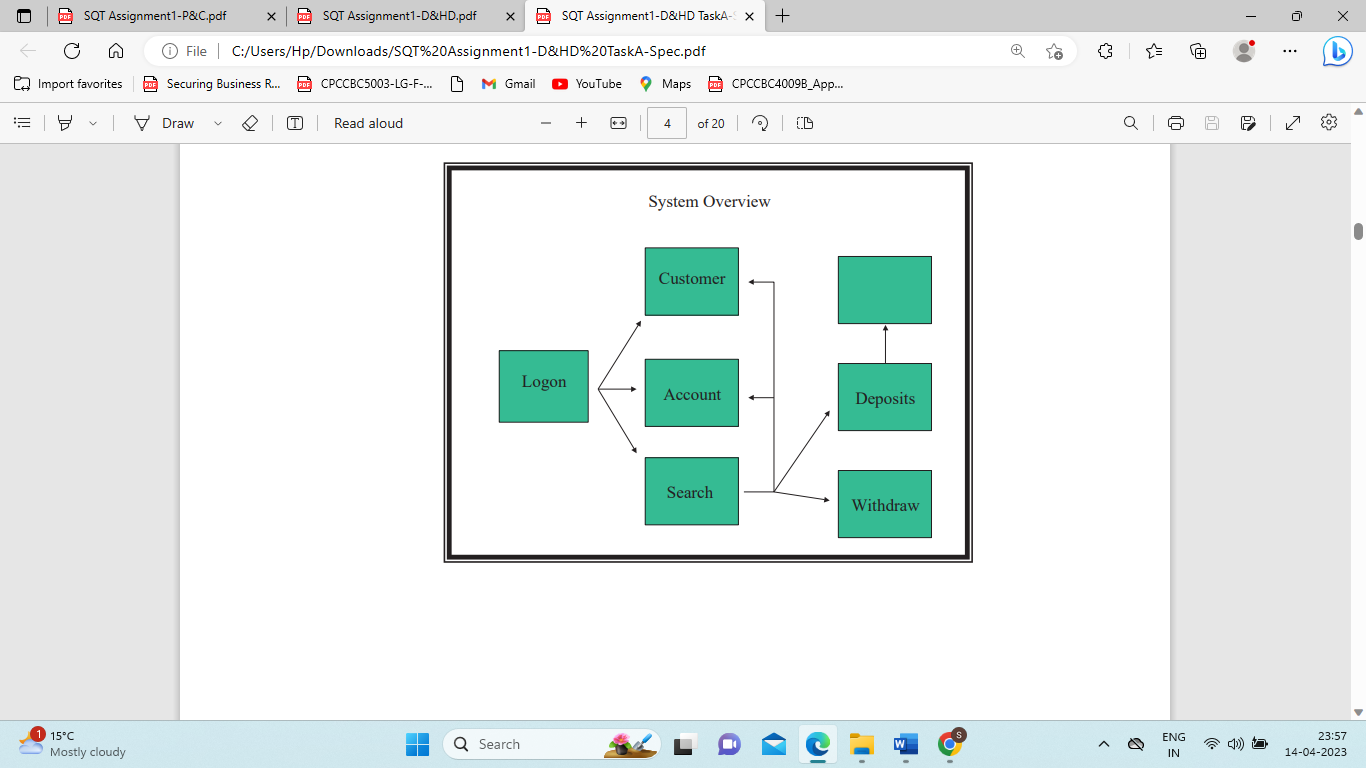
2.1. Overview of Functional Requirements
The functional requirements of the system are:
- The system allows a business user to log on to the system assigning appropriate permissions.
- The system allows a business user to create new customer.
- The system allows a business user to create account type or many account types for an existing customer
- The system allows a customer to withdraw available funds (there is no limit on the amount that can be withdrawn)
- The system allows a customer to deposit funds into a specified account
- The system allows a business user to search the MyBank customer database to locate specific customer details.
- The system allows a business user to provide the customer with statement details
- Allow Customers to view their current balance at info posts
2.2. Overview of System Properties
The system properties will take into account the following:
- Security issues - the system must be secure in that only authorised personnel may use the system.
- Performance issues - the system must perform the all specified functions of the system and must perform as expected whether one or all business users are accessing it at the same time.
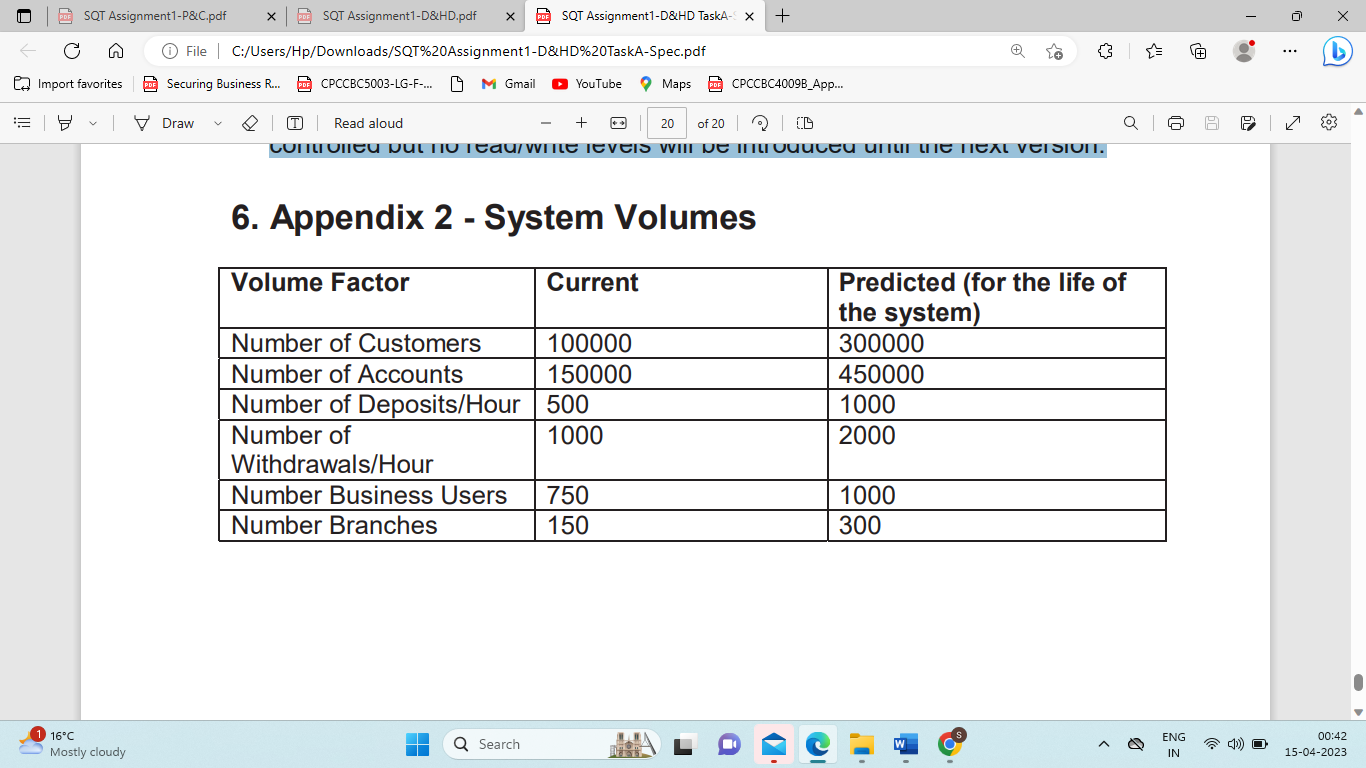
- Volume issues - multiple users must be able to use the system concurrently - See the Appendix for system volumes
- Scalability - The system must be upgradeable according to technical advances and the need to maintain competitive advantage for the system. The system most be able to cope with the projected growth.
- Training/Usability - The system must be user-friendly in that it will not require extensive staff training. Staff will be trained over a period of two days equipping them with the appropriate skills in which to commence work immediately.
2.3. Overview of Constraints
The system will be used at a specified branch at first. Based on the experience of business users at the specified branch a decision will be made later as to whether other branches are ready to utilise the system. Staff can not be made available for training or system implementation at the following times:
- Six weeks prior to 25th December
- First week in January
- First week in July
2.4. User Characteristics
All business users will be trained to use the system; they do not need any prior experience with the computer system. The GUI will be intuitive and will be simple to use. Prompts will help the business user navigate the forms in a logical way and also ensure business rules are adhered to. The use of the system should not de-personalise the friendly service provided by MyBank business users.
2.5. Operational Environment
The system will be run on PCs that use the following operating systems:
- Microsoft Products - Windows 2000.
- The Back-end repository is to be an Oracle 7 database running on NT
- The system runs off a centralised network based in Melbourne. A series of LANs,and WANs connect to the central system.
- A replica of the system is run concurrently at the Disaster Recovery Site.
3. Specific Requirements
3.1. Logon
3.1.1. Description This form will be the first screen a user will see when starting the application. The user cannot proceed into the application until they have been successfully validated, by the entry of a user name and password.
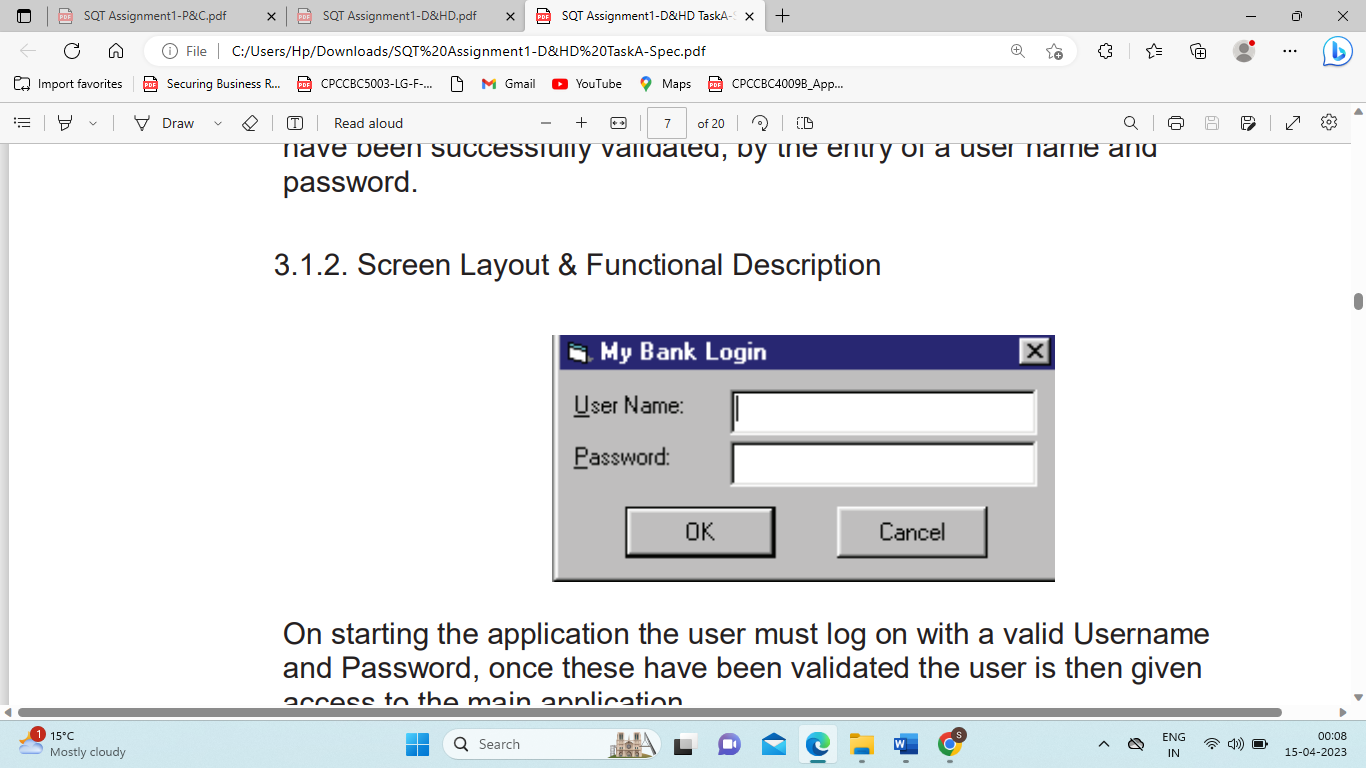
3.1.2. Screen Layout & Functional Description
On starting the application the user must log on with a valid Username and Password, once these have been validated the user is then given access to the main application.
3.1.3. Screen Access
This screen is accessed by running the program executable icon from either the start bar or from the desktop.
3.1.4. Button Processing Rules
OK Button
The Username and Password are both validated against the USER table and if they match the user is then permitted to enter the application and the logon screen is closed and the main window is displayed. If the user and password do not match, display an appropriate error message and clear both fields and set the focus to the user name.
Cancel Button
If the cancel button is pressed the screen and application are closed.
3.1.5. Program Flow
Called From - The application executable (mybank.exe)
Calls To - The main menu screen
3.2. Customer Maintenance
3.2.1. Description This screen allows the business user to create, amend and delete customer details
3.2.2. Screen Layout & Functional Description
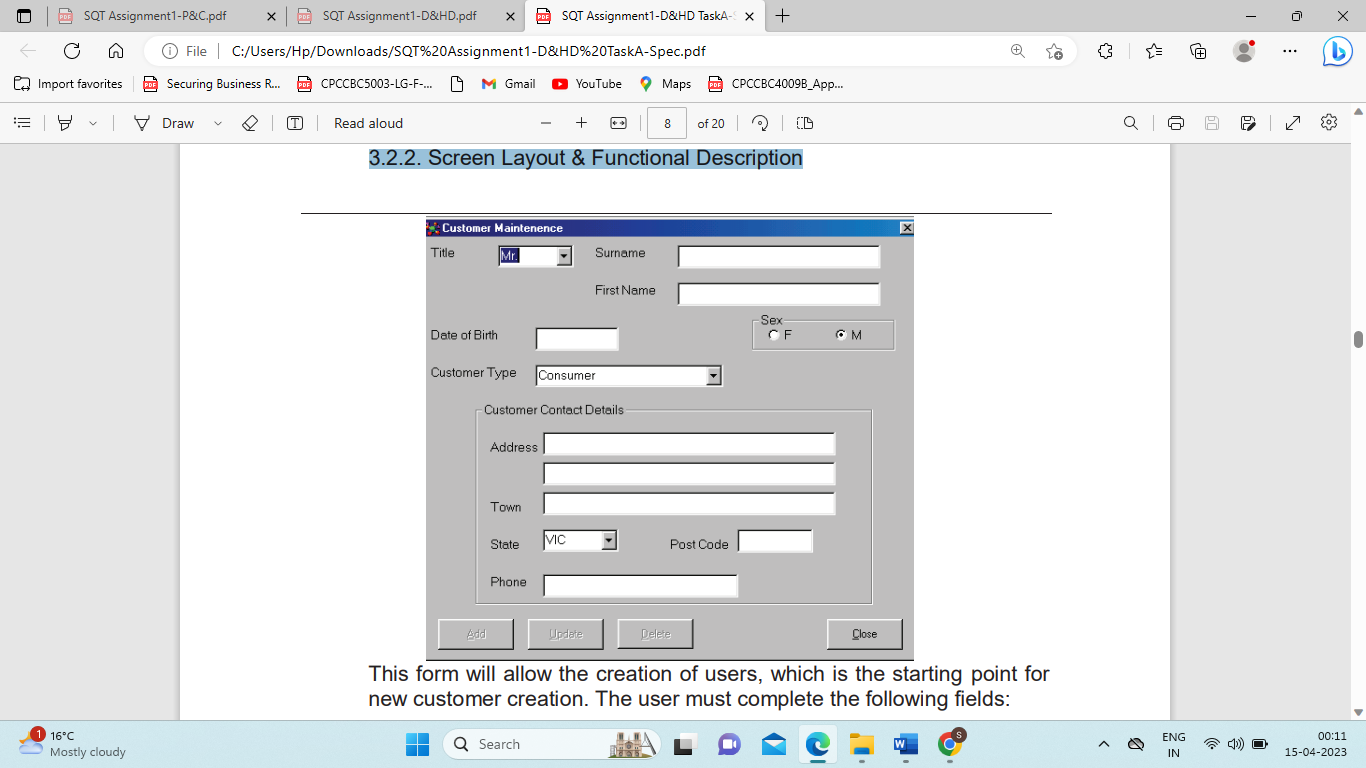
This form will allow the creation of users, which is the starting point for new customer creation. The user must complete the following fields:
Title
Surname
First Name
Date of Birth
Sex
Customer type
Address line # 1.
Town
State
Post Code
Phone
There are 2 types of customer that can be created. Any new account holder must be between the ages of 18 and 65 years old inclusive. Existing account holders over 65 are accepted.
3.2.3. Screen Access
The screen is only accessible by authorised business users. This screen is accessed solely from the main menu or the search screen.
3.2.4. Button Processing Rules
Add
When the Add button is pressed the addition of a new customer is acknowledged, a message box is returned which asks the user if he/she is satisfied that all the details that have been entered are correct. Pressing OK returns the Account Maintenance screen. Pressing No returns the user to the Customer Maintenance screen.
Update When the Update button is pressed the update of customer details is acknowledged, a message box is returned which asks the user if he/she is satisfied that all the details that have been entered are correct. Pressing OK returns the Account Maintenance screen. Pressing No returns the user to the Customer Maintenance screen.
Delete When the Delete button is pressed customer details are deleted, a message box is returned which asks the user if he/she wants to delete the customer details. Pressing OK acknowledges the deletion of a customer. Pressing No returns the user to the Customer Maintenance screen. A customer cannot be deleted until their account details have been deleted, if a user attempts to delete a customer before deleting the account an error message is displayed.
Close The screen is closed when this button is pressed.
3.2.5. Program Flow
Called From - The main menu screen
Calls To - The account maintenance screen
3.3. Account Maintenance
3.3.1. Description
This screen allows the business user to create, amend, delete and print account details.
3.3.2. Screen Layout & Functional Description
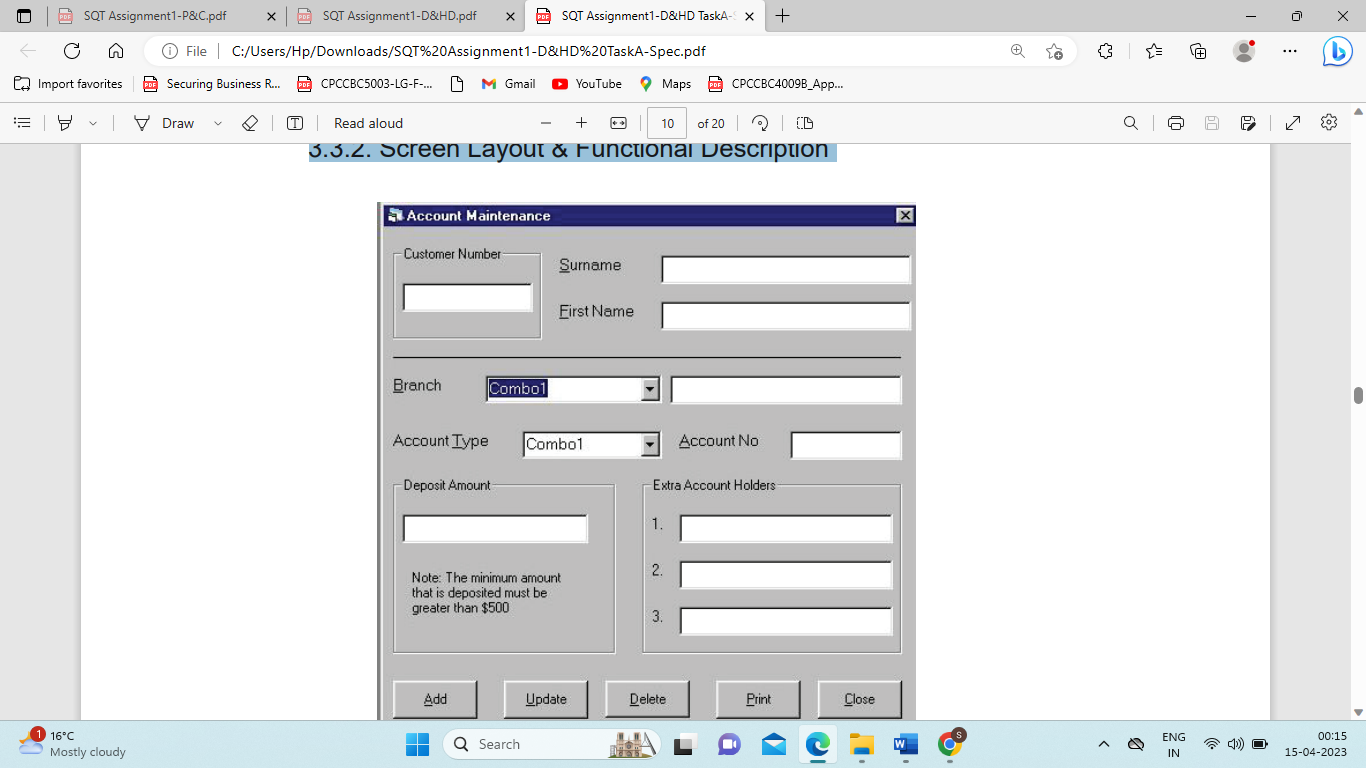
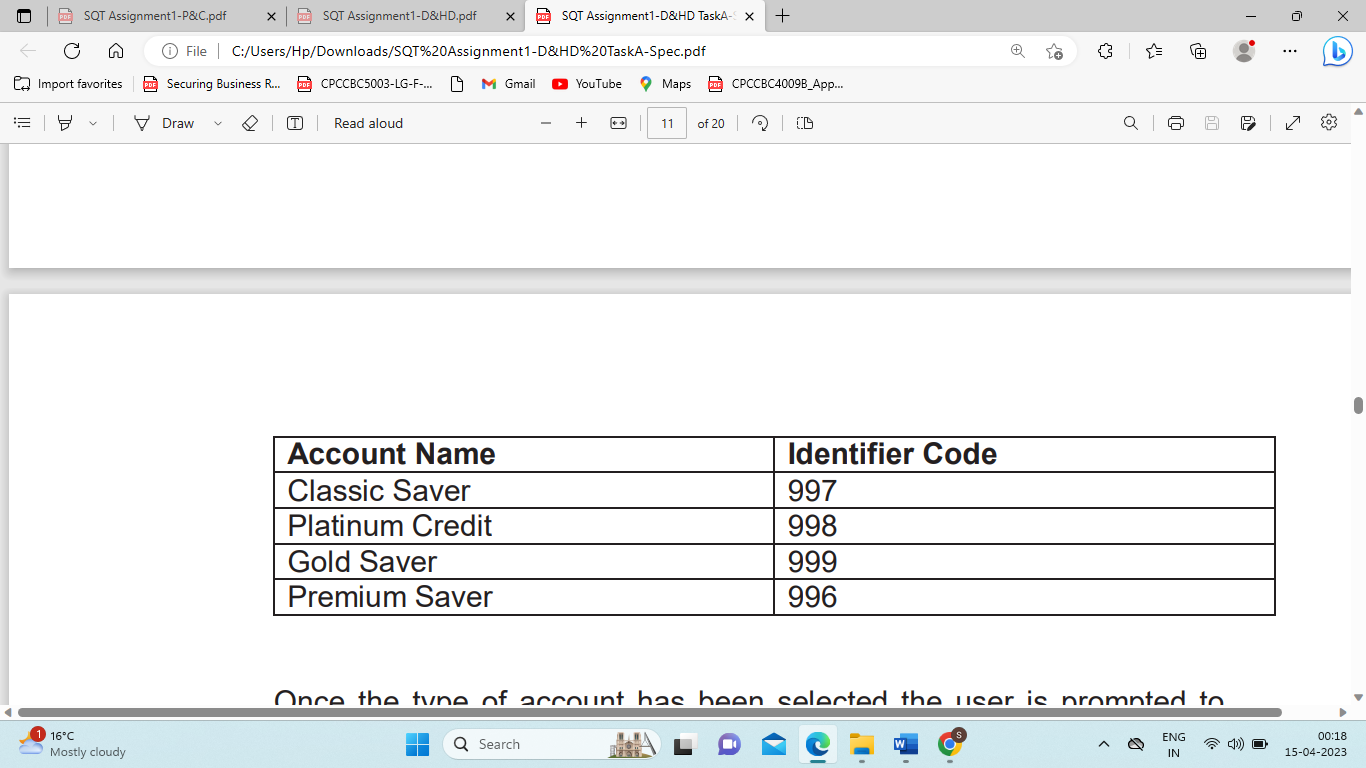
Once the type of account has been selected the user is prompted to generate the unique account number for the customer. The account number is in the format NNN-NNNN where the first part (NNN) is an identifier of the type of account, and the second (NNNN) is the account number itself.
In order to complete the Account details for a new customer a minimum deposit is required. However the minimum deposit varies according to the Account Type selected.
Customers opening an account must deposit at least 500 Australian Dollars. The following table illustrates the minimum amounts to be deposited by Account Type.
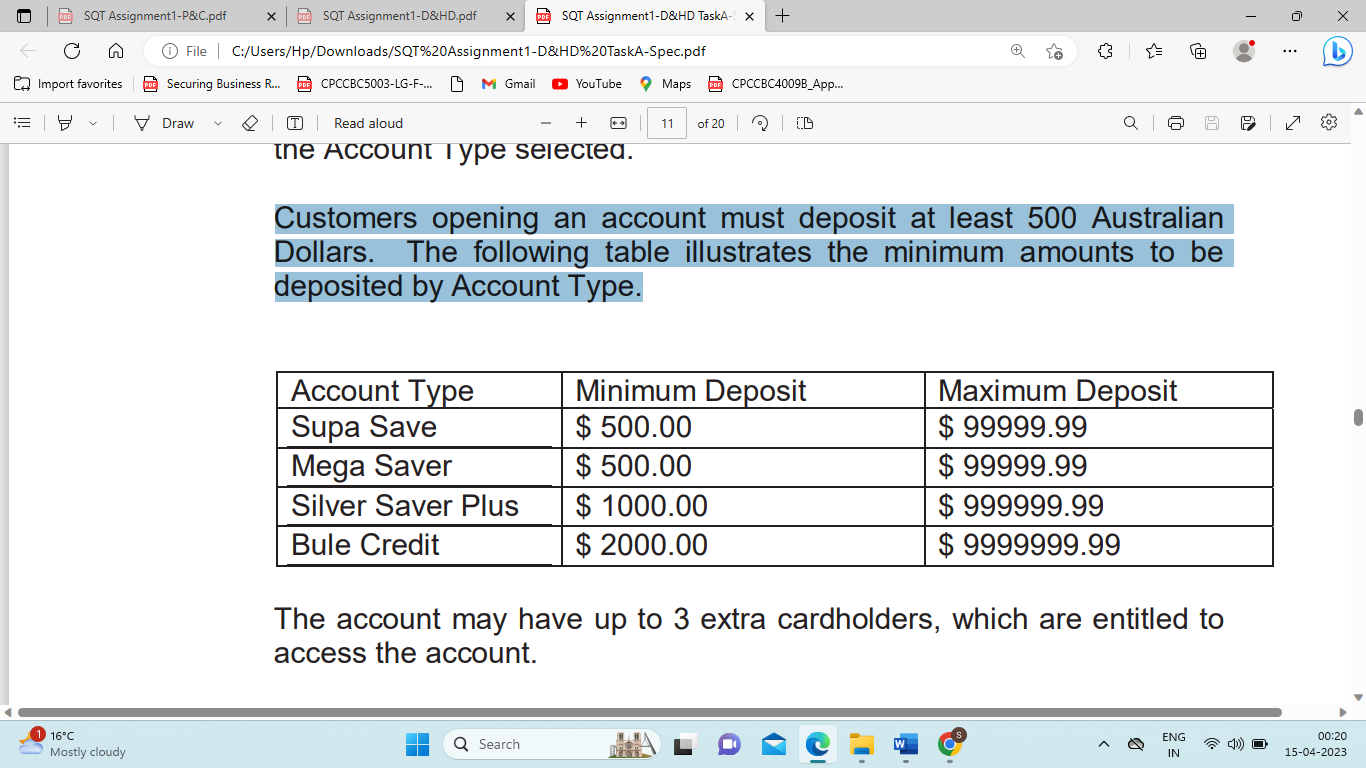
The account may have up to 3 extra cardholders, which are entitled to access the account.
3.3.3. Screen Access
The screen is only accessible by authorised business users. This screen is accessed only from the Add Customer screen or the search screen.
3.3.4. Button Processing Rules
Add
When the Add button is pressed the addition of a new account is acknowledged, a message box is returned which asks the user if he/she is satisfied that all the details that have been entered are correct.
Update
When the Update button is pressed the update of account details is acknowledged, a message box is returned which asks the user if he/she is satisfied that all the details that have been entered are correct. Pressing OK completes the update process. Pressing No returns the user to the Account Maintenance screen. The following fields cannot be updated: Account Type & Deposits Amount.
Delete
When the Delete button is pressed customer details are deleted, a message box is returned which asks the user if he/she wants to delete the account details. Pressing OK acknowledges the deletion of an account. Pressing No returns the user to the Customer Maintenance screen.
When the Print button is pressed, the information on the form is transferred and automatically formatted and inserted to a template letter welcoming the customer to the bank and giving confirmation of acceptance of the new customer form MyBank.
Close
The screen is closed when this button is pressed.
3.3.5. Program Flow
Calls from - The Add Customer screen, Main Menu or Search screen
3.4. Deposits
3.4.1. Description
This screen identifies the deposit type, deposit amount, deposit verification number and allows the user to print a record of the deposit details with a date and time stamp. The business user can navigate to the withdrawal screen and can delete the deposit prior to completing the Add deposit screen.
3.4.2. Screen Layout & Functional Description
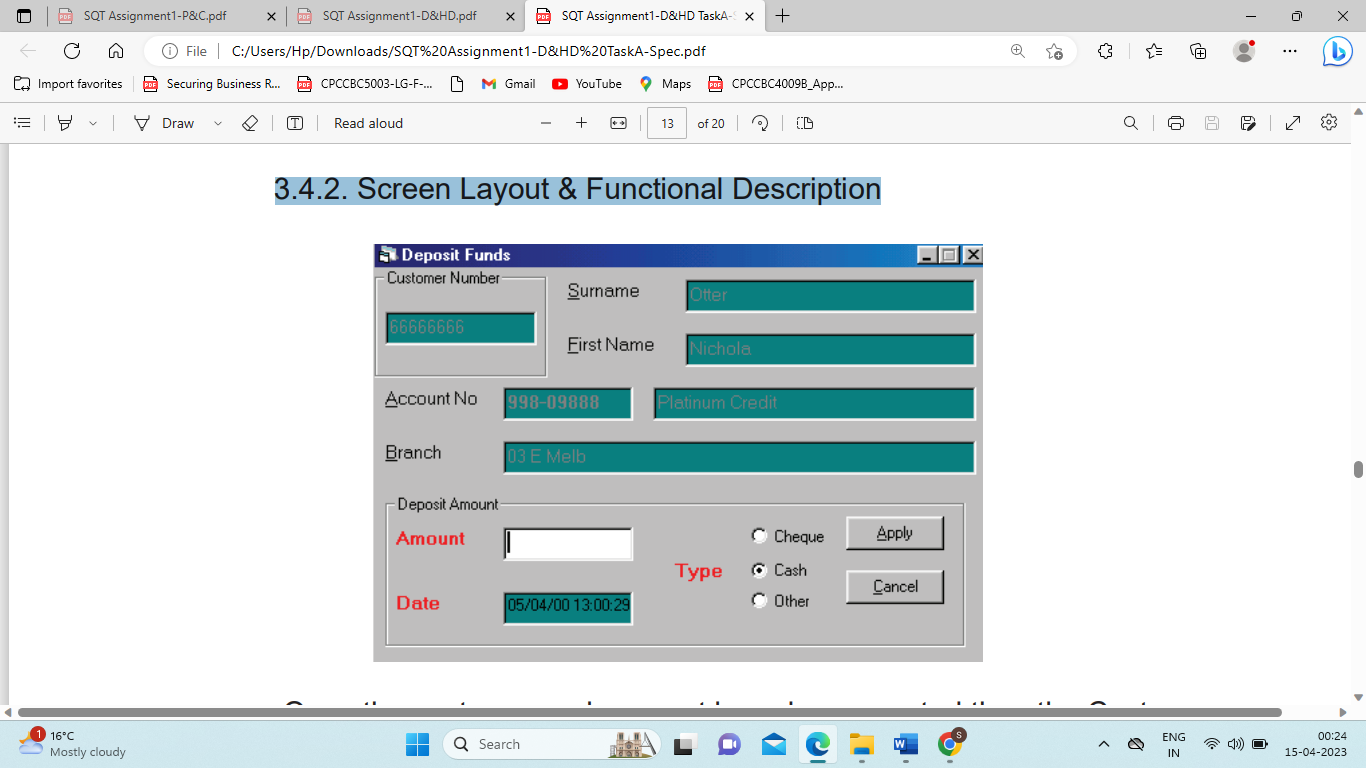
Once the customer and account have been created then the Customer can deposit funds at any time during business hours over the counter of any branch. The user must complete the following fields:
Amount
Transaction Type
The user can deposit any amount from A$10 to A$99999.99. The deposit can be by either cash, cheque or if neither those apply then the other option can be selected. If Cheque is selected then the user is prompted to enter the cheque number. If the other option is selected then the user is prompted for a description.
3.4.3. Screen Access
The screen is only accessible by authorised business users. This screen is accessed from the customer search screen.
3.4.4. Button Processing Rules
Apply
When the Apply button is pressed the deposit of funds is acknowledged, a message box is displayed which asks the user if he/she is satisfied that all the details that have been entered are correct. Pressing OK completes the deposit process. Pressing No returns the user to the Deposits screen. After pressing OK, a confirmation screen is displayed showing the amount deposited, the customers details, and new balance and also the Deposit Verification Number (DVN) this DVN is automatically generated. This screen can be printed as part of a receipt for the customer.
Close
The screen is closed when this button is pressed.
3.4.5. Program Flow
Calls from - Search screen
3.5. Withdrawals
3.5.1. Description
This screen identifies the withdrawal type, withdrawal amount, withdrawal verification number and allows the user to print a record of the withdrawal details with a date and time stamp. The business user can navigate to the deposit screen and can delete the withdrawal prior to completing the Add withdrawal screen.
3.5.2. Screen Layout & Functional Description
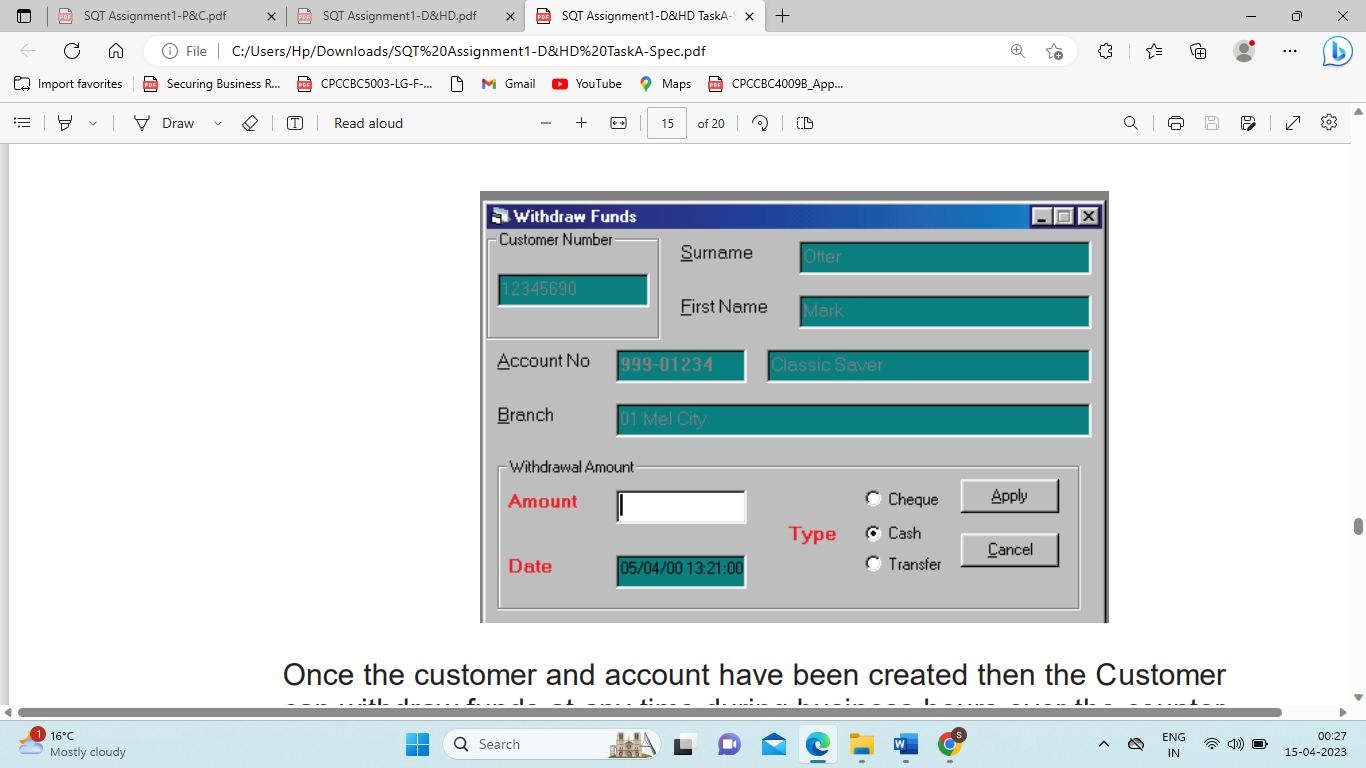
Once the customer and account have been created then the Customer can withdraw funds at any time during business hours over the counter of any branch. The user must complete the following fields:
Amount
Transaction Type
The users can withdraw any amount from A$10 to A$99999.99. The withdrawal can be by either cash, cheque or if neither of these options apply then the other option can be selected. If cheque is selected then the user is prompted to enter the cheque number. If the other option is selected then the user is prompted for a description.
3.5.3. Screen Access
The screen is only accessible by authorised business users. This screen is accessed from the customer search screen.
3.5.4. Button Processing Rules
Apply
When the Apply button is pressed the withdrawal of funds is acknowledged, a message box is displayed which asks the user if he/she is satisfied that all the details that have been entered are correct. Pressing OK completes the withdrawal process. Pressing No returns the user to the Withdrawal screen. If the customer does not have sufficient funds for the withdrawal then an error message is displayed and the withdrawal is declined. After pressing OK, a confirmation screen is displayed showing the amount deposited, the customers details, and new balance and also the Withdrawal Verification Number (WVN) this WVN is automatically generated. This screen is printed as part of a receipt for the customer.
Update When the Update button is pressed the update of Withdrawal details is acknowledged, a message box is returned which asks the user if he/she is satisfied that all the details that have been entered are correct. Pressing OK completes the update Withdrawal process. Pressing No returns the user to the Withdrawal screen.
Print When the Print button is pressed, the information on the form is transferred and automatically formatted and inserted to a template relating to the Withdrawal being made. This is date and time stamped.
Close
The screen is closed when this button is pressed.
3.5.5. Program Flow
Calls from - Search screen
3.6. Enquires
3.6.1. Description
The business user is able to search the system database to locate a customer's details by account number or surname.
3.6.2. Screen Layout & Functional Description
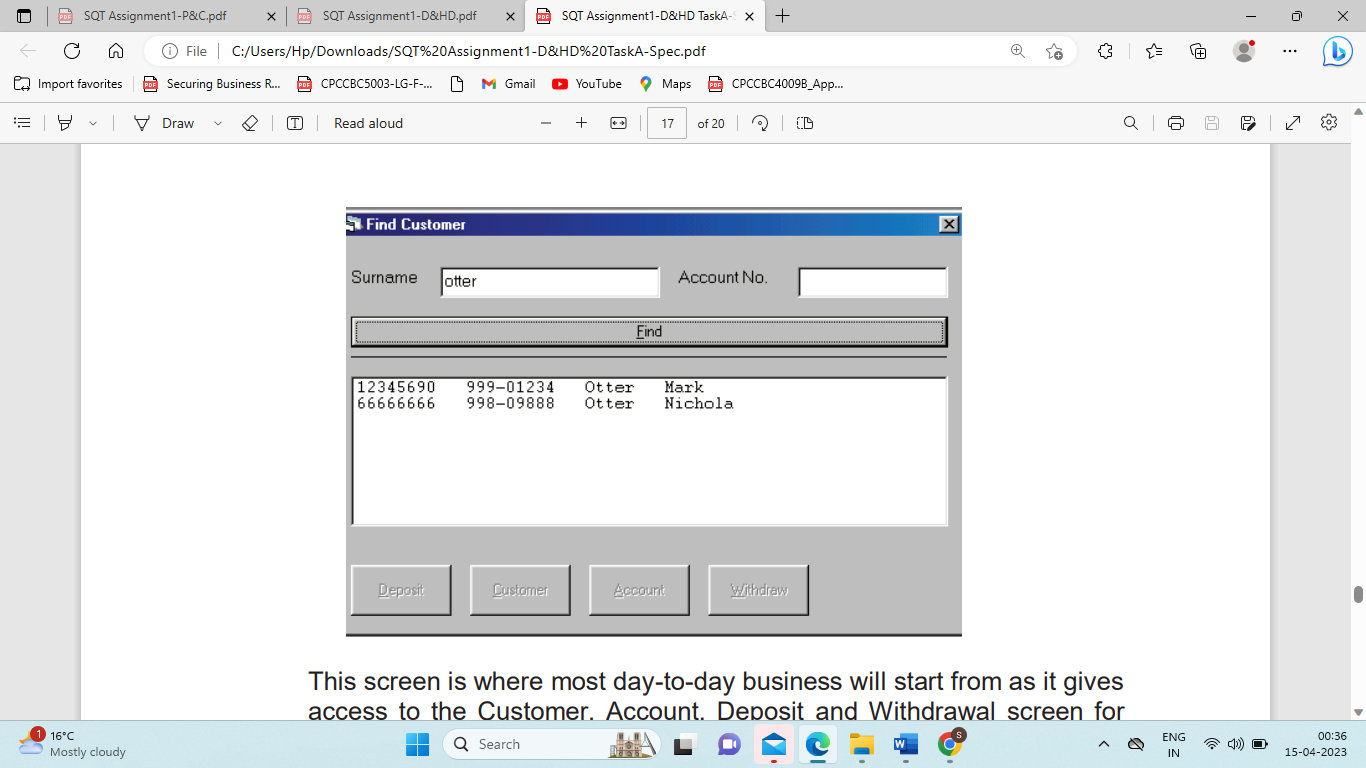
This screen is where most day-to-day business will start from as it gives access to the Customer, Account, Deposit and Withdrawal screen for existing users. The User is able to search on one or both of the following fields: Wild card search is not permitted in this screen
Account Number
Surname
3.6.3. Screen Access
The screen is only accessible by authorised business users. This screen is accessed from the main menu
3.6.4. Button Processing Rules
Find
All customers that match the search criteria are displayed. If all search fields are empty then the find button is disabled.
Customer
If a customer is selected from the search results list, then the customer screen is opened with the selected customer details displayed.
Account If a customer is selected from the search results list, then the account screen is opened with the selected account details displayed.
Withdrawal If a customer is selected from the search results list, then the withdrawal screen is opened with the selected customer details displayed, for a withdrawal to be made.
Deposit
If a customer is selected from the search results list, then the deposit screen is opened with the selected customer details displayed, for a deposit to be made.
Close
The screen is closed when this button is pressed.
3.6.5. Program Flow
Calls from - Main Menu
4.Reports
4.1. Statement Report
4.1.1. Description
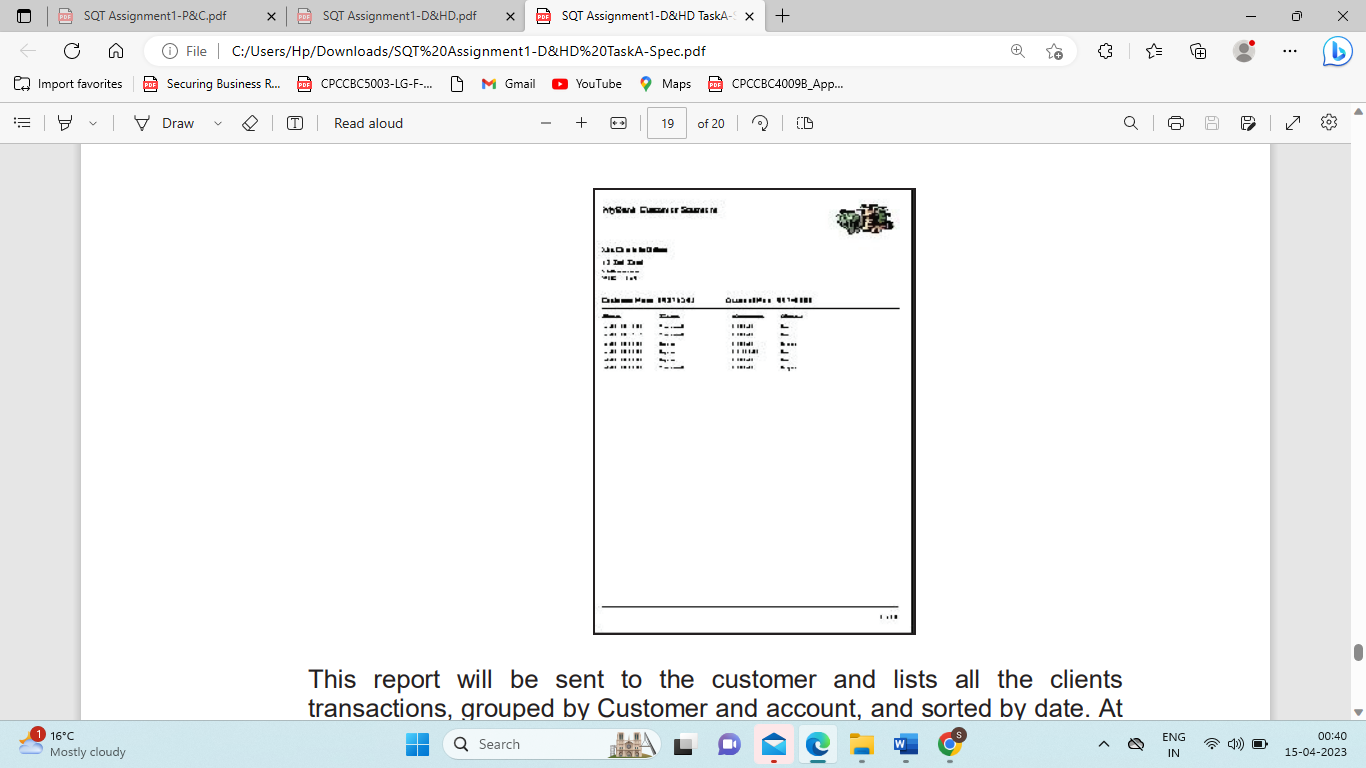
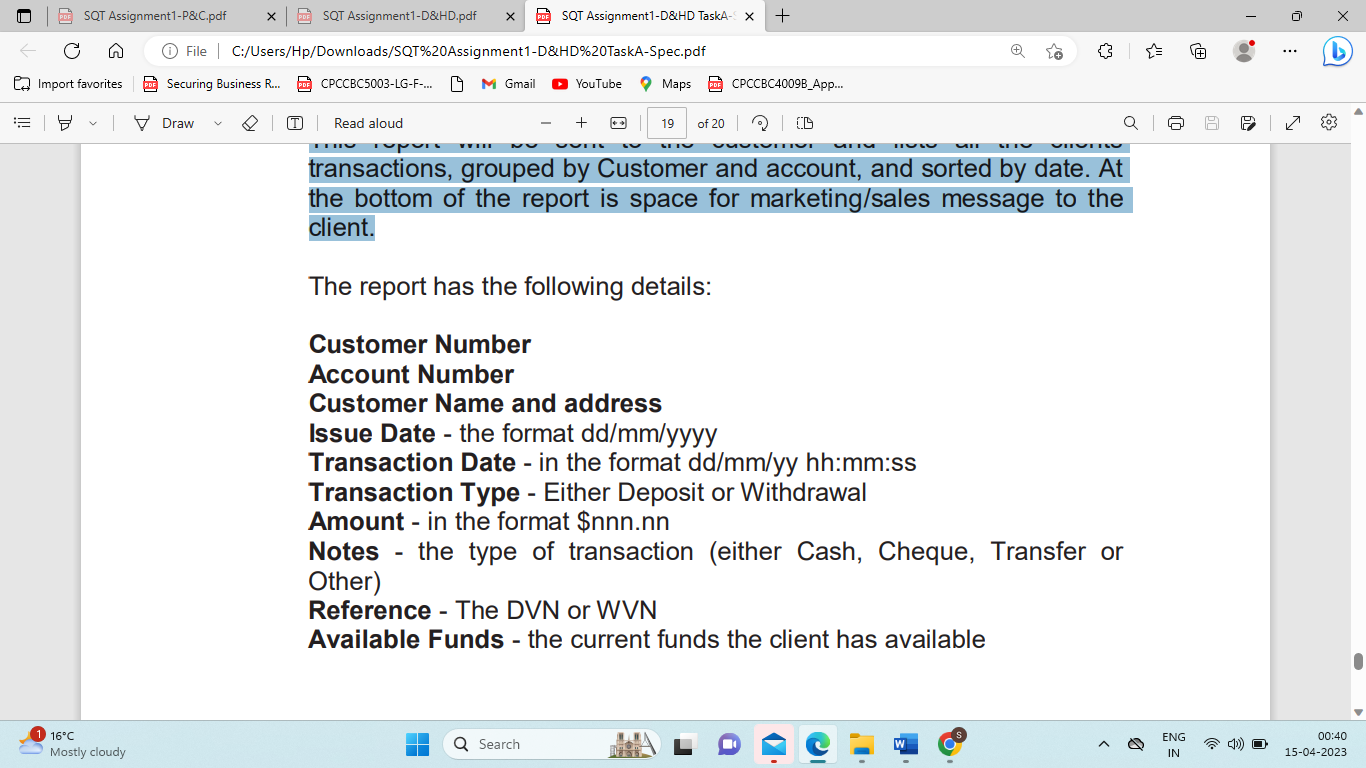
The business user is able to print a statement that details the customer's transactions.
4.1.2. Report Layout and Functional Description
4.1.3. Report Access
This report can be called from 2 screens, firstly by double clicking on a record in the Customer Enquiry screen where the statement for the selected customer is displayed, and secondly from the main menu, there all customer statements are produced.
5. Appendix 1 - Deferred Features
The following features have been deferred to a later release: x Full implementation of the security model - the system will be password controlled but no read/write levels will be introduced until the next version.
NOTE: There is no additional information to solve Task A which has some questions and task B which is draw state machine diagram. Just go through documentation and then answer these two questions.
The one image of report is also blurry in the question
Please dont say question is incomplete. its complete question. there is nothing more .
8 !!! SQT Assignment1-P&C.pdf n Import favorites PDE Securing Business R... PDF CPCCBC5003-LG-F-... 19 M Gmail T X PDSQT Assignment1-D&HD.pdf X PESQT Assignment1-D&HD.pdf x + File | C:/Users/Hp/Downloads/SQT%20Assignment1-D&HD.pdf 16C Cloudy Draw V IT. Read aloud YouTube + ** Maps CPCCBC4009B_App... Assignment 1 (D&HD) - Requirements & Modelling This part of Assignment 1 is for students targeting at grades of Distinction and High Distinction. 1 of 2 (0) If you are targeting at the grade of D or HD in COS80022, you need to complete the following two tasks in addition to those in Assignment 1 (P&C). 1 Task A: Review of "MyBank" Functional Specification (7 points) Suppose that you are working in a team testing a new "over the counter" banking application for MyBank, a large Australian bank. A draft version of the Functional Specification has been completed by the business analysts. You are asked to perform an informal review on the specification. Q Search Your review is particularly focused on answering the question "is the document internally consistent?" This consists of checking the document for the following: 1. Is it ambiguous? If not, please list the relevant items and briefly explain why. 2. Is it consistent within itself? If not, please list the relevant items and briefly explain why. 3. Is it complete? If not, please list the relevant items and briefly explain why. 4. Is it free of errors? If not, please list the relevant items and briefly explain why. 5. Is it feasible? If not, please list the relevant items and briefly explain why. 6. Is it testable? If not, please list the relevant items and briefly explain why. re 0.9 ENG IN 80 7.9 P 1 4) O : N x 2 16:03 15-04-2023
Step by Step Solution
There are 3 Steps involved in it
Step: 1

Get Instant Access to Expert-Tailored Solutions
See step-by-step solutions with expert insights and AI powered tools for academic success
Step: 2

Step: 3

Ace Your Homework with AI
Get the answers you need in no time with our AI-driven, step-by-step assistance
Get Started


