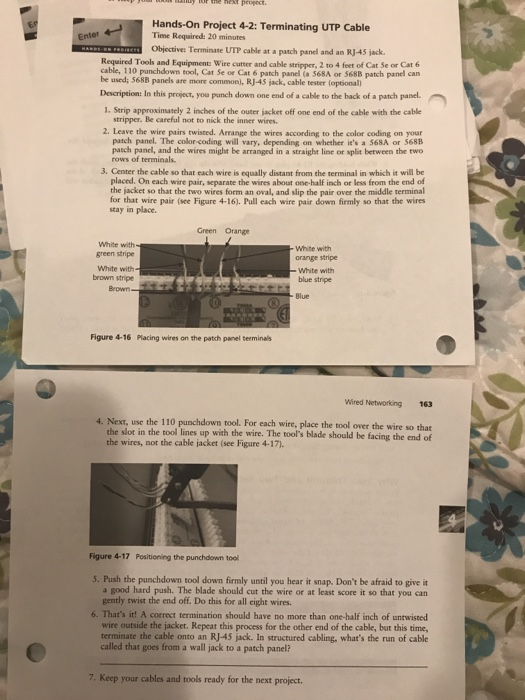
Hands-On Project 4-2: Terminating UTP Cable Time Required: 20 minutes Enter Objective: Terminate UTP cable at a patch panel and an RJ45 ack. Required Tools and Equipment: Wire cutter and cable stripper, 2 to 4 feet of Cat Se or Cat 6 cable, 110 punchdown tool, Cat Se or Cat 6 patch panel (a 568A or 5688 patch panel can be used; 568B panels are more common), RJ-45 jack, cable tester (optional Description: In this project, you punch down one end of a cable to the back of a patch panel. 1. Strip approximately 2 inches of the outer jacket off one end of the cable with the cable stripper. Be careful not to nick the inner wires. 2. Leave the wire pairs twisted. Arrange the wires according to the color coding on your patch panel. The color-coding will vary, depending on whether it's a 568A or 5688 patch panel, and the wires might be arranged in a straight line or split between the two rows of terminals. 3. Center the cable so that each wire is equally distant from the terminal in which it will be placed. On each wire pair, separate the wires about one-half inch or less from the end of the jacket so that the two wires form an oval, and slip the pair over the middle terminal for that wire pair (see Figure 4-16). Pull each wire pair down firmly so that the wires stay in place Green Orange White with green stripe White with White with orange stripe brown stripe blue stripe Brown Figure 4-16 Placing wires on the patch panel terminals Wired Networking 163 4. Next, use the 110 punchdown tool. For each wire, place the tool over the wire so that the slot in the tool lines up with the wire. The tool's blade should be facing the end of 2 the wires, not the cable jacket (see Figure 4-17) Figure 4-17 Positioning the punchdown tool 5. Push the punchdown tool down firmly until you hear it snap. Don't be afraid to give it a good hard push. The blade should cut the wire or at least score it so that you can gently twist the end off. Do this for all eight wires. 6. That's it! A correct termination should have no more than one-half inch of untwisted wire outside the jacket. Repeat this process for the other end of the cable, but this time, terminate the cable onto an RJ-45 jack. In structured cabling, what's the run of cable called that goes from a wall jack to a patch panel? 7. Keep your cables and tools ready for the next p Hands-On Project 4-2: Terminating UTP Cable Time Required: 20 minutes Enter Objective: Terminate UTP cable at a patch panel and an RJ45 ack. Required Tools and Equipment: Wire cutter and cable stripper, 2 to 4 feet of Cat Se or Cat 6 cable, 110 punchdown tool, Cat Se or Cat 6 patch panel (a 568A or 5688 patch panel can be used; 568B panels are more common), RJ-45 jack, cable tester (optional Description: In this project, you punch down one end of a cable to the back of a patch panel. 1. Strip approximately 2 inches of the outer jacket off one end of the cable with the cable stripper. Be careful not to nick the inner wires. 2. Leave the wire pairs twisted. Arrange the wires according to the color coding on your patch panel. The color-coding will vary, depending on whether it's a 568A or 5688 patch panel, and the wires might be arranged in a straight line or split between the two rows of terminals. 3. Center the cable so that each wire is equally distant from the terminal in which it will be placed. On each wire pair, separate the wires about one-half inch or less from the end of the jacket so that the two wires form an oval, and slip the pair over the middle terminal for that wire pair (see Figure 4-16). Pull each wire pair down firmly so that the wires stay in place Green Orange White with green stripe White with White with orange stripe brown stripe blue stripe Brown Figure 4-16 Placing wires on the patch panel terminals Wired Networking 163 4. Next, use the 110 punchdown tool. For each wire, place the tool over the wire so that the slot in the tool lines up with the wire. The tool's blade should be facing the end of 2 the wires, not the cable jacket (see Figure 4-17) Figure 4-17 Positioning the punchdown tool 5. Push the punchdown tool down firmly until you hear it snap. Don't be afraid to give it a good hard push. The blade should cut the wire or at least score it so that you can gently twist the end off. Do this for all eight wires. 6. That's it! A correct termination should have no more than one-half inch of untwisted wire outside the jacket. Repeat this process for the other end of the cable, but this time, terminate the cable onto an RJ-45 jack. In structured cabling, what's the run of cable called that goes from a wall jack to a patch panel? 7. Keep your cables and tools ready for the next p


