

Question: I need help with this project and here is the guids for the style 1 Objective In this program, you will get in introduction to
I need help with this project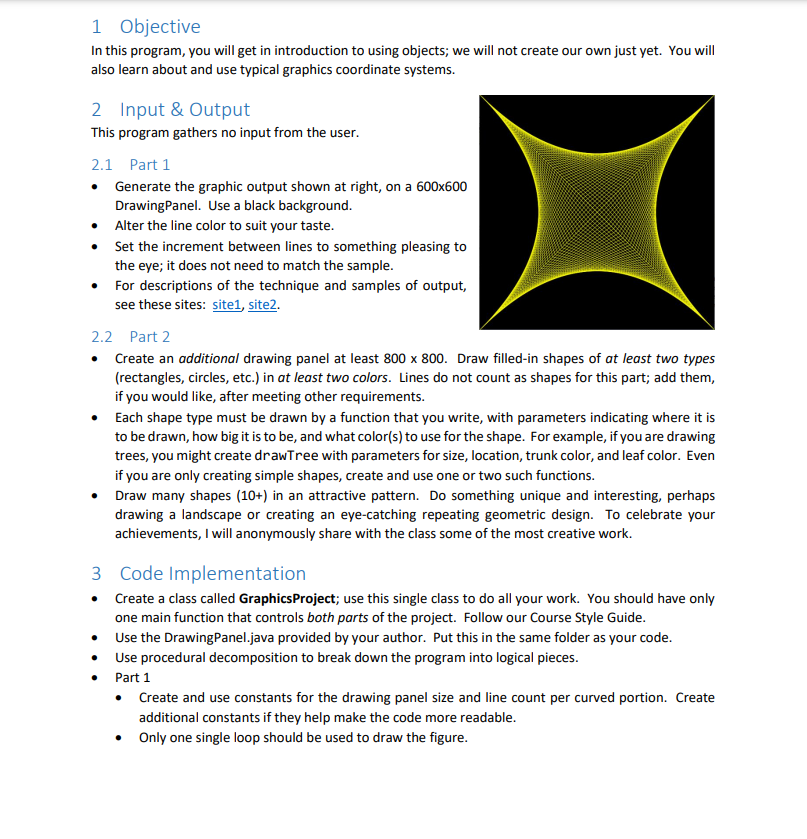
 and here is the guids for the style
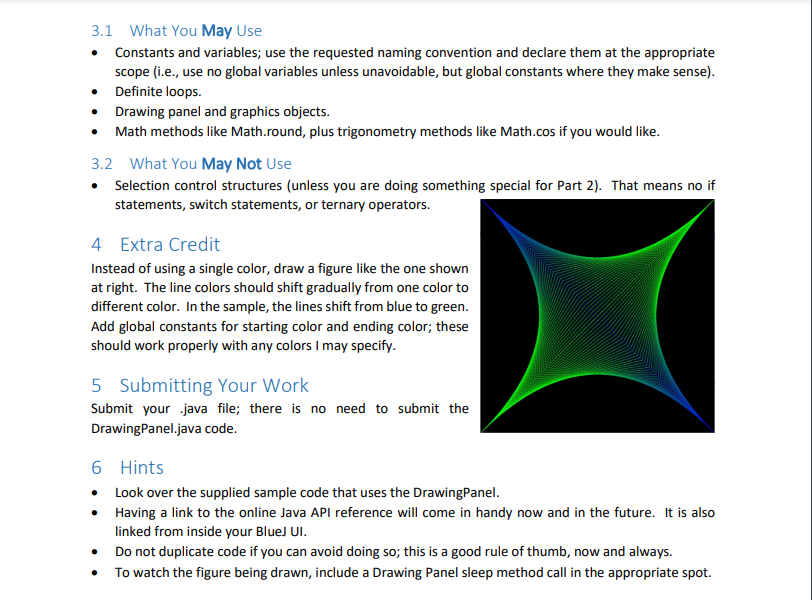
1 Objective In this program, you will get in introduction to using objects; we will not create our own just yet. You will also learn about and use typical graphics coordinate systems. 2 Input & Output This program gathers no input from the user. 2.1 Part 1 Generate the graphic output shown at right, on a 600x600 Drawing Panel. Use a black background. Alter the line color to suit your taste. Set the increment between lines to something pleasing to the eye; it does not need to match the sample. For descriptions of the technique and samples of output, see these sites: sitel, site2. 2.2 Part 2 Create an additional drawing panel at least 800 x 800. Draw filled-in shapes of at least two types (rectangles, circles, etc.) in at least two colors. Lines do not count as shapes for this part; add them, if you would like, after meeting other requirements. Each shape type must be drawn by a function that you write, with parameters indicating where it is to be drawn, how big it is to be, and what color(s) to use for the shape. For example, if you are drawing trees, you might create drawTree with parameters for size, location, trunk color, and leaf color. Even if you are only creating simple shapes, create and use one or two such functions. Draw many shapes (10+) in an attractive pattern. Do something unique and interesting, perhaps drawing a landscape or creating an eye-catching repeating geometric design. To celebrate your achievements, I will anonymously share with the class some of the most creative work. 3 Code Implementation Create a class called GraphicsProject; use this single class to do all your work. You should have only one main function that controls both parts of the project. Follow our Course Style Guide. Use the Drawing Panel.java provided by your author. Put this in the same folder as your code. Use procedural decomposition to break down the program into logical pieces. Part 1 Create and use constants for the drawing panel size and line count per curved portion. Create additional constants if they help make the code more readable. Only one single loop should be used to draw the figure. 3.1 What You May Use Constants and variables; use the requested naming convention and declare them at the appropriate scope (i.e., use no global variables unless unavoidable, but global constants where they make sense). Definite loops. Drawing panel and graphics objects. Math methods like Math.round, plus trigonometry methods like Math.cos if you would like. 3.2 What You May Not Use Selection control structures (unless you are doing something special for Part 2). That means no if statements, switch statements, or ternary operators. 4 Extra Credit Instead of using a single color, draw a figure like the one shown at right. The line colors should shift gradually from one color to different color. In the sample, the lines shift from blue to green. Add global constants for starting color and ending color; these should work properly with any colors I may specify. 5 Submitting Your Work Submit your java file; there is no need to submit the Drawing Panel.java code. 6 Hints Look over the supplied sample code that uses the DrawingPanel. Having a link to the online Java API reference will come in handy now and in the future. It is also linked from inside your Blue) UI. Do not duplicate code if you can avoid doing so; this is a good rule of thumb, now and always. To watch the figure being drawn, include a Drawing Panel sleep method call in the appropriate spot. Java Style Guide for CSC142 1 Formatting 1.1 Indentation and Curly Braces Indents are four spaces (one tab, in Blue)). Open curly braces go at the end of the line of code that starts the class/method/block, not on the following line by themselves. End curly braces sit on a line by themselves (unless followed by the else keyword) and align under the code that started the block. Control statements (if, while, for, etc.) use curly braces even if they control a single statement. Indents are used to make wrapped/broken lines clear. 1.2 Spacing Binary operators have spaces on either side. Casts are written with no following space. Control keywords (if, while, for, switch, catch, etc.) are followed by a space. Code is aligned between similar statements for readability and to emphasize parallelism. One space is used after list-separating commas (or semicolons used similarly, e.g., in for loops). 1.3 Line Length Lines longer than 100 characters are avoided; wrap and indent them. 1.4 Blank Lines Single blank lines are used purposefully, to separate blocks of code or between methods. More than one blank line is used only when separating methods (perhaps two, in that case). 2 Identifiers Names of classes and interfaces use book-title case. The first letter of the name will be uppercase. For multi-word names, the first letter of each subsequent word will be uppercase. The rest of the letters will be lowercase. Names of constants are in all uppercase, with underscores used as word separators. All other identifiers begin with a lowercase letter. For multi-word names, the first letter of each subsequent word will be uppercase. The rest of the letters will be lowercase. This is called "camel casing;" the uppercase letters are like "humps." Abbreviations are avoided in identifiers unless they are undeniably clear to all who might read the code, those of every nationality and linguistic group. Generic names like "amount" or "number" are avoided; use more descriptive names. Singular names are used, in general, unless the object referenced represents a collection. 3 Literals Literals match the intended data type, e.g., 0.0 for a double (not 0). "Magic numbers" (numbers that appear out of thin air with their values unexplained) are not used. Instead, use constants (declared static final). . 4 Coding 4.1 Imports Import classes should be listed explicitly, e.g., import java.util.ArrayList, not import java.util.* 4.2 Constructs to Avoid Prefer while loops to do/while loops; they make their exit conditions clearer from the start. Prefer not to return from the middle of a method; return at the end instead (single exit point). Don't use continue; construct better logic instead. Don't use break except in constructs that require it (e.g., switch). Don't exit artificially from the program in the middle; use good control flow/logic instead. 4.3 Initialization Declare variables as close as possible to where they are used (not always at the top). 4.4 Access All instance variables must be private. Constants may be public when it makes sense to do so. Constants must be marked final. 5 Internal Documentation 5.1 General Rather than trying to document complex algorithms in comments, try to make the algorithm easier to read by introducing more, and better named, identifiers. It's often the case that comments don't get modified when code is changed, leaving them confusing and out of sync. Provide a file header comment in each source file. Beware of end-of-line comments; they often either state the obvious or reveal the need for better identifiers. Avoid commenting on individual lines of code, or each line of code. Use white-space delimited block commenting, i.e., a single-line comment (or two), a block of code, then a blank line for visual separation. Use JavaDoc notation for the file header (@author and @version) and method headers (@param, @return, sometimes @throws) 5.2 Readability Prefer readability to strict adherence to rules, i.e., sometimes breaking the rule makes the code more readable. Think twice before doing this, however. 5.3 Citations If you receive help from someone, please add a comment with their name and how they helped. If you use a source other than our textbook or the Java API, include a citation
Step by Step Solution
There are 3 Steps involved in it

Get step-by-step solutions from verified subject matter experts