I need this in Mobile Applications. this all to same question not many question !! please hurry up and thank you
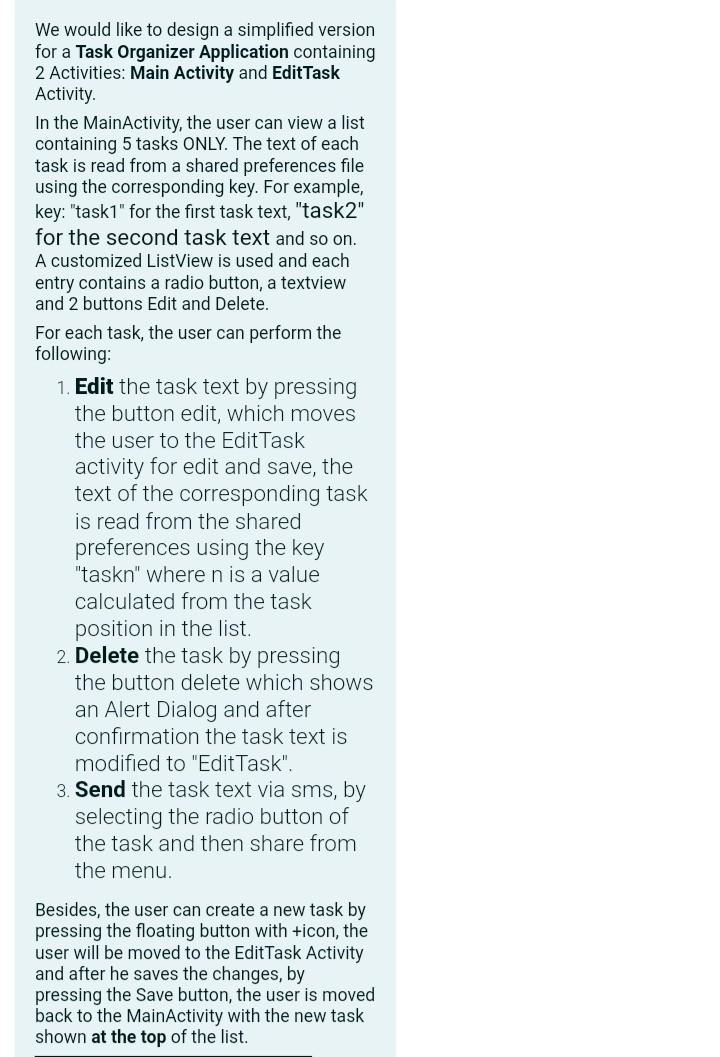
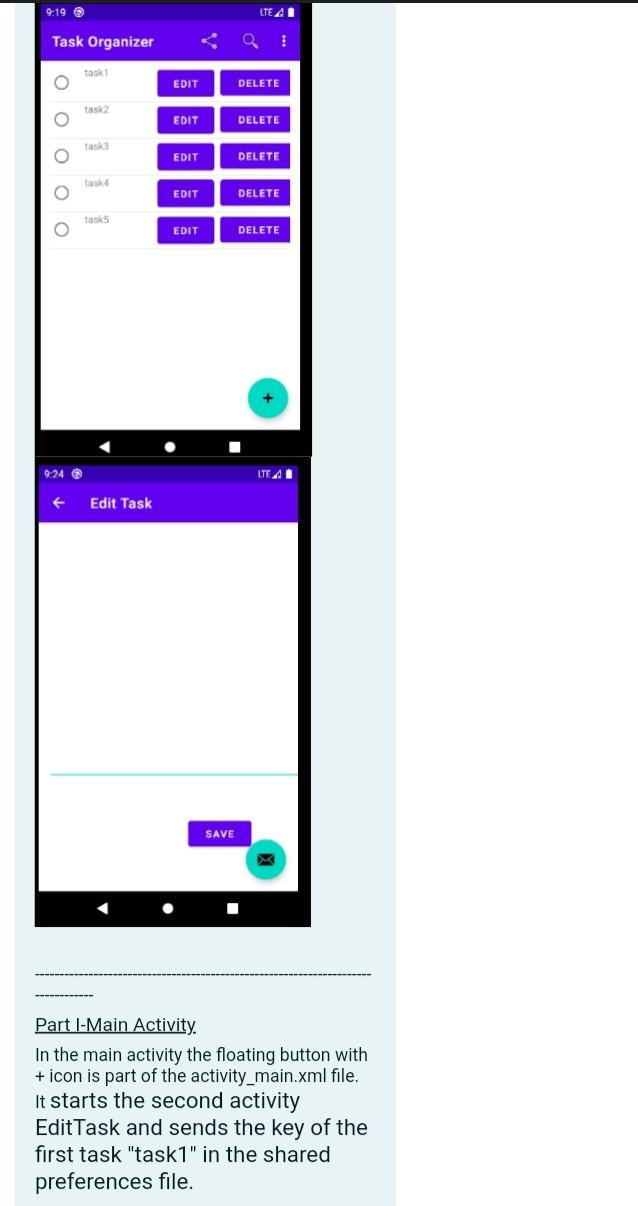
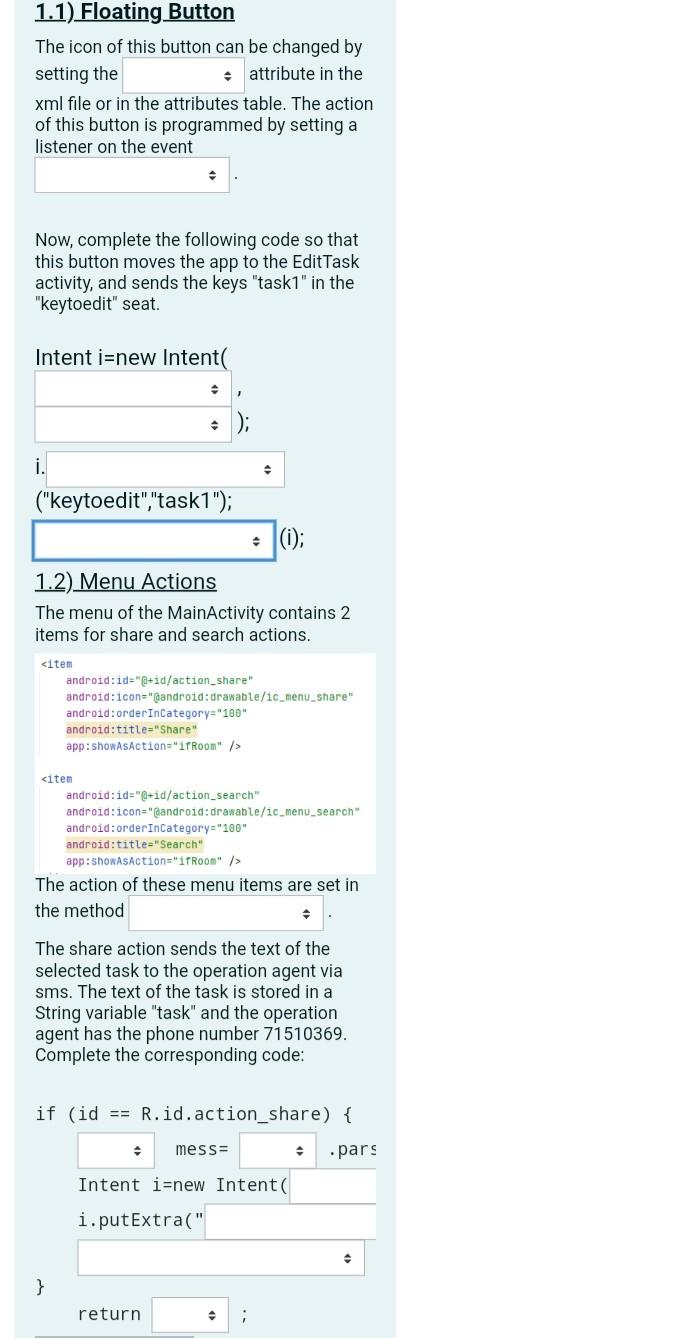
We would like to design a simplified version for a Task Organizer Application containing 2 Activities: Main Activity and EditTask Activity In the MainActivity, the user can view a list containing 5 tasks ONLY. The text of each task is read from a shared preferences file using the corresponding key. For example, key: "task1" for the first task text, "task2" for the second task text and so on. A customized ListView is used and each entry contains a radio button, a textview and 2 buttons Edit and Delete. For each task, the user can perform the following: 1. Edit the task text by pressing the button edit, which moves the user to the Edit Task activity for edit and save, the text of the corresponding task is read from the shared preferences using the key "taskn" where n is a value calculated from the task position in the list. 2. Delete the task by pressing the button delete which shows an Alert Dialog and after confirmation the task text is modified to "Edit Task". 3. Send the task text via sms, by selecting the radio button of the task and then share from the menu. Besides, the user can create new task by pressing the floating button with +icon, the user will be moved to the Edit Task Activity and after he saves the changes, by pressing the Save button, the user is moved back to the MainActivity with the new task shown at the top of the list. 9:19 LTE A Task Organizer V task EDIT DELETE EDIT DELETE tasks EDIT DELETE EDIT DELETE tasks EDIT DELETE 9:24 LTE A + Edit Task SAVE Part I-Main Activity. In the main activity the floating button with + icon is part of the activity_main.xml file. It starts the second activity Edit Task and sends the key of the first task "task1" in the shared preferences file. 1.1) Floating Button The icon of this button can be changed by setting the attribute in the xml file or in the attributes table. The action of this button is programmed by setting a listener on the event Now, complete the following code so that this button moves the app to the EditTask activity, and sends the keys "task1" in the "keytoedit" seat. Intent i=new Intent i. ("keytoedit","task1"); (i); 1.2) Menu Actions The menu of the MainActivity contains 2 items for share and search actions.
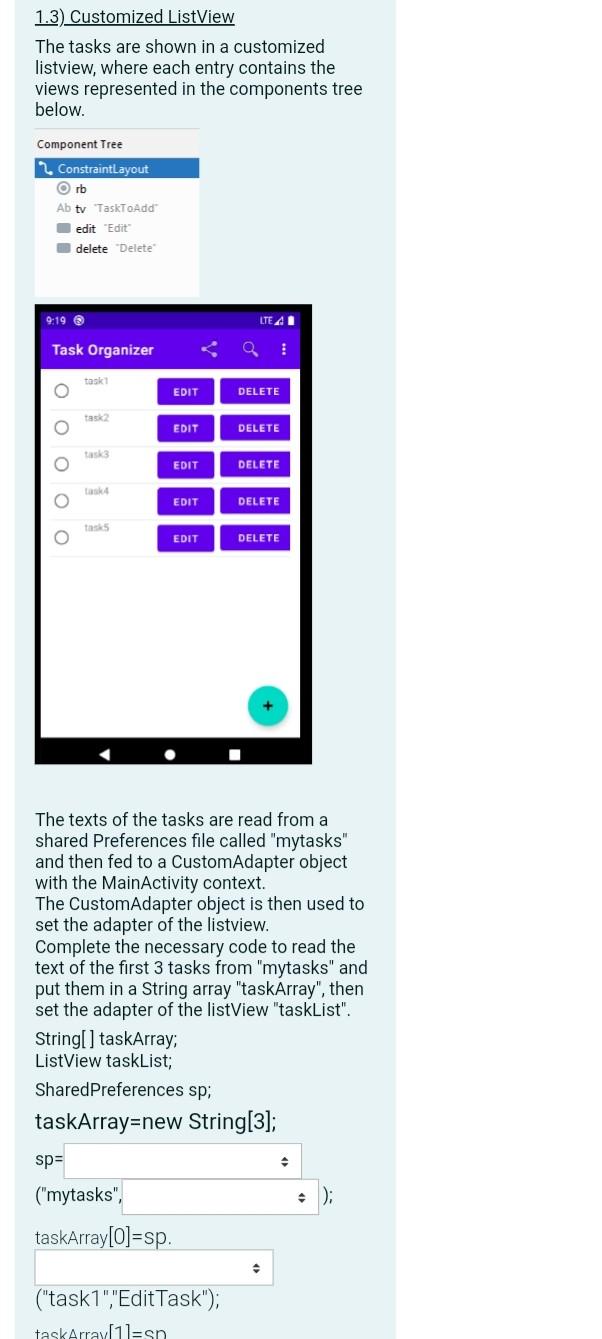
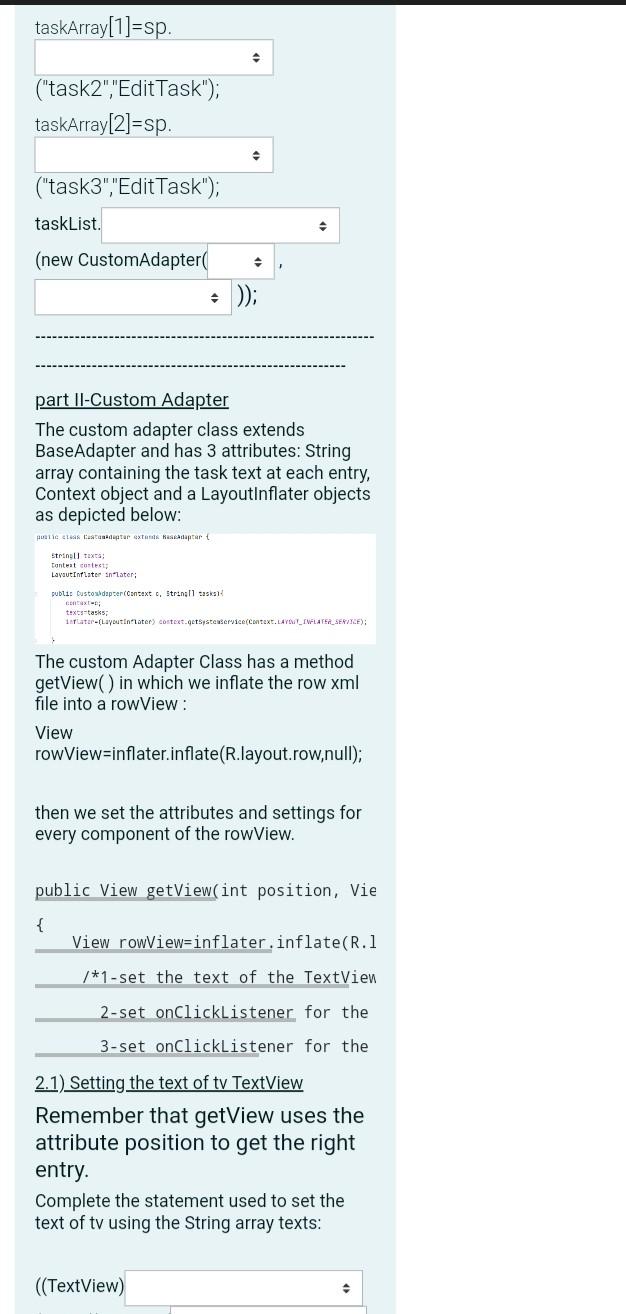
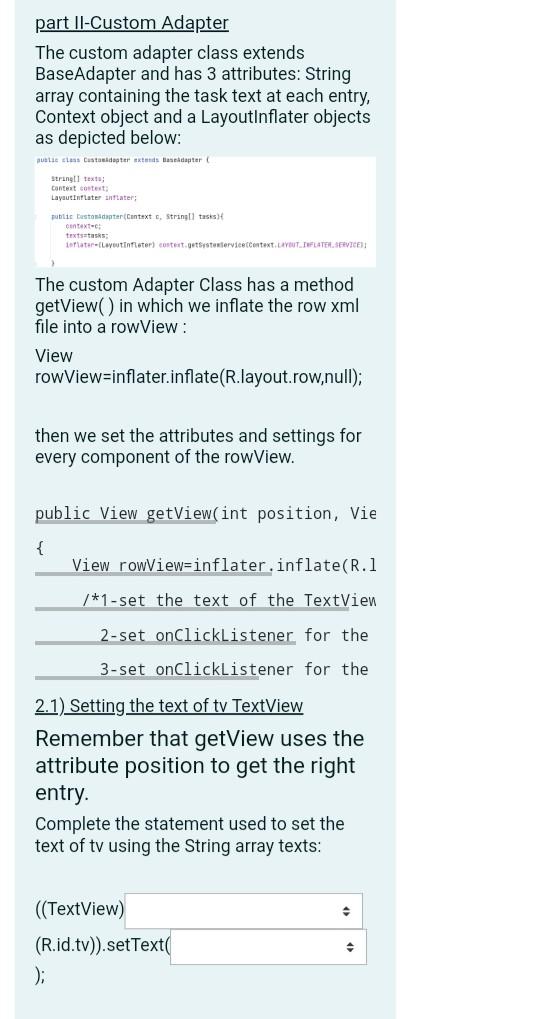
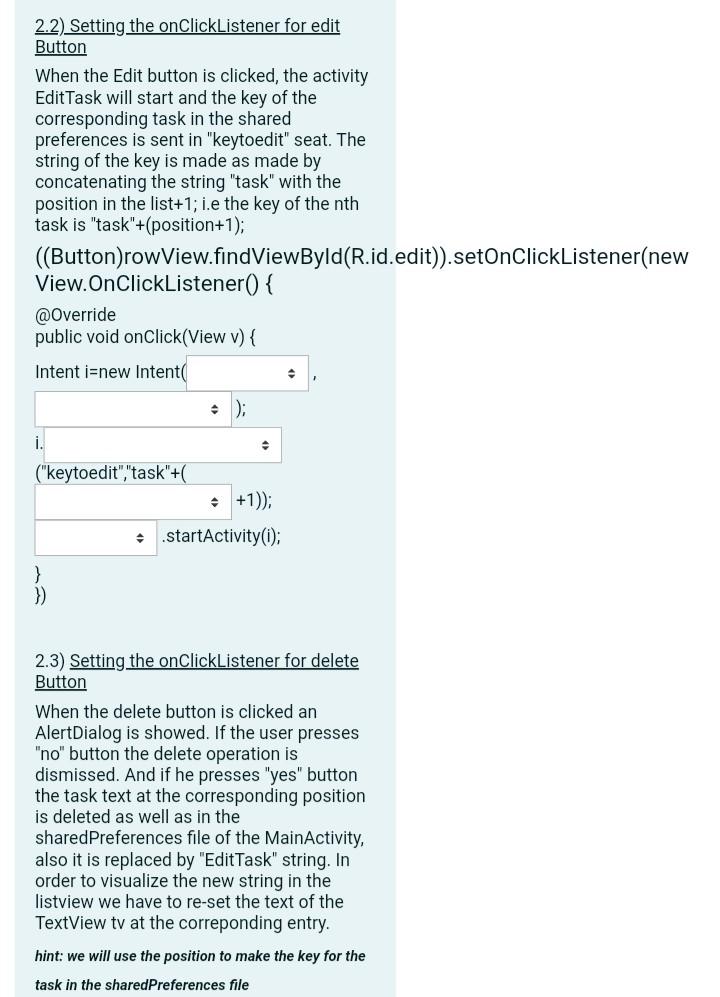
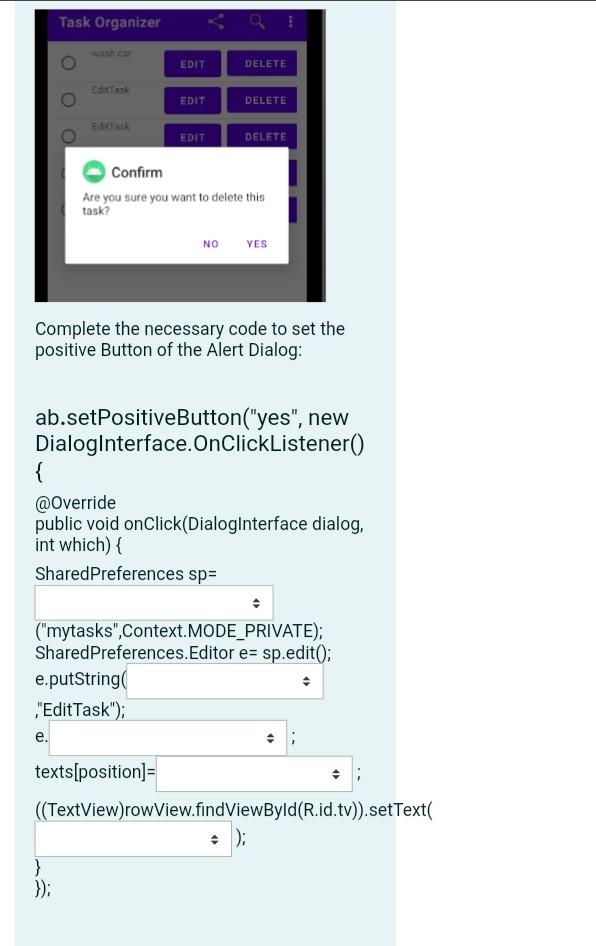
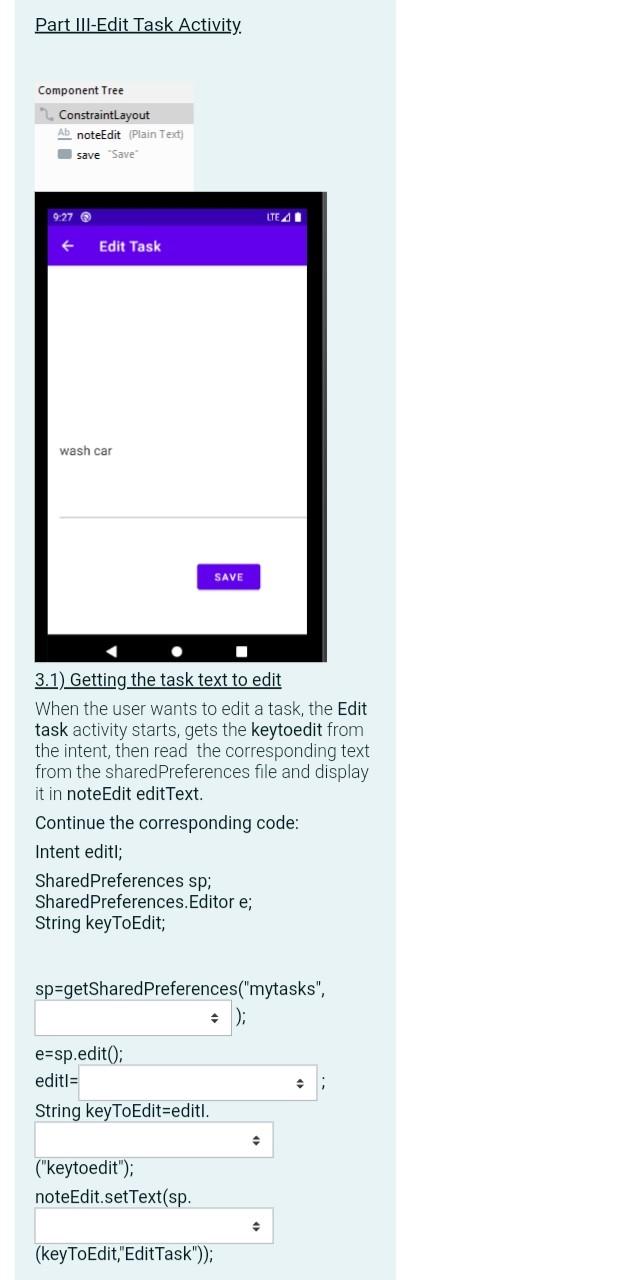
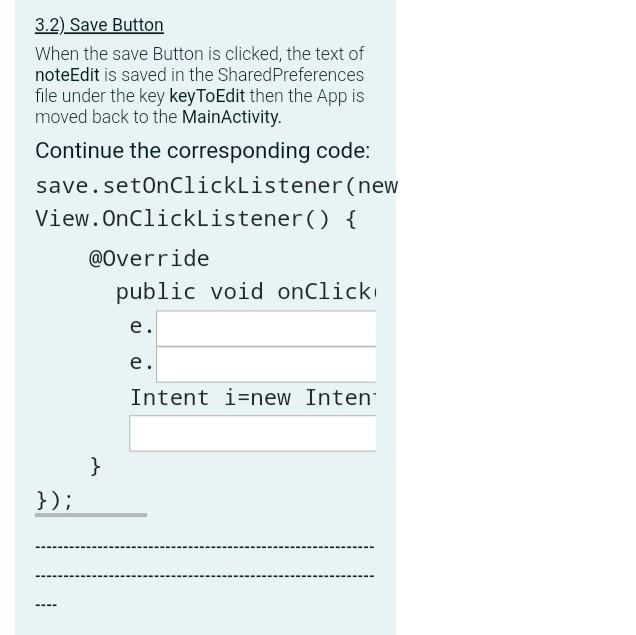
The action of these menu items are set in the method The share action sends the text of the selected task to the operation agent via sms. The text of the task is stored in a String variable "task" and the operation agent has the phone number 71510369. Complete the corresponding code: if (id == R.id.action_share) { messa . pars Intent i=new Intent( i.putExtra" e } return e 1.3) Customized ListView The tasks are shown in a customized listview, where each entry contains the views represented in the components tree below. Component Tree 2. ConstraintLayout Orb Ab tv "TaskToAdd" edit Edit delete "Delete 0:19 LTEA 1 Task Organizer task EDIT DELETE task2 EDIT DELETE task3 EDIT DELETE ak EDIT DELETE tasks EDIT DELETE The texts of the tasks are read from a shared Preferences file called "mytasks" and then fed to a CustomAdapter object with the MainActivity context. The CustomAdapter object is then used to set the adapter of the listview. Complete the necessary code to read the text of the first 3 tasks from "mytasks" and put them in a String array "taskArray", then set the adapter of the listView "taskList". String[] taskArray; ListView taskList; SharedPreferences sp; taskArray=new String[3]; sp= ("mytasks", taskArray[0]=sp. ("task1","Edit Task"); taskArray[1l=sp taskArray[1]=sp. ("task2","Edit Task"); taskArray[2]=sp. . ("task3","EditTask"); taskList. (new CustomAdapter )); part II-Custom Adapter The custom adapter class extends BaseAdapter and has 3 attributes: String array containing the task text at each entry, Context object and a LayoutInflater objects as depicted below: poetic tua testa datur extants Kaseadapter strin TES: Contest contest LayoutInfister Slater; publi: Custoidapparansaxt , Stringil asks cotxe textraks fater-(Layoutin later) context.getSystenservice context.LAY_INFLATER_SERVICE); The custom Adapter Class has a method getView() in which we inflate the row xml file into a rowView : View rowView=inflater inflate(R.layout.row,null); then we set the attributes and settings for every component of the rowView. public View getView(int position, Vie { View rowView=inflater.inflate(R.1 /*1-set the text of the TextVien 2-set onClickListener for the 3-set onClickListener for the 2.1) Setting the text of tv TextView Remember that getView uses the attribute position to get the right entry. Complete the statement used to set the text of tv using the String array texts: ((TextView) part Il-Custom Adapter The custom adapter class extends BaseAdapter and has 3 attributes: String array containing the task text at each entry, Context object and a LayoutInflater objects as depicted below: austie class Custasidapter studs tadapter stringi texto content content: Layout Inflater stater publis Destonidanter(Context, String tasks) contexte texts tasks: orlater-Lytinister) contest testostervice context, LAYOUT INFLATER SERVICES The custom Adapter Class has a method getView() in which we inflate the row xml file into a rowView: View rowView=inflater.inflate(R.layout.row,null); then we set the attributes and settings for every component of the rowView. public View getView(int position, Vie { View rowView=inflater.inflate(R.1 /*1-set the text of the TextVien 2-set onClickListener for the 3-set onClickListener for the 2.1) Setting the text of ty TextView Remember that getView uses the attribute position to get the right entry. Complete the statement used to set the text of tv using the String array texts: (TextView) (R.id.tv)).setText ); 2.2) Setting the onClickListener for edit Button When the Edit button is clicked, the activity Edit Task will start and the key of the corresponding task in the shared preferences is sent in "keytoedit" seat. The string of the key is made as made by concatenating the string "task" with the position in the list+1; i.e the key of the nth task is "task"+(position+1); ((Button)rowView.findViewById(R.id.edit)).setOnClickListener(new View.OnClickListener() { @Override public void onClick(View v) { Intent i=new Intent i. ("keytoedit","task"+( +1)); startActivity(i); } }) 2.3) Setting the onClickListener for delete Button When the delete button is clicked an AlertDialog is showed. If the user presses "no" button the delete operation is dismissed. And if he presses "yes" button the task text at the corresponding position is deleted as well as in the sharedPreferences file of the MainActivity, also it is replaced by "EditTask" string. In order to visualize the new string in the listview we have to re-set the text of the TextView tv at the correponding entry. hint: we will use the position to make the key for the task in the sharedPreferences file Task Organizer EDIT DELETE Editinti EDIT DELETE EDIT DELETE Confirm Are you sure you want to delete this task? NO YES Complete the necessary code to set the positive Button of the Alert Dialog: ab.setPositiveButton("yes", new DialogInterface.OnClickListener() { @Override public void onClick(DialogInterface dialog, int which) { SharedPreferences sp= ("mytasks",Context.MODE_PRIVATE); SharedPreferences.Editor e= sp.edit(); e.putString "Edit Task"); e. texts[position] = ((TextView)rowView.findViewById(R.id.tv)).setText( } }); Part III-Edit Task Activity. Component Tree ConstraintLayout Ab noteEdit Plain Text) save "Save 0:27 T 41 Edit Task wash car SAVE 3.1) Getting the task text to edit When the user wants to edit a task, the Edit task activity starts, gets the keytoedit from the intent, then read the corresponding text from the sharedPreferences file and display it in note Edit edit Text. Continue the corresponding code: Intent editl; SharedPreferences sp; SharedPreferences.Editor e; String key ToEdit; sp=getSharedPreferences("mytasks", e=sp.edit(); editi String keyToEdit=editi. ("keytoedit"); noteEdit.setText(sp. (key ToEdit,"Edit Task")); 3.2) Save Button When the save Button is clicked, the text of noteEdit is saved in the SharedPreferences file under the key keyToEdit then the App is moved back to the MainActivity. Continue the corresponding code: save.setOnClickListener(new View.OnClickListener() { @Override public void onClick e. e. Intent i=new Inten } }); We would like to design a simplified version for a Task Organizer Application containing 2 Activities: Main Activity and EditTask Activity In the MainActivity, the user can view a list containing 5 tasks ONLY. The text of each task is read from a shared preferences file using the corresponding key. For example, key: "task1" for the first task text, "task2" for the second task text and so on. A customized ListView is used and each entry contains a radio button, a textview and 2 buttons Edit and Delete. For each task, the user can perform the following: 1. Edit the task text by pressing the button edit, which moves the user to the Edit Task activity for edit and save, the text of the corresponding task is read from the shared preferences using the key "taskn" where n is a value calculated from the task position in the list. 2. Delete the task by pressing the button delete which shows an Alert Dialog and after confirmation the task text is modified to "Edit Task". 3. Send the task text via sms, by selecting the radio button of the task and then share from the menu. Besides, the user can create new task by pressing the floating button with +icon, the user will be moved to the Edit Task Activity and after he saves the changes, by pressing the Save button, the user is moved back to the MainActivity with the new task shown at the top of the list. 9:19 LTE A Task Organizer V task EDIT DELETE EDIT DELETE tasks EDIT DELETE EDIT DELETE tasks EDIT DELETE 9:24 LTE A + Edit Task SAVE Part I-Main Activity. In the main activity the floating button with + icon is part of the activity_main.xml file. It starts the second activity Edit Task and sends the key of the first task "task1" in the shared preferences file. 1.1) Floating Button The icon of this button can be changed by setting the attribute in the xml file or in the attributes table. The action of this button is programmed by setting a listener on the event Now, complete the following code so that this button moves the app to the EditTask activity, and sends the keys "task1" in the "keytoedit" seat. Intent i=new Intent i. ("keytoedit","task1"); (i); 1.2) Menu Actions The menu of the MainActivity contains 2 items for share and search actions.
The action of these menu items are set in the method The share action sends the text of the selected task to the operation agent via sms. The text of the task is stored in a String variable "task" and the operation agent has the phone number 71510369. Complete the corresponding code: if (id == R.id.action_share) { messa . pars Intent i=new Intent( i.putExtra" e } return e 1.3) Customized ListView The tasks are shown in a customized listview, where each entry contains the views represented in the components tree below. Component Tree 2. ConstraintLayout Orb Ab tv "TaskToAdd" edit Edit delete "Delete 0:19 LTEA 1 Task Organizer task EDIT DELETE task2 EDIT DELETE task3 EDIT DELETE ak EDIT DELETE tasks EDIT DELETE The texts of the tasks are read from a shared Preferences file called "mytasks" and then fed to a CustomAdapter object with the MainActivity context. The CustomAdapter object is then used to set the adapter of the listview. Complete the necessary code to read the text of the first 3 tasks from "mytasks" and put them in a String array "taskArray", then set the adapter of the listView "taskList". String[] taskArray; ListView taskList; SharedPreferences sp; taskArray=new String[3]; sp= ("mytasks", taskArray[0]=sp. ("task1","Edit Task"); taskArray[1l=sp taskArray[1]=sp. ("task2","Edit Task"); taskArray[2]=sp. . ("task3","EditTask"); taskList. (new CustomAdapter )); part II-Custom Adapter The custom adapter class extends BaseAdapter and has 3 attributes: String array containing the task text at each entry, Context object and a LayoutInflater objects as depicted below: poetic tua testa datur extants Kaseadapter strin TES: Contest contest LayoutInfister Slater; publi: Custoidapparansaxt , Stringil asks cotxe textraks fater-(Layoutin later) context.getSystenservice context.LAY_INFLATER_SERVICE); The custom Adapter Class has a method getView() in which we inflate the row xml file into a rowView : View rowView=inflater inflate(R.layout.row,null); then we set the attributes and settings for every component of the rowView. public View getView(int position, Vie { View rowView=inflater.inflate(R.1 /*1-set the text of the TextVien 2-set onClickListener for the 3-set onClickListener for the 2.1) Setting the text of tv TextView Remember that getView uses the attribute position to get the right entry. Complete the statement used to set the text of tv using the String array texts: ((TextView) part Il-Custom Adapter The custom adapter class extends BaseAdapter and has 3 attributes: String array containing the task text at each entry, Context object and a LayoutInflater objects as depicted below: austie class Custasidapter studs tadapter stringi texto content content: Layout Inflater stater publis Destonidanter(Context, String tasks) contexte texts tasks: orlater-Lytinister) contest testostervice context, LAYOUT INFLATER SERVICES The custom Adapter Class has a method getView() in which we inflate the row xml file into a rowView: View rowView=inflater.inflate(R.layout.row,null); then we set the attributes and settings for every component of the rowView. public View getView(int position, Vie { View rowView=inflater.inflate(R.1 /*1-set the text of the TextVien 2-set onClickListener for the 3-set onClickListener for the 2.1) Setting the text of ty TextView Remember that getView uses the attribute position to get the right entry. Complete the statement used to set the text of tv using the String array texts: (TextView) (R.id.tv)).setText ); 2.2) Setting the onClickListener for edit Button When the Edit button is clicked, the activity Edit Task will start and the key of the corresponding task in the shared preferences is sent in "keytoedit" seat. The string of the key is made as made by concatenating the string "task" with the position in the list+1; i.e the key of the nth task is "task"+(position+1); ((Button)rowView.findViewById(R.id.edit)).setOnClickListener(new View.OnClickListener() { @Override public void onClick(View v) { Intent i=new Intent i. ("keytoedit","task"+( +1)); startActivity(i); } }) 2.3) Setting the onClickListener for delete Button When the delete button is clicked an AlertDialog is showed. If the user presses "no" button the delete operation is dismissed. And if he presses "yes" button the task text at the corresponding position is deleted as well as in the sharedPreferences file of the MainActivity, also it is replaced by "EditTask" string. In order to visualize the new string in the listview we have to re-set the text of the TextView tv at the correponding entry. hint: we will use the position to make the key for the task in the sharedPreferences file Task Organizer EDIT DELETE Editinti EDIT DELETE EDIT DELETE Confirm Are you sure you want to delete this task? NO YES Complete the necessary code to set the positive Button of the Alert Dialog: ab.setPositiveButton("yes", new DialogInterface.OnClickListener() { @Override public void onClick(DialogInterface dialog, int which) { SharedPreferences sp= ("mytasks",Context.MODE_PRIVATE); SharedPreferences.Editor e= sp.edit(); e.putString "Edit Task"); e. texts[position] = ((TextView)rowView.findViewById(R.id.tv)).setText( } }); Part III-Edit Task Activity. Component Tree ConstraintLayout Ab noteEdit Plain Text) save "Save 0:27 T 41 Edit Task wash car SAVE 3.1) Getting the task text to edit When the user wants to edit a task, the Edit task activity starts, gets the keytoedit from the intent, then read the corresponding text from the sharedPreferences file and display it in note Edit edit Text. Continue the corresponding code: Intent editl; SharedPreferences sp; SharedPreferences.Editor e; String key ToEdit; sp=getSharedPreferences("mytasks", e=sp.edit(); editi String keyToEdit=editi. ("keytoedit"); noteEdit.setText(sp. (key ToEdit,"Edit Task")); 3.2) Save Button When the save Button is clicked, the text of noteEdit is saved in the SharedPreferences file under the key keyToEdit then the App is moved back to the MainActivity. Continue the corresponding code: save.setOnClickListener(new View.OnClickListener() { @Override public void onClick e. e. Intent i=new Inten } })
