

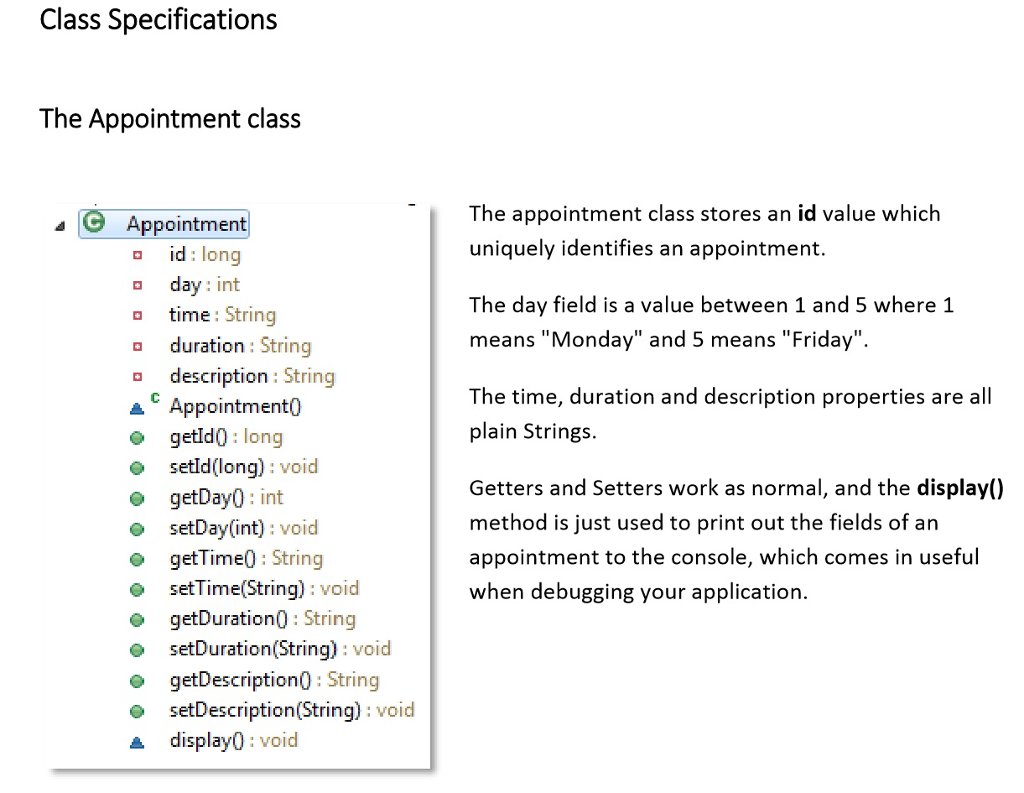
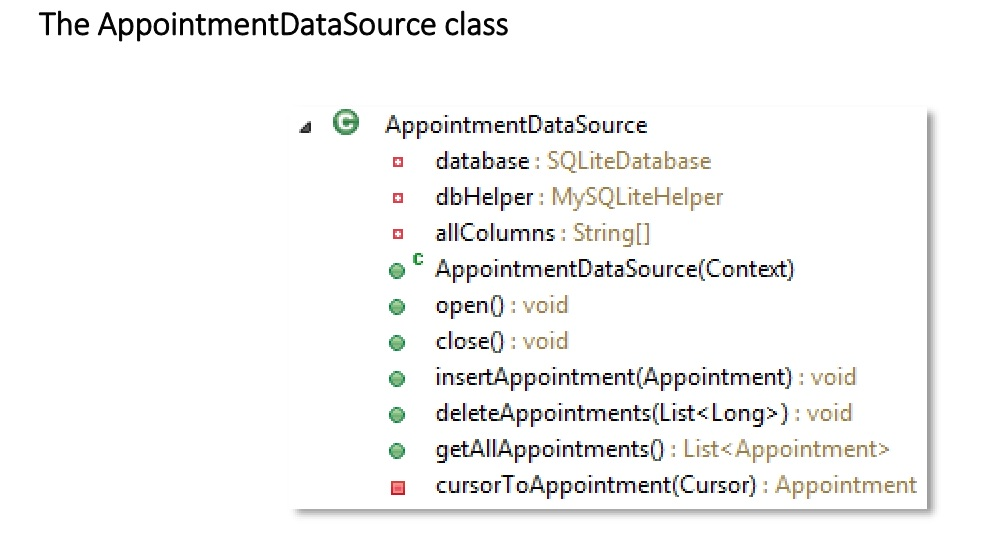
Question
If someone could just even provide code for the layout of each page to help get me started that would be a great step in
If someone could just even provide code for the layout of each page to help get me started that would be a great step in the right direction. Someone commented on a previous post of this and said it would be too hard to make the full app in time, but i never specified a time period. I have been struggling with mobile application development and have asked my teacher numerous times for help just to be turned away so i'll turn to this community and hopefully someone can help me. cheers everyone.
Project Settings
Your Android application should have the following settings: Minimum SDK: API 19 Android 4.4 Application Name: Mobile Timetabler Project Name: MobileTimetabler For example, MobileTimetabler30078589 Package name: au.edu.vu.timetable For example, au.edu.vu.timetable30078589
Your Mobile Timetabler application will do exactly what it sounds like. When the application first launches, it will display the days of the week Monday through to Friday, and underneath each day, it will display some details (which you will enter, and which will be saved into a simple SQLite database) about what classes / labs you have on that day. When the application starts it should have two buttons which are displayed at the top of the screen: - A button to create a New appointment, and - A button to Delete appointment(s). Under this, in a LinearLayout inside a ScrollView, there should be 5 centred TextViews with the days of the week Monday through Friday. Under each day should be the text for one or more appointments. If there are no appointments saved for that day then the text "No appointments." is displayed. An example of the MainActivity layout is shown below in figure 1 (Figures provided in this assignment are as sample only): 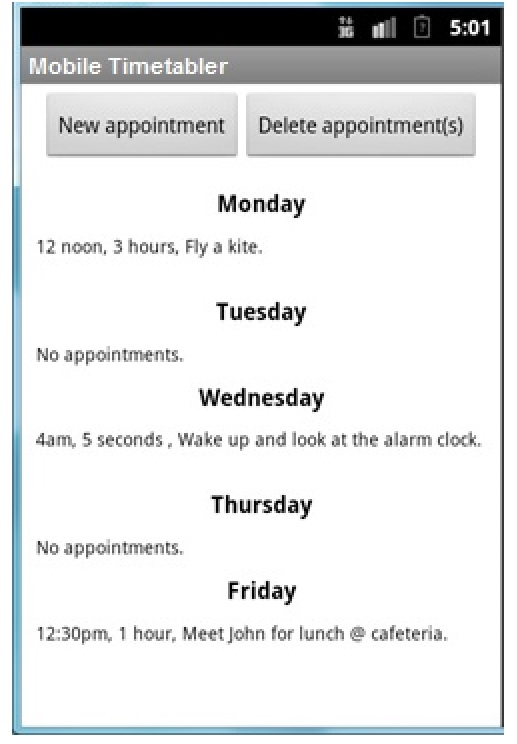
When the user clicks the [New appointment] button, an "onClick" method is executed which creates a new Intent, and starts a new NewAppointmentActivity using that intent. The NewAppointmentActivity layout has two buttons, one to [Create appointment] which triggers the creation of a new Appointment object which must be saved to the SQLite database, and a second [Back] button which simply finishes the NewAppointmentActivity and returns to the MainActivity. Under these two buttons are 5 radio buttons with the text "Mon", "Tue", "Wed", "Thur", and "Fri" on them inside a horizontal RadioGroup. It also has TextViews which display the words "Time", "Duration" and "Description". Under each of these three TextViews are EditText views which allow the user to enter text for the time, duration and description of the appointment. The layout of NewAppointmentActivity is shown below: 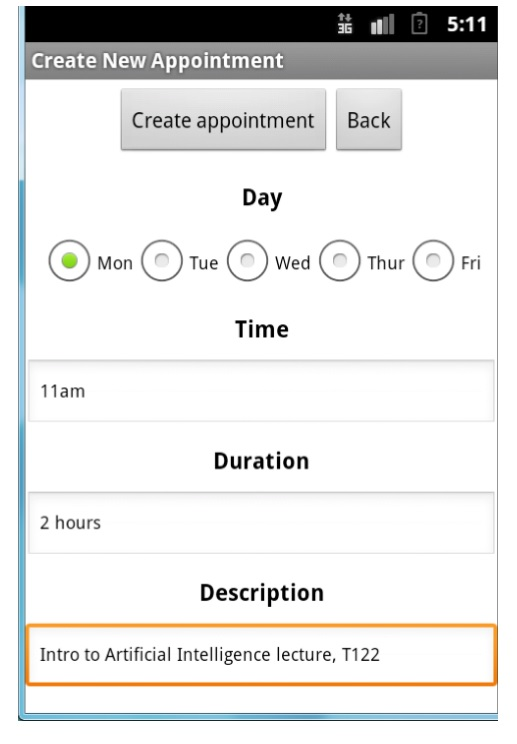
Once the user clicks the New appointment button, the appointment must be saved in the database, and the NewAppointmentActivity finishes so we return to the MainActivity, which in both the onCreate and onResume methods calls another method called populateSchedule - which reads all the appointments from the database and puts them under the correct day for which they are scheduled. For example, after saving the above appointment, our new schedule is shown below in Figure 3. 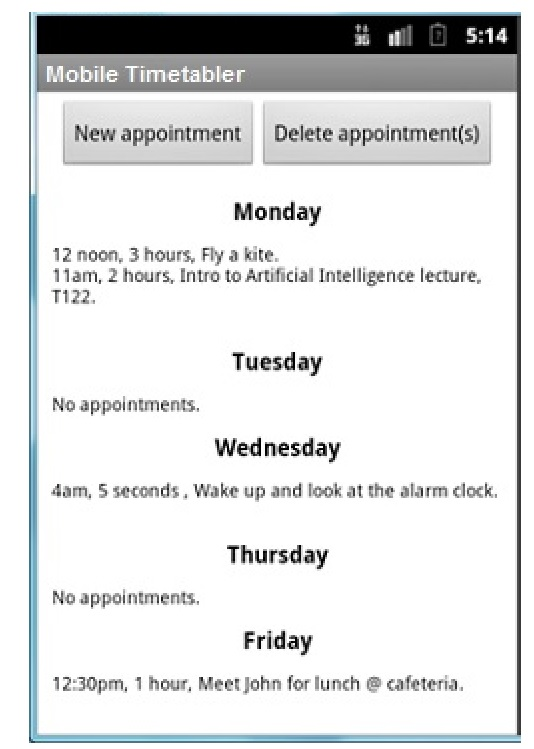
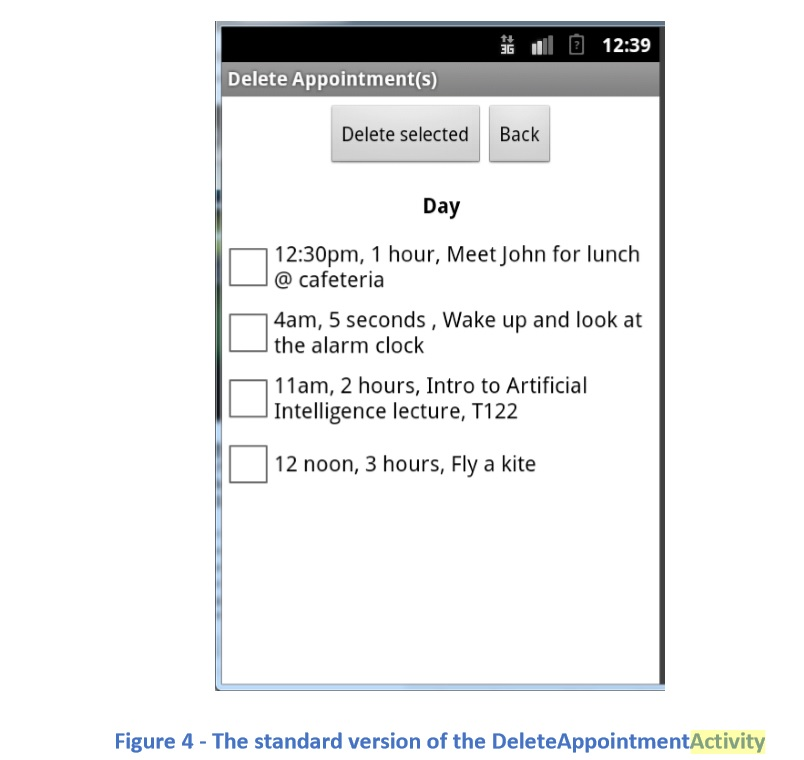
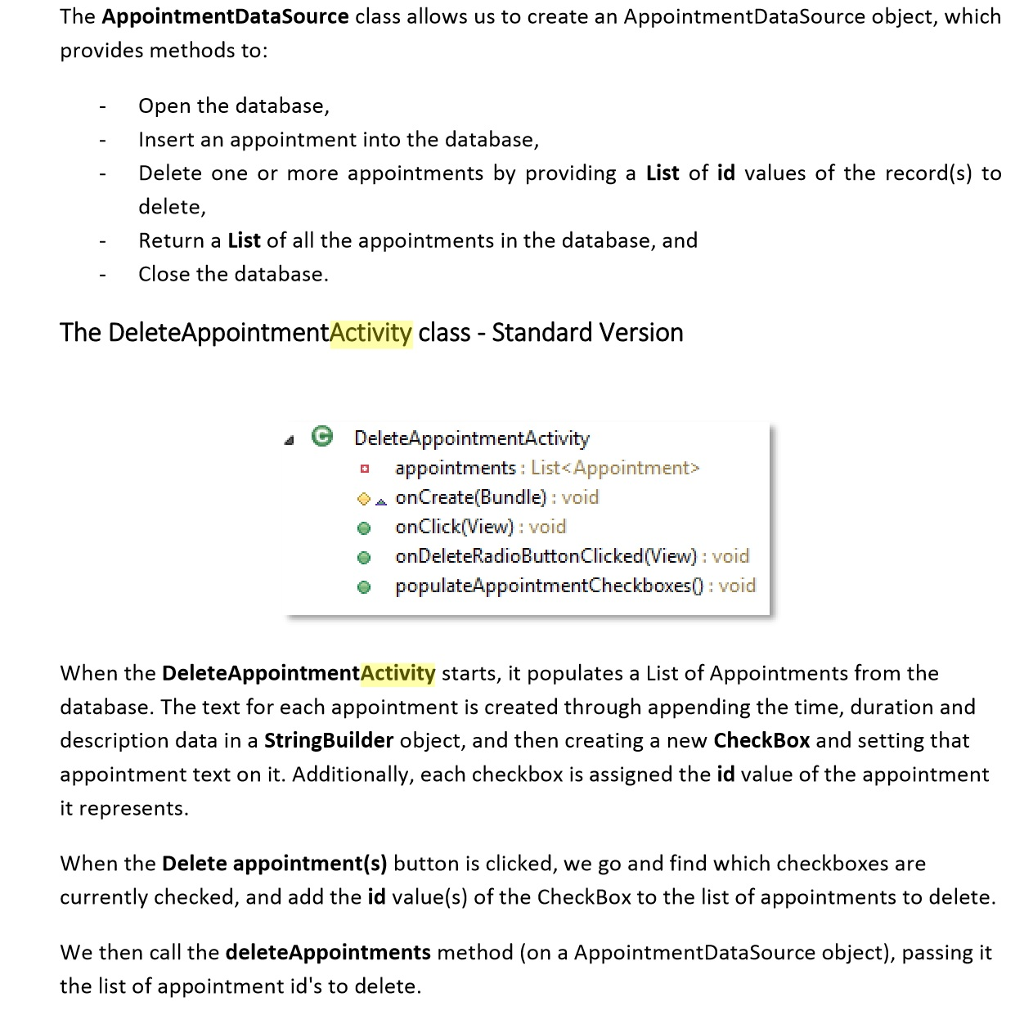
If the user then clicks the [Delete appointment(s)] button the DeleteAppointmentActivity is executed. There are two ways that you can write the DeleteAppointmentActivity - a standard way. DeleteAppointmentActivity - Standard Version When a DeleteAppointmentActivity is launched, the database is queried for all saved appointments, and each appointment is displayed in a list of dynamically created checkboxes, one appointment per checkbox. The id value from the database is retrieved (along with all other fields for each appointment), and the program sets the id value of the checkbox to be the id of the appointment. This way, the id value of each checked checkbox is the id value of the appointment we want to delete from the database. A user can check some, all or none of the checkboxes and then click the [Delete selected] button, which will trigger deletion of the appointments from the database. This is achieved by creating a List of the checkbox id values where the checkbox is checked, and then passing that list to a deleteScheduleItems method which goes through each value in the list and deletes the record with that id from the database.
If the user clicks the [Back] button the activity finishes and we are returned to the MainActivity without making any changes to the database. An example layout for the standard version of the DeleteAppointmentActivity is shown below in Figure 4:
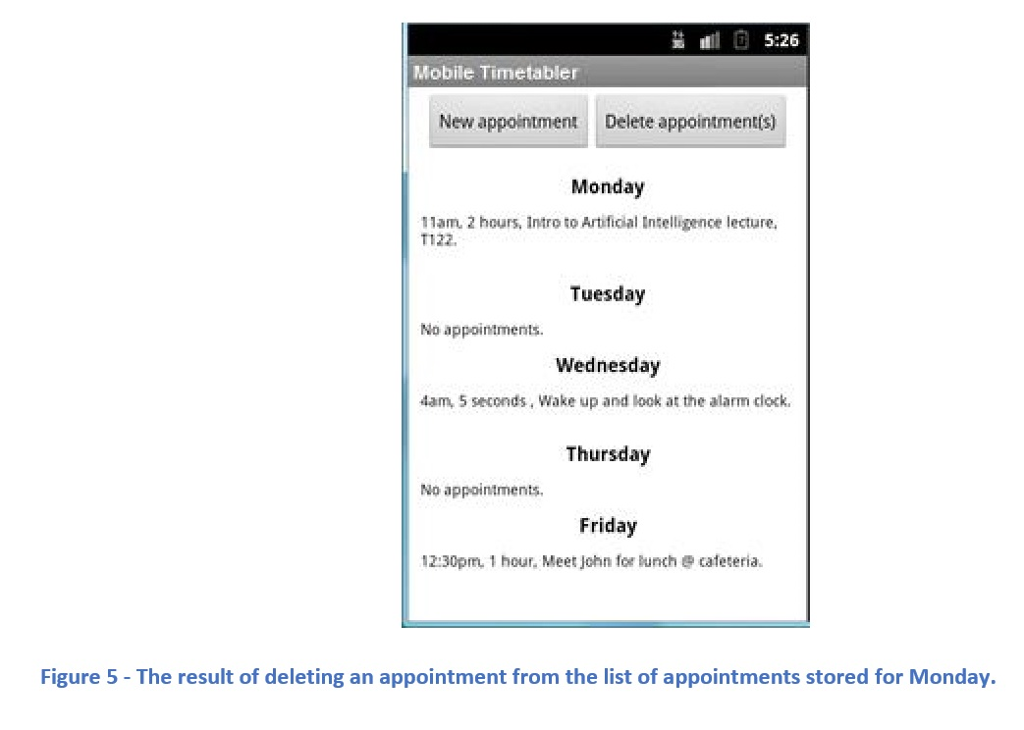
After deleting the "fly a kite" appointment above, our appointment list in the MainActivity will now look like Figure 5, below:
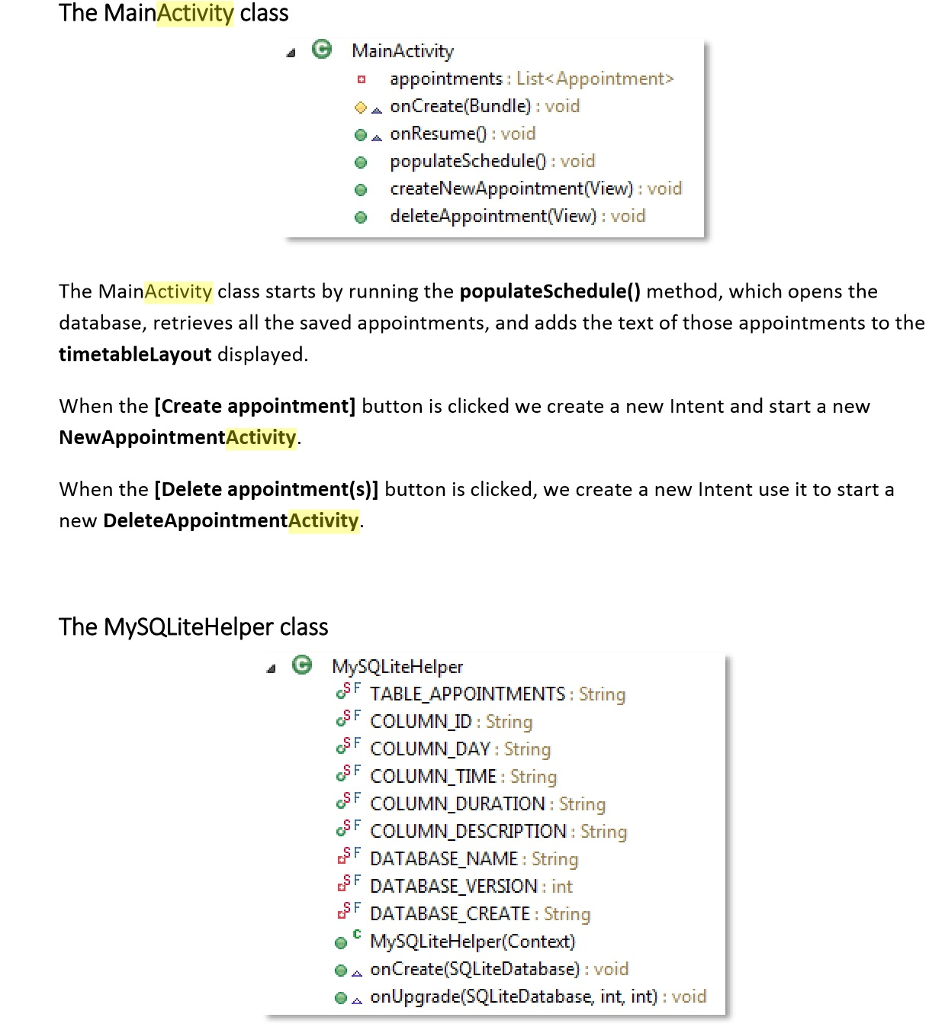
The MySQLiteHelper class creates our SQLite database. The DATABASE_CREATE string must contain commands to create the table with the following schema: COLUMN_ID - integer primary key autoincrement COLUMN_DAY - integer not null COLUMN_TIME - text not null COLUMN_DURATION - text not null COLUMN_DESCRIPTION - text not null The database name should be appointments.db
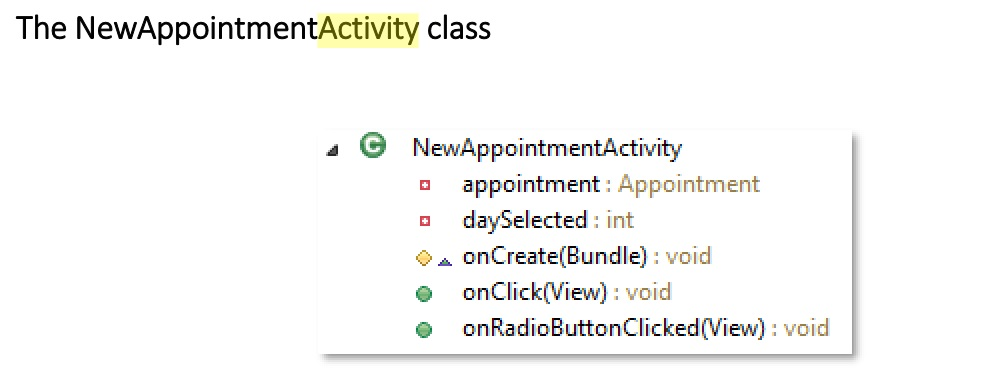
The NewAppointmentActivity allows the user to select a day from a group of RadioButtons, and then enter text (as a String) for the time, duration and description. If the [Create appointment] button is clicked the appointment is saved to the database. However, if the user opts to create a new appointment but has not entered any time, duration or description information (i.e. all three strings are empty) - then placeholder text is used for each field, which is specified as "", "" and "" respectively. After saving the appointment the activity finishes and we are returned to the MainActivity. If the [Back] button is pressed then the activity finishes without saving the appointment and we are again returned to the MainActivity.
1111 5:01 Mobile Timetabler New appointment Delete appointmentis) Monday 12 noon, 3 hours, Fly a kite Tuesday No appointments, Wednesday 4am, 5 seconds, Wake up and look at the alarm clock Thursday No appointments, Friday 12:30pm, 1 hour, Meet John for lunch @ cafeteriaStep by Step Solution
There are 3 Steps involved in it
Step: 1

Get Instant Access to Expert-Tailored Solutions
See step-by-step solutions with expert insights and AI powered tools for academic success
Step: 2

Step: 3
Ace Your Homework with AI
Get the answers you need in no time with our AI-driven, step-by-step assistance
Get Started
Seven Databases In Seven Weeks A Guide To Modern Databases And The NoSQL Movement
Authors: Eric Redmond ,Jim Wilson
1st Edition
1934356921, 978-1934356920