

Question: IN JAVA, PLEASE DO NOT USE CHATGPT AND HELP FOR AN UPVOTE! MAKE SURE TO SEPERATE BY CLASS Introduction Inheritance is a relationship between a
IN JAVA, PLEASE DO NOT USE CHATGPT AND HELP FOR AN UPVOTE!
MAKE SURE TO SEPERATE BY CLASS
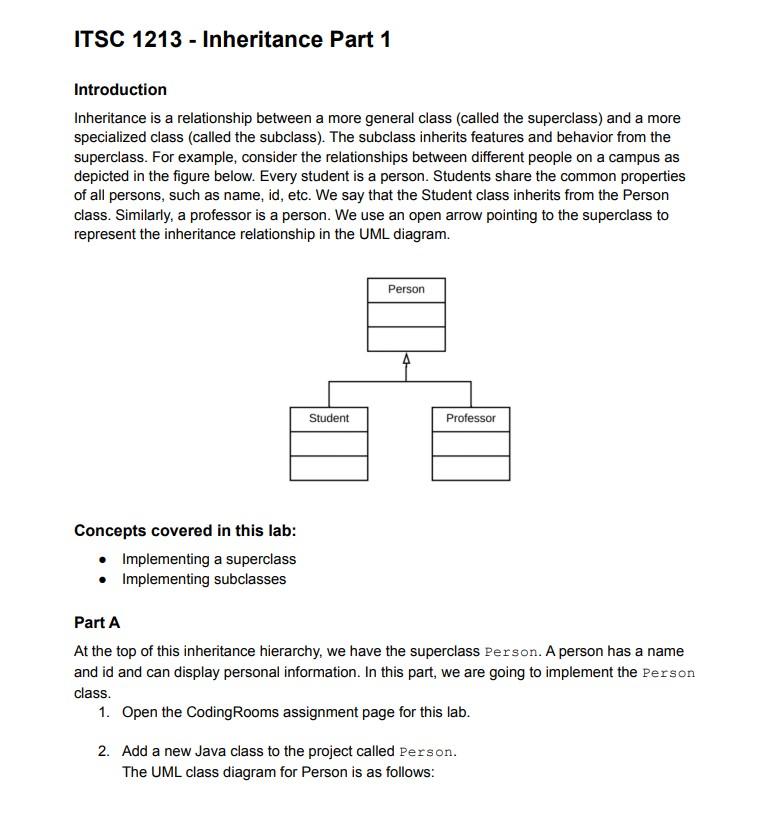
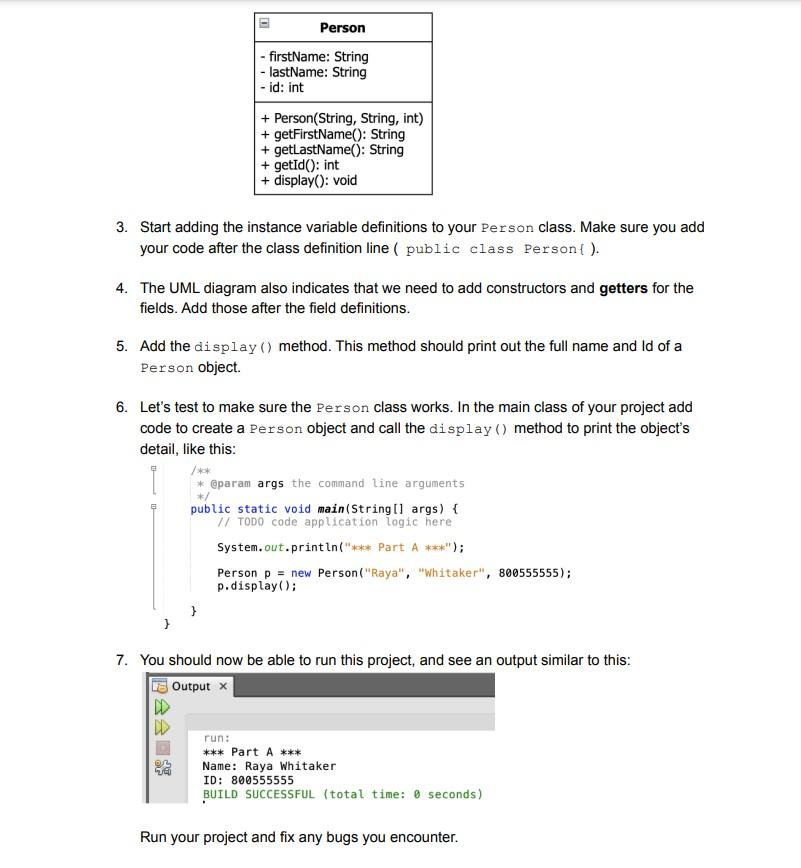
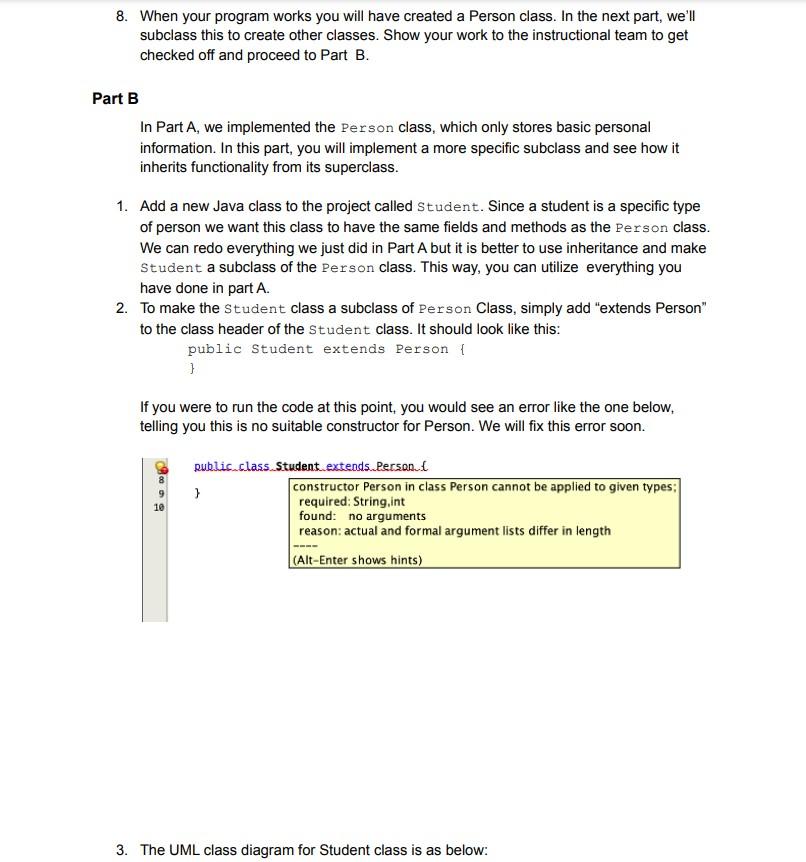
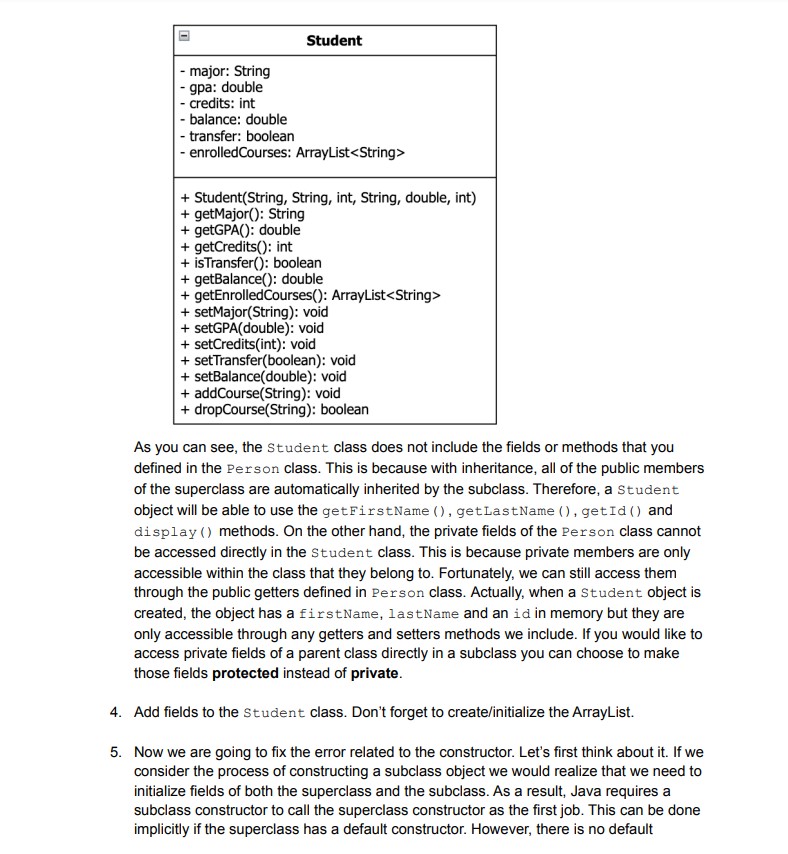
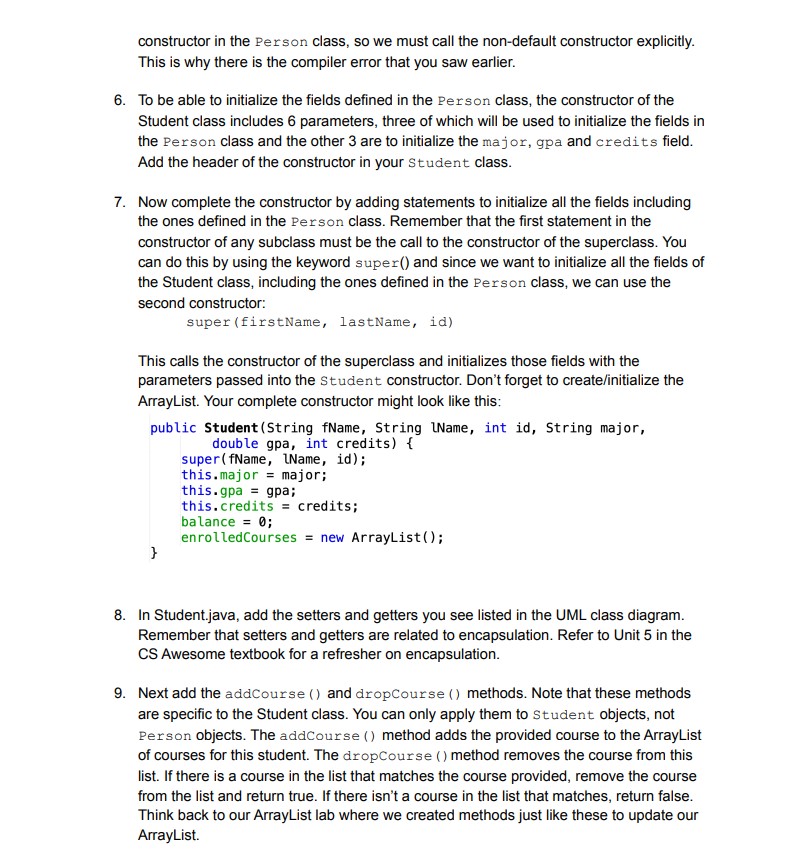
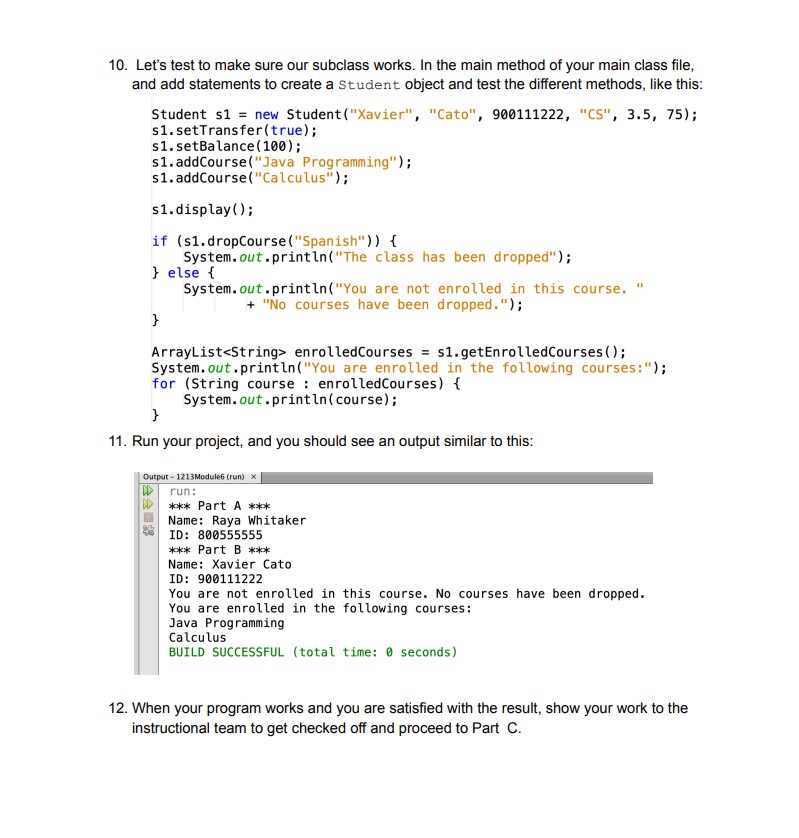
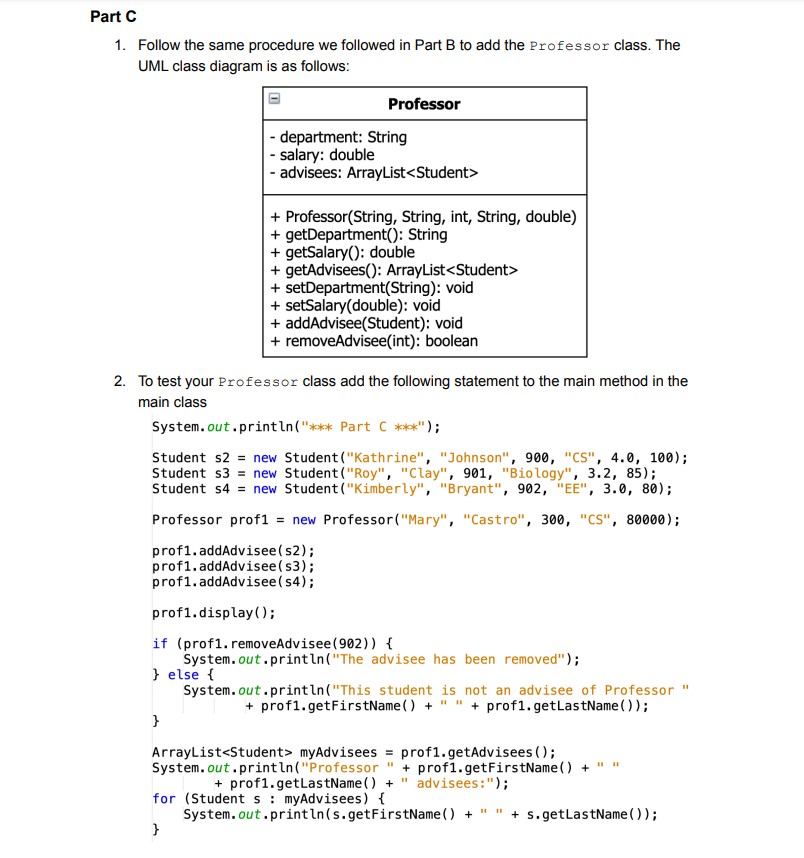
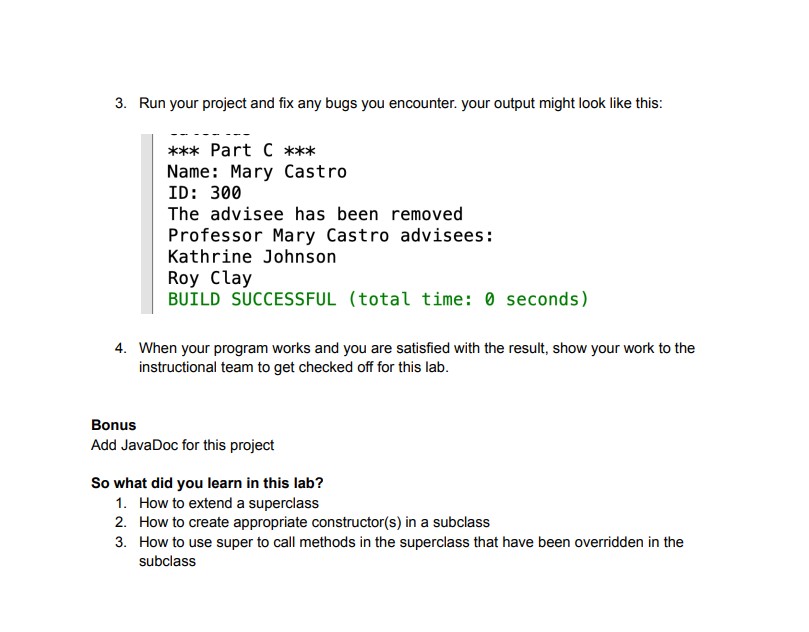
Introduction Inheritance is a relationship between a more general class (called the superclass) and a more specialized class (called the subclass). The subclass inherits features and behavior from the superclass. For example, consider the relationships between different people on a campus as depicted in the figure below. Every student is a person. Students share the common properties of all persons, such as name, id, etc. We say that the Student class inherits from the Person class. Similarly, a professor is a person. We use an open arrow pointing to the superclass to represent the inheritance relationship in the UML diagram. Concepts covered in this lab: - Implementing a superclass - Implementing subclasses Part A At the top of this inheritance hierarchy, we have the superclass Person. A person has a name and id and can display personal information. In this part, we are going to implement the Person class. 1. Open the CodingRooms assignment page for this lab. 2. Add a new Java class to the project called Person. The UML class diagram for Person is as follows: 3. Start adding the instance variable definitions to your Person class. Make sure you add your code after the class definition line ( public class Person { ). 4. The UML diagram also indicates that we need to add constructors and getters for the fields. Add those after the field definitions. 5. Add the display () method. This method should print out the full name and Id of a Person object. 6. Let's test to make sure the Person class works. In the main class of your project add code to create a Person object and call the display () method to print the object's detail, like this: /*ok * Oparam args the command line arguments *// public static void main(String[] args) // TODO code application logic here System.out.println("*ak* Part A ***"); Person p = new Person("Raya", "Whitaker", 800555555); p.display(); 8. When your program works you will have created a Person class. In the next part, we'll subclass this to create other classes. Show your work to the instructional team to get checked off and proceed to Part B. Part B In Part A, we implemented the Person class, which only stores basic personal information. In this part, you will implement a more specific subclass and see how it inherits functionality from its superclass. 1. Add a new Java class to the project called Student. Since a student is a specific type of person we want this class to have the same fields and methods as the Person class. We can redo everything we just did in Part A but it is better to use inheritance and make Student a subclass of the Person class. This way, you can utilize everything you have done in part A. 2. To make the Student class a subclass of Person Class, simply add "extends Person" to the class header of the Student class. It should look like this: public Student extends Person \{ \} If you were to run the code at this point, you would see an error like the one below, telling you this is no suitable constructor for Person. We will fix this error soon. public. class. Student extends.Person ConstructorPersoninclassPersoncannotbeappliedtogiventypes;required:String.intfound:noargumentsreason:actualandformalargumentlistsdifferinlength(Alt-Entershowshints) 3. The UML class diagram for Student class is as below: As you can see, the student class does not include the fields or methods that you defined in the Person class. This is because with inheritance, all of the public members of the superclass are automatically inherited by the subclass. Therefore, a student object will be able to use the getFirstName (), getLastName (), getId () and display () methods. On the other hand, the private fields of the Person class cannot be accessed directly in the student class. This is because private members are only accessible within the class that they belong to. Fortunately, we can still access them through the public getters defined in Person class. Actually, when a student object is created, the object has a firstname, lastName and an id in memory but they are only accessible through any getters and setters methods we include. If you would like to access private fields of a parent class directly in a subclass you can choose to make those fields protected instead of private. 4. Add fields to the student class. Don't forget to create/initialize the ArrayList. 5. Now we are going to fix the error related to the constructor. Let's first think about it. If we consider the process of constructing a subclass object we would realize that we need to initialize fields of both the superclass and the subclass. As a result, Java requires a subclass constructor to call the superclass constructor as the first job. This can be done implicitly if the superclass has a default constructor. However, there is no default constructor in the Person class, so we must call the non-default constructor explicitly. This is why there is the compiler error that you saw earlier. 6. To be able to initialize the fields defined in the Person class, the constructor of the Student class includes 6 parameters, three of which will be used to initialize the fields in the Person class and the other 3 are to initialize the major, gpa and credits field. Add the header of the constructor in your Student class. 7. Now complete the constructor by adding statements to initialize all the fields including the ones defined in the Person class. Remember that the first statement in the constructor of any subclass must be the call to the constructor of the superclass. You can do this by using the keyword super() and since we want to initialize all the fields of the Student class, including the ones defined in the Person class, we can use the second constructor: super(firstName, lastName, id) This calls the constructor of the superclass and initializes those fields with the parameters passed into the student constructor. Don't forget to create/initialize the ArrayList. Your complete constructor might look like this: public Student (String fName, String LName, int id, String major, double gpa, int credits) super(fName, IName, id); this.major = major; this.gpa = gpa; this.credits = credits; balance =0; enrolledCourses = new ArrayList (); 8. In Student.java, add the setters and getters you see listed in the UML class diagram. Remember that setters and getters are related to encapsulation. Refer to Unit 5 in the CS Awesome textbook for a refresher on encapsulation. 9. Next add the addCourse () and dropcourse () methods. Note that these methods are specific to the Student class. You can only apply them to Student objects, not Person objects. The addcourse () method adds the provided course to the ArrayList of courses for this student. The dropcourse () method removes the course from this list. If there is a course in the list that matches the course provided, remove the course from the list and return true. If there isn't a course in the list that matches, return false. Think back to our ArrayList lab where we created methods just like these to update our ArrayList. 10. Let's test to make sure our subclass works. In the main method of your main class file, and add statements to create a student object and test the different methods, like this: Student s1= new Student("Xavier", "Cato", 900111222, "CS", 3.5, 75); s1.setTransfer(true); s1.setBalance(100); s1.addCourse("Java Programming"); s1.addCourse("Calculus"); s1.display(); if (s1.dropCourse("Spanish")) \{ System.out.println("The class has been dropped"); \} else \{ System.out.println("You are not enrolled in this course. " "No courses have been dropped."); Arraylist enrolledCourses = s1.getEnrolledCourses(); System. out.println("You are enrolled in the following courses:"); for (String course : enrolledCourses) \{ System. out.println(course); 11. Run your project, and you should see an output similar to this: \begin{tabular}{|l|l} Output- 1213 Module6 (run) 1 \\ & run: \\ **** Part A \\ Name: Raya Whitaker \\ ID: 800555555 \\ **** Part B **** \\ Name: Xavier Cato \\ ID: 900111222 \\ You are not enrolled in this course. No courses have been dropped. \\ You are enrolled in the following courses: \\ Java Programming \\ Calculus \\ BUILD SUCCESSFUL (total time: 0 seconds) \end{tabular} 12. When your program works and you are satisfied with the result, show your work to the instructional team to get checked off and proceed to Part C. 1. Follow the same procedure we followed in Part B to add the Professor class. The UML class diagram is as follows: 2. To test your Professor class add the following statement to the main method in the main class System. out.println( "*** Part C ); Student s2 = new Student("Kathrine", "Johnson", 900, "CS", 4.0, 100); Student s3 = new Student("Roy", "Clay", 901, "Biology", 3.2, 85); Student s4= new Student ("Kimberly", "Bryant", 902, "EE", 3.0, 80); Professor prof1 = new Professor("Mary", "Castro", 300, "CS", 80000); prof1.addAdvisee( 2 2); prof1. addAdvisee( s3); prof1. addAdvisee(s4); prof1.display (); if (prof1. removeAdvisee( 902) ) \{ System. out.println("The advisee has been removed"); \} else \{ System. out.println("This student is not an advisee of Professor " \} + prof1.getFirstName( )+" + prof1.getLastName( )); Arraylist myAdvisees = prof1.getAdvisees () ; System. out.println("Professor" + prof1.getFirstName() + " " + prof1.getLastName( ) + "advisees:"); for (Student s : myAdvisees) \{ \} System. out.println(s.getFirstName( ) +" " + s.getLastName()); 3. Run your project and fix any bugs you encounter. your output might look like this: *** Part C Name: Mary Castro ID: 300 The advisee has been removed Professor Mary Castro advisees: Kathrine Johnson Roy Clay BUILD SUCCESSFUL (total time: 0 seconds) 4. When your program works and you are satisfied with the result, show your work to the instructional team to get checked off for this lab. Bonus Add JavaDoc for this project So what did you learn in this lab? 1. How to extend a superclass 2. How to create appropriate constructor(s) in a subclass 3. How to use super to call methods in the superclass that have been overridden in the subclass
Step by Step Solution
There are 3 Steps involved in it

Get step-by-step solutions from verified subject matter experts