Question: Instructions Paper This paper involves writing a set of instructions to manufacture the Magic Box from a standard 8.5 by 11.0 piece of copy machine
Instructions Paper This paper involves writing a set of instructions to manufacture the "Magic Box" from a standard 8.5" by 11.0" piece of copy machine paper. The instructions must: ? Consist of a minimum of six (6) steps ? Be original, using nothing downloaded from the Internet or other source. All diagrams/photos must be done by the writer. Make sure to source and number all diagrams/photos used. ? Follow the instructions In Outline 7.1 (p. 69). All items must be addressed. ? By using photographs or diagrams contain as few words as possible and therefore be as simple as possible while still providing all the information required in Outline 7.1 (p. 69). ? Be written so they are readily understandable by a user with an eighth (8th) grade education.
OUTLINE 7.1
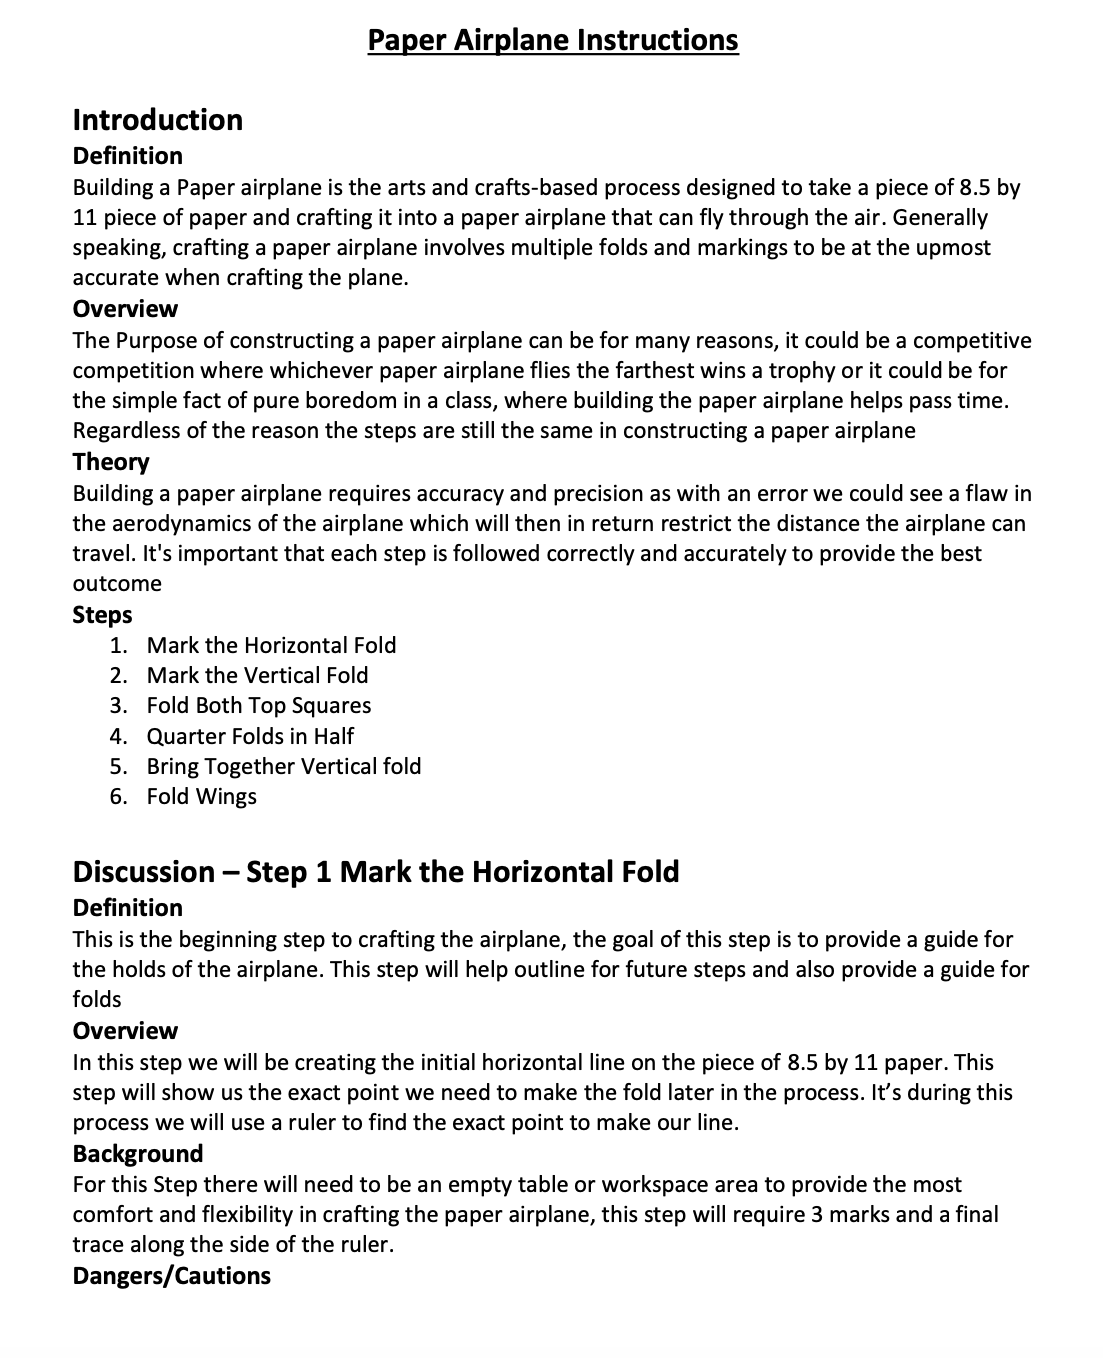
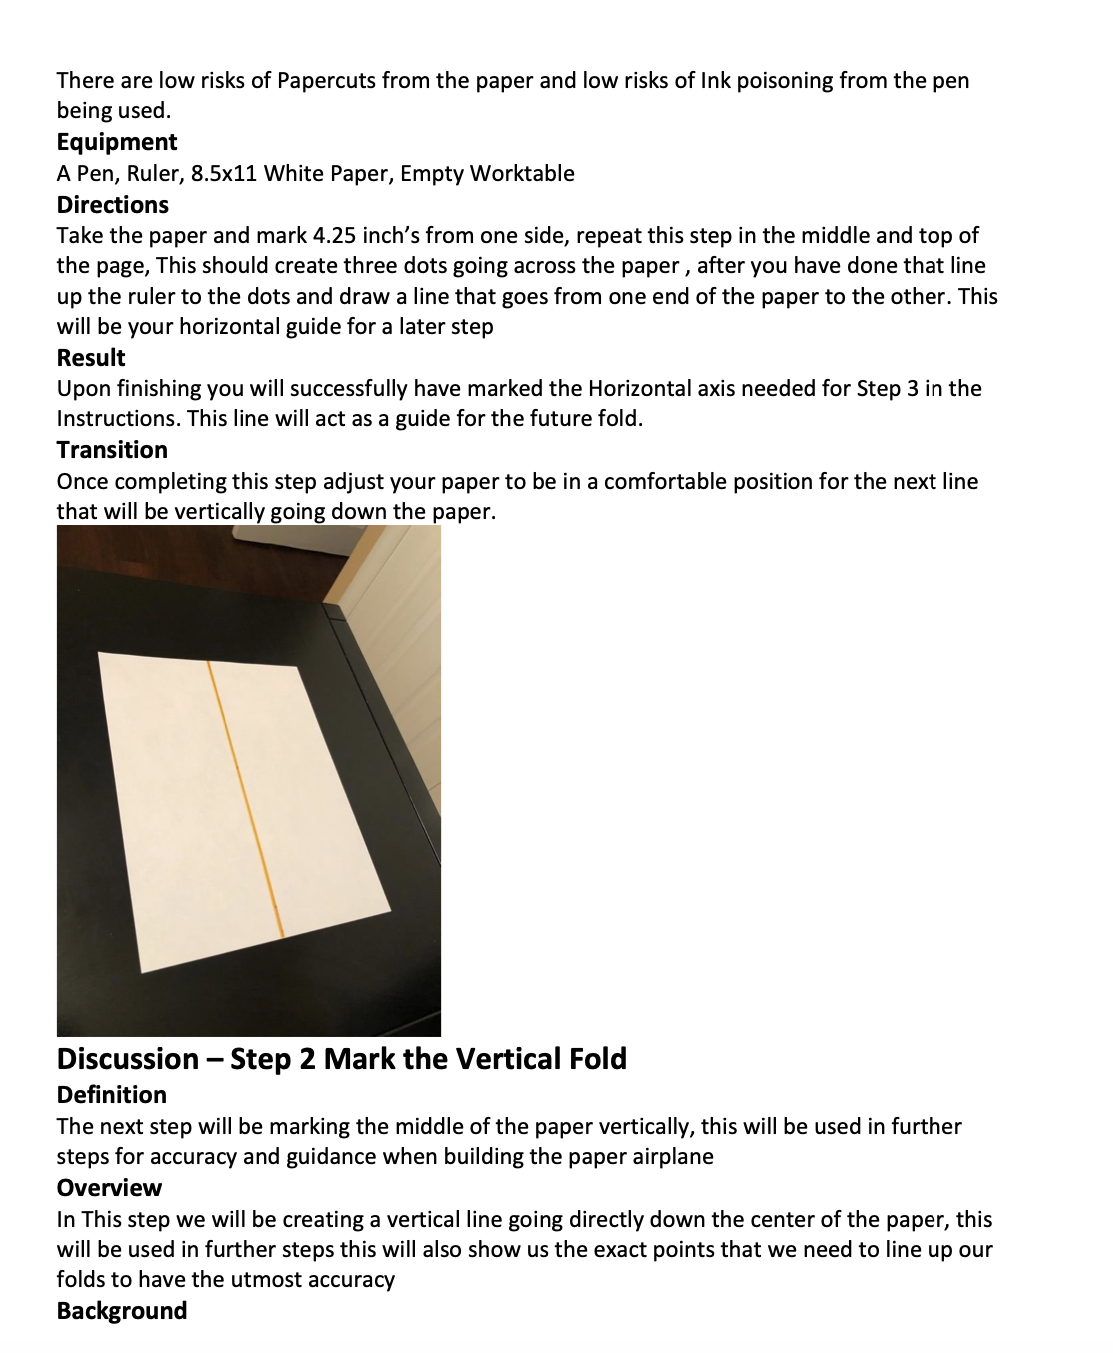
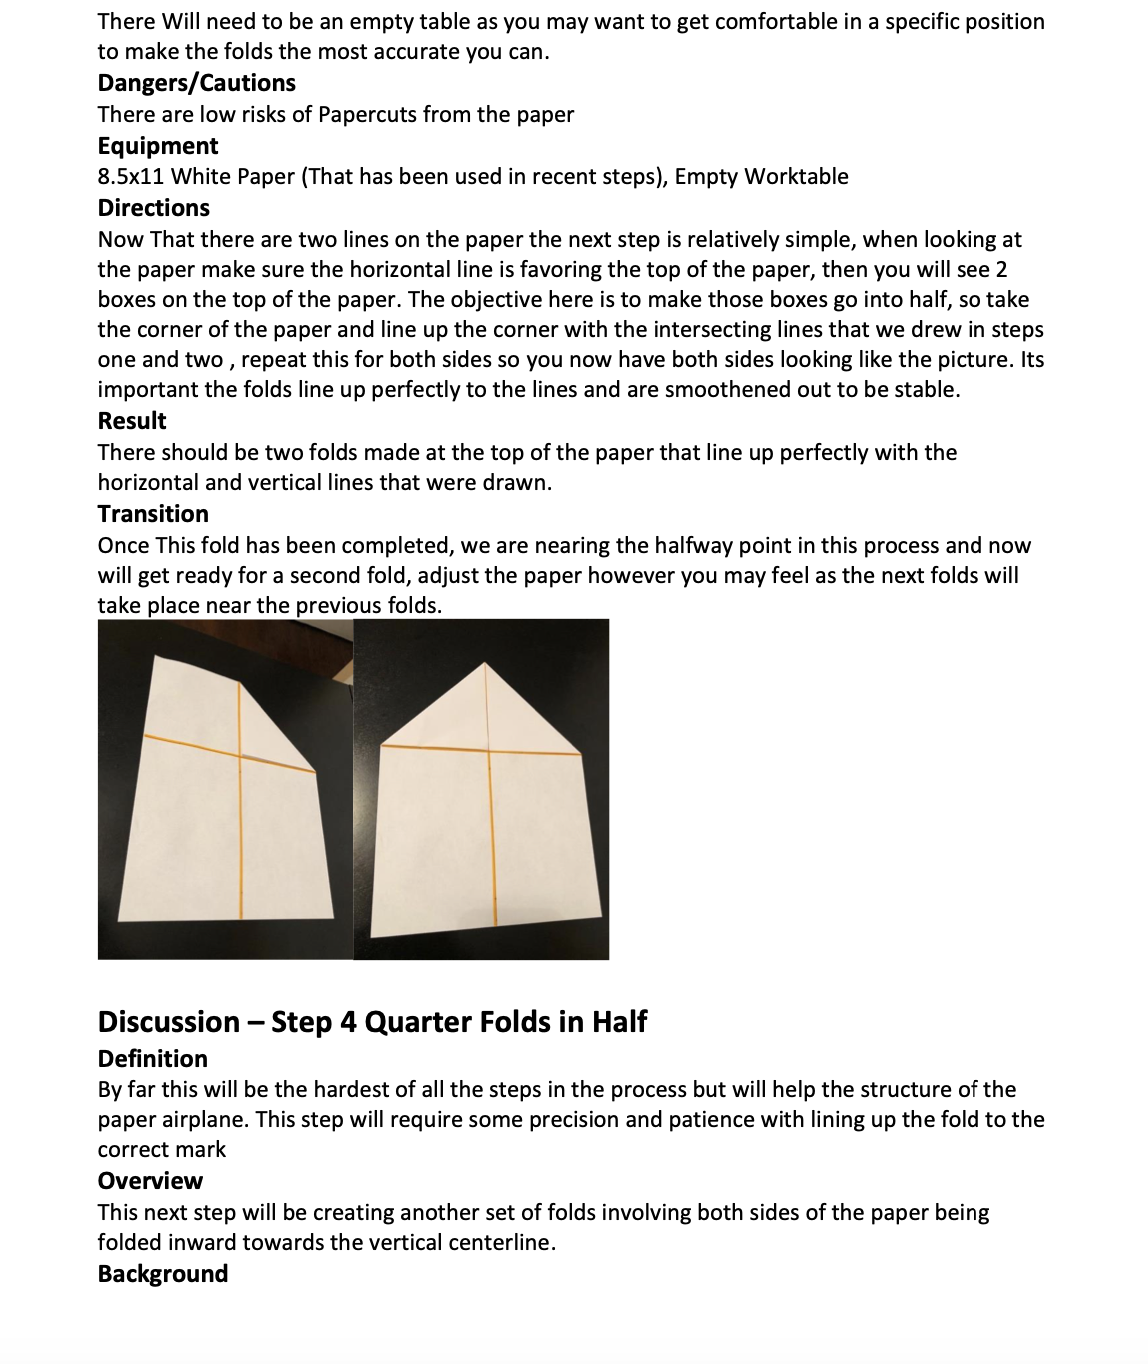
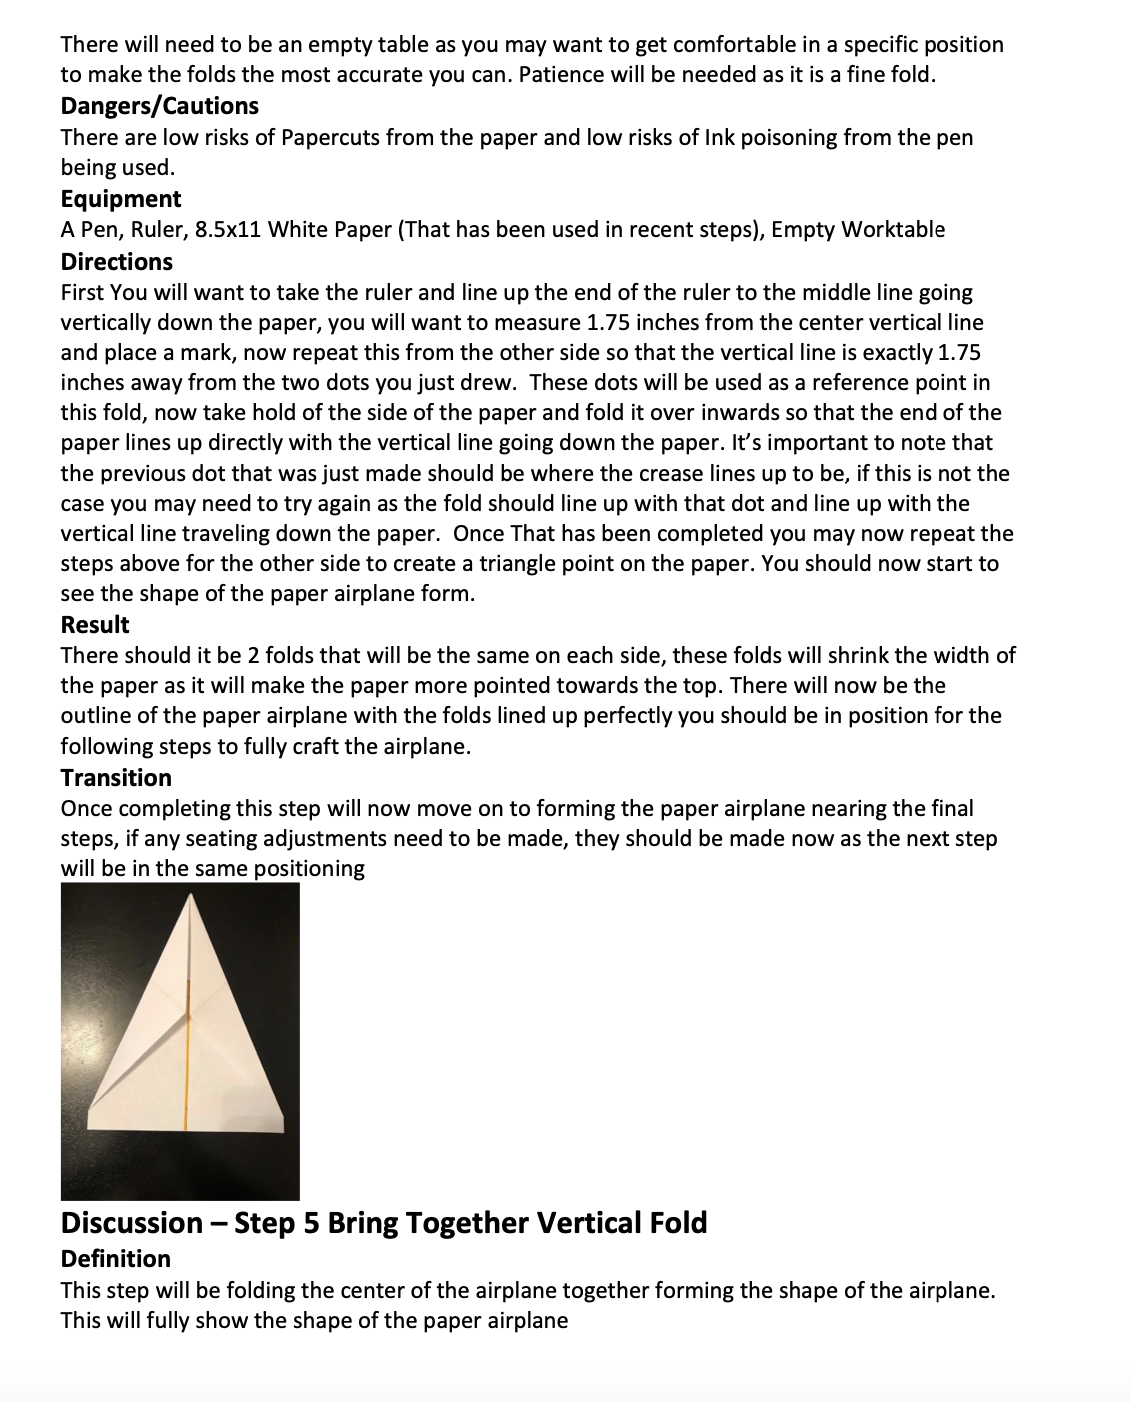
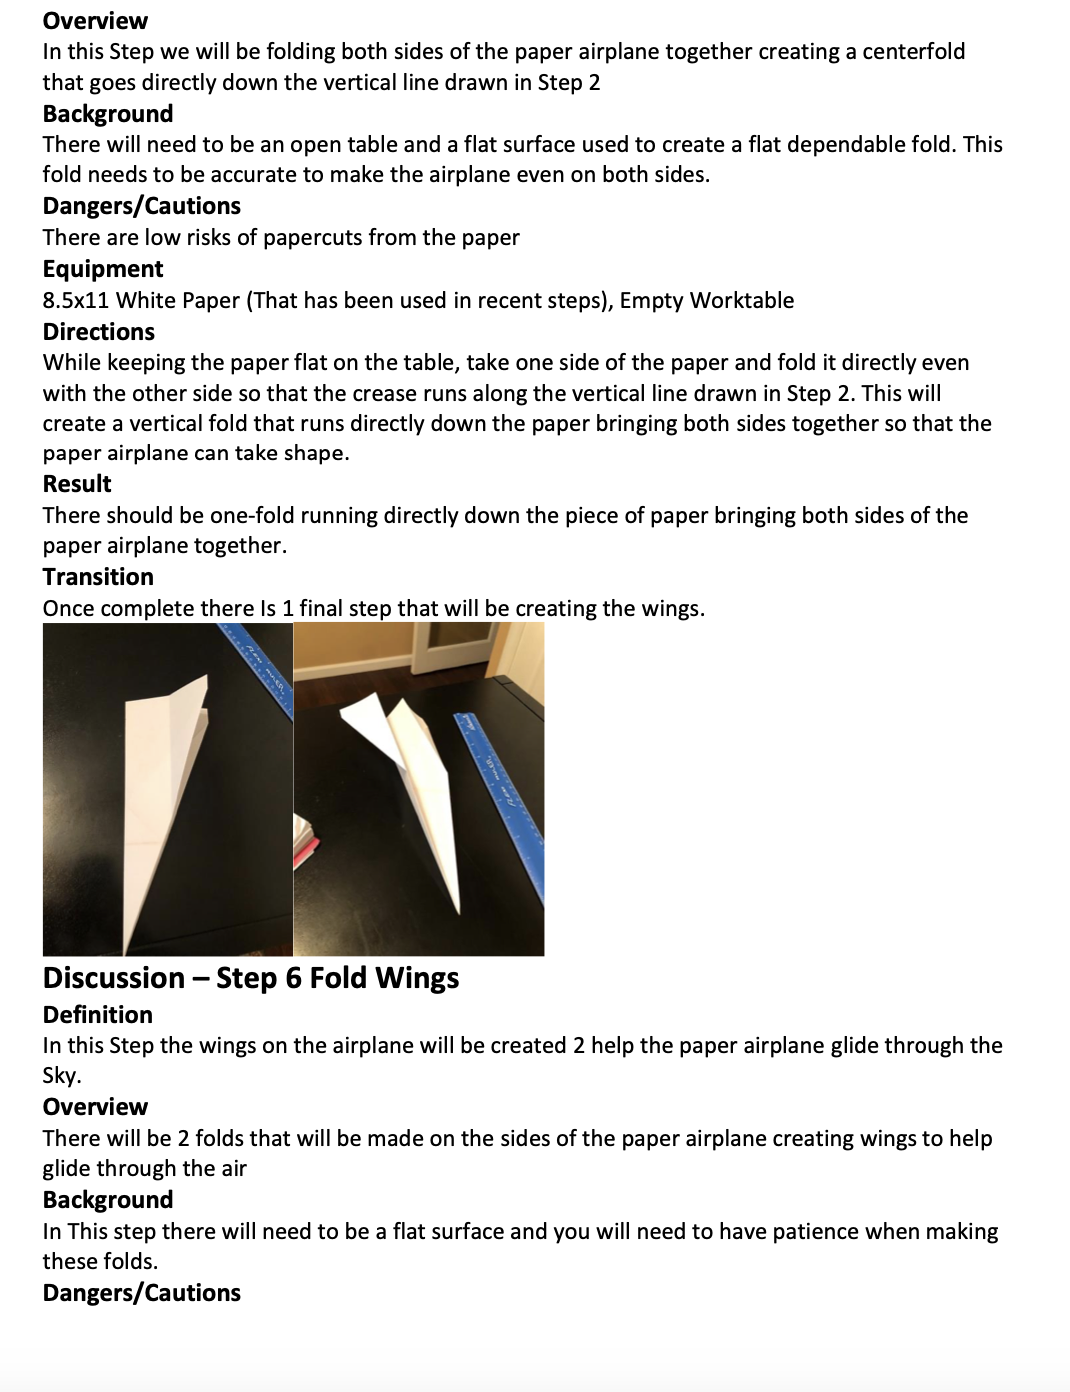
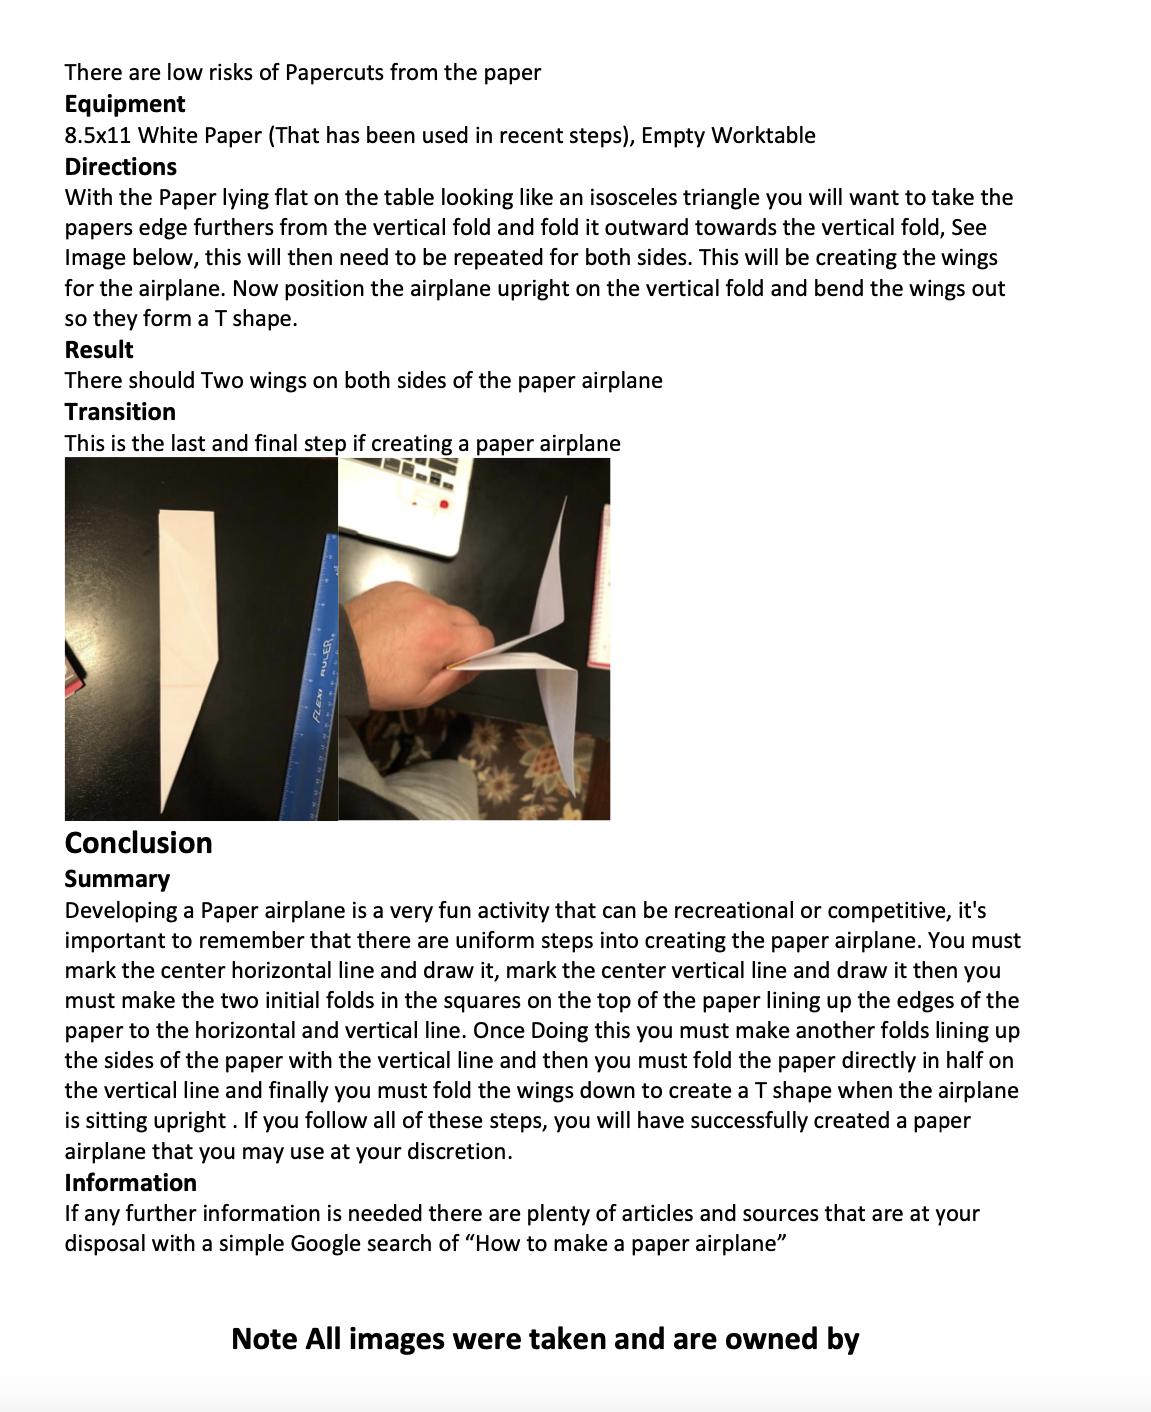
Outline 7.1 Instructions Introduction . Defini- Define the overall tion process. . Overview Describe its purpose and provide an over- view. . Theory Explain any needed the- ory or principles. . Steps List the steps. Discussion For each step listed above: . Defini- Define the step. tion . Overview Describe what happensin this step. . Back- Provide needed context ground specific to this step. . Dangers/cau- Note any dangers and tions cautions the reader should be aware of. . Equip- List the equipment and ment tools required for this step. . Direc- Provide specific direc- tions tions for executing this step. . Result Describe the result that should occur. . Transi- Move coherently from tion this step to the next step. Conclusion . Sum- Briefly summarize the mary steps of the process. . Informa- Tell the reader where to tion find any needed, addi- tional information.Paper Airplane Instructions Introduction Definition Building a Paper airplane is the arts and crafts-based process designed to take a piece of 8.5 by 11 piece of paper and crafting it into a paper airplane that can fly through the air. Generally speaking, crafting a paper airplane involves multiple folds and markings to be at the upmost accurate when crafting the plane. Overview The Purpose of constructing a paper airplane can be for many reasons, it could be a competitive competition where whichever paper airplane flies the farthest wins a trophy or it could be for the simple fact of pure boredom in a class, where building the paper airplane helps pass time. Regardless of the reason the steps are still the same in constructing a paper airplane Theory Building a paper airplane requires accuracy and precision as with an error we could see a flaw in the aerodynamics of the airplane which will then in return restrict the distance the airplane can travel. It's important that each step is followed correctly and accurately to provide the best outcome Steps 1. Mark the Horizontal Fold Mark the Vertical Fold Fold Both Top Squares Quarter Folds in Half Bring Together Vertical fold Fold Wings s wN Discussion Step 1 Mark the Horizontal Fold Definition This is the beginning step to crafting the airplane, the goal of this step is to provide a guide for the holds of the airplane. This step will help outline for future steps and also provide a guide for folds Overview In this step we will be creating the initial horizontal line on the piece of 8.5 by 11 paper. This step will show us the exact point we need to make the fold later in the process. It's during this process we will use a ruler to find the exact point to make our line. Background For this Step there will need to be an empty table or workspace area to provide the most comfort and flexibility in crafting the paper airplane, this step will require 3 marks and a final trace along the side of the ruler. Dangers/Cautions There are low risks of Papercuts from the paper and low risks of Ink poisoning from the pen being used. Equipment A Pen, Ruler, 8.5x11 White Paper, Empty Worktable Directions Take the paper and mark 4.25 inch's from one side, repeat this step in the middle and top of the page, This should create three dots going across the paper, after you have done that line up the ruler to the dots and draw a line that goes from one end of the paper to the other. This will be your horizontal guide for a later step Result Upon finishing you will successfully have marked the Horizontal axis needed for Step 3 in the Instructions. This line will act as a guide for the future fold. Transition Once completing this step adjust your paper to be in a comfortable position for the next line that will be vertically going down the paper. Discussion Step 2 Mark the Vertical Fold Definition The next step will be marking the middle of the paper vertically, this will be used in further steps for accuracy and guidance when building the paper airplane Overview In This step we will be creating a vertical line going directly down the center of the paper, this will be used in further steps this will also show us the exact points that we need to line up our folds to have the utmost accuracy Background For this Step there will need to be an empty table or workspace area to provide the most comfort and flexibility in crafting the paper airplane, this step will require 3 marks and a final trace along the side of the ruler going directly vertical. Dangers/Cautions There are low risks of Papercuts from the paper and low risks of Ink poisoning from the pen being used. Equipment A Pen, Ruler, 8.5x11 White Paper, Empty Worktable Directions Take the paper and mark 4.25 inch's from opposite side of step one, repeat this step in the middle and top of the page. This should create three dots going down the center the paper, after you have done that, line up the ruler to the dots and draw a line that goes from one end of the paper to the other. This will be your vertical guide for a later step. This will be the spine of the paper airplane. Result There will now be 2 lines on the paper, one going horizontally and another going vertically, both are 4.25 inches away from each end of the paper Transition Once all the marks are made on the paper, we can now move on to the next steps of folding the paper airplane and crafting it Discussion Step 3 Fold Both Top Squares Definition This Will be the first of many folds as this is a double fold that will need to take place, this will set up the beginning foundation of the paper airplane. Overview In this step the two corners of the paper will be folded to directly line up with the vertical and horizontal lines drawn on the paper. Background There Will need to be an empty table as you may want to get comfortable in a specific position to make the folds the most accurate you can. Dangers/Cautions There are low risks of Papercuts from the paper Equipment 8.5x11 White Paper (That has been used in recent steps), Empty Worktable Directions Now That there are two lines on the paper the next step is relatively simple, when looking at the paper make sure the horizontal line is favoring the top of the paper, then you will see 2 boxes on the top of the paper. The objective here is to make those boxes go into half, so take the corner of the paper and line up the corner with the intersecting lines that we drew in steps one and two, repeat this for both sides so you now have both sides looking like the picture. Its important the folds line up perfectly to the lines and are smoothened out to be stable. Result There should be two folds made at the top of the paper that line up perfectly with the horizontal and vertical lines that were drawn. Transition Once This fold has been completed, we are nearing the halfway point in this process and now will get ready for a second fold, adjust the paper however you may feel as the next folds will take place near the previous folds. Discussion Step 4 Quarter Folds in Half Definition By far this will be the hardest of all the steps in the process but will help the structure of the paper airplane. This step will require some precision and patience with lining up the fold to the correct mark Overview This next step will be creating another set of folds involving both sides of the paper being folded inward towards the vertical centerline. Background There will need to be an empty table as you may want to get comfortable in a specific position to make the folds the most accurate you can. Patience will be needed as it is a fine fold. Dangers/Cautions There are low risks of Papercuts from the paper and low risks of Ink poisoning from the pen being used. Equipment A Pen, Ruler, 8.5x11 White Paper (That has been used in recent steps), Empty Worktable Directions First You will want to take the ruler and line up the end of the ruler to the middle line going vertically down the paper, you will want to measure 1.75 inches from the center vertical line and place a mark, now repeat this from the other side so that the vertical line is exactly 1.75 inches away from the two dots you just drew. These dots will be used as a reference point in this fold, now take hold of the side of the paper and fold it over inwards so that the end of the paper lines up directly with the vertical line going down the paper. It's important to note that the previous dot that was just made should be where the crease lines up to be, if this is not the case you may need to try again as the fold should line up with that dot and line up with the vertical line traveling down the paper. Once That has been completed you may now repeat the steps above for the other side to create a triangle point on the paper. You should now start to see the shape of the paper airplane form. Result There should it be 2 folds that will be the same on each side, these folds will shrink the width of the paper as it will make the paper more pointed towards the top. There will now be the outline of the paper airplane with the folds lined up perfectly you should be in position for the following steps to fully craft the airplane. Transition Once completing this step will now move on to forming the paper airplane nearing the final steps, if any seating adjustments need to be made, they should be made now as the next step will be in the same positioning Discussion Step 5 Bring Together Vertical Fold Definition This step will be folding the center of the airplane together forming the shape of the airplane. This will fully show the shape of the paper airplane Overview In this Step we will be folding both sides of the paper airplane together creating a centerfold that goes directly down the vertical line drawn in Step 2 Background There will need to be an open table and a flat surface used to create a flat dependable fold. This fold needs to be accurate to make the airplane even on both sides. Dangers/Cautions There are low risks of papercuts from the paper Equipment 8.5x11 White Paper (That has been used in recent steps), Empty Worktable Directions While keeping the paper flat on the table, take one side of the paper and fold it directly even with the other side so that the crease runs along the vertical line drawn in Step 2. This will create a vertical fold that runs directly down the paper bringing both sides together so that the paper airplane can take shape. Result There should be one-fold running directly down the piece of paper bringing both sides of the paper airplane together. Transition Once complete there Is 1 final step that will bg creating the wings. Discussion Step 6 Fold Wings Definition In this Step the wings on the airplane will be created 2 help the paper airplane glide through the Sky. Overview There will be 2 folds that will be made on the sides of the paper airplane creating wings to help glide through the air Background In This step there will need to be a flat surface and you will need to have patience when making these folds. Dangers/Cautions There are low risks of Papercuts from the paper Equipment 8.5x11 White Paper (That has been used in recent steps), Empty Worktable Directions With the Paper lying flat on the table looking like an isosceles triangle you will want to take the papers edge furthers from the vertical fold and fold it outward towards the vertical fold, See Image below, this will then need to be repeated for both sides. This will be creating the wings for the airplane. Now position the airplane upright on the vertical fold and bend the wings out so they form a T shape. Result There should Two wings on both sides of the paper airplane Transition This is the last and final step if creating a paper airplane mEvYN Conclusion Summary Developing a Paper airplane is a very fun activity that can be recreational or competitive, it's important to remember that there are uniform steps into creating the paper airplane. You must mark the center horizontal line and draw it, mark the center vertical line and draw it then you must make the two initial folds in the squares on the top of the paper lining up the edges of the paper to the horizontal and vertical line. Once Doing this you must make another folds lining up the sides of the paper with the vertical line and then you must fold the paper directly in half on the vertical line and finally you must fold the wings down to create a T shape when the airplane is sitting upright . If you follow all of these steps, you will have successfully created a paper airplane that you may use at your discretion. Information If any further information is needed there are plenty of articles and sources that are at your disposal with a simple Google search of \"How to make a paper airplane\" Note All images were taken and are owned by
Step by Step Solution
There are 3 Steps involved in it
1 Expert Approved Answer
Step: 1 Unlock
Question Has Been Solved by an Expert!
Get step-by-step solutions from verified subject matter experts
Step: 2 Unlock
Step: 3 Unlock
Students Have Also Explored These Related Business Writing Questions!