

Question
Introduction These ideas can be brought together to form a UML diagram for this class, as shown below. Task #1 Creating a New Class 1.
Introduction
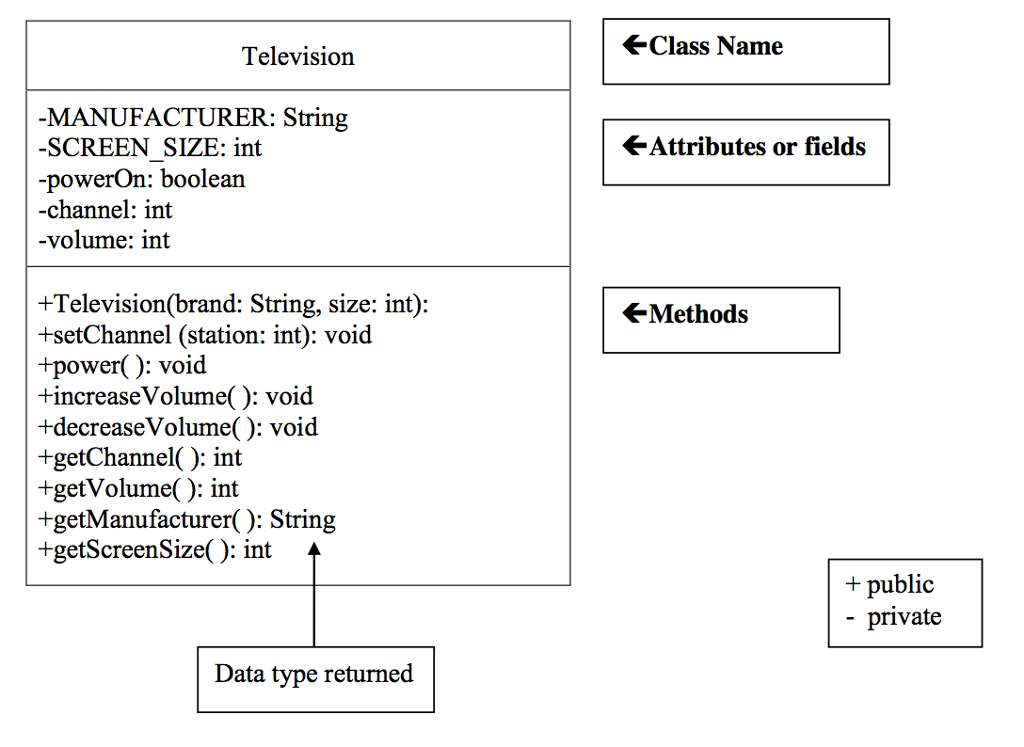
These ideas can be brought together to form a UML diagram for this class, as shown below.
Task #1 Creating a New Class
1. In a new file, create a class definition called Television.
2. Put a program header (comments or documentation) at the top of the file
// The purpose of this class is to model a television
// Your name and todays date
3. Declare the 2 constant fields listed in the UML diagram.
4. Declare the 3 remaining fields listed in the UML diagram.
5. Write a comment for each field indicating what it represents.
6. Save this file as Television.java.
7. Compile and debug. Do not run.
Task #2 Writing a Constructor
Create a constructor definition that has two parameters, a manufacturers brand and a screen size. These parameters will bring in information.
Inside the constructor, assign the values taken in from the parameters to the corresponding fields.
Initialize the powerOn field to false (power is off), the volume to 20, and the channel to 2.
Write comments describing the purpose of the constructor above the method header.
Compile and debug. Do not run.
Task #3 Methods
1. Define accessor methods called getVolume, getChannel, getManufacturer, and getScreenSize that return the value of the corresponding field.
2. Define a mutator method called setChannel that accepts a value to be stored in the channel field.
3. Define a mutator method called power that changes the state from true to false or from false to true. This can be accomplished by using the NOT operator (!). If the boolean variable powerOn is true, then !powerOn is false and vice versa.
Use the assignment statement - powerOn = !powerOn;
to change the state of powerOn and then store it back into powerOn (remember assignment statements evaluate the right hand side first, then assign the result to the left hand side variable.
4. Define two mutator methods to change the volume. One method should be called increaseVolume and will increase the volume by 1. The other method should be called decreaseVolume and will decrease the volume by 1.
5. Write javadoc comments above each method header.
6. Compile and debug. Do not run.
Task #4 Running the Application
1. You can only execute (run) a program that has a main method, so there is a driver program that is already written to test out your Television class. Copy the file TelevisionDemo.java (see Code Listing 3.1) from the Student CD or as directed by your instructor. Make sure it is in the same directory as Television.java.
2. Compile and run TelevisionDemo and follow the prompts.
3.If your output matches the output below, Television.java is complete and correct. You will not need to modify it further for this lab.
OUTPUT (boldface is user input)
A 55 inch Toshiba has been turned on.
What channel do you want? 56
Channel: 56 Volume: 21 Too loud! Lowering the volume. Channel: 56 Volume: 15
Task #5 Creating another instance of a Television
1. Edit the TelevisionDemo.java file.
2. Declare another Television object called portable.
3. Instantiate portable to be a Sharp 19 inch television.
4. Use a call to the power method to turn the power on.
5. Use calls to the accessor methods to print what television was turned on.
6. Use calls to the mutator methods to change the channel to the users preference and decrease the volume by two.
7. Use calls to the accessor methods to print the changed state of the portable.
8. Compile and debug this class.
9. Run TelevisionDemo again.
10. The output for Task #5 will appear after the output from above, since we added onto the bottom of the program. The output for Task #5 is shown below.
OUTPUT (boldface is user input)
A 19 inch Sharp has been turned on.
What channel do you want? 7
Channel: 7 Volume: 18
Code Listing 6.1 (TelevisionDemo.java)
import java.util.Scanner; // Needed for the Scanner class /** This class demonstrates the Television class. */ public class TelevisionDemo { public static void main(String[] args) { // Create a Scanner object to read from the keyboard Scanner keyboard = new Scanner (System.in); // Declare variables int station; // The user's channel choice // Declare and instantiate a television object Television bigScreen = new Television("Toshiba", 55); // Turn the power on bigScreen.power(); // Display the state of the television System.out.println("A " + bigScreen.getScreenSize() + " inch " + bigScreen.getManufacturer() + " has been turned on."); // Prompt the user for input and store into station System.out.print("What channel do you want? "); station = keyboard.nextInt(); // Change the channel on the television bigScreen.setChannel(station); // Increase the volume of the television bigScreen.increaseVolume(); // Display the the current channel and // volume of the television System.out.println("Channel: " + bigScreen.getChannel() + " Volume: " + bigScreen.getVolume()); System.out.println("Too loud! Lowering the volume."); // Decrease the volume of the television bigScreen.decreaseVolume(); bigScreen.decreaseVolume(); bigScreen.decreaseVolume(); bigScreen.decreaseVolume(); bigScreen.decreaseVolume(); bigScreen.decreaseVolume(); // Display the the current channel and // volume of the television System.out.println("Channel: " + bigScreen.getChannel() + " Volume: " + bigScreen.getVolume()); System.out.println(); // For a blank line // HERE IS WHERE YOU DO TASK #5 } } Class Name Television MANUFACTURER: String SCREEN SIZE: int -power -channel: int -volume: int F-Attributes or fields On: boolean +Television(brand: String, size: int): +setChannel (station: int): void +power): void tincreaseVolume(): void +decreaseVolume(): void +getChannel(): int +getVolume(): int +getManufacturer(): String +getScreenSize(): int KMethods + public private Data type returned Step by Step Solution
There are 3 Steps involved in it
Step: 1

Get Instant Access to Expert-Tailored Solutions
See step-by-step solutions with expert insights and AI powered tools for academic success
Step: 2

Step: 3
Ace Your Homework with AI
Get the answers you need in no time with our AI-driven, step-by-step assistance
Get Started
Microsoft SQL Server 2012 Unleashed
Authors: Ray Rankins, Paul Bertucci
1st Edition
0133408507, 9780133408508