Answered step by step
Verified Expert Solution
Question
1 Approved Answer
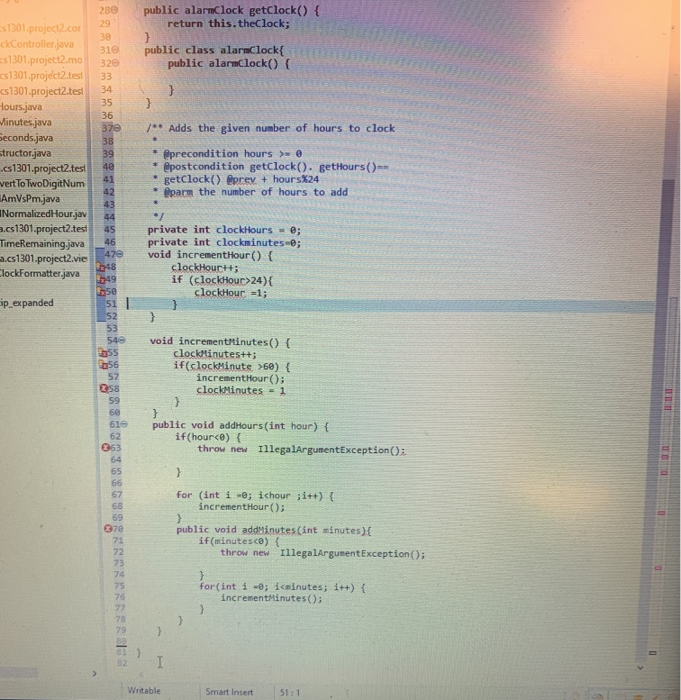
its in java i really need help on how 9-12 below is what i have so far In the AlarmClockController class, find the following line:
its in java

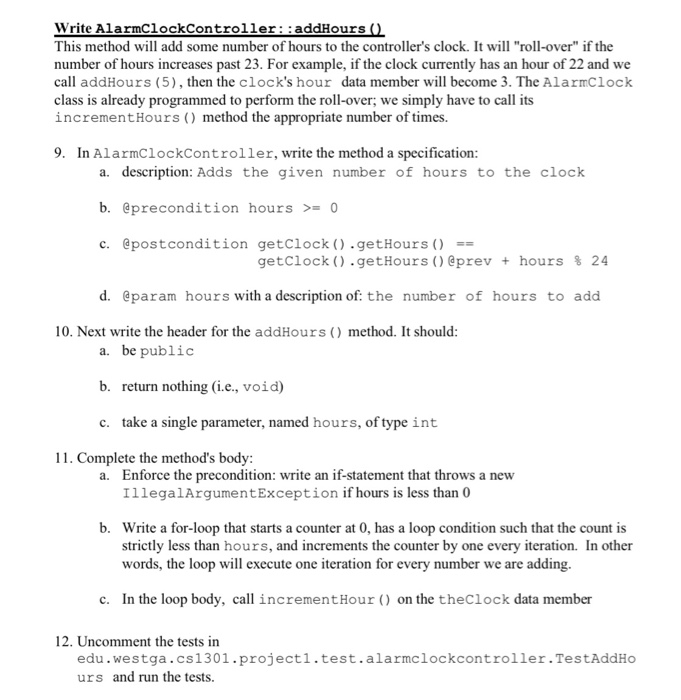
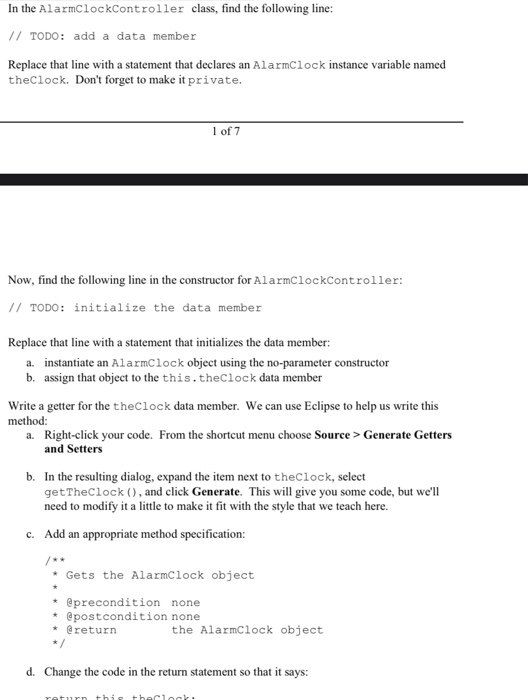
In the AlarmClockController class, find the following line: // TODO: add a data member Replace that line with a statement that declares an Alarmclock instance variable named theclock. Don't forget to make it private. 1 of 7 Now, find the following line in the constructor for AlarmclockController: // TODO: initialize the data member Replace that line with a statement that initializes the data member: a instantiate an AlarmClock object using the no-parameter constructor b. assign that object to the this.theclock data member Write a getter for the theClock data member. We can use Eclipse to help us write this method: a. Right-click your code. From the shortcut menu choose Source > Generate Getters and Setters b. In the resulting dialog, expand the item next to theClock, select getTheClock(), and click Generate. This will give you some code, but we'll need to modify it a little to make it fit with the style that we teach here. c. Add an appropriate method specification: * Gets the AlarmClock object * @precondition none * @postcondition none * @return the AlarmClock object d. Change the code in the return statement so that it says: Write AlarmClockController::addHours () This method will add some number of hours to the controller's clock. It will "roll-over" if the number of hours increases past 23. For example, if the clock currently has an hour of 22 and we call addHours (5), then the clock's hour data member will become 3. The AlarmClock class is already programmed to perform the roll-over, we simply have to call its increment Hours () method the appropriate number of times. 9. In AlarmClockController, write the method a specification: a. description: Adds the given number of hours to the clock b. @precondition hours >= 0 c. @postcondition getClock().getHours () == getClock().getHours () @prev + hours % 24 d. @param hours with a description of the number of hours to add 10. Next write the header for the addHours () method. It should: a. be public b. return nothing (i.e., void) c. take a single parameter, named hours, of type int 11. Complete the method's body: a. Enforce the precondition: write an if-statement that throws a new IllegalArgumentException if hours is less than 0 b. Write a for-loop that starts a counter at 0, has a loop condition such that the count is strictly less than hours, and increments the counter by one every iteration. In other words, the loop will execute one iteration for every number we are adding. c. In the loop body, call increment Hour () on the theClock data member 12. Uncomment the tests in edu.westga.cs1301.projecti.test.alarmclockcontroller.TestAddHo urs and run the tests. 280 public alarmClock getClock() { return this. theClock; 29 20 31e 32e public class alarmclock public alarmclock() { 34 35 37e /** Adds the given number of hours to clock s1301.project2.com ck Controller.java 51301.project2.mo cs1301.project2.tesi c51301.project2.tesi Hours.java inutes.java Seconds.java structor.java cs1301.project2.test vert To TwoDigitNum AmVsPm.java INormalizedHour.jav 3.cs1301.project2.test TimeRemaining java a.cs1301.project2.vie ClockFormatter.java 39 4e * @precondition hours > @ * @postcondition getClock(). getHours()=- getClock() prey + hours%24 par the number of hours to add 47e private int clockHours - e; private int clockminutes @; void incrementHour() { clockHouCH; if (clockHour>24){ clockHour =1; 149 p expanded void incrementMinutes() { clockMinutes++; if(clockMinute >60) { increment Hour(); clockMinutes - 1 public void addHours(int hour) { if(houri really need help on how 9-12
below is what i have so far 


Step by Step Solution
There are 3 Steps involved in it
Step: 1

Get Instant Access to Expert-Tailored Solutions
See step-by-step solutions with expert insights and AI powered tools for academic success
Step: 2

Step: 3

Ace Your Homework with AI
Get the answers you need in no time with our AI-driven, step-by-step assistance
Get Started


