Please write in C language.

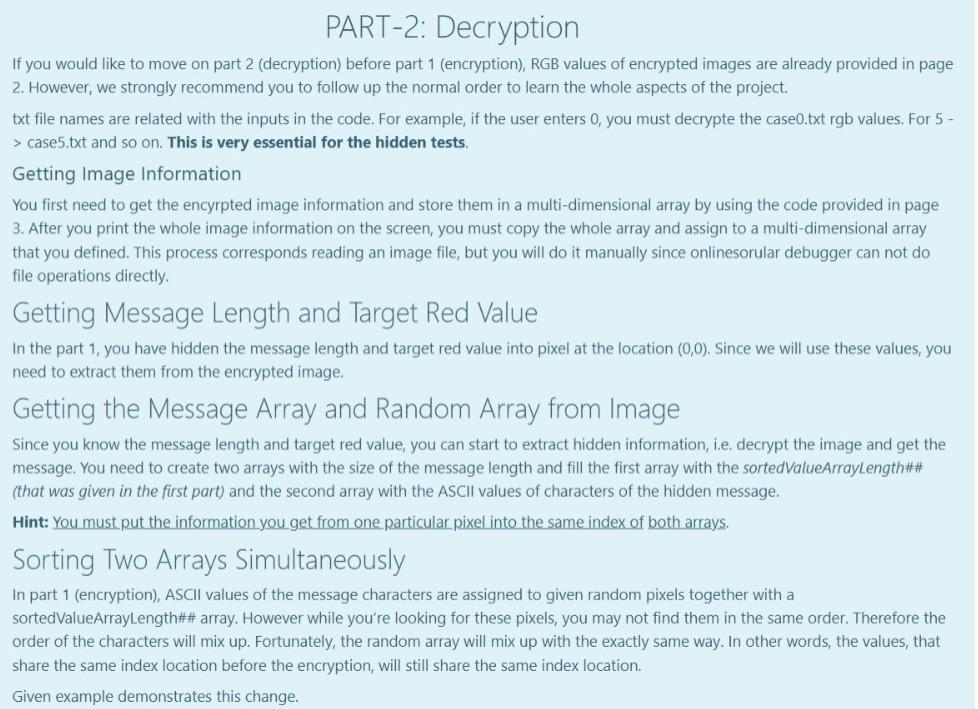
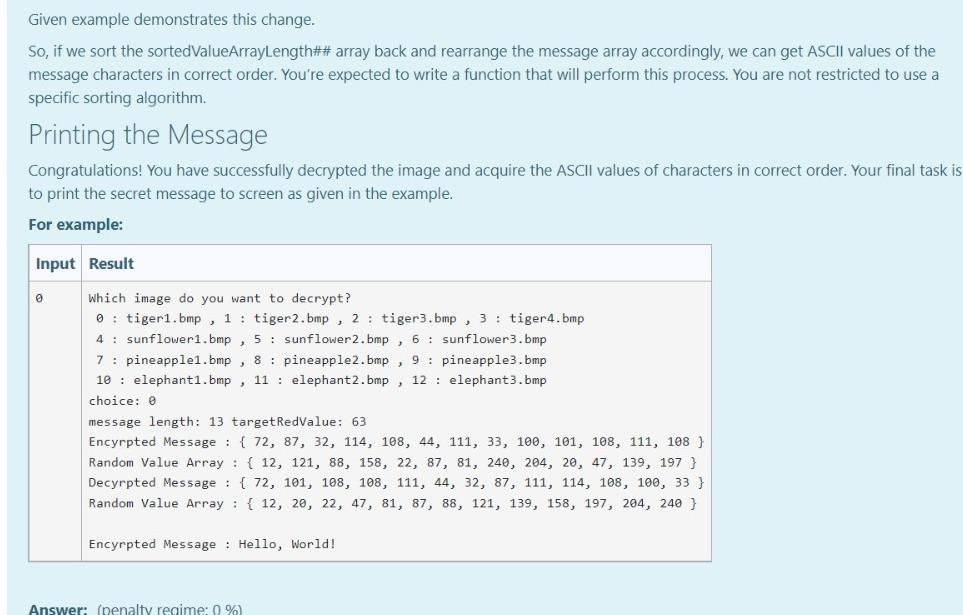
Aim of the Project In this project you will first encrypt a message on an image by using the fact that the pixels of the image carry some specific data that is ordinarily a color data stored as RGB values. You will manipulate this data to hide another information in them in this case you are expected to hide characters as ASCII values). You will be given clear instructions on how to store these data in a way that you can decrypt the image and get back the hidden message. On the second part of the project you are expected to decrypt the image and get the hidden secret message back. You will also be given clear instructions on how to get the message properly. Given Images You are given original images to hide the user-given secret message. If you successfully complete the first part, then move to the second part of the project On the other hand, we provide you additional encrypted images in case if you would like to work on part 2 before finishing part 1. Your code must only work with the provided images below. No other images will be tested. Original Images: tiger.bmp sunflower.bmp pineapple.bmp elephant.bmp pineapple.bmp elephant.bmp You first download them (right click on the image then save as). All 4 images are jpg formatted. However, you have to change their type as .bmp, if you want to get the rgb values of each pixel via the code that will be provided for you in the next page. Encrypted Images: You will get the rgb values of each pixel of all encrypted images in txt file. In this way, you at least can manage to do the 2nd part of this project To download the txt files in a zip folder, click here. IIIT! You will NOT check any code in this page. IIIII! This part is not a grade matter question but essential for the graded parts. We are providing you the following code that reads an image and stores the rgb values of each pixel of this image. However, you still need to manipulate some parts in the code. Code Lines to be manipulated : line 4, line 16, line 32, line 50. Do not change the other lines. This code snippet is not valid in onlinesorular debugger since it includes file operations. Therefore, you have to install on your computer any one of the Desktop IDEs such as DEVC++ or CodeBlocks You will use this function only to get the rgb values of each pixel and you will copy the whole array into your code manually. For example, when you read the tiger image (tiger.bmp), you will get the following. {{{68, 94, 103}, {63, 90, 99}, {62, 86, 92}}, {{0, 0, 64}, {91, 100, 70}, {92, 99, 67}}, {{98, 107, @}, {0, 87, 101}, {105, 69, 93}} In this very example (tiger.bmp), we only gave you the 3x3 left corner part of the image (Actual image contains 47x62 pixel). {68 94 103) is the rgb values for the left corner. Its adjacent pixel has the rgb values of {63 90 99) and so on. There must be stored 47x62 (width x heights) pixels and their rgb values in an array for each images. This means that the array must contain only 47x62x3 values. Hint 1: All images that were given in the previous page must be dealt with. Hint 2: You can define a multi-dimensional array to store this data in line 4. Hint 3: Copy the printed values on the command window and paste it to your first part code, directly. Do NOT delete any of the curly brackets or commas or semi colons. Hint 4: You can check whether your resultant multi-dimensional array values are true or not, in the next page. How to check the values will be explained there. Hint 5: Use unsigned char type to define multi-dimensional array, not int. This is important ! TINTI You will NOT check any code in this page. IIIIII ...!!! You can check the rgb values of given images by using the code in the previous page. The process is very simple. Change the height value with 8, in line 11. the width value with 9, in line 14. the width value with 9, in line 17. the height value with 8, in line 21. Change the file names as tiger, sunflower, pineapple or elephant in line 32. Run the code in a desktop IDE. On command window you will have the rgb values as given below (figure shows the values for tiger.bmp). {{{68, 94, 193}, {63, 90, 99}, {62, 86, 92}, {73, 96, 103}, {51, 76, 82}, {42, 64, 73}, {70, 89, 95}, {31, 49, 59}, {57, 79, 86}}, ie, e, 64), (91, 100, 70), (92, 99, 67), (89, 94, 77), 95, 98, 65), (83, 90, 68}, {87, 90, 42}, {64, 75, 59}, {74, 79, 25}}, (198, 107, e}, {e, 87, 101), (105, 69, 93), 100, 67, 86), 93, 60, 87}, {95, 55, 77}, {83, 70, 85}, {90, 53, 76), (86, 49, 65}}. ((184, 45, 70), (80, 0, 0), (71, 91, 97}, {74, 96, 98), (66, 86, 92}, {57, 79, 83), (66, 85, 90), (60, 78, 83), (61, 75, 82}}, (36, 61, 74}, {68, 88, 94}, {@, e, 76), 93, 94, 82), (99, 101, 92), (105, 188, 22}, {93, 97, 58}, {79, 86, 65}, {83, 90, 89}}, {{105, 119, 90}, {114, 130, 115}, {139, 152, e}, {e, 108, 122}, {125, 93, 112}, {120, 79, 96}, {102, 88, 188}, {116, 76, 96}, {106, 82, 105}}, ([181, 127, 152}, {166, 117, 146}, {165, 119, 148}, {170, 0, 6}, {86, 110, 120}, {80, 184, 114}, {59, 84, 94}, {48, 64, 74}, {4, 58, 68}}, ( 130, 155, 173}, {109, 140, 162), 123, 147, 160), (112, 134, 141}, {e, 8, 89}, {112, 124, 88}, {111, 119, 92), (115, 123, 83}, {106, 116, 96}} execution time: 0.151 s Process returned @ (exe) Press any key to continue. Copy all values and paste here, You need to use printf for each line of output as given in the example below. After you finish this part, you have to change the values inside the for loop conditions with variable names height and width in order to get the whole array. This page only checks 8x9 left corner part of the whole array to make it less harmful to our server. *** There were some mistakes in the code snippet given below. We corrected it but if you still observe red cross even for the example, just copy the expected values and paste to your code. Also you can re-attempt to the quiz and this issue will be solved immediately. (Sorry about it.) For example: Input Result 1 {{{68, 94, 103}, {63, 90, 99}, {62, 86, 92}, {73, 96, 103}, {51, 76, 82}, {42, 64, 73}, {70, 89, 95}, {31, 49, 59}, {' {{0, 0, 64}, {91, 109, 70}, {92, 99, 67}, {89, 94, 77}, {95, 98, 65}, {83, 90, 68}, {87, 90, 42}, {64, 75, 59}, {74, {{98, 107, @}, {0, 87, 101}, {105, 69, 93}, {100, 67, 86}, {93, 60, 87}, {95, 55, 77}, {83, 70, 85}, {90, 53, 76}, {81 {{104, 45, 70}, {80, 0, 0}, {71, 91, 97}, {74, 96, 98}, {66, 86, 92}, {57, 79, 83}, {66, 85, 90}, {60, 78, 83}, {61, {{36, 61, 74}, {60, 80, 94}, {0, 0, 76}, {93, 94, 82}, {99, 101, 92}, {105, 108, 72}, {93, 97, 58}, {79, 86, 65}, {83 {{105, 119, 90), {114, 130, 115}, {139, 152, 0), {0, 108, 122}, {125, 93, 112}, {120, 79, 96}, {102, 88, 108}, {116, {{181, 127, 152}, {166, 117, 146), 165, 119, 148}, {170, 0, 0), {86, 119, 120), 80, 104, 114}, {59, 84, 94}, {48, 6 {{130, 155, 173}, {109, 140, 162), (123, 147, 160}, {112, 134, 141}, {0, 0, 89), (112, 124, 88}, {111, 119, 92}, {115 }; PART-2: Decryption If you would like to move on part 2 (decryption) before part 1 (encryption), RGB values of encrypted images are already provided in page 2. However, we strongly recommend you to follow up the normal order to learn the whole aspects of the project. txt file names are related with the inputs in the code. For example, if the user enters 0, you must decrypte the case0.txt rgb values. For 5- > case5.txt and so on. This is very essential for the hidden tests. Getting Image Information You first need to get the encyrpted image information and store them in a multi-dimensional array by using the code provided in page 3. After you print the whole image information on the screen, you must copy the whole array and assign to a multi-dimensional array that you defined. This process corresponds reading an image file, but you will do it manually since onlinesorular debugger can not do file operations directly Getting Message Length and Target Red Value In the part 1, you have hidden the message length and target red value into pixel at the location (0,0). Since we will use these values, you need to extract them from the encrypted image. Getting the Message Array and Random Array from Image Since you know the message length and target red value, you can start to extract hidden information, i.e. decrypt the image and get the message. You need to create two arrays with the size of the message length and fill the first array with the sorted ValueArrayLength## (that was given in the first part) and the second array with the ASCII values of characters of the hidden message. Hint: You must put the information you get from one particular pixel into the same index of both arrays. Sorting Two Arrays Simultaneously In part 1 (encryption), ASCII values of the message characters are assigned to given random pixels together with a sortedValueArrayLength## array. However while you're looking for these pixels, you may not find them in the same order. Therefore the order of the characters will mix up. Fortunately, the random array will mix up with the exactly same way. In other words, the values, that share the same index location before the encryption, will still share the same index location. Given example demonstrates this change. Given example demonstrates this change. So, if we sort the sortedValueArrayLength## array back and rearrange the message array accordingly, we can get ASCII values of the message characters in correct order. You're expected to write a function that will perform this process. You are not restricted to use a specific sorting algorithm. Printing the Message Congratulations! You have successfully decrypted the image and acquire the ASCII values of characters in correct order. Your final task is to print the secret message to screen as given in the example. For example: Input Result Which image do you want to decrypt? 0 : tiger1.bmp, 1 : tiger2.bmp, 2: tiger3.bmp, 3: tiger4.bmp 4 : sunflower1.bmp, 5 : sunflower2.bmp, 6: sunflower3.bmp 7 : pineapplei.bmp , 8: pineapple2.bmp, 9 : pineapple3.bmp 10 : elephanti.bmp, 11 : elephant 2.bmp, 12 : elephant3.bmp choice: 0 message length: 13 targetRedValue: 63 Encyrpted Message : { 72, 87, 32, 114, 108, 44, 111, 33, 100, 101, 108, 111, 108 } Random Value Array : { 12, 121, 88, 158, 22, 87, 81, 240, 204, 20, 47, 139, 197 } Decyrpted Message : { 72, 101, 108, 108, 111, 44, 32, 87, 111, 114, 108, 100, 33 } Random Value Array : { 12, 20, 22, 47, 81, 87, 88, 121, 139, 158, 197, 204, 240 } Encyrpted Message : Hello, World! Answer: (penalty regime: 0 %) Aim of the Project In this project you will first encrypt a message on an image by using the fact that the pixels of the image carry some specific data that is ordinarily a color data stored as RGB values. You will manipulate this data to hide another information in them in this case you are expected to hide characters as ASCII values). You will be given clear instructions on how to store these data in a way that you can decrypt the image and get back the hidden message. On the second part of the project you are expected to decrypt the image and get the hidden secret message back. You will also be given clear instructions on how to get the message properly. Given Images You are given original images to hide the user-given secret message. If you successfully complete the first part, then move to the second part of the project On the other hand, we provide you additional encrypted images in case if you would like to work on part 2 before finishing part 1. Your code must only work with the provided images below. No other images will be tested. Original Images: tiger.bmp sunflower.bmp pineapple.bmp elephant.bmp pineapple.bmp elephant.bmp You first download them (right click on the image then save as). All 4 images are jpg formatted. However, you have to change their type as .bmp, if you want to get the rgb values of each pixel via the code that will be provided for you in the next page. Encrypted Images: You will get the rgb values of each pixel of all encrypted images in txt file. In this way, you at least can manage to do the 2nd part of this project To download the txt files in a zip folder, click here. IIIT! You will NOT check any code in this page. IIIII! This part is not a grade matter question but essential for the graded parts. We are providing you the following code that reads an image and stores the rgb values of each pixel of this image. However, you still need to manipulate some parts in the code. Code Lines to be manipulated : line 4, line 16, line 32, line 50. Do not change the other lines. This code snippet is not valid in onlinesorular debugger since it includes file operations. Therefore, you have to install on your computer any one of the Desktop IDEs such as DEVC++ or CodeBlocks You will use this function only to get the rgb values of each pixel and you will copy the whole array into your code manually. For example, when you read the tiger image (tiger.bmp), you will get the following. {{{68, 94, 103}, {63, 90, 99}, {62, 86, 92}}, {{0, 0, 64}, {91, 100, 70}, {92, 99, 67}}, {{98, 107, @}, {0, 87, 101}, {105, 69, 93}} In this very example (tiger.bmp), we only gave you the 3x3 left corner part of the image (Actual image contains 47x62 pixel). {68 94 103) is the rgb values for the left corner. Its adjacent pixel has the rgb values of {63 90 99) and so on. There must be stored 47x62 (width x heights) pixels and their rgb values in an array for each images. This means that the array must contain only 47x62x3 values. Hint 1: All images that were given in the previous page must be dealt with. Hint 2: You can define a multi-dimensional array to store this data in line 4. Hint 3: Copy the printed values on the command window and paste it to your first part code, directly. Do NOT delete any of the curly brackets or commas or semi colons. Hint 4: You can check whether your resultant multi-dimensional array values are true or not, in the next page. How to check the values will be explained there. Hint 5: Use unsigned char type to define multi-dimensional array, not int. This is important ! TINTI You will NOT check any code in this page. IIIIII ...!!! You can check the rgb values of given images by using the code in the previous page. The process is very simple. Change the height value with 8, in line 11. the width value with 9, in line 14. the width value with 9, in line 17. the height value with 8, in line 21. Change the file names as tiger, sunflower, pineapple or elephant in line 32. Run the code in a desktop IDE. On command window you will have the rgb values as given below (figure shows the values for tiger.bmp). {{{68, 94, 193}, {63, 90, 99}, {62, 86, 92}, {73, 96, 103}, {51, 76, 82}, {42, 64, 73}, {70, 89, 95}, {31, 49, 59}, {57, 79, 86}}, ie, e, 64), (91, 100, 70), (92, 99, 67), (89, 94, 77), 95, 98, 65), (83, 90, 68}, {87, 90, 42}, {64, 75, 59}, {74, 79, 25}}, (198, 107, e}, {e, 87, 101), (105, 69, 93), 100, 67, 86), 93, 60, 87}, {95, 55, 77}, {83, 70, 85}, {90, 53, 76), (86, 49, 65}}. ((184, 45, 70), (80, 0, 0), (71, 91, 97}, {74, 96, 98), (66, 86, 92}, {57, 79, 83), (66, 85, 90), (60, 78, 83), (61, 75, 82}}, (36, 61, 74}, {68, 88, 94}, {@, e, 76), 93, 94, 82), (99, 101, 92), (105, 188, 22}, {93, 97, 58}, {79, 86, 65}, {83, 90, 89}}, {{105, 119, 90}, {114, 130, 115}, {139, 152, e}, {e, 108, 122}, {125, 93, 112}, {120, 79, 96}, {102, 88, 188}, {116, 76, 96}, {106, 82, 105}}, ([181, 127, 152}, {166, 117, 146}, {165, 119, 148}, {170, 0, 6}, {86, 110, 120}, {80, 184, 114}, {59, 84, 94}, {48, 64, 74}, {4, 58, 68}}, ( 130, 155, 173}, {109, 140, 162), 123, 147, 160), (112, 134, 141}, {e, 8, 89}, {112, 124, 88}, {111, 119, 92), (115, 123, 83}, {106, 116, 96}} execution time: 0.151 s Process returned @ (exe) Press any key to continue. Copy all values and paste here, You need to use printf for each line of output as given in the example below. After you finish this part, you have to change the values inside the for loop conditions with variable names height and width in order to get the whole array. This page only checks 8x9 left corner part of the whole array to make it less harmful to our server. *** There were some mistakes in the code snippet given below. We corrected it but if you still observe red cross even for the example, just copy the expected values and paste to your code. Also you can re-attempt to the quiz and this issue will be solved immediately. (Sorry about it.) For example: Input Result 1 {{{68, 94, 103}, {63, 90, 99}, {62, 86, 92}, {73, 96, 103}, {51, 76, 82}, {42, 64, 73}, {70, 89, 95}, {31, 49, 59}, {' {{0, 0, 64}, {91, 109, 70}, {92, 99, 67}, {89, 94, 77}, {95, 98, 65}, {83, 90, 68}, {87, 90, 42}, {64, 75, 59}, {74, {{98, 107, @}, {0, 87, 101}, {105, 69, 93}, {100, 67, 86}, {93, 60, 87}, {95, 55, 77}, {83, 70, 85}, {90, 53, 76}, {81 {{104, 45, 70}, {80, 0, 0}, {71, 91, 97}, {74, 96, 98}, {66, 86, 92}, {57, 79, 83}, {66, 85, 90}, {60, 78, 83}, {61, {{36, 61, 74}, {60, 80, 94}, {0, 0, 76}, {93, 94, 82}, {99, 101, 92}, {105, 108, 72}, {93, 97, 58}, {79, 86, 65}, {83 {{105, 119, 90), {114, 130, 115}, {139, 152, 0), {0, 108, 122}, {125, 93, 112}, {120, 79, 96}, {102, 88, 108}, {116, {{181, 127, 152}, {166, 117, 146), 165, 119, 148}, {170, 0, 0), {86, 119, 120), 80, 104, 114}, {59, 84, 94}, {48, 6 {{130, 155, 173}, {109, 140, 162), (123, 147, 160}, {112, 134, 141}, {0, 0, 89), (112, 124, 88}, {111, 119, 92}, {115 }; PART-2: Decryption If you would like to move on part 2 (decryption) before part 1 (encryption), RGB values of encrypted images are already provided in page 2. However, we strongly recommend you to follow up the normal order to learn the whole aspects of the project. txt file names are related with the inputs in the code. For example, if the user enters 0, you must decrypte the case0.txt rgb values. For 5- > case5.txt and so on. This is very essential for the hidden tests. Getting Image Information You first need to get the encyrpted image information and store them in a multi-dimensional array by using the code provided in page 3. After you print the whole image information on the screen, you must copy the whole array and assign to a multi-dimensional array that you defined. This process corresponds reading an image file, but you will do it manually since onlinesorular debugger can not do file operations directly Getting Message Length and Target Red Value In the part 1, you have hidden the message length and target red value into pixel at the location (0,0). Since we will use these values, you need to extract them from the encrypted image. Getting the Message Array and Random Array from Image Since you know the message length and target red value, you can start to extract hidden information, i.e. decrypt the image and get the message. You need to create two arrays with the size of the message length and fill the first array with the sorted ValueArrayLength## (that was given in the first part) and the second array with the ASCII values of characters of the hidden message. Hint: You must put the information you get from one particular pixel into the same index of both arrays. Sorting Two Arrays Simultaneously In part 1 (encryption), ASCII values of the message characters are assigned to given random pixels together with a sortedValueArrayLength## array. However while you're looking for these pixels, you may not find them in the same order. Therefore the order of the characters will mix up. Fortunately, the random array will mix up with the exactly same way. In other words, the values, that share the same index location before the encryption, will still share the same index location. Given example demonstrates this change. Given example demonstrates this change. So, if we sort the sortedValueArrayLength## array back and rearrange the message array accordingly, we can get ASCII values of the message characters in correct order. You're expected to write a function that will perform this process. You are not restricted to use a specific sorting algorithm. Printing the Message Congratulations! You have successfully decrypted the image and acquire the ASCII values of characters in correct order. Your final task is to print the secret message to screen as given in the example. For example: Input Result Which image do you want to decrypt? 0 : tiger1.bmp, 1 : tiger2.bmp, 2: tiger3.bmp, 3: tiger4.bmp 4 : sunflower1.bmp, 5 : sunflower2.bmp, 6: sunflower3.bmp 7 : pineapplei.bmp , 8: pineapple2.bmp, 9 : pineapple3.bmp 10 : elephanti.bmp, 11 : elephant 2.bmp, 12 : elephant3.bmp choice: 0 message length: 13 targetRedValue: 63 Encyrpted Message : { 72, 87, 32, 114, 108, 44, 111, 33, 100, 101, 108, 111, 108 } Random Value Array : { 12, 121, 88, 158, 22, 87, 81, 240, 204, 20, 47, 139, 197 } Decyrpted Message : { 72, 101, 108, 108, 111, 44, 32, 87, 111, 114, 108, 100, 33 } Random Value Array : { 12, 20, 22, 47, 81, 87, 88, 121, 139, 158, 197, 204, 240 } Encyrpted Message : Hello, World! Answer: (penalty regime: 0 %)


