

Question
Project/Lab (3) By the end of this project, the students will: Learn how to use Mininet. Become familiar with HEVC video transmission over mininet. Be
Project/Lab (3)
By the end of this project, the students will:
Learn how to use Mininet. Become familiar with HEVC video transmission over mininet. Be able to identify bit streaming.
Video streaming
Video quality is a characteristic of a video passed through a video transmission/processing system, a formal or informal measure of perceived video degradation (typically, compared to the original video). Video processing systems may introduce some amount of distortion or artifacts in the video signal, which negatively impacts the users perception of a system. For many stakeholders such as content providers, service providers, and network operators, the assurance of video quality is an important task.
Video quality evaluation is performed to describe the quality of a set of video sequences under study. Video quality can be evaluated objectively (by mathematical models) or subjectively (by asking users for their rating). Also, the quality of a system can be determined offline (i.e., in a laboratory setting for developing new codecs or services), or in-service (to monitor and ensure a certain level of quality).
Read more about video quality here. https://en.wikipedia.org/wiki/Video_quality
Through this project you will be introduced to different tools that can be used to steam the video
as well as measure the video quality.
FFmpeg is a free software project that produces libraries and programs for handling multimedia data. FFmpeg includes libavcodec, an audio/video codec library used by several other projects, libavformat (Lavf) an audio/video container mux and demux library, and the ffmpeg command line program for transcoding multimedia files.
Read more about FFmpeg here and also here.
https://ffmpeg.orghttps://www.ostechnix.com/20-ffmpeg-commands-beginners/
Peak signal-to-noise ratio (PSNR): is most commonly used to measure the quality of reconstruc- tion of lossy compression codecs (e.g., for image compression). The signal in this case is the original data, and the noise is the error introduced by compression. When comparing compression
Dr. K., 2018 1
CPSC 4550: Computer NetworksFall 2018 codecs, PSNR is an approximation to human perception of reconstruction quality.
Read more about PSNR here.
https://en.wikipedia.org/wiki/Peak_signal-to-noise_ratio
1 Setup the project environment
You will be using Mininet to develop and test your Video Streaming application.
In this project, we will be using a pre-setup 64-bit Linux Virtual Machine along with a VirtualBox, which is a free and open-source hypervisor.
You need to:
Download and setup Virtualbox.
Download our MininetVM and import it to your Virtualbox. You can follow the step here to upload the image to your Virtualbox.
When you boot up the VM, youll have to log in using Mininet5590 and mininet5590 as username and password. After uploading our VM to your virtualbox you can complete the Mininet Walthrough (Section 1.1) to learn how to use Mininet. Please note that if you are familiar with Mininet you can skip this walkthrough.
1.1 Mininet Walkthrough
Once you have a Mininet VM, you should complete the following sections of the standard Mininet walkthrough:
2 Preparing the files and running the stream
All of Part 1, except the section Start Wireshark
The first four sections of Part 2 Run a Regression Test, Changing Topology Size and Type, Link variations, and Adjustable Verbosity
All of Part 3 You do not need to submit anything for this part of the project.
Please note that to run the project, you need to run all the command from ffmpeg-tools/binfolder. mininet@mininet-vm:$ cd ffmpeg-tools/bin
To get the test video you can run the following command:
sudo wget http://cecs-leda.utc.edu/files/Mininet/tractor.y4m
2.1 Encoding
After downloading the video, you start by encoding it using the following command:
mininet@mininet-vm:/ffmpeg-tools/bin$ sudo ./TAppEncoderStatic -i tractor.y4m -wdt 352 -hgt 288 -fr 25 -f 300 -c ../cfg/encoder randomaccess main.cfg -b tractor.bin
Please node the following commands used:
TAppEncoderStatic: Encoder
-i : indicate the input file
-wdt: width
-hgt: height
-fr: frame rate
-f: the total number of video frames
-c: refers to the coding file to bbe used
-b: indicate the output file name
Please note that this process may take a while depending on the machine you are using.
Many video CODECs use a Group of Pictures (GoP) frame structure, which consists of indepen- dently coded reference frames (I frames), motion changes from the last reference frame (P frames) and motion changes from the last reference or next reference frame (B frames). If a transmission error occurs, the type of frame lost determines how many other frames are affected. If the compression is too extreme blocky or blurry images will result1.
If the transmission error results in the loss of a frame, then the type of frame lost determines the duration of the loss:
A loss of an I frame causes all frames until the next I frame to be lost
A loss of a P frame affects the quality of all frame from this P to the next I frame
A loss of a B frame affects only this B frame. Turn in: When you are done take a screen shot showing the encoders output.
2.2 Compare the file size
Compare the file size of original video and encoded video. You can see amazing compression rate.
mininet@mininet-vm:/ffmpeg-tools/bin$ ls -l tractor.y4m tractor.bin 1A video calrity white paper - Understanding MOS, JND and PSNR
2.3 Play the video
Use ffplay to display the video before and after encoding it and write down your observations.
mininet@mininet-vm:/ffmpeg-tools/bin$ ffplay tractor.y4m mininet@mininet-vm:/ffmpeg-tools/bin$ ffplay tractor.bin
2.4 Encapsulation
Before transmitting the video over mininet, we have to encapsulate the HEVC bitstream in a MP4 file. Then transfer to MPEG2 Transport Stream (mpeg2ts). After that we can use ffmpeg to do video streaming.
Encapsulate the HEVC bitstream in a MP4 file:
mininet@mininet-vm:/ffmpeg-tools/bin$ sudo MP4Box -add tractor.bin:FMT=HEVC -new output.mp4
To MPEG2TS format:
mininet@mininet-vm:/ffmpeg-tools/bin$ sudo ffmpeg -i output.mp4 -map 0:v -c copy output.ts
After having the output.ts file we can transmit the video stream over mininet.
2.5 Setting up the topology
A python script to run Mininet with the topology described below is provided here. To get the python script you can run the following command:
sudo wget http://cecs-leda.utc.edu/files/Mininet/TopologyStream.py
To run Mininet with the provided topology, run the Python script TopologyCS.pyusing sudo:
sudo python TopologyStream.py
If you have trouble launching the script, a common fix is to first try running
sudo mn -c
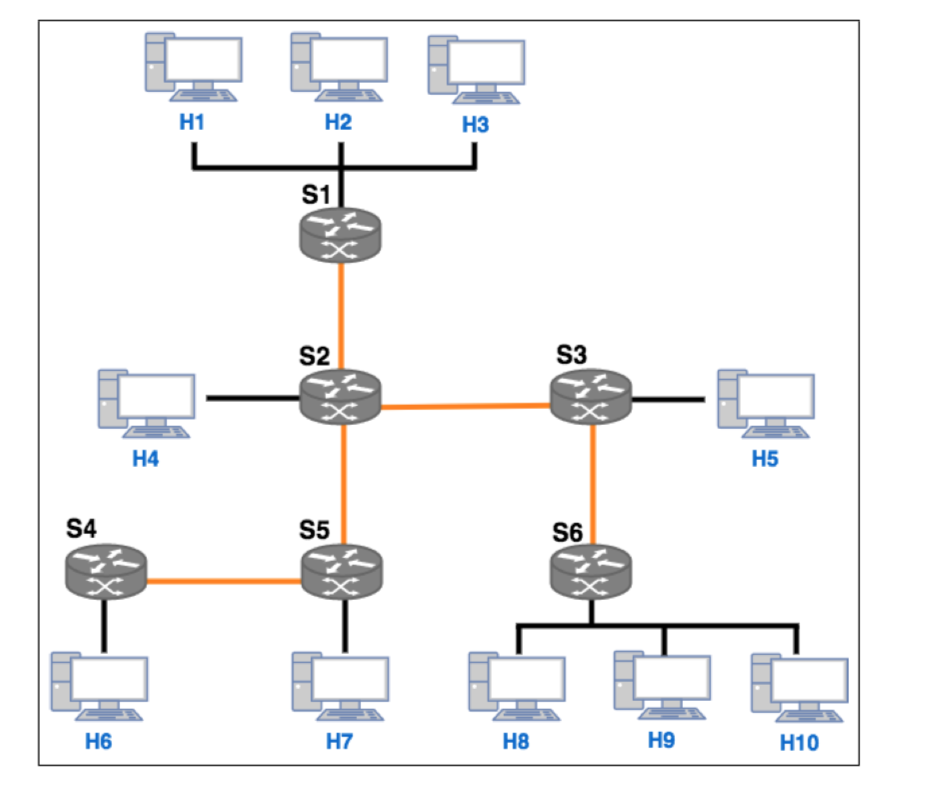
and then try launching the script again. The topology consists of 10 hosts (h1 to h10) with host (h10) to be designated as a server and six
switch (s1 to s6); the names in the diagram match the names of hosts and switches in Mininet. The hosts are assigned IP addresses 10.0.0.1 through 10.0.0.10; the last number in the IP address
matches the host number.
3 Sample stream over mininet Open the server terminal at h10 and any other host terminal h7 for instance. Before transmitting
the video, make sure that you can ping between the two hosts. On the host side (the receiver) run the following command to receive the stream:
ffmpeg -i udp://10.0.0.7:1234 -c copy rec.ts
On the server side (the sender) run the following command to start the stream:
ffmpeg -re -i output.ts -c copy -f mpegts udp://10.0.0.7:1234
Running these commands will allow you to see the streaming process on the receivers terminal. Turn in: After transmission, compare the files sizes and write down your observations. ls -l output.ts rec.ts Decompress the received file with the following command:
ffmpeg -i rec.ts rec.y4m
Get the PSNR with the following command and write down your observations.
./PSNRstatic 352 288 tractor.y4m rec.y4m
4 Running the project tasks
For tasks (2 and 3) we will be generating traffic to interfere with the video transmission between hosts.
To generate traffic a client - server scenario should be made: All commands on the host must be ran from /D-ITG/bin
On the receiving host run: ./ITGRecv
On the sending host use this generic format to send traffic: ./ITGSend -T UDP -a [host IP] -c [packet rate] -C [packet size] -t [time in miliseconds] -l sender.log -x receiver.log
An example being: ./ITGSend -T UDP -a 10.0.0.2 -c 100 -C 10 -t 120000 -l sender.log -x receiver.log
4.3 Task 3
Start streaming the video between the server (H10) and host (H4).
While streaming the video, run the scrip to generate traffic between host H5 and the server H6.
After done with the transmitting, provide a screen-shot of the transmission and compare the files sizes (the original and the received file).
Write down your observations about the sizes.
Draw a chart showing the bit stream being transmitted.
Get the PSNR and write down your observations.
Please provide screenshots
H1 H2 H3 S1 S2 S3 H4 H5 S4 S5 S6 H6 H7 H9 H10 H1 H2 H3 S1 S2 S3 H4 H5 S4 S5 S6 H6 H7 H9 H10Step by Step Solution
There are 3 Steps involved in it
Step: 1

Get Instant Access to Expert-Tailored Solutions
See step-by-step solutions with expert insights and AI powered tools for academic success
Step: 2

Step: 3
Ace Your Homework with AI
Get the answers you need in no time with our AI-driven, step-by-step assistance
Get Started
Data Analysis In Microsoft Excel
Authors: Alex Holloway
1st Edition
B0CCCPKTTX, 979-8852388452