

Question: Question 2 (6 points): Purpose: To practice indexing, and looking up and using module functions. Degree of Difficulty: Moderate A dragon curve is a fascinating
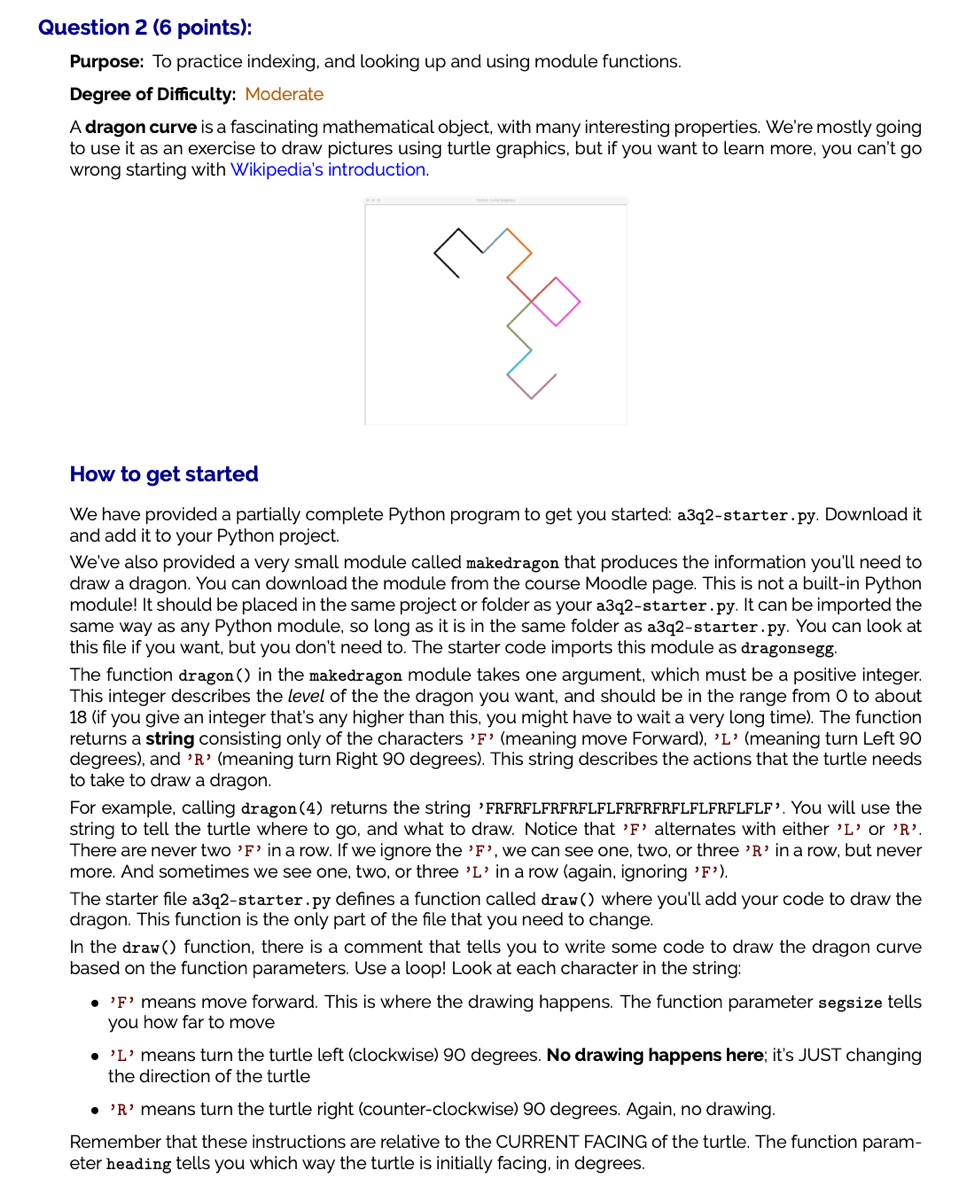
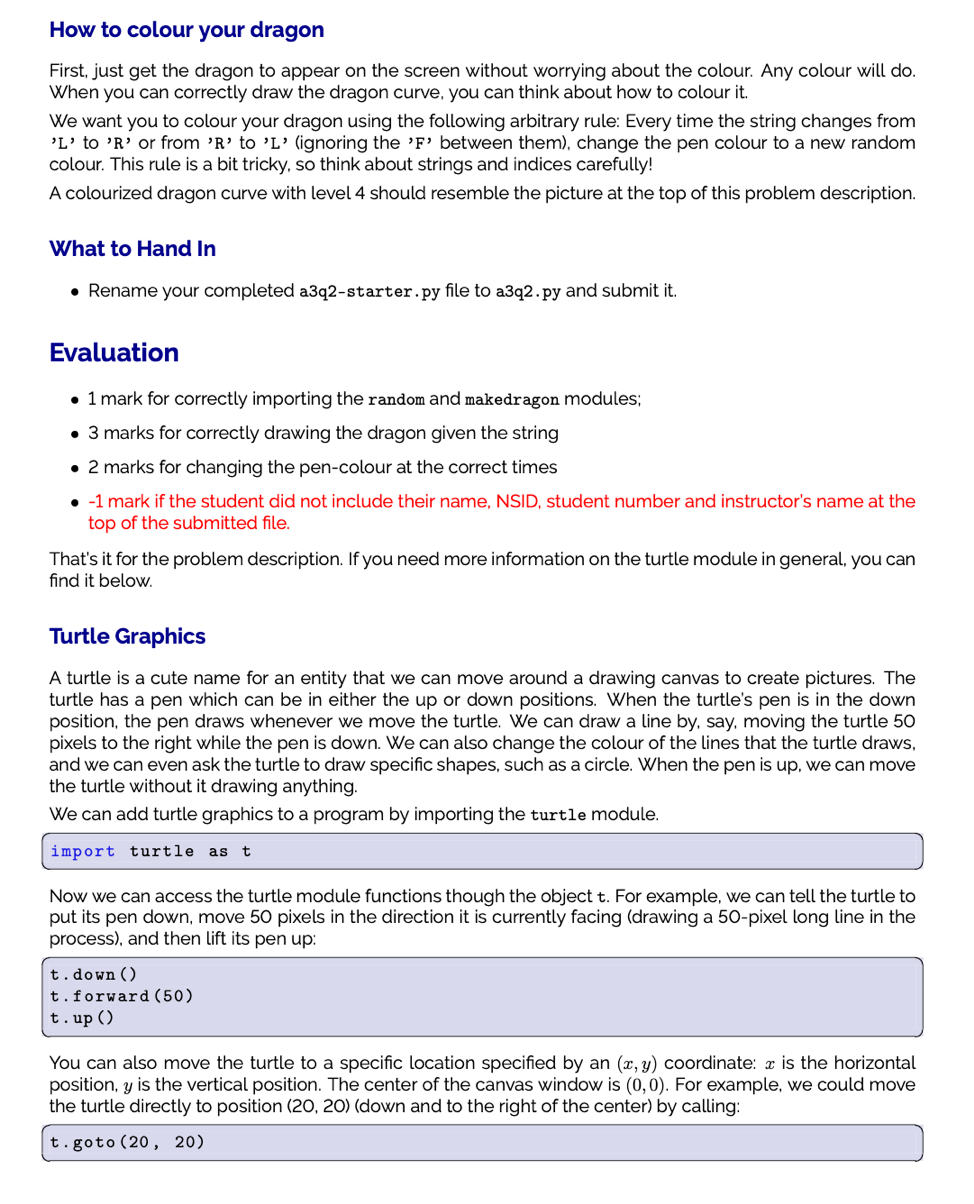
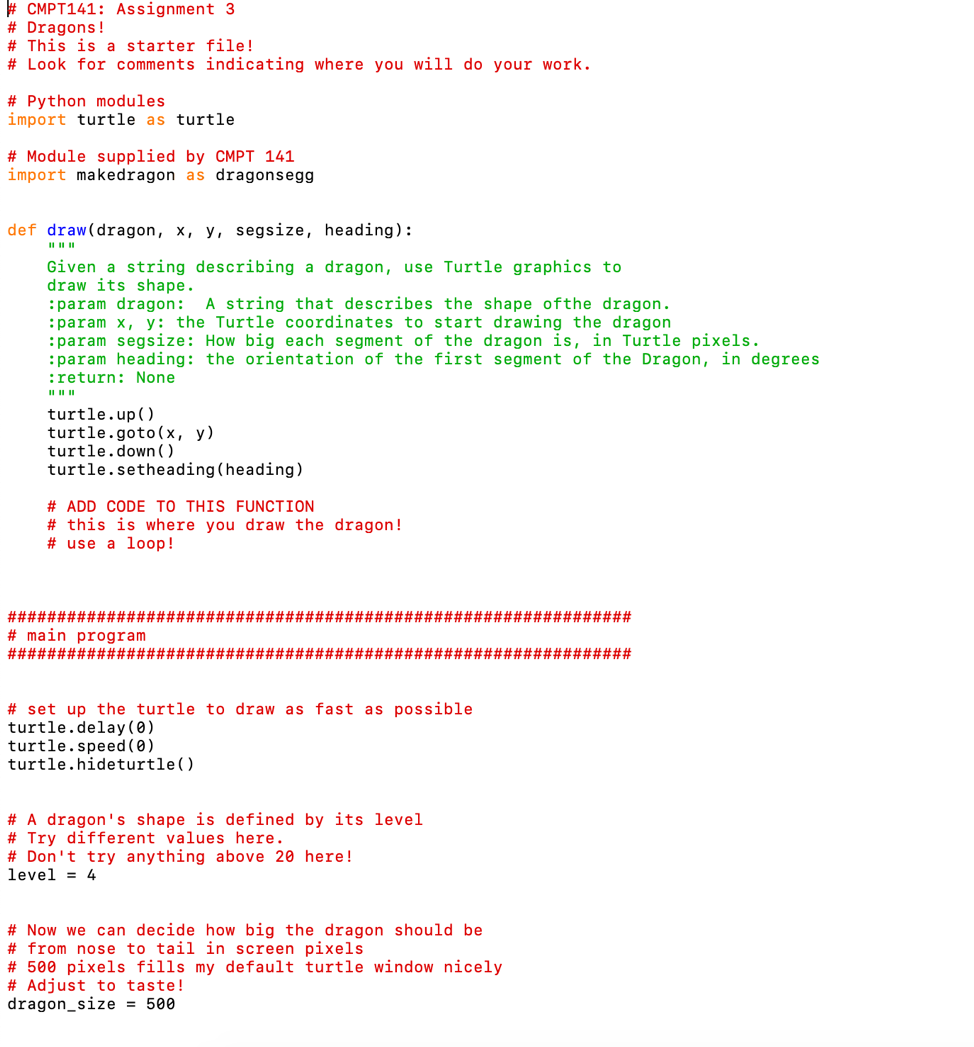
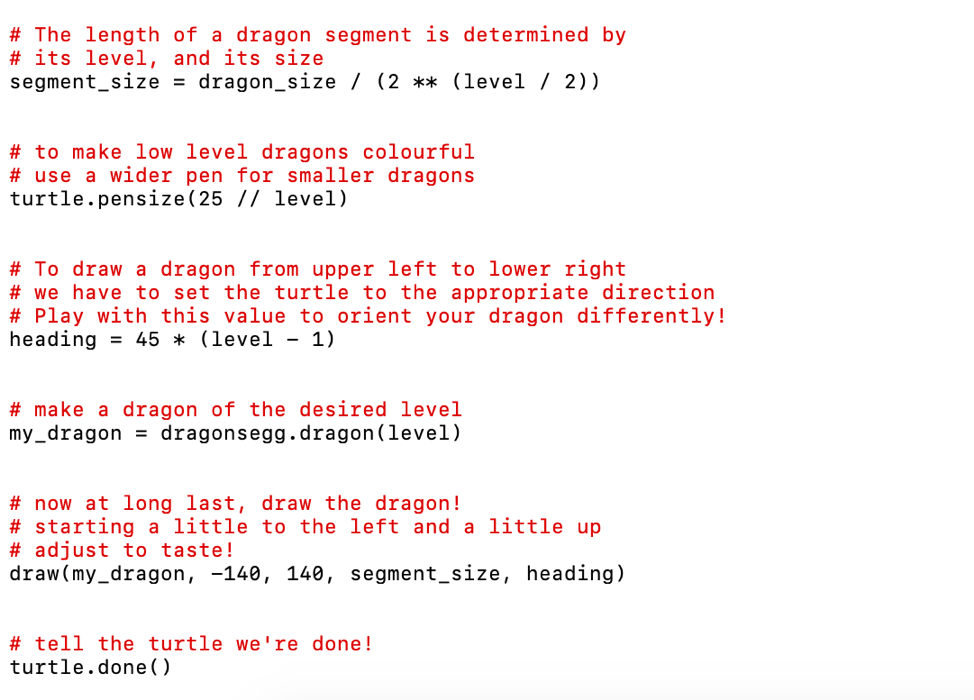

Question 2 (6 points): Purpose: To practice indexing, and looking up and using module functions. Degree of Difficulty: Moderate A dragon curve is a fascinating mathematical object, with many interesting properties. We're mostly going to use it as an exercise to draw pictures using turtle graphics, but if you want to learn more, you can't go wrong starting with Wikipedia's introduction. How to get started We have provided a partially complete Python program to get you started: a3q2-starter.py. Download it and add it to your Python project. We've also provided a very small module called makedragon that produces the information you'll need to draw a dragon. You can download the module from the course Moodle page. This is not a built-in Python module! It should be placed in the same project or folder as your a3q2-starter.py. It can be imported the same way as any Python module, so long as it is in the same folder as a3q2-starter.py. You can look at this file if you want, but you don't need to. The starter code imports this module as dragonsegg. The function dragon() in the makedragon module takes one argument, which must be a positive integer. This integer describes the level of the the dragon you want, and should be in the range from O to about 18 (if you give an integer that's any higher than this, you might have to wait a very long time). The function returns a string consisting only of the characters 'F' (meaning move Forward), 'L' (meaning turn Left 90 degrees), and 'R' (meaning turn Right 90 degrees). This string describes the actions that the turtle needs to take to draw a dragon. For example, calling dragon (4) returns the string 'FRFRFLFRFRFLFLFRFRFRFLFLFRFLFLF'. You will use the string to tell the turtle where to go, and what to draw. Notice that 'F' alternates with either 'L' or 'R'. There are never two 'F' in a row. If we ignore the 'F', we can see one, two, or three 'R' in a row, but never more. And sometimes we see one, two, or three 'L' in a row (again, ignoring 'F'). The starter file a3q2-starter.py defines a function called draw() where you'll add your code to draw the dragon. This function is the only part of the file that you need to change. In the draw() function, there is a comment that tells you to write some code to draw the dragon curve based on the function parameters. Use a loop! Look at each character in the string: . 'F' means move forward. This is where the drawing happens. The function parameter segsize tells you how far to move . 'L' means turn the turtle left (clockwise) 90 degrees. No drawing happens here; it's JUST changing the direction of the turtle . 'R' means turn the turtle right (counter-clockwise) 90 degrees. Again, no drawing. Remember that these instructions are relative to the CURRENT FACING of the turtle. The function param- eter heading tells you which way the turtle is initially facing, in degrees. How to colour your dragon First, just get the dragon to appear on the screen without worrying about the colour. Any colour will do. When you can correctly draw the dragon curve, you can think about how to colour it. We want you to colour your dragon using the following arbitrary rule: Every time the string changes from 'L' to 'R' or from 'R' to 'L' (ignoring the 'F' between them), change the pen colour to a new random colour. This rule is a bit tricky, so think about strings and indices carefully! A colourized dragon curve with level 4 should resemble the picture at the top of this problem description. What to Hand In . Rename your completed a3q2-starter.py file to a3q2.py and submit it. Evaluation 1 mark for correctly importing the random and makedragon modules; 3 marks for correctly drawing the dragon given the string 2 marks for changing the pen-colour at the correct times -1 mark if the student did not include their name, NSID, student number and instructor's name at the top of the submitted file. That's it for the problem description. If you need more information on the turtle module in general, you can find it below. Turtle Graphics A turtle is a cute name for an entity that we can move around a drawing canvas to create pictures. The turtle has a pen which can be in either the up or down positions. When the turtle's pen is in the down position, the pen draws whenever we move the turtle. We can draw a line by, say, moving the turtle 50 pixels to the right while the pen is down. We can also change the colour of the lines that the turtle draws, and we can even ask the turtle to draw specific shapes, such as a circle. When the pen is up, we can move the turtle without it drawing anything. We can add turtle graphics to a program by importing the turtle module. import turtle as t Now we can access the turtle module functions though the object t. For example, we can tell the turtle to put its pen down, move 50 pixels in the direction it is currently facing (drawing a 50-pixel long line in the process), and then lift its pen up: t.down() t.forward (50) t.up ( You can also move the turtle to a specific location specified by an (x, y) coordinate: x is the horizontal position, y is the vertical position. The center of the canvas window is (0,0). For example, we could move the turtle directly to position (20, 20) (down and to the right of the center) by calling: t.goto (20, 20) If the pen is down, then this will also draw a line from the turtle's current position to the position (20, 20). We can tell the turtle to draw lines of a given width (if the pen is down) like this: t.pensize (3) The line colour can be changed by calling: t.pencolor (r, g, b) wherer.g, and bare values between 0 and 1 indicating the red, green, and blue values of the colour, O.O be- ing none of that colour component, 1.0 the maximum amount of that colour component. E.g. t. pencolour(1.0, 1.0, 0.0) gives bright yellow (since red - green - yellow). If you'd like another example, Lecture 6, demo 2 shows a complete program that uses turtle graphics to draw a circle wherever the user clicks the mouse. It uses all of the turtle functions described here. The documentation for the turtle module containing descriptions of how to use the turtle module func- tions can be found here (click to link). Click on the name of a function to get more details. When you run a program that uses turtle graphics, it pops up a canvas window on the screen. This window will often hide behind other windows (such as PyCharm) so if you think nothing is happening when you run your program, make sure you move your windows and look behind them. Also, the program is only terminated when you close the canvas window, so make sure you close the window between runs or you may get confused by having multiple drawing canvases open at the same time. W CMPT141: Assignment 3 # Dragons! # This is a starter file! # Look for comments indicating where you will do your work. # Python modules import turtle as turtle # Module supplied by CMPT 141 import makedragon as dragonsegg def draw(dragon, x, y, segsize, heading): Given a string describing a dragon, use Turtle graphics to draw its shape. :param dragon: A string that describes the shape ofthe dragon. :param x, y: the Turtle coordinates to start drawing the dragon :param segsize: How big each segment of the dragon is, in Turtle pixels. :param heading: the orientation of the first segment of the Dragon, in degrees :return: None II II II turtle.up() turtle.goto(x, y) turtle.down() turtle.setheading (heading) # ADD CODE TO THIS FUNCTION # this is where you draw the dragon! # use a loop! ############################################################### # main program ############################################################### # set up the turtle to draw as fast as possible turtle.delay (0) turtle.speed (0) turtle.hideturtle() # A dragon's shape is defined by its level # Try different values here. # Don't try anything above 20 here! level = 4 # Now we can decide how big the dragon should be # from nose to tail in screen pixels # 500 pixels fills my default turtle window nicely # Adjust to taste! dragon_size = 500 # The length of a dragon segment is determined by # its level, and its size segment_size = dragon_size 1 (2 ** (level / 2)). # to make low level dragons colourful # use a wider pen for smaller dragons turtle.pensize(25 // level) # To draw a dragon from upper left to lower right # we have to set the turtle to the appropriate direction # Play with this value to orient your dragon differently! heading = 45 * (level - 1) # make a dragon of the desired level my_dragon = dragonsegg.dragon(level) # now at long last, draw the dragon! # starting a little to the left and a little up # adjust to taste! draw(my_dragon, -140, 140, segment_size, heading) # tell the turtle we're done! turtle.done() # CMPT 141: Assignment 3 # This module consists of a single function, # whose purpose is to create a string from which we can # draw a dragon. A dragon curve is defined here to consist of 3 characters: 'F' means to draw a straight line of a constant size 'R' means to make a 90 degree turn to the Right (clockwise) 'L' means to make a 90 degree turn to the Left (counter-clockwise) # Dragon curves have many interesting properties. # The function here is recursive. That's Chapter 16. # Don't worry if you don't understand what it is doing! def dragon(lev): Produces the DNA for a dragon of level lev. :param lev: the level of the dragon :return: a string that describes the dragon. if lev == 0: return 'F' else: # produce DNA for a smaller dragon d = dragon (lev-1) # make a copy, reverse it, and swap the "L" and "R" rd = d[::-1).replace('R','I').replace('L', 'R').replace('T', 'L') # construct the DNA from the two, joining them with an "R" return d+'R'+rd Question 2 (6 points): Purpose: To practice indexing, and looking up and using module functions. Degree of Difficulty: Moderate A dragon curve is a fascinating mathematical object, with many interesting properties. We're mostly going to use it as an exercise to draw pictures using turtle graphics, but if you want to learn more, you can't go wrong starting with Wikipedia's introduction. How to get started We have provided a partially complete Python program to get you started: a3q2-starter.py. Download it and add it to your Python project. We've also provided a very small module called makedragon that produces the information you'll need to draw a dragon. You can download the module from the course Moodle page. This is not a built-in Python module! It should be placed in the same project or folder as your a3q2-starter.py. It can be imported the same way as any Python module, so long as it is in the same folder as a3q2-starter.py. You can look at this file if you want, but you don't need to. The starter code imports this module as dragonsegg. The function dragon() in the makedragon module takes one argument, which must be a positive integer. This integer describes the level of the the dragon you want, and should be in the range from O to about 18 (if you give an integer that's any higher than this, you might have to wait a very long time). The function returns a string consisting only of the characters 'F' (meaning move Forward), 'L' (meaning turn Left 90 degrees), and 'R' (meaning turn Right 90 degrees). This string describes the actions that the turtle needs to take to draw a dragon. For example, calling dragon (4) returns the string 'FRFRFLFRFRFLFLFRFRFRFLFLFRFLFLF'. You will use the string to tell the turtle where to go, and what to draw. Notice that 'F' alternates with either 'L' or 'R'. There are never two 'F' in a row. If we ignore the 'F', we can see one, two, or three 'R' in a row, but never more. And sometimes we see one, two, or three 'L' in a row (again, ignoring 'F'). The starter file a3q2-starter.py defines a function called draw() where you'll add your code to draw the dragon. This function is the only part of the file that you need to change. In the draw() function, there is a comment that tells you to write some code to draw the dragon curve based on the function parameters. Use a loop! Look at each character in the string: . 'F' means move forward. This is where the drawing happens. The function parameter segsize tells you how far to move . 'L' means turn the turtle left (clockwise) 90 degrees. No drawing happens here; it's JUST changing the direction of the turtle . 'R' means turn the turtle right (counter-clockwise) 90 degrees. Again, no drawing. Remember that these instructions are relative to the CURRENT FACING of the turtle. The function param- eter heading tells you which way the turtle is initially facing, in degrees. How to colour your dragon First, just get the dragon to appear on the screen without worrying about the colour. Any colour will do. When you can correctly draw the dragon curve, you can think about how to colour it. We want you to colour your dragon using the following arbitrary rule: Every time the string changes from 'L' to 'R' or from 'R' to 'L' (ignoring the 'F' between them), change the pen colour to a new random colour. This rule is a bit tricky, so think about strings and indices carefully! A colourized dragon curve with level 4 should resemble the picture at the top of this problem description. What to Hand In . Rename your completed a3q2-starter.py file to a3q2.py and submit it. Evaluation 1 mark for correctly importing the random and makedragon modules; 3 marks for correctly drawing the dragon given the string 2 marks for changing the pen-colour at the correct times -1 mark if the student did not include their name, NSID, student number and instructor's name at the top of the submitted file. That's it for the problem description. If you need more information on the turtle module in general, you can find it below. Turtle Graphics A turtle is a cute name for an entity that we can move around a drawing canvas to create pictures. The turtle has a pen which can be in either the up or down positions. When the turtle's pen is in the down position, the pen draws whenever we move the turtle. We can draw a line by, say, moving the turtle 50 pixels to the right while the pen is down. We can also change the colour of the lines that the turtle draws, and we can even ask the turtle to draw specific shapes, such as a circle. When the pen is up, we can move the turtle without it drawing anything. We can add turtle graphics to a program by importing the turtle module. import turtle as t Now we can access the turtle module functions though the object t. For example, we can tell the turtle to put its pen down, move 50 pixels in the direction it is currently facing (drawing a 50-pixel long line in the process), and then lift its pen up: t.down() t.forward (50) t.up ( You can also move the turtle to a specific location specified by an (x, y) coordinate: x is the horizontal position, y is the vertical position. The center of the canvas window is (0,0). For example, we could move the turtle directly to position (20, 20) (down and to the right of the center) by calling: t.goto (20, 20) If the pen is down, then this will also draw a line from the turtle's current position to the position (20, 20). We can tell the turtle to draw lines of a given width (if the pen is down) like this: t.pensize (3) The line colour can be changed by calling: t.pencolor (r, g, b) wherer.g, and bare values between 0 and 1 indicating the red, green, and blue values of the colour, O.O be- ing none of that colour component, 1.0 the maximum amount of that colour component. E.g. t. pencolour(1.0, 1.0, 0.0) gives bright yellow (since red - green - yellow). If you'd like another example, Lecture 6, demo 2 shows a complete program that uses turtle graphics to draw a circle wherever the user clicks the mouse. It uses all of the turtle functions described here. The documentation for the turtle module containing descriptions of how to use the turtle module func- tions can be found here (click to link). Click on the name of a function to get more details. When you run a program that uses turtle graphics, it pops up a canvas window on the screen. This window will often hide behind other windows (such as PyCharm) so if you think nothing is happening when you run your program, make sure you move your windows and look behind them. Also, the program is only terminated when you close the canvas window, so make sure you close the window between runs or you may get confused by having multiple drawing canvases open at the same time. W CMPT141: Assignment 3 # Dragons! # This is a starter file! # Look for comments indicating where you will do your work. # Python modules import turtle as turtle # Module supplied by CMPT 141 import makedragon as dragonsegg def draw(dragon, x, y, segsize, heading): Given a string describing a dragon, use Turtle graphics to draw its shape. :param dragon: A string that describes the shape ofthe dragon. :param x, y: the Turtle coordinates to start drawing the dragon :param segsize: How big each segment of the dragon is, in Turtle pixels. :param heading: the orientation of the first segment of the Dragon, in degrees :return: None II II II turtle.up() turtle.goto(x, y) turtle.down() turtle.setheading (heading) # ADD CODE TO THIS FUNCTION # this is where you draw the dragon! # use a loop! ############################################################### # main program ############################################################### # set up the turtle to draw as fast as possible turtle.delay (0) turtle.speed (0) turtle.hideturtle() # A dragon's shape is defined by its level # Try different values here. # Don't try anything above 20 here! level = 4 # Now we can decide how big the dragon should be # from nose to tail in screen pixels # 500 pixels fills my default turtle window nicely # Adjust to taste! dragon_size = 500 # The length of a dragon segment is determined by # its level, and its size segment_size = dragon_size 1 (2 ** (level / 2)). # to make low level dragons colourful # use a wider pen for smaller dragons turtle.pensize(25 // level) # To draw a dragon from upper left to lower right # we have to set the turtle to the appropriate direction # Play with this value to orient your dragon differently! heading = 45 * (level - 1) # make a dragon of the desired level my_dragon = dragonsegg.dragon(level) # now at long last, draw the dragon! # starting a little to the left and a little up # adjust to taste! draw(my_dragon, -140, 140, segment_size, heading) # tell the turtle we're done! turtle.done() # CMPT 141: Assignment 3 # This module consists of a single function, # whose purpose is to create a string from which we can # draw a dragon. A dragon curve is defined here to consist of 3 characters: 'F' means to draw a straight line of a constant size 'R' means to make a 90 degree turn to the Right (clockwise) 'L' means to make a 90 degree turn to the Left (counter-clockwise) # Dragon curves have many interesting properties. # The function here is recursive. That's Chapter 16. # Don't worry if you don't understand what it is doing! def dragon(lev): Produces the DNA for a dragon of level lev. :param lev: the level of the dragon :return: a string that describes the dragon. if lev == 0: return 'F' else: # produce DNA for a smaller dragon d = dragon (lev-1) # make a copy, reverse it, and swap the "L" and "R" rd = d[::-1).replace('R','I').replace('L', 'R').replace('T', 'L') # construct the DNA from the two, joining them with an "R" return d+'R'+rd
Step by Step Solution
There are 3 Steps involved in it

Get step-by-step solutions from verified subject matter experts