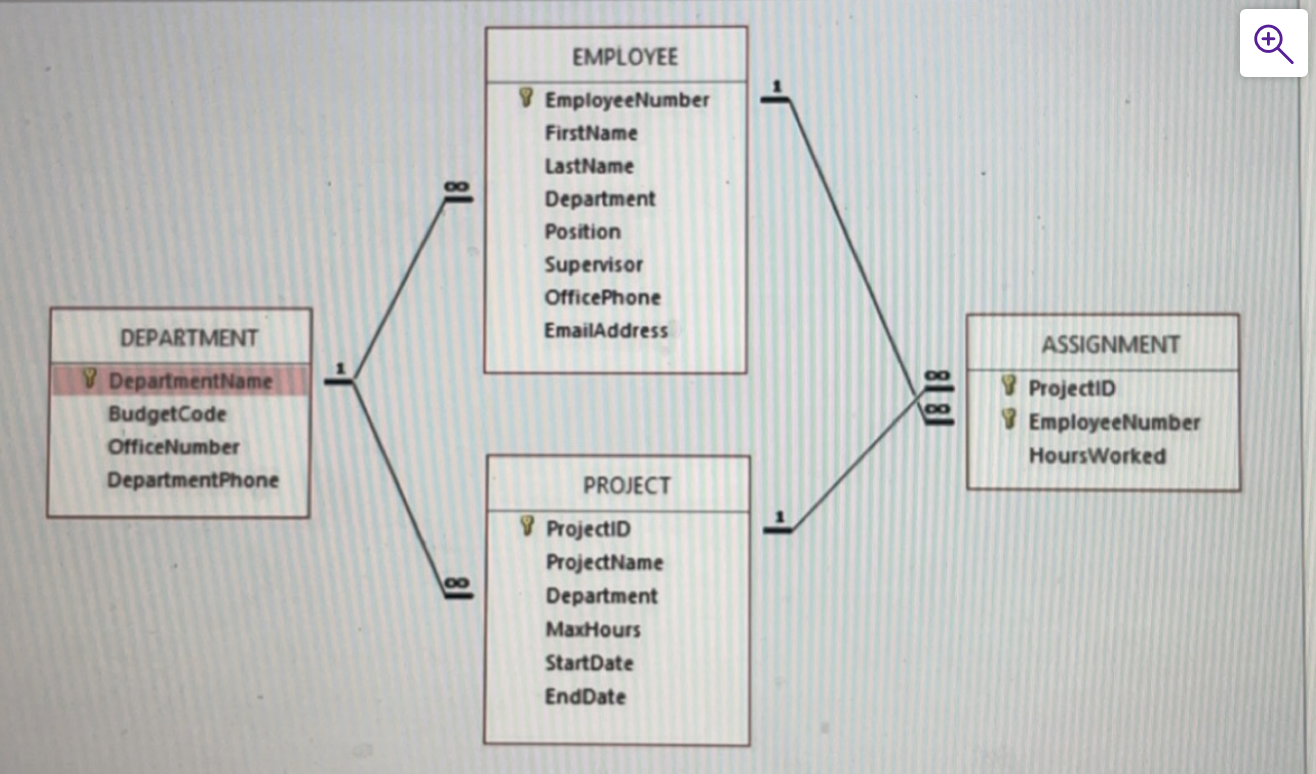
Question
Run the new Wedgewood SQL Code: /* ************************************************************** Creat ASSIGNMENT table Run this code next and submit the results per the assignment. ************************************************************** */ DROP
Run the new Wedgewood SQL Code:
/*
**************************************************************
Creat ASSIGNMENT table
Run this code next and submit the results per the assignment.
**************************************************************
*/
DROP TABLE IF EXISTS ASSIGNMENT;
CREATE TABLE ASSIGNMENT (
ProjectID CHAR(20) NOT NULL,
EmployeeNumber INTEGER NOT NULL,
HoursWorked NUMERIC(6,2) NULL
);
/*
**************************************************************
Create EMPLOYEE table
Run this code next and submit the results per the assignment.
**************************************************************
*/
DROP TABLE IF EXISTS EMPLOYEE;
CREATE TABLE EMPLOYEE (
EmployeeNumber CHAR(25) NOT NULL,
FirstName CHAR(25) NOT NULL,
LastName CHAR(25) NOT NULL,
Department CHAR(30) NOT NULL,
Position CHAR(35) NULL,
Supervisor INTEGER NULL,
OfficePhone CHAR(12) NULL,
EmailAddress VARCHAR(100) NOT NULL
);
/*
**************************************************************
Create PROJECT table
Run this code next and submit the results per the assignment.
**************************************************************
*/
DROP TABLE IF EXISTS PROJECT;
CREATE TABLE PROJECT (
ProjectID INTEGER NOT NULL,
ProjectName CHAR(50) NOT NULL,
Department CHAR(35) NOT NULL,
MaxHours NUMERIC(8,2) NOT NULL,
StartDate DATE NULL,
EndDate DATE NULL
);
/*
**************************************************************
Create DEPARTMENT table
Run this code first and submit the results per the assignment.
**************************************************************
*/
DROP TABLE IF EXISTS DEPARTMENT;
CREATE TABLE DEPARTMENT (
DepartmentName CHAR(35) NOT NULL,
BudgetCode CHAR(30) NOT NULL,
OfficeNumber CHAR(15) NOT NULL,
DepartmentPhone CHAR(12) NOT NULL
);

. Create the Primary Keys on each table, except the ASSIGNMENT table (review the end of the assignment for code submission requirements). Remember the syntax for creating a Primary Key is {insert relevant data here}: ALTER TABLE {table} ADD CONSTRAINT {key name} PRIMARY KEY ({columns separated by comma}); 4. Create the Foreign Key for the EMPLOYEE table. Remember the syntax is: ALTER TABLE {table} ADD CONSTRAINT {keyname} FOREIGN KEY ({column}) REFERENCES {table}({column}); a. Did you have an issue? Why? b. Correct the issue in the EMPLOYEE table and remember the syntax to change a column is: ALTER TABLE {table} ALTER COLUMN {column} {datatype}; c. Save your code and then create the Foreign Key 5. Create the Foreign Key on Project - did you have any issue? If so, Why? a. If there is an issue, correct it and create the Foreign KeyIT 240 - ASSIGNMENT 5 - CREATE KEYS AND INSERTING DATA 6. Create the two Foreign Keys on ASSIGNMENT - did you have an issue? Why? a. Correct the issue and create the Foreign Key 7. Create the Primary Key on the ASSIGNMENT table - did you have an issue? Why? a. Correct the issue and create the Primary Key 8. Then using the slide data INSERT the remaining data for DEPARTMENT and EMPLOYEE tables. 9. Run a SELECT * on each table to confirm your DEPARTMENT table has select 9 rows and your employee table has 20 rows. 10. Only submit a .sql (text file) to D2L which should include the code you used for: Creating the Primary Key on each table Correcting the issue on the Foreign Key for EMPLOYEE The code to create the Foreign Key on EMPLOYEE Correcting the issue on the Foreign Key for PROJECT - No Issue The code to create the Foreign Key on PROJECT Correcting the issue on the Foreign Key for ASSIGNMENT The code to create the Foreign Keys on ASSIGNMENT Correcting the issue on the Primary Key for ASSIGNMENT - No Longer Issue The code to create the Primary Key for Assignment Code to INSERT the data - Insert data works fine SELECT returns all rows
Step by Step Solution
There are 3 Steps involved in it
Step: 1

Get Instant Access to Expert-Tailored Solutions
See step-by-step solutions with expert insights and AI powered tools for academic success
Step: 2

Step: 3

Ace Your Homework with AI
Get the answers you need in no time with our AI-driven, step-by-step assistance
Get Started


