Question
subject: software development In this assignment, youll be writing unit tests capable of exposing bugs in a code base that someone else has written. Your
subject: software development
In this assignment, youll be writing unit tests capable of exposing bugs in a code base that someone else has written. Your unit tests will provide thorough test coverage for all functionality, including the buggy code and the working code.


Beetle.java
package edu.csc413.bugs;
/** Represents a Beetle, which is a type of Bug. */ public class Beetle extends Bug { private String name;
public Beetle(String name) { super(name, 6); }
// TODO ERROR: This returns the instance variable stored in the Beetle class. // TODO ERROR: There's redundancy in having this method which is already inherited. public String getName() { return name; }
/** Some beetles can fly. */ public boolean canFly() { return true; }
public String specialTrait() { return "strong"; } }
Bug.java
package edu.csc413.bugs;
/** Represents a generic Bug. It is an abstract class, so users cannot instantiate a Bug directly. */ public abstract class Bug { // Instance variables: every bug has a name and a number of legs. private String name; private int numLegs;
/** Creates a Bug with the provided name and number of legs. */ public Bug(String name, int numLegs) { // TODO ERROR: assignment for both instance variables written incorrectly name = this.name; numLegs = this.numLegs; }
/** Returns the Bug's name. */ public String getName() { return name; }
/** Returns the number of legs this Bug has. */ public int getNumLegs() { return numLegs; }
/** Returns true if the Bug can fly, and false otherwise. May be overridden for a Bug type that can fly. */ public boolean canFly() { return false; }
/** * Returns a String describing this Bug's special trait. It varies based on the specific type of Bug, so it is an * abstract method. */ public abstract String specialTrait(); }
Spider.java
package edu.csc413.bugs;
/** Represents a Spider, which is a type of Bug (sorta technically not, but this isn't a Biology class). */ public class Spider extends Bug { public Spider(String name) { // TODO ERROR: Wrong number of legs! Should be 8. super(name, 10); }
public String specialTrait() { return "webs"; } }
Terrarium.java
package edu.csc413.bugs;
import java.util.ArrayList;
/** Represents a collection of Bugs. */ public class Terrarium { private ArrayList bugs;
/** Creates an empty Terrarium. */ public Terrarium() { bugs = new ArrayList(); }
/** Adds some preset Bugs to the Terrarium. */ public void setUpBugs() { // TODO ERROR: This declares and initializes a local variable instead of the instance variable. ArrayList bugs = new ArrayList(); bugs.add(new Beetle("Juice")); bugs.add(new Spider("Charlotte")); bugs.add(new Wasp("Boris")); }
/** Returns the number of Bugs in the Terrarium. */ public int getNumBugs() { return bugs.size(); }
/** Returns the Bug at the specified index in the Terrarium's list of Bugs. */ public Bug getBug(int index) { // TODO ERROR: index is off by 1. return bugs.get(index + 1); }
/** Searches for a Bug with the specified name and returns it. Returns null if there isn't a Bug with that name. */ public Bug getBugWithName(String name) { for (Bug bug: bugs) { if (bug.getName().equals(name)) { return bug; } }
// TODO ERROR: This should return null instead of the first Bug. return bugs.get(0); }
/** Returns a list of all Bugs that have the specified number of legs. */ public ArrayList getBugsWithLegs(int numLegs) { // TODO ERROR: This just returns a list with all of the Bugs. ArrayList result = new ArrayList(); for (Bug bug: bugs) { result.add(bug); } return result; }
public static void main(String[] args) { Terrarium terrarium = new Terrarium(); terrarium.setUpBugs();
System.out.println("Terrarium created!"); System.out.println("Number of bugs: " + terrarium.getNumBugs()); System.out.println("Bug info:"); for (int i = 0; i
Wasp.java
package edu.csc413.bugs;
/** Represents a Wasp, which is a type of Bug. */ public class Wasp extends Bug { public Wasp(String name) { super(name, 6); }
// TODO ERROR: This is meant to override a method, but it's misspelled. public boolean cantFly() { return true; }
public String specialTrait() { // TODO ERROR: Should be "mean" instead. return "nice"; } }
TerrariumTest.java
import org.junit.jupiter.api.Test;
public class TerrariumTest { @Test public void fakeTest() { // TODO: Delete this test case and replace it with your own. } }
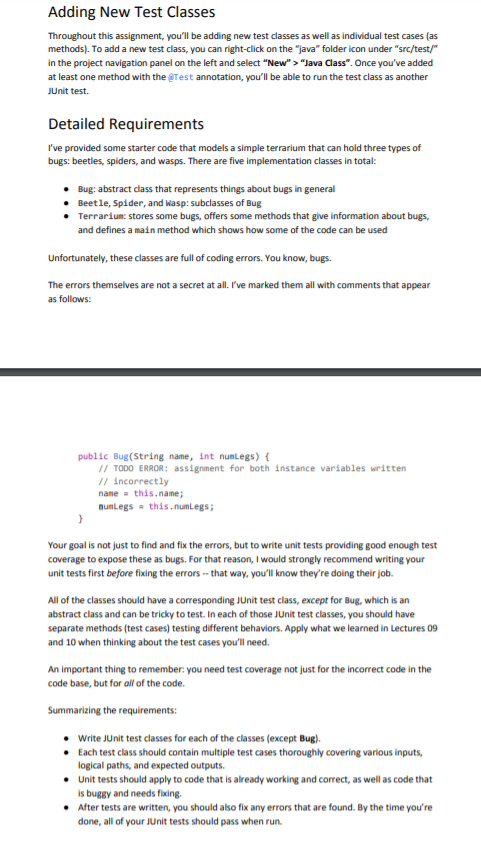
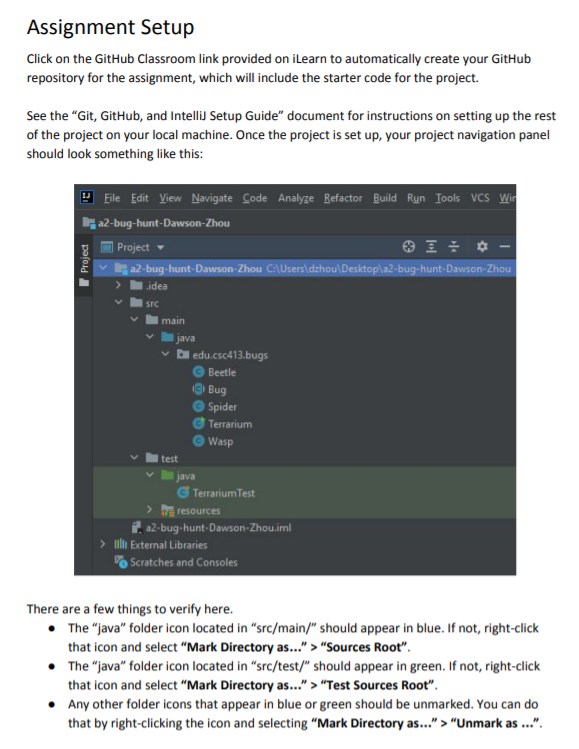
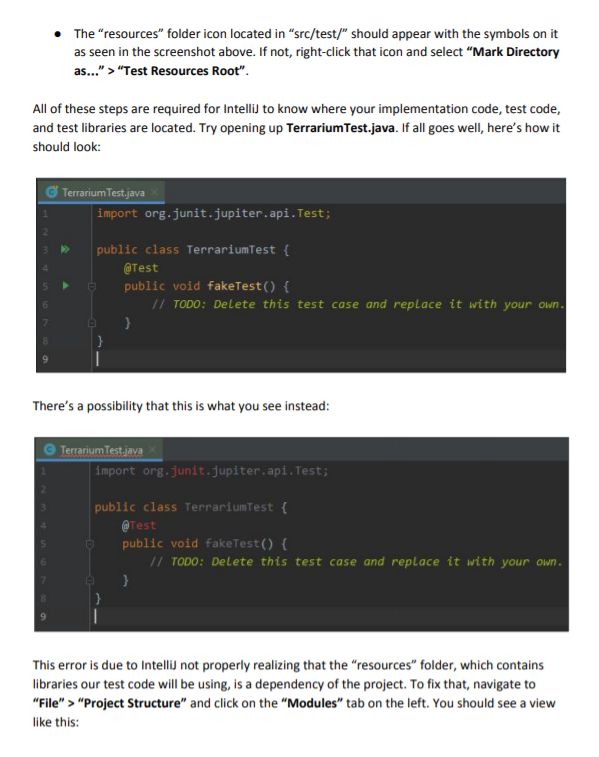
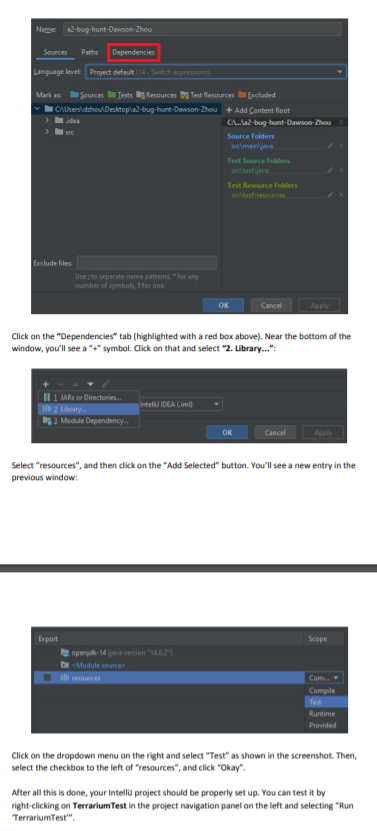
Adding New Test Classes Throughout this assignment, you'll be adding new test classes as well as individual test cases (as methods). To add a new test class, you can right-click on the "java" folder icon under "src/test/ in the project navigation panel on the left and select "New">"Java Class". Once you've added at least one method with the best annotation, you'll be able to run the test class as another JUnit test. Detailed Requirements I've provided some starter code that models a simple terrarium that can hold three types of bugs: beetles, spiders, and wasps. There are five implementation classes in total: Bug: abstract class that represents things about bugs in general Beetle, Spider, and Wasp: subclasses of Bug Terrarium: stores some bugs, offers some methods that give information about bugs, and defines a main method which shows how some of the code can be used Unfortunately, these classes are full of coding errors. You know, bugs. The errors themselves are not a secret at all. I've marked them all with comments that appear as follows: public Bug(String name, int nunLegs) { // TODO ERROR: assignment for both instance variables written // incorrectly nane = this.name; nunlegs = this.numLegs; > Your goal is not just to find and fix the errors, but to write unit tests providing good enough test coverage to expose these as bugs. For that reason, I would strongly recommend writing your unit tests first before fixing the errors -- that way, you'll know they're doing their job. All of the classes should have a corresponding Junit test class, except for Bug, which is an abstract class and can be tricky to test. In each of those JUnit test classes, you should have separate methods (test cases) testing different behaviors. Apply what we learned in Lectures 09 and 10 when thinking about the test cases you'll need. An important thing to remember: you need test coverage not just for the incorrect code in the code base, but for all of the code. Summarizing the requirements: Write JUnit test classes for each of the classes (except Bug). Each test class should contain multiple test cases thoroughly covering various inputs, logical paths, and expected outputs. Unit tests should apply to code that is already working and correct, as well as code that is bugs and needs fixing After tests are written, you should also fix any errors that are found. By the time you're done, all of your Junit tests should pass when run. Assignment Setup Click on the GitHub Classroom link provided on iLearn to automatically create your GitHub repository for the assignment, which will include the starter code for the project. See the "Git, GitHub, and Intellid Setup Guide" document for instructions on setting up the rest of the project on your local machine. Once the project is set up, your project navigation panel should look something like this: Eile Edit View Navigate Code Analyze Refactor Build Run Tools vcs wird a2-bug-hunt-Dawson-Zhou Project a2-bug-hunt-Dawson-Zhou C:\Users\dzhou\Desktop\a2-bug-hunt-Dawson-Zhou Project idea SIC main java bedu.csc413.bugs Beetle @ Bug Spider Terrarium Wasp test java Terrarium Test De resources 1a2-bug-hunt-Dawson-Zhou.ml illi External Libraries Scratches and Consoles There are a few things to verify here. The "java" folder icon located in "src/main/" should appear in blue. If not, right-click that icon and select "Mark Directory as..." > "Sources Root". The "java" folder icon located in "src/test/" should appear in green. If not, right-click that icon and select "Mark Directory as..." > "Test Sources Root". Any other folder icons that appear in blue or green should be unmarked. You can do that by right-clicking the icon and selecting "Mark Directory as..." > "Unmark as ...". The "resources" folder icon located in "src/test/" should appear with the symbols on it as seen in the screenshot above. If not, right-click that icon and select "Mark Directory as.." > "Test Resources Root. All of these steps are required for Intellid to know where your implementation code, test code, and test libraries are located. Try opening up TerrariumTest.java. If all goes well, here's how it should look: Terrarium Test.java import org.junit.jupiter.api. Test; public class TerrariumTest { @Test public void fakeTest() { // TODO: Delete this test case and replace it with your own. There's a possibility that this is what you see instead: Terrarium Test.java import org. junit.jupiter.api. Test; public class TerrariumTest { @Test public void fakeTest() { // TODO: Delete this test case and replace it with your own. } } This error is due to intellid not properly realizing that the "resources" folder, which contains libraries our test code will be using, is a dependency of the project. To fix that, navigate to "File" > "Project Structure" and click on the "Modules" tab on the left. You should see a view like this: Name a2-bug.hunt-Dawson-Zhou Sources Paths Dependencies Language level Project defuit (14. Switch expression) Marks Sources Tests Resources Test Resources Excluded CAUsersidahou Desktop 2-bug.hunt-Dawson-Zhou + Add Content Root CA...a2-bug-hunt-Dawson-Zhou Source Folders Test Source Folders Test Resource folders sre tester Exclude files: Use; to separate name patterns for any number of symbols, ? for one. OK Cancel Apple Click on the "Dependencies" tab (highlighted with a red box above). Near the bottom of the window, you'll see a "+" symbol. Click on that and select "2. Library..." Intel IDEA (im MARs or Directories. Library 2 Modde Dependency OK Cancel Apply Select "resources", and then click on the "Add Selected" button. You'll see a new entry in the previous window: Export Scope operidk-14 (ava version 1402 1 Module source Com. Compile Test Runtime Provided Click on the dropdown menu on the right and select "Test as shown in the screenshot. Then, select the checkbox to the left of resources", and click "okay". After all this is done, your Intel project should be properly set up. You can test it by right-clicking on Terrarium Test in the project navigation panel on the left and selecting Run Terrarium TestStep by Step Solution
There are 3 Steps involved in it
Step: 1

Get Instant Access to Expert-Tailored Solutions
See step-by-step solutions with expert insights and AI powered tools for academic success
Step: 2

Step: 3

Ace Your Homework with AI
Get the answers you need in no time with our AI-driven, step-by-step assistance
Get Started


