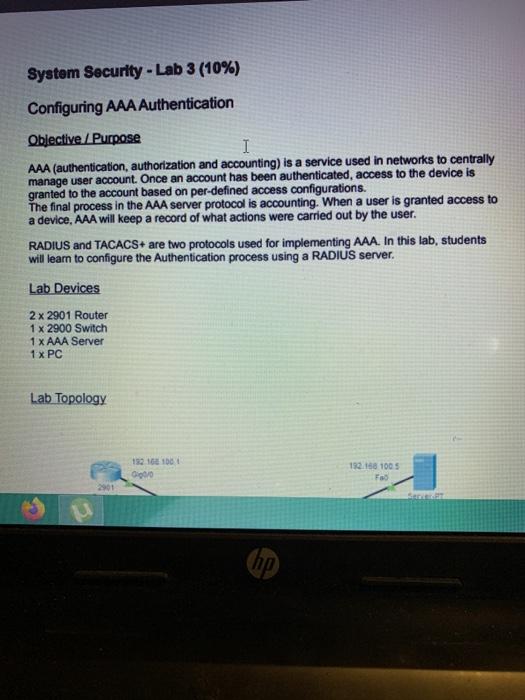
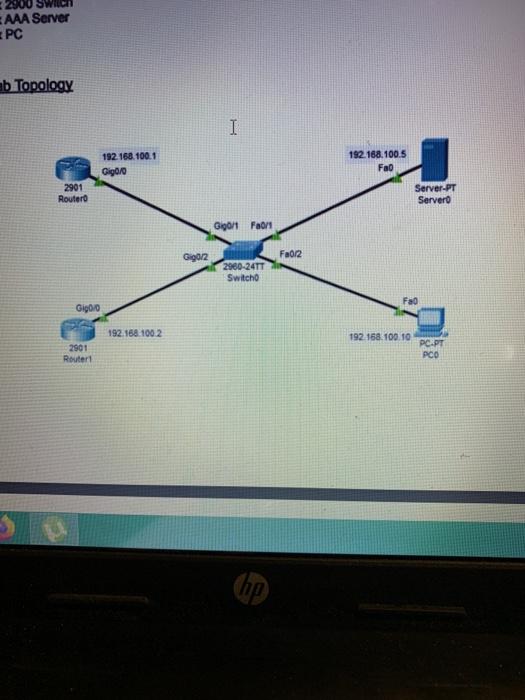
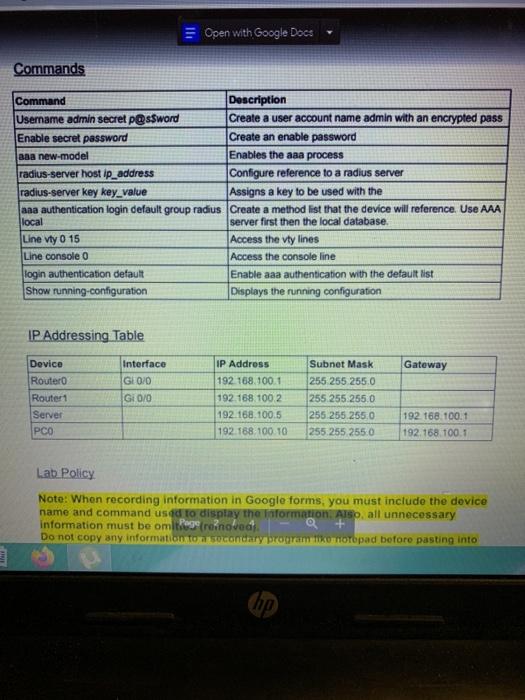
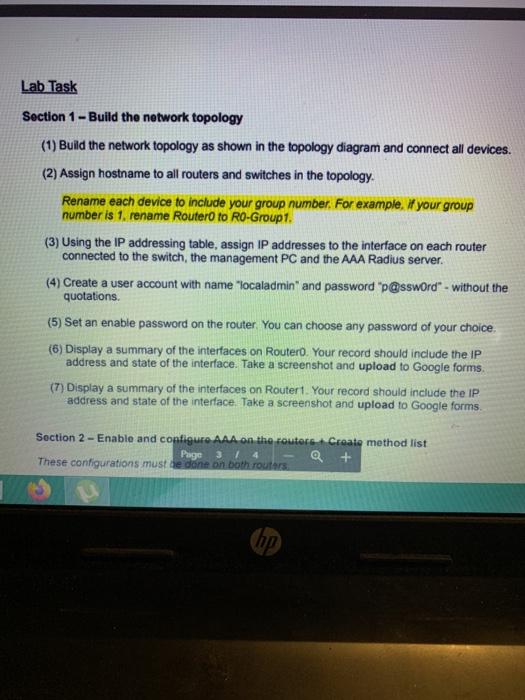
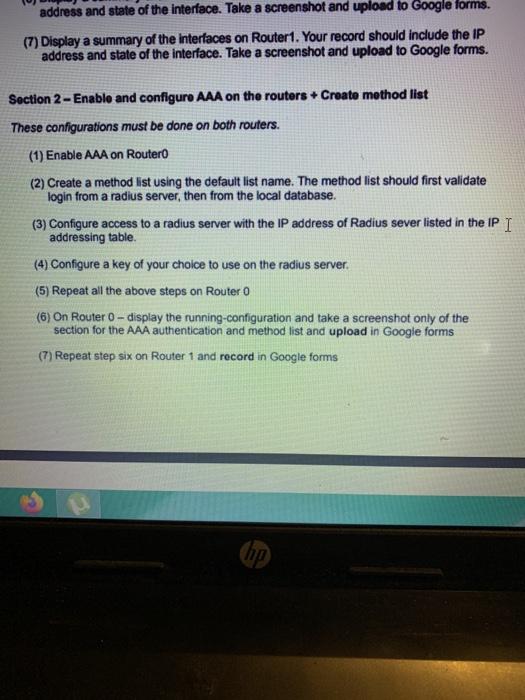
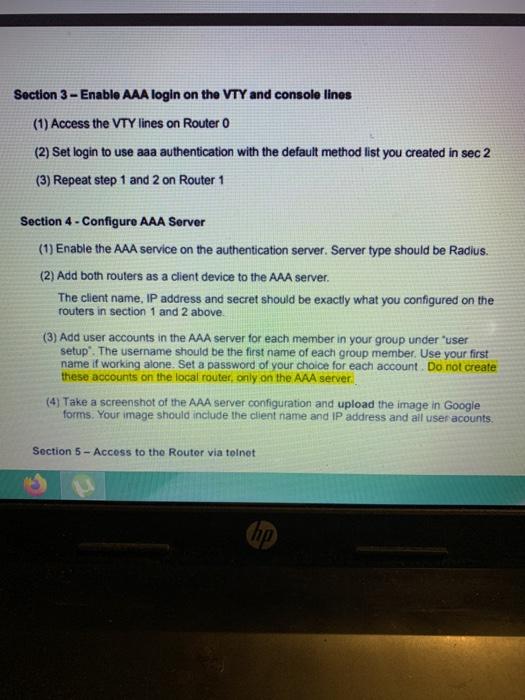
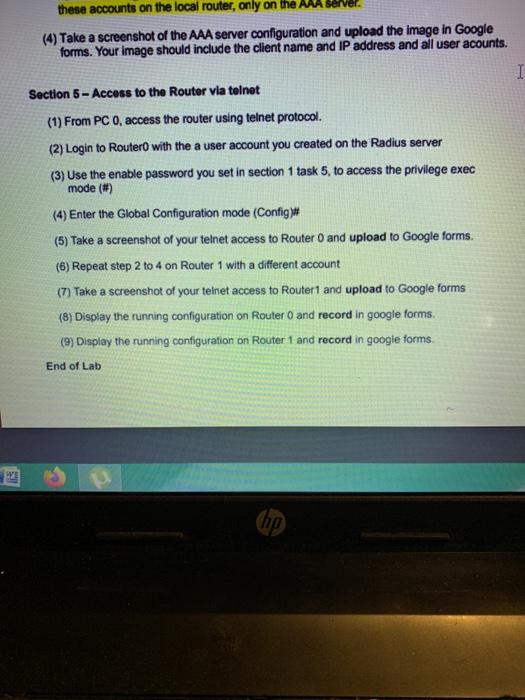
System Security - Lab 3 (10%) Configuring AAA Authentication Objective/Purpose I AAA (authentication, authorization and accounting) is a service used in networks to centrally manage user account. Once an account has been authenticated, access to the device is granted to the account based on per-defined access configurations. The final process in the AAA server protocol is accounting. When a user is granted access to a device, AAA will keep a record of what actions were carried out by the user. RADIUS and TACACS+ are two protocols used for implementing AAA. In this lab, students will learn to configure the Authentication process using a RADIUS server. Lab Devices 2 x 2901 Router 1 x 2900 Switch 1 x AAA Server 1 x PC Lab Topology 152 163 16 000 192.168 1005 Fao 2901 hp 2300 Switc AAA Server PC b Topology 192.168.100.1 Gigolo 192.168.100.5 Fao 2901 Router Server-PT Servero G0/1 Fan G9012 Fa0/2 2960-24TT Switch Fao Gigo 192.168.100 2 192.168.100.10 2901 Router PC.PT PCO Open with Google Docs Commands Command Description Username admin secret P@ssword Create a user account name admin with an encrypted pass Enable secret password Create an enable password aaa new model Enables the aaa process radius-server host ip address Configure reference to a radius server radius-server key key_value Assigns a key to be used with the aaa authentication login default group radius Create a method list that the device will reference. Use AAA local server first then the local database. Line Vty 0 15 Access the vty lines Line console Access the console line login authentication default Enable aaa authentication with the default list Show running configuration Displays the running configuration IP Addressing Table Gateway Device Router Router1 Server PCO Interface Gl0/0 Gi 010 IP Address 192.168.100.1 192.168.100 2 192.168.100.5 192.168.100.10 Subnet Mask 255.255.255.0 (255.255.255.0 255.255.255.0 255.255.255.0 192.168.100.1 192.168.100.1 Lab Policy Note: When recording information in Google forms, you must include the dovice name and command used to display the information. Also, all unnecessary information must be omitos reinovodi O Do not copy any information to secondary program komoropad before pasting into hp Lab Task Section 1 - Build the network topology (1) Build the network topology as shown in the topology diagram and connect all devices. (2) Assign hostname to all routers and switches in the topology. Rename each device to include your group number. For example. If your group number is 1, rename Router to RO-Group1. (3) Using the IP addressing table, assign IP addresses to the interface on each router connected to the switch, the management PC and the AAA Radius server. (4) Create a user account with name "localadmin" and password "p@ssword" - without the quotations (5) Set an enable password on the router. You can choose any password of your choice (6) Display a summary of the interfaces on Routero. Your record should include the IP address and state of the interface. Take a screenshot and upload to Google forms (7) Display a summary of the interfaces on Router1. Your record should include the IP address and state of the interface. Take a screenshot and upload to Google forms. Section 2 - Enable and configure AAA on the routers Create method list Page 3 / 4 Q + These configurations must be done on both routers address and state of the interface. Take a screenshot and upload to Google forms. (7) Display a summary of the interfaces on Router1. Your record should include the IP address and state of the interface. Take a screenshot and upload to Google forms. Section 2 - Enable and configure AAA on the routers + Create method list These configurations must be done on both routers. (1) Enable AAA on Routero (2) Create a method list using the default list name. The method list should first validate login from a radius server, then from the local database. (3) Configure access to a radius server with the IP address of Radius sever listed in the IP I addressing table. (4) Configure a key of your choice to use on the radius server. (5) Repeat all the above steps on Router (6) On Router - display the running-configuration and take a screenshot only of the section for the AAA authentication and method list and upload in Google forms (7) Repeat step six on Router 1 and record in Google forms ho Section 3 - Enable AAA login on the VTY and console lines (1) Access the VTY lines on Router 0 (2) Set login to use aaa authentication with the default method list you created in sec 2 (3) Repeat step 1 and 2 on Router 1 Section 4 - Configure AAA Server (1) Enable the AAA service on the authentication server. Server type should be Radius. (2) Add both routers as a client device to the AAA server. The client name, IP address and secret should be exactly what you configured on the routers in section 1 and 2 above. (3) Add user accounts in the AAA server for each member in your group under 'user setup. The username should be the first name of each group member. Use your first name if working alone. Set a password of your choice for each account. Do not create these accounts on the local router, only on the AAA server (4) Take a screenshot of the AAA server configuration and upload the image in Google forms. Your image should include the client name and IP address and all user acounts. Section 5 - Access to the Router via telnet 13 hp these accounts on the local router, only on the (4) Take a screenshot of the AAA server configuration and upload the image in Google forms. Your image should include the client name and IP address and all user acounts. I Section 5 - Access to the Router via telnet (1) From PC 0, access the router using telnet protocol. (2) Login to Router with the a user account you created on the Radius server (3) Use the enable password you set in section 1 task 5, to access the privilege exec mode (#) (4) Enter the Global Configuration mode (Config)# (5) Take a screenshot of your telnet access to Router 0 and upload to Google forms. (6) Repeat step 2 to 4 on Router 1 with a different account (7) Take a screenshot of your telnet access to Router1 and upload to Google forms (8) Display the running configuration on Router 0 and record in google forms (9) Display the running configuration on Router 1 and record in google forms End of Lab ho System Security - Lab 3 (10%) Configuring AAA Authentication Objective/Purpose I AAA (authentication, authorization and accounting) is a service used in networks to centrally manage user account. Once an account has been authenticated, access to the device is granted to the account based on per-defined access configurations. The final process in the AAA server protocol is accounting. When a user is granted access to a device, AAA will keep a record of what actions were carried out by the user. RADIUS and TACACS+ are two protocols used for implementing AAA. In this lab, students will learn to configure the Authentication process using a RADIUS server. Lab Devices 2 x 2901 Router 1 x 2900 Switch 1 x AAA Server 1 x PC Lab Topology 152 163 16 000 192.168 1005 Fao 2901 hp 2300 Switc AAA Server PC b Topology 192.168.100.1 Gigolo 192.168.100.5 Fao 2901 Router Server-PT Servero G0/1 Fan G9012 Fa0/2 2960-24TT Switch Fao Gigo 192.168.100 2 192.168.100.10 2901 Router PC.PT PCO Open with Google Docs Commands Command Description Username admin secret P@ssword Create a user account name admin with an encrypted pass Enable secret password Create an enable password aaa new model Enables the aaa process radius-server host ip address Configure reference to a radius server radius-server key key_value Assigns a key to be used with the aaa authentication login default group radius Create a method list that the device will reference. Use AAA local server first then the local database. Line Vty 0 15 Access the vty lines Line console Access the console line login authentication default Enable aaa authentication with the default list Show running configuration Displays the running configuration IP Addressing Table Gateway Device Router Router1 Server PCO Interface Gl0/0 Gi 010 IP Address 192.168.100.1 192.168.100 2 192.168.100.5 192.168.100.10 Subnet Mask 255.255.255.0 (255.255.255.0 255.255.255.0 255.255.255.0 192.168.100.1 192.168.100.1 Lab Policy Note: When recording information in Google forms, you must include the dovice name and command used to display the information. Also, all unnecessary information must be omitos reinovodi O Do not copy any information to secondary program komoropad before pasting into hp Lab Task Section 1 - Build the network topology (1) Build the network topology as shown in the topology diagram and connect all devices. (2) Assign hostname to all routers and switches in the topology. Rename each device to include your group number. For example. If your group number is 1, rename Router to RO-Group1. (3) Using the IP addressing table, assign IP addresses to the interface on each router connected to the switch, the management PC and the AAA Radius server. (4) Create a user account with name "localadmin" and password "p@ssword" - without the quotations (5) Set an enable password on the router. You can choose any password of your choice (6) Display a summary of the interfaces on Routero. Your record should include the IP address and state of the interface. Take a screenshot and upload to Google forms (7) Display a summary of the interfaces on Router1. Your record should include the IP address and state of the interface. Take a screenshot and upload to Google forms. Section 2 - Enable and configure AAA on the routers Create method list Page 3 / 4 Q + These configurations must be done on both routers address and state of the interface. Take a screenshot and upload to Google forms. (7) Display a summary of the interfaces on Router1. Your record should include the IP address and state of the interface. Take a screenshot and upload to Google forms. Section 2 - Enable and configure AAA on the routers + Create method list These configurations must be done on both routers. (1) Enable AAA on Routero (2) Create a method list using the default list name. The method list should first validate login from a radius server, then from the local database. (3) Configure access to a radius server with the IP address of Radius sever listed in the IP I addressing table. (4) Configure a key of your choice to use on the radius server. (5) Repeat all the above steps on Router (6) On Router - display the running-configuration and take a screenshot only of the section for the AAA authentication and method list and upload in Google forms (7) Repeat step six on Router 1 and record in Google forms ho Section 3 - Enable AAA login on the VTY and console lines (1) Access the VTY lines on Router 0 (2) Set login to use aaa authentication with the default method list you created in sec 2 (3) Repeat step 1 and 2 on Router 1 Section 4 - Configure AAA Server (1) Enable the AAA service on the authentication server. Server type should be Radius. (2) Add both routers as a client device to the AAA server. The client name, IP address and secret should be exactly what you configured on the routers in section 1 and 2 above. (3) Add user accounts in the AAA server for each member in your group under 'user setup. The username should be the first name of each group member. Use your first name if working alone. Set a password of your choice for each account. Do not create these accounts on the local router, only on the AAA server (4) Take a screenshot of the AAA server configuration and upload the image in Google forms. Your image should include the client name and IP address and all user acounts. Section 5 - Access to the Router via telnet 13 hp these accounts on the local router, only on the (4) Take a screenshot of the AAA server configuration and upload the image in Google forms. Your image should include the client name and IP address and all user acounts. I Section 5 - Access to the Router via telnet (1) From PC 0, access the router using telnet protocol. (2) Login to Router with the a user account you created on the Radius server (3) Use the enable password you set in section 1 task 5, to access the privilege exec mode (#) (4) Enter the Global Configuration mode (Config)# (5) Take a screenshot of your telnet access to Router 0 and upload to Google forms. (6) Repeat step 2 to 4 on Router 1 with a different account (7) Take a screenshot of your telnet access to Router1 and upload to Google forms (8) Display the running configuration on Router 0 and record in google forms (9) Display the running configuration on Router 1 and record in google forms End of Lab ho
