Answered step by step
Verified Expert Solution
Question
1 Approved Answer
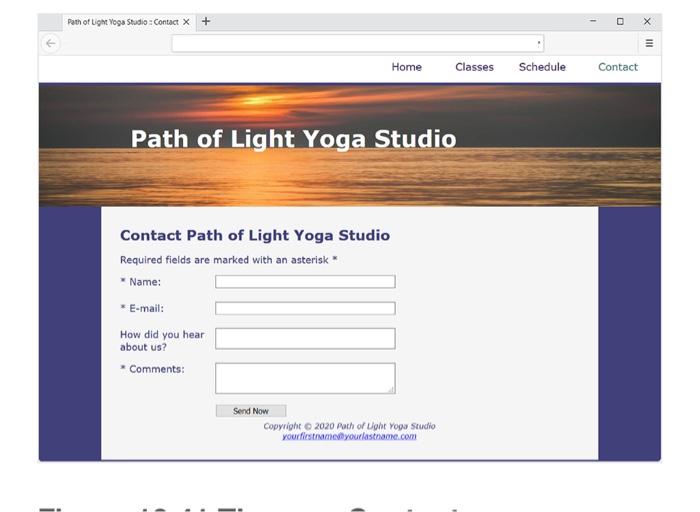
Task 2: Configure the CSS. Review Figure 10.41 and the wireframe in Figure 10.42. Notice how the text labels for the form controls are on
Task 2: Configure the CSS. Review Figure 10.41 and the wireframe in Figure 10.42. Notice how the text labels for the form controls are on the left side of the content area but contain right-aligned text. Notice the empty vertical space between each form control. When displaying on a narrow viewport, the display will be more pleasing if there is only one column, as shown in Figure 10.43. Open yoga.css in a text editor. Configure the CSS as follows:
The field set element borders are shaded.
Figure 10.42 The grid layout sketch of the form.
The yoga studios updated contact page has a contact form with text boxes for Name and Email, a scrolling text box for Comments, and a button labeled, Send Now. Text labels are to the left, justified right, with text boxes on the right, justified left.
Figure 10.43 Single-column form in a narrow viewport.
Configure the single column display for narrow viewports using flexbox. Add the following CSS above the media queries to configure the form element selection as a flex container with one column. Also set a .5em bottom margin on the input, datalist, and textarea element selectors.
form { display: flex;
flex-flow: column nowrap; }
input, datalist textarea { margin-bottom: .5em; }
Configure the two-column display with grid layout. Add CSS to the first media query to accomplish this.
Configure a form element selector. Set 60% width, maximum width 40em, grid display with 1em grid gap, two columns (9em width and 1fr width), and auto rows.
Configure an attribute selector for the submit button. Use the grid-column property to place this in the second column. Set width to 9em.
Save the yoga.css file.
Task 3: Create the Contact Page. Use the Classes page as the starting point for the Contact page. Launch a text editor and open classes.html. Save the file as contact.html. Modify your contact.html file to look similar to the Contact page (shown in Figure 10.41) as follows:
Change the page title to an appropriate phrase.
The Contact page will display a form in the main element. Delete all HTML and content within the main element except for the
element and its text.
Change the text in the
element to Contact Path of Light Yoga Studio.
Add a paragraph below the h2 element to indicate: Required fields are marked with an asterisk * .
Prepare to code the HTML for the form area. Begin with a form element that uses the post method and the action attribute to invoke server-side processing. Unless directed otherwise by your instructor, configure the action attribute to send the form data to https://webdevbasics.net/scripts/yoga.php.
Configure the form control for the Name information. Create a label element that contains the text * Name:. Create a text box configured with myName as the value of the id and name attributes. Use the for attribute to associate the label element with the form control. Configure the required attribute.
Configure the e-mail form control for the E-mail information (use type="email"). Create a label element that contains the text * E-mail:. Create a text box configured with myEmail as the value of the id and name attributes. Use the for attribute to associate the label element with the form control. Configure the required attribute.
Code a label element containing the text How did you hear about us? that is associated with a textbox and datalist form control with the following options configured: Google, Bing, Facebook, Friend, Radio Ad.
Configure the Comments area on the form. Create a label element that contains the text * Comments:. Create a textarea element configured with myComments as the value of the id and name attributes, rows set to 2, and cols set to 20. Use the for attribute to associate the label element with the form control. Configure the required attribute.
Configure the submit button to display "Send Now".
Code an ending tag on a blank line after the submit button.
Save your file and test your web page in a browser. It should look similar to the pages shown in Figures 10.41 and 10.43, depending on the size of your browser viewport. Submit the form with missing information or only a partial e-mail address. Depending on the browsers level of HTML5 support, the browser may perform form validation and display an error message. Figure 10.44 shows the Contact page rendered in a browser with an incorrectly formatted e-mail address.
A web page.

Step by Step Solution
There are 3 Steps involved in it
Step: 1

Get Instant Access to Expert-Tailored Solutions
See step-by-step solutions with expert insights and AI powered tools for academic success
Step: 2

Step: 3

Ace Your Homework with AI
Get the answers you need in no time with our AI-driven, step-by-step assistance
Get Started


