

Question
the code for that i have package stopwatch; import javax.swing.*; import java.awt.*; import java.awt.event.*; public class Stopwatch extends JFrame { public static void main(String args[])
 the code for that i have
package stopwatch; import javax.swing.*; import java.awt.*; import java.awt.event.*; public class Stopwatch extends JFrame { public static void main(String args[]) { // Construct the frame new Stopwatch().show(); } public Stopwatch() { // Frame constructor setTitle("Stopwatch Application"); setSize(300, 100);
}
}
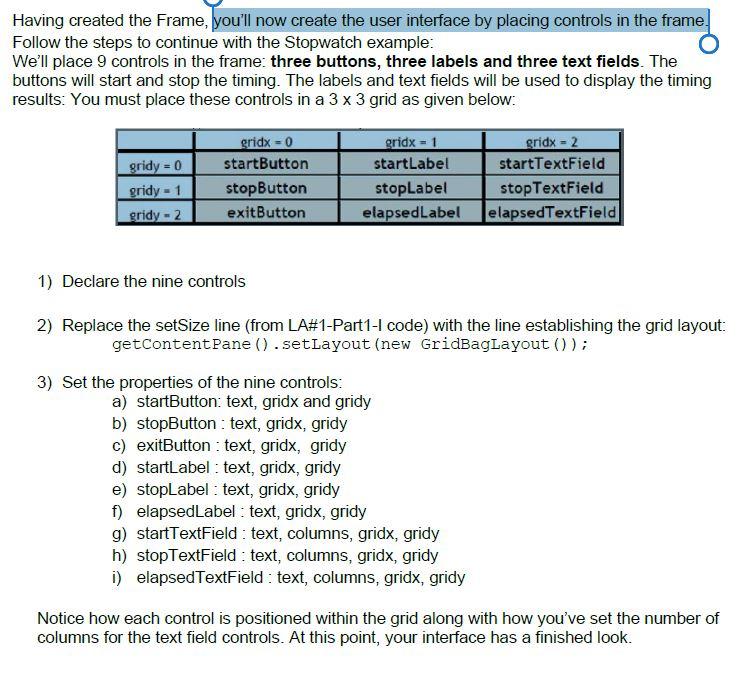
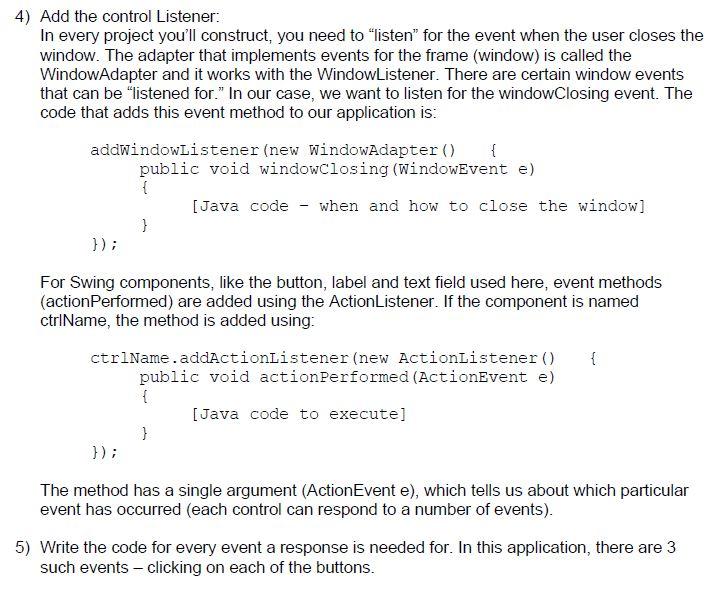
Having created the Frame, you'll now create the user interface by placing controls in the frame. Follow the steps to continue with the Stopwatch example: We'll place 9 controls in the frame: three buttons, three labels and three text fields. The buttons will start and stop the timing. The labels and text fields will be used to display the timing results: You must place these controls in a 3 x 3 grid as given below: gridy = 0 gridy - 1 gridy - 2 gridx = 0 startButton stopButton exitButton gridx = 1 startLabel stopLabel elapsedLabel gridx - 2 startTextField stop TextField elapsedTextField 1) Declare the nine controls 2) Replace the setSize line (from LA#1-Part1-1 code) with the line establishing the grid layout: getContentPane ().setLayout (new GridBag Layout()); 3) Set the properties of the nine controls: a) startButton: text, gridx and gridy b) stopButton : text, gridx, gridy c) exitButton : text, gridx, gridy d) startLabel : text, gridx, gridy e) stopLabel : text, gridx, gridy f) elapsedLabel : text, gridx, gridy g) startTextField : text, columns, gridx, gridy h) stopTextField : text, columns, gridx, gridy i) elapsedTextField : text, columns, gridx, gridy Notice how each control is positioned within the grid along with how you've set the number of columns for the text field controls. At this point, your interface has a finished look. 4) Add the control Listener: In every project you'll construct, you need to "listen" for the event when the user closes the window. The adapter that implements events for the frame (window) is called the WindowAdapter and it works with the WindowListener. There are certain window events that can be listened for." In our case, we want to listen for the window Closing event. The code that adds this event method to our application is: addwindowListener(new WindowAdapter() { public void windowclosing (WindowEvent e) { [Java code when and how to close the window] } }); For Swing components, like the button, label and text field used here, event methods (action Performed) are added using the ActionListener. If the component is named ctrlName, the method is added using: ctrlName.addActionListener(new ActionListener() { public void action Performed (ActionEvent e) 1 [Java code to execute] } The method has a single argument (ActionEvent e), which tells us about which particular event has occurred (each control can respond to a number of events). 5) Write the code for every event a response is needed for. In this application, there are 3 such events - clicking on each of the buttonsStep by Step Solution
There are 3 Steps involved in it
Step: 1

Get Instant Access to Expert-Tailored Solutions
See step-by-step solutions with expert insights and AI powered tools for academic success
Step: 2

Step: 3
Ace Your Homework with AI
Get the answers you need in no time with our AI-driven, step-by-step assistance
Get Started
Oracle Solaris 11.2 System Administration (oracle Press)
Authors: Harry Foxwell
1st Edition
007184421X, 9780071844215