Question
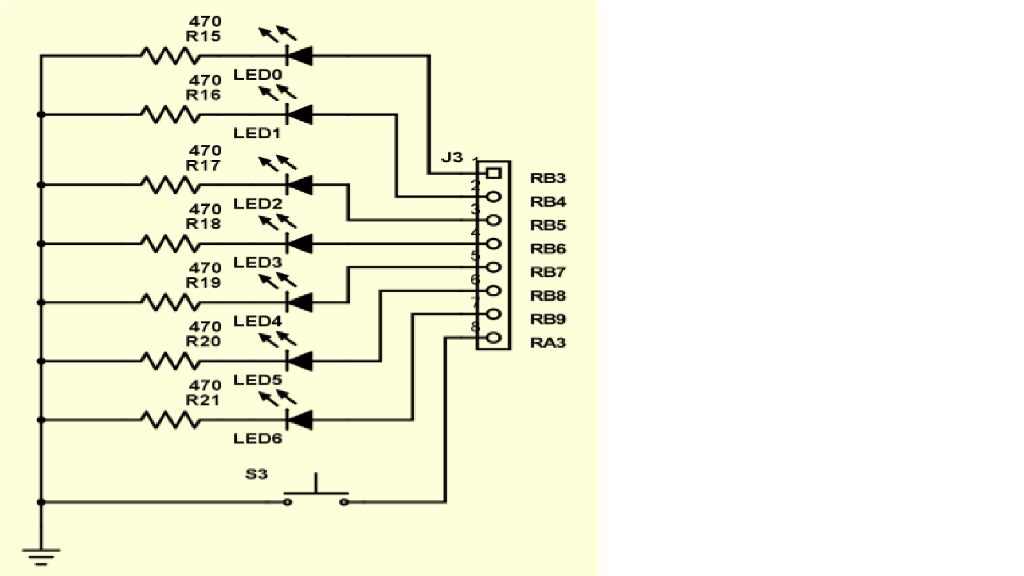
The code is run using C++ Programming using MPLAB X IDE from microchip Develop Code that will implement this flowchart Start with All the LEDs
The code is run using C++ Programming using MPLAB X IDE from microchip
Develop Code that will implement this flowchart
Start with All the LEDs Turned Off
1.) Press and release the switch SW3 one time ------> LED6 turns ON
2.) Press and release the switch SW3 again ------> LED6 turns OFF
3.) Press and release the switch SW3 again ------> LED5 turns ON
4.) Press and release the switch SW3 again ------> LED5 turns OFF
5.) Press and hold switch SW3 ------> LED4 turns ON
6.) Release switch SW3 ------> LED4 turns OFF and LED3 turns ON
7.) Press and hold switch SW3 ------> LED2 turns ON
8.) Release switch SW3 ------> LED3 turns OFF and LED1 turns ON
9.) Press and hold switch SW3 ------> LED0 turns ON and LED1 turns OFF
10.) Release switch SW3 ------> LED2 turns OFF and LED0 turns OFF
11.) Return to step 1 and repeat
Implement this flowchart using IF, ELSEIF, or ELSE statements
The code would then be loaded into a dspic33 using PICkit3

Here is what I have strucutre so far even though it does not run
#include "../Config3310.h"
#include "xc.h"
#include
// Global Variable Declaration
int I, J, K;
void Config_IO(void) { // Config_IO sets up the pins
ANSELA = 0b00000; // TURN ANALOG OFF , could also give ANSELA = 0b and you would have to figure it out
TRISA = 0b10000; // SET TRISA RA4 is input, others output
LATA = 0b00000; // Want to pull all unsued pins to ground inital state of 0
ANSELB = 0x0000; // TURN ANALOG OFF
TRISB = 0x0000; // Turn all others to outputs
LATB = 0x0000; // PULL all others to ground
_CNPUA4 = 1; // Add RA4 Pull up!!
}
void ShortDelay(void) { // calling a function, exucuting a sub rountine from other shortdelay's
for (I = 0; I
for (J = 0; J
} //
}
int main(void) {
// Variable Declarations
int stage = 0;
int step = 1;
// Configuration Calls
Config_IO();
// _RA4 = 0;
while (1) {
// stage = 0;
// step = 1;
If (step == 1) {
while (stage == 0) { //
if (_RA3 == 0) { // if SW3 close (switch 3)) Switch is pressed
_RB9 = 1; // turn RB9 ((LED6)) ON)
stage++; // Go to next stage in project
}
ShortDelay();
// _RA3 = 1;
}
Else if (stage == 1) {
While (stage == 1)
if (_RA3 == 1) { // SW3 open (switch 3 released)
_RB9 = 0; // turn RB9 ((LED6)) OFF)
stage++;
}
ShortDelay();
// _RA3 = 0;
}
Else if (stage == 2) {
While(stage == 2)
if (_RA3 == 0) { // If SW3 is pressed
_RB8 = 1; // Turn LED6 ON
stage++;
}
ShortDelay();
// _RA3 = 1;
}
Else if (stage == 3)
while (stage == 3) {
if (_RA3 == 1) { //Switch is released
_RB8 = 0;
step = 2; //Go to Case 2 next (might have been a line of code missing) that gibbs had)
stage = 0; //Set up start point in Case 2
}
ShortDelay();
}
break;
If step( == 2){
// _RA3 = 0;
while (stage == 0) { //
if (_RA3 == 0) { // if SW3 close (switch 3)) Switch is pressed
_RB7 = 1; // turn RB9 ((LED4)) ON)
ShortDelay(); //This is to be the part where the LED4 remains on while pressed
stage++; // Go to next stage in project
}
ShortDelay();
// _RA3 = 1;
Else if (stage == 1) {
While (stage == 1)
if (_RA3 == 1) { // SW3 open (switch 3 released)
_RB7 = 0; // turn RB7 ((LED4)) OFF)
_RB6 = 1: // turn RB6 ((LED3)) ON
stage++;
}
ShortDelay();
// _RA3 = 0;
Else if (stage == 2) {
While(stage == 2)
if (_RA3 == 0) { // If SW3 is pressed
_RB5 = 1; // Turn LED2 ON
ShortDelay(); //This is to be the part where the LED4 remains on while pressed
stage++;
// _RA4 = 1;
Else if (stage == 3)
while (stage == 3) {
if (_RA3 == 1) { //Switch is released
_RB6 = 0; // LED 3 turns off
_RB4 = 1; // LED 1 turns on
}
ShortDelay();
}
// step = 1;
// stage =0;
break; // Out of case 2
default: // Into default case , go back to beginning
// ShortDelay();
stage = 0;
step = 1;
// _RA4 = 0;
} // end switch (step)
} // end while (1))
} // end main
470 R15 470 LEDO R1 6 LED1 470 R17 J3 470 LED2 R18 470 LED3 R19K*. RB5 RB6 RBT 470 LED4 R R 2 470 LEDS R21 LED6 S3Step by Step Solution
There are 3 Steps involved in it
Step: 1

Get Instant Access to Expert-Tailored Solutions
See step-by-step solutions with expert insights and AI powered tools for academic success
Step: 2

Step: 3

Ace Your Homework with AI
Get the answers you need in no time with our AI-driven, step-by-step assistance
Get Started


