Question
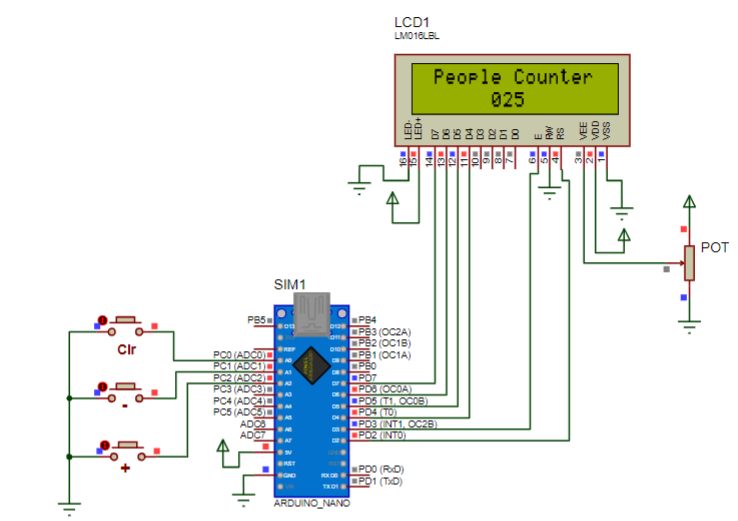
These is the hardware in proteus for the simulation: Implement a people counter with the following characteristics in C code, People Counter for Arduino Nano
These is the hardware in proteus for the simulation:

Implement a people counter with the following characteristics in C code, People Counter for Arduino Nano Version (16MHz).
It is necessary to put the i/o ports in the if like (PINC.1==0) for example The count must have a minimum of 0 and a maximum of 999 people. There will be 3 switches: o +: Increases the people count by one (as long as it does not reach the maximum of 999) o -: Decreases the people count by one (as long as it does not reach the minimum of 0) o Clr: initialize the counter to 0 The rebound must be handled properly in the switches, that is, if it is pressed once, it will not you will need to do the corresponding function more than once. The number should always be shown in 3 positions with zeros preceding the number if it is necessary. For example: 000, 009, 010, 100, and 999.
it is necesary to use the following library for display
//Library for using a LCD by Agustin Dominguez Version3 // Copy this file to "inc" folder and put LCD connections before the #include
//You need to copy this library to the inc folder
#include
#pragma used+
void SendDataBitsLCD(unsigned char dato); void WriteComandLCD(unsigned char Comando); void PulseEn();
/* Procedimiento para configurar el LCD. Es necesaria ejecutar al inicio para el correcto funcionamiento */ /* en un LCD fsico (no es crtico para simulcacin slo en Proteus*/ void SetupLCD() { unsigned char TableSetup[12]={3,3,3,2,2,12,0,8,0,1,0,6}; unsigned char i; #asm SBI __lcd_port-1,__lcd_EN SBI __lcd_port-1,__lcd_RS SBI __lcd_port-1,__lcd_D4 SBI __lcd_port-1,__lcd_D5 SBI __lcd_port-1,__lcd_D6 SBI __lcd_port-1,__lcd_D7 #endasm //DDRF=DDRF|0x3F; //Outputs for LCD delay_ms(50); for (i=0;i
void SendDataBitsLCD(unsigned char dato) { if ((dato&0x08)!=0) #asm("SBI __lcd_port,__lcd_D7") //D7=1; else #asm("CBI __lcd_port,__lcd_D7") // D7=0; if ((dato&0x04)!=0) #asm("SBI __lcd_port,__lcd_D6") // D6=1; else #asm("CBI __lcd_port,__lcd_D6") // D6=0; if ((dato&0x02)!=0) #asm("SBI __lcd_port,__lcd_D5") else #asm("CBI __lcd_port,__lcd_D5") // D5=0; if ((dato&0x01)!=0) #asm("SBI __lcd_port,__lcd_D4") //D4=1; else #asm("CBI __lcd_port,__lcd_D4") //D4=0; }
void WriteComandLCD(unsigned char Comando) { unsigned char tempComando; #asm("CBI __lcd_port,__lcd_RS") //RS=0; delay_ms(2); tempComando=Comando&0xF0; tempComando=tempComando>>4; SendDataBitsLCD(tempComando); PulseEn(); tempComando=Comando&0x0F; SendDataBitsLCD(tempComando); delay_ms(2); PulseEn(); }
/* Sends a character to LCD where the cursor is located*/ void CharLCD(unsigned char dato) { unsigned char tempdato; #asm("SBI __lcd_port,__lcd_RS") // RS=1; delay_ms(2); tempdato=dato&0xF0; tempdato=tempdato>>4; SendDataBitsLCD(tempdato); PulseEn(); tempdato=dato&0x0F; SendDataBitsLCD(tempdato); delay_ms(2); PulseEn(); }
/* Sends a fixed string to LCD*/ void StringLCD(flash unsigned char Mensaje[]) { unsigned char i; i=0; do{ CharLCD(Mensaje[i++]); }while(Mensaje[i]!=0); }
/* Sends a fixed string to LCD with delay (msec) among each character*/ void StringLCD2(flash unsigned char Mensaje[],unsigned int tiempo) { unsigned char i; i=0; do{ CharLCD(Mensaje[i++]); delay_ms(tiempo); }while(Mensaje[i]!=0); }
/* Sents a varible string to LCD*/ void StringLCDVar(unsigned char Mensaje[]) { unsigned char i; i=0; do{ CharLCD(Mensaje[i++]); }while(Mensaje[i]!=0); }
/* Erase all LCD */ void EraseLCD( ) { WriteComandLCD(1); }
/* Move coursor to the position (x,y) */ /* x: Column number 0 a 15 */ /* y: Row number 0 or 1 */ void MoveCursor(unsigned char x, unsigned char y) { switch (y) { case(0): WriteComandLCD(0x80+x); break; case(1): WriteComandLCD(0xC0+x); break; case(2): WriteComandLCD(0x94+x); break; case(3): WriteComandLCD(0xD4+x); break; } }
/* It appers the Underscore Cursor _ */ void UnderscoreCursor() { cursor=cursor|0x02; WriteComandLCD(cursor); }
/* It disappers the Underscore Cursor*/ void NoUnderscoreCursor() { cursor=cursor&0xFD; WriteComandLCD(cursor); }
/* It appers the Blink cursor */ void BlinkCursor() { cursor=cursor|0x01; WriteComandLCD(cursor); }
/* It disappears the Blink cursor */ void NoBlinkCursor() { cursor=cursor&0xFE; WriteComandLCD(cursor); }
/* Crate a custum character Parameters: NoCaracter.- number from 0 to 7 (you can have 8 custum characters) datos[8].- Array with 8 bytes with the draw of the custum character, a 1 stands for a black pixel. 0x00 $ $ 0x0A $ $ $ 0x15 $ $ 0x11 $ $ 0x0A $ 0x04 Example: unsigned char Letra0[8] = {0x00, 0x0A, 0x15, 0x11, 0x0A, 0x04}; //Caracter como un corazn CreateChar(0, Letra0); For display this character use: CharLCD(0); */
void CreateChar(unsigned char NoCaracter, unsigned char datos[8]) { unsigned char i; WriteComandLCD(0x40+NoCaracter*8); for (i=0;i
#pragma used-
LCD1 LMO16LBLStep by Step Solution
There are 3 Steps involved in it
Step: 1

Get Instant Access to Expert-Tailored Solutions
See step-by-step solutions with expert insights and AI powered tools for academic success
Step: 2

Step: 3

Ace Your Homework with AI
Get the answers you need in no time with our AI-driven, step-by-step assistance
Get Started


