Question
WebGL A Generalized Cylinder is a 3D geometric object created by sweeping a 2D face (often a circle/square/polygon/etc) across a spine, which is some line
WebGL
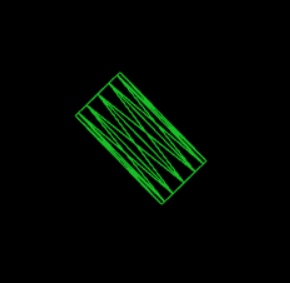
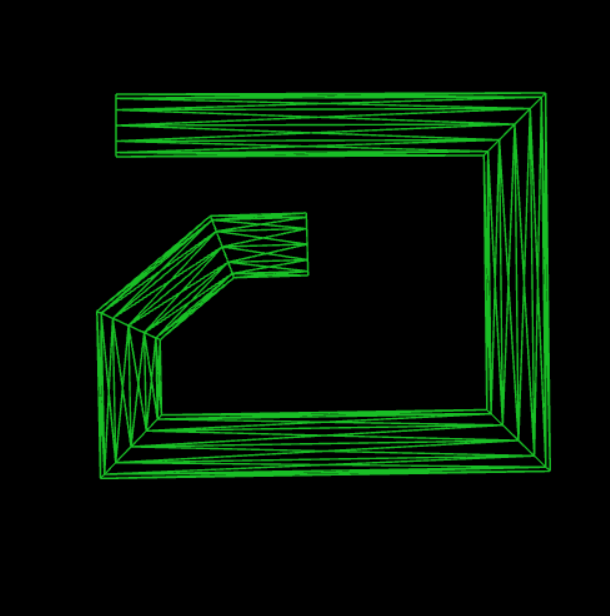
A Generalized Cylinder is a 3D geometric object created by "sweeping" a 2D face (often a circle/square/polygon/etc) across a spine, which is some line or curve in space. In our case, you will use your polyline as the spine, and a 12-sided regular polygon as the face. You will also only be drawing the Wireframe, that is, the faces will be hollow, and we will only see the outlines of the sides (the "skeleton"). Here are some examples of what it should look like:


There are several things to note:
There is no perspective; the cylinder looks completely 2D. This is called an "orthographic projection," which will be covered later in the course. Essentially, our 3D model looks flattened in the z-direction, removing any depth. Your generalized cylinder model SHOULD, however, be specified in 3D coordinates, as later assignments will allow us to rotate and move around our generalized cylinders with perspective.
There are a lot of extra, crisscrossing lines. Typically when you think of a cylinder, you imagine it having rectangular faces going down the side, and polygonal faces at the ends. However, it is more typical to specify faces in computer graphics with triangles. Thus in the images above, each rectangular face is actually represented with two triangles. (If you look closely, however, it appears like each rectangle is four triangles in a sort of 'X' shape. This is not actually the case: we are simply looking through the cylinder to the other side, which is also broken up into two triangles, giving the illusion of four triangles).
The sections of the cylinder intersect cleanly. If you simply stick together a bunch of cylinders like the one in the first picture together for each section of your polyline, you will end up with weird gaps at the intersections. So, you need to implement some method of seamlessly connecting the sections.
Saving and Loading:
Saving and loading generalized cylinders will be done using the 'ioSOR.js' script, which is provided. The functions in this script will turn your models (stored as arrays of vertices and indices) into OBJ format and back.
How you should proceed:
In the end, your assignment should first allow the user to draw a polyline. When the user right clicks to finish the polyline, a 12-sided generalized cylinder is then drawn around the polyline.
Instead of going directly for this, first try just drawing a single, fixed-position generalized cylinder of fixed-length. Then, once that is comfortable, move on to figuring out how to attach that cylinder to the polyline. From there you can then move on to the additional points. This will all be talked about in more detail in lab.
As for the saving and loading portion of the assignment, since it is a pretty separate feature, you can easily save this for the end. However, take care about how you store your vertices (how your points and indices are organized in your arrays) and how you read them back to reconstruct the generalized cylinder. That is, make sure you interpret the vertices you get from a file the same way that you store them.
Here's a video of a working version of this program: https://vimeo.com/264728025
Here's some starter code:
("webgl-utils.js", "webgl-debug.js", and "cuon-utils.js" are libraries that can be found online.)
HTML file:
Javascript files
(load-file.js):
// load text from a file, and calls 'load_handle(file_string)' when done function loadFile(file_name, load_handle) { var request = new XMLHttpRequest(); request.onreadystatechange = function() { if (request.readyState === 4 & request.status != 404) load_handle(request.responseText); } request.open('GET', file_name, true); request.send(); }
(driver.js):
var FSIZE = 4; // size of a vertex coordinate (32-bit float)
var VSHADER_SOURCE = null; // vertex shader program
var FSHADER_SOURCE = null; // fragment shader program
var g_points = []; // array of mouse presses
// called when page is loaded
function main() {
// retrieve
var canvas = document.getElementById('webgl');
// get the rendering context for WebGL
var gl = getWebGLContext(canvas);
if (!gl) {
console.log('Failed to get the rendering context for WebGL');
return;
}
// load shader files (calls 'setShader' when done loading)
loadFile("shader.vert", function(shader_src) {
setShader(gl, canvas, gl.VERTEX_SHADER, shader_src); });
loadFile("shader.frag", function(shader_src) {
setShader(gl, canvas, gl.FRAGMENT_SHADER, shader_src); });
}
// set appropriate shader and start if both are loaded
function setShader(gl, canvas, shader, shader_src) {
if (shader == gl.VERTEX_SHADER)
VSHADER_SOURCE = shader_src;
if (shader == gl.FRAGMENT_SHADER)
FSHADER_SOURCE = shader_src;
if (VSHADER_SOURCE && FSHADER_SOURCE)
start(gl, canvas);
}
// called by 'setShader' when shaders are done loading
function start(gl, canvas) {
// initialize shaders
if (!initShaders(gl, VSHADER_SOURCE, FSHADER_SOURCE)) {
console.log('Failed to intialize shaders.');
return;
}
// initialize buffers
var success = initVertexBuffer(gl);
success = success && initIndexBuffer(gl);
// initialize attributes
success = success && initAttributes(gl);
// check success
if (!success) {
console.log('Failed to initialize buffers.');
return;
}
// specify the color for clearing
gl.clearColor(0, 0, 0, 1);
// clear
gl.clear(gl.COLOR_BUFFER_BIT);
// Register function (event handler) to be called on a mouse press
canvas.onmousedown = function(ev){ click(ev, gl, canvas); };
}
// initialize vertex buffer
function initVertexBuffer(gl) {
// create buffer object
var vertex_buffer = gl.createBuffer();
if (!vertex_buffer) {
console.log("failed to create vertex buffer");
return false;
}
// bind buffer objects to targets
gl.bindBuffer(gl.ARRAY_BUFFER, vertex_buffer);
return true;
}
// initialize index buffer
function initIndexBuffer(gl) {
// create buffer object
var index_buffer = gl.createBuffer();
if (!index_buffer) {
console.log("failed to create index buffer");
return false;
}
// bind buffer objects to targets
gl.bindBuffer(gl.ELEMENT_ARRAY_BUFFER, index_buffer);
return true;
}
// set data in vertex buffer (given typed float32 array)
function setVertexBuffer(gl, vertices) {
gl.bufferData(gl.ARRAY_BUFFER, vertices, gl.STATIC_DRAW);
}
// set data in index buffer (given typed uint16 array)
function setIndexBuffer(gl, indices) {
gl.bufferData(gl.ELEMENT_ARRAY_BUFFER, indices, gl.STATIC_DRAW);
}
// initializes attributes
function initAttributes(gl) {
// assign buffer to a_Position and enable assignment
var a_Position = gl.getAttribLocation(gl.program, 'a_Position');
if (a_Position
console.log("failed to get storage location of a_Position");
return false;
}
gl.vertexAttribPointer(a_Position, 3, gl.FLOAT, false, FSIZE * 3, 0);
gl.enableVertexAttribArray(a_Position);
return true;
}
// Called when user clicks on canvas
function click(ev, gl, canvas) {
var x = ev.clientX; // x coordinate of a mouse pointer
var y = ev.clientY; // y coordinate of a mouse pointer
var rect = ev.target.getBoundingClientRect();
x = ((x - rect.left) - canvas.width/2)/(canvas.width/2);
y = (canvas.height/2 - (y - rect.top))/(canvas.height/2);
// Store the coordinates to g_points array
g_points.push(x);
g_points.push(y);
g_points.push(0); // z-coordinate is 0; polyline lines in xy-plane z=0
// Clear canvas
gl.clear(gl.COLOR_BUFFER_BIT);
// Draw polyline
drawPolyline(gl);
// If user right clicks, finish polyline and draw cylinder
if (ev.button == 2) {
// Clear canvas
gl.clear(gl.COLOR_BUFFER_BIT);
/* PUT CODE TO GENERATE VERTICES/INDICES OF CYLINDER AND DRAW HERE */
drawRectangles(gl); // TEMP: Generates rectangles whose corners are connected
// Remove click handle
canvas.onmousedown = null;
}
}
// Draws the polyline based on clicked points
function drawPolyline(gl) {
// Set vertices
setVertexBuffer(gl, new Float32Array(g_points));
var n = Math.floor(g_points.length/3);
// Set indices (just an array of the numbers 0 to (n-1), which connects them one by one)
var ind = [];
for (i = 0; i
ind.push(i);
setIndexBuffer(gl, new Uint16Array(ind));
// Draw points and lines
gl.drawElements(gl.POINTS, n, gl.UNSIGNED_SHORT, 0);
/* PUT CODE TO DRAW LINES CONNECTING POINTS OF POLYLINES HERE (should only be 1 line of code) */
}
// Draws connected rectangles between clicked points
function drawRectangles(gl) {
var n = g_points.length - 1; // Number of rectangles
var vert = [];
var ind = [];
// Draw each individual rectangle separately
/* NOTE: You can also draw them all at once (single call to 'drawElements') if you want */
for (i = 0; i
// First corner of rectangle
vert.push(g_points[i*3]);
vert.push(g_points[i*3 + 1]);
vert.push(0);
ind.push(0);
// Second corner of rectangle
vert.push(g_points[i*3]);
vert.push(g_points[(i+1)*3 + 1]);
vert.push(0);
ind.push(1);
// Third corner of rectangle
vert.push(g_points[(i+1)*3]);
vert.push(g_points[(i+1)*3 + 1]);
vert.push(0);
ind.push(2);
// Fourth corner of rectangle
vert.push(g_points[(i+1)*3]);
vert.push(g_points[i*3 + 1]);
vert.push(0);
ind.push(3);
// First corner again to wrap lines around
vert.push(g_points[i*3]);
vert.push(g_points[i*3 + 1]);
vert.push(0);
ind.push(0);
// Set vertices
setVertexBuffer(gl, new Float32Array(vert));
var n = Math.floor(vert.length/3);
// Set indices
setIndexBuffer(gl, new Uint16Array(ind));
// Draw rectangle
gl.drawElements(gl.LINE_STRIP, n, gl.UNSIGNED_SHORT, 0);
// Reset vertices and indices
vert = [];
ind = [];
}
}
Other files:
(shader.frag):
void main() { gl_FragColor = vec4(1.0, 0.0, 0.0, 1.0); }
(shader.vert):
attribute vec4 a_Position; void main() { gl_Position = a_Position; gl_PointSize = 10.0; }
Step by Step Solution
There are 3 Steps involved in it
Step: 1

Get Instant Access to Expert-Tailored Solutions
See step-by-step solutions with expert insights and AI powered tools for academic success
Step: 2

Step: 3

Ace Your Homework with AI
Get the answers you need in no time with our AI-driven, step-by-step assistance
Get Started


