Question
* When you done writing the code the output answer should be like that ^ as in the picture above, and it needs to have
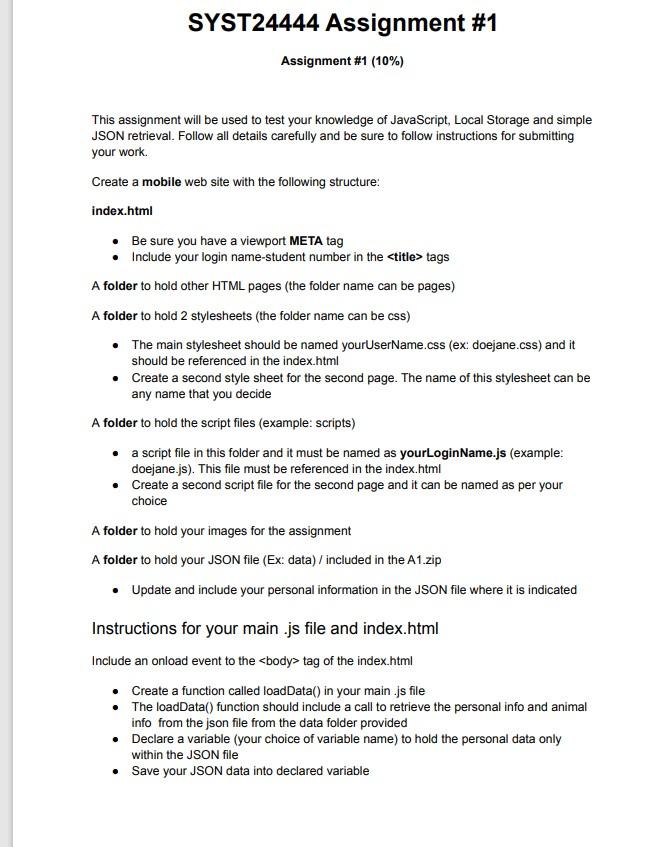
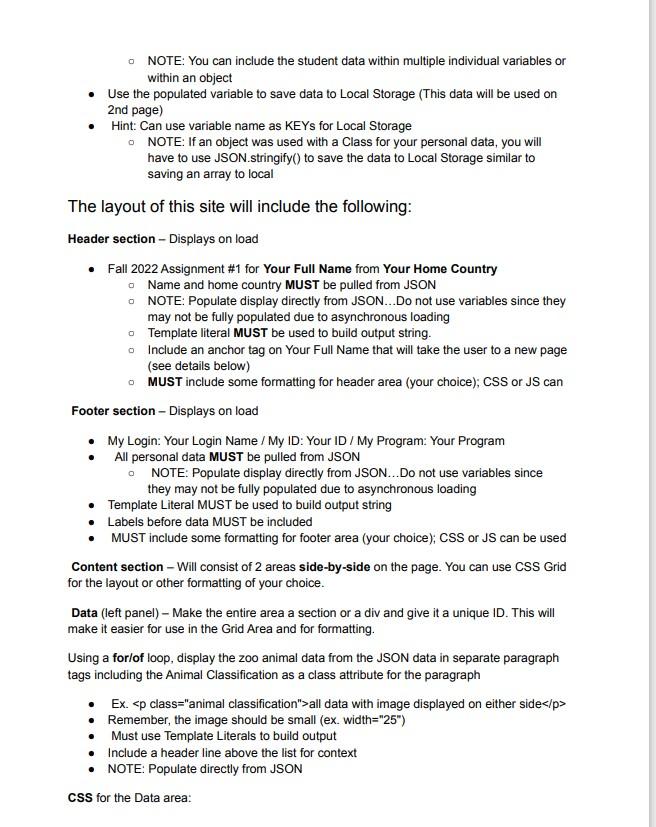
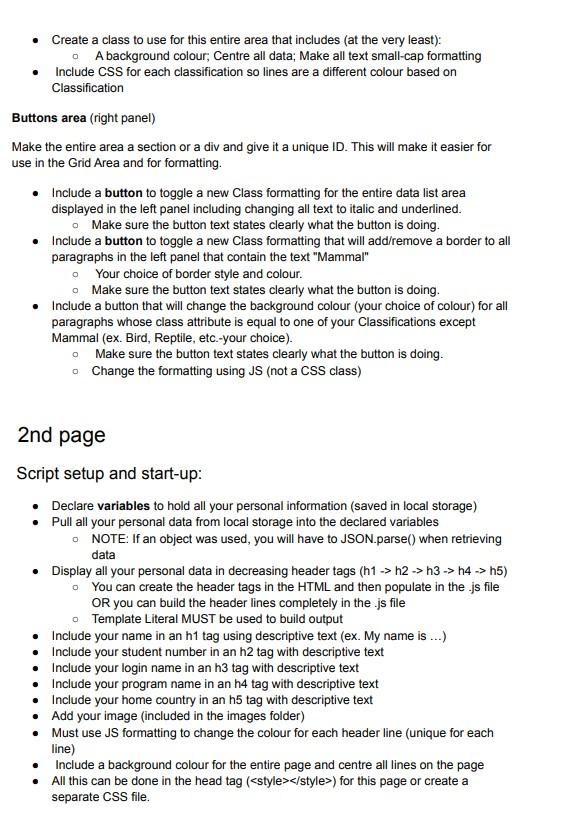
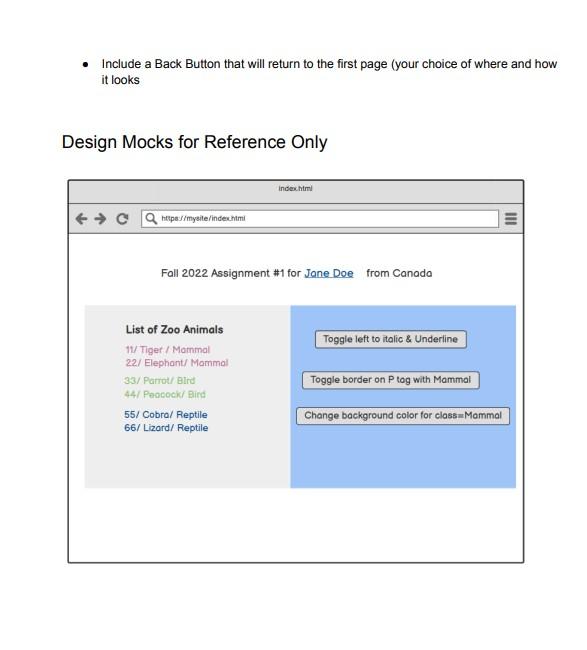
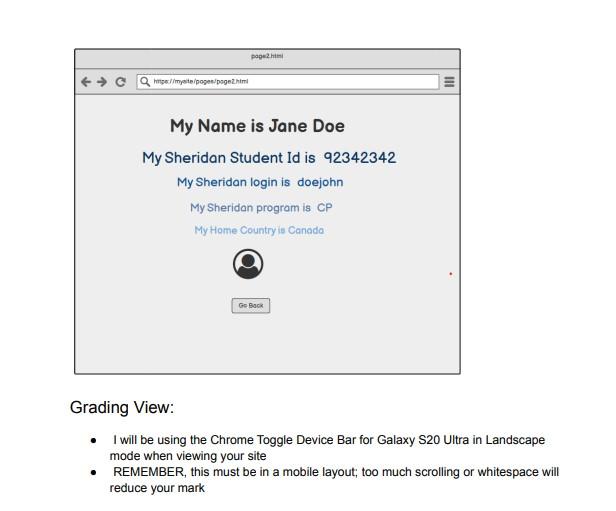
* When you done writing the code the output answer should be like that ^ as in the picture above, and it needs to have HTML, CSS, & JS with PROPER instruction code that's written above, that's all the information that I have only for me too.
and please separate the section of the code with comments between which one is HTML, CSS and JS code
I need to have 2 .js file, 2 .css file (maybe 2 of the HTML file) if possible
the name on the output should pull from the js file
please use my code:
a1.json
```
{
"student": {
"name": "Jisoo Kang",
"studentId": "991636291",
"login": "kangjiso",
"program": "Software Development & Network Engineering",
"homeCountry": "Canada",
"profileImage": "images/myImage.gif"
},
"animals": [
{
"id": 11,
"name": "Monkey",
"classification": "Mammal"
},
{
"id": 22,
"name": "Dog",
"classification": "Mammal"
},
{
"id": 33,
"name": "Pigeon",
"classification": "Bird"
},
{
"id": 44,
"name": "Crow",
"classification": "Bird"
},
{
"id": 55,
"name": "Crocodile",
"classification": "Reptile"
},
{
"id": 44,
"name": "Cobra",
"classification": "Reptile"
}
]
}```
----------------------main.css-----------
var aArray = new Array();
var sArray = new Array();
function loadData() {
console.log("in function");
fetch("data/a1.json")
.then((res) => res.json())
.then((dataJSON) => {
console.log(dataJSON);
loadArrays(dataJSON);
loadView(aArray, true);
});
}// loadData ends
function loadArrays(dataJSON){
var animalList = dataJSON.animals;
for(let animal of animalList){
console.log(animal);
aArray.push(new Animal(
animal.id,
animal.name,
animal.classification
));
}
}
function loadView(arrList, animal) {
let aData = document.getElementById("data");
aData.innerHTML = "";
for (let x of arrList) {
aData.innerHTML +=
`
}
}
class Student {
constructor(name, studentID, login, program, homeCountry, profileImage) {
this.name = name;
this.studentID = studentID;
this.login = login;
this.program = program;
this.homeCountry = homeCountry;
this.profileImg = profileImage;
}
}//end of class student
class Animal {
constructor(id, name, classification) {
this.id = id;
this.name = name;
this.classification = classification;
}
}// end of class Animal
----------main.css ends-----------
-----------second.css------------
var aArray = new Array();
var sArray = new Array();
class Student{
constructor(name, studentID, login, program, homeCountry, profileImage){
this.name = name;
this.studentID = studentID;
this.login = login;
this.program = program;
this.homeCountry = homeCountry;
this.profileImg = profileImage;
}
}//end of class student
class Animal{
constructor(id, name, classification){
this.id = id;
this.name = name;
this.classification = classification;
}
}// end of class Animal
----second.css ends--------
--------------index.html---------------
">
Fall 2022 Assignment #1 for Name from Canada
My Login: name/My ID: ########/ My Program: Software Development and Network Engineering
Assignment #1(10%) This assignment will be used to test your knowledge of JavaScript, Local Storage and simple JSON retrieval. Follow all details carefully and be sure to follow instructions for submitting your work. Create a mobile web site with the following structure: index.html - Be sure you have a viewport META tag - Include your login name-student number in the tags A folder to hold other HTML pages (the folder name can be pages) A folder to hold 2 stylesheets (the folder name can be css) - The main stylesheet should be named yourUserName.css (ex: doejane.css) and it should be referenced in the index.html - Create a second style sheet for the second page. The name of this stylesheet can be any name that you decide A folder to hold the script files (example: scripts) - a script file in this folder and it must be named as yourLoginName.js (example: doejane.js). This file must be referenced in the index.html - Create a second script file for the second page and it can be named as per your choice A folder to hold your images for the assignment A folder to hold your JSON file (Ex: data) / included in the A1.zip - Update and include your personal information in the JSON file where it is indicated Instructions for your main .js file and index.html Include an onload event to the tag of the index.html - Create a function called loadData() in your main .js file - The loadData() function should include a call to retrieve the personal info and animal info from the json file from the data folder provided - Declare a variable (your choice of variable name) to hold the personal data only within the JSON file - Save your JSON data into declared variable NOTE: You can include the student data within multiple individual variables or within an object - Use the populated variable to save data to Local Storage (This data will be used on 2nd page) - Hint: Can use variable name as KEYs for Local Storage - NOTE: If an object was used with a Class for your personal data, you will have to use JSON.stringify() to save the data to Local Storage similar to saving an array to local The layout of this site will include the following: Header section - Displays on load - Fall 2022 Assignment \#1 for Your Full Name from Your Home Country Name and home country MUST be pulled from JSON NOTE: Populate display directly from JSON..Do not use variables since they may not be fully populated due to asynchronous loading Template literal MUST be used to build output string. Include an anchor tag on Your Full Name that will take the user to a new page (see details below) MUST include some formatting for header area (your choice); CSS or JS can Footer section - Displays on load - My Login: Your Login Name / My ID: Your ID / My Program: Your Program - All personal data MUST be pulled from JSON NOTE: Populate display directly from JSON...Do not use variables since they may not be fully populated due to asynchronous loading - Template Literal MUST be used to build output string - Labels before data MUST be included - MUST include some formatting for footer area (your choice); CSS or JS can be used Content section - Will consist of 2 areas side-by-side on the page. You can use CSS Grid for the layout or other formatting of your choice. Data (left panel) - Make the entire area a section or a div and give it a unique ID. This will make it easier for use in the Grid Area and for formatting. Using a forlof loop, display the zoo animal data from the JSON data in separate paragraph tags including the Animal Classification as a class attribute for the paragraph - Ex. > all data with image displayed on either side /p> - Remember, the image should be small (ex. width="25") - Must use Template Literals to build output - Include a header line above the list for context - NOTE: Populate directly from JSON CSS for the Data area: - Create a class to use for this entire area that includes (at the very least): - A background colour, Centre all data; Make all text small-cap formatting - Include CSS for each classification so lines are a different colour based on Classification Buttons area (right panel) Make the entire area a section or a div and give it a unique ID. This will make it easier for use in the Grid Area and for formatting. - Include a button to toggle a new Class formatting for the entire data list area displayed in the left panel including changing all text to italic and underlined. - Make sure the button text states clearly what the button is doing. - Include a button to toggle a new Class formatting that will add/remove a border to all paragraphs in the left panel that contain the text "Mammal" - Your choice of border style and colour. - Make sure the button text states clearly what the button is doing. - Include a button that will change the background colour (your choice of colour) for all paragraphs whose class attribute is equal to one of your Classifications except Mammal (ex. Bird, Reptile, etc-your choice). - Make sure the button text states clearly what the button is doing. - Change the formatting using JS (not a CSS class) 2nd page Script setup and start-up: - Declare variables to hold all your personal information (saved in local storage) - Pull all your personal data from local storage into the declared variables - NOTE: If an object was used, you will have to JSON.parse() when retrieving data - Display all your personal data in decreasing header tags (h1h2h3h4h5) - You can create the header tags in the HTML and then populate in the .js file OR you can build the header lines completely in the .js file - Template Literal MUST be used to build output - Include your name in an h1 tag using descriptive text (ex. My name is ...) - Include your student number in an h2 tag with descriptive text - Include your login name in an h3 tag with descriptive text - Include your program name in an h4 tag with descriptive text - Include your home country in an h5 tag with descriptive text - Add your image (included in the images folder) - Must use JS formatting to change the colour for each header line (unique for each line) - Include a background colour for the entire page and centre all lines on the page - All this can be done in the head tag ( style ) for this page or create a separate CSS file. - Include a Back Button that will return to the first page (your choice of where and how it looks Design Mocks for Reference Only Grading View: - I will be using the Chrome Toggle Device Bar for Galaxy S20 Ultra in Landscape mode when viewing your site - REMEMBER, this must be in a mobile layout; too much scrolling or whitespace will reduce your mark
Step by Step Solution
There are 3 Steps involved in it
Step: 1

Get Instant Access to Expert-Tailored Solutions
See step-by-step solutions with expert insights and AI powered tools for academic success
Step: 2

Step: 3

Ace Your Homework with AI
Get the answers you need in no time with our AI-driven, step-by-step assistance
Get Started


