

Answered step by step
Verified Expert Solution
Question
1 Approved Answer
1 Description This project builds directly on the last one. Now that we can get the robot to follow a plan, we turn to building
Description
This project builds directly on the last one. Now that we can get the robot to follow a plan, we turn to building
aplan.
Start up
You will be given a folder called project which contains a lot of familiarlooking files.
The control program is in the file makeplan.cc so first build that:
build makeplan
then run player on the config file worldcfg:
player worldcfg
The robot, as it has at the start of previous projects, will trundle off to the southeast.
However, before it starts to move, it will display something new
This is an occupancy grid with a resolution of meters for the format of the grid, see below For
the purposes of the project, this is a map.
The program will also display a plan, just like last time.
Map format
In terms of this project, an occupancy grid map is an array of integers.
A indicates that a square is occupied, a indicates that it is not occupied.
The code in makeplan.cc assumes that the map is square, so there is only one parameter that
controls the size of the map.
In the example in the folder project each grid square is half a meter on each side.
This example map is for a map that is meters on each side.
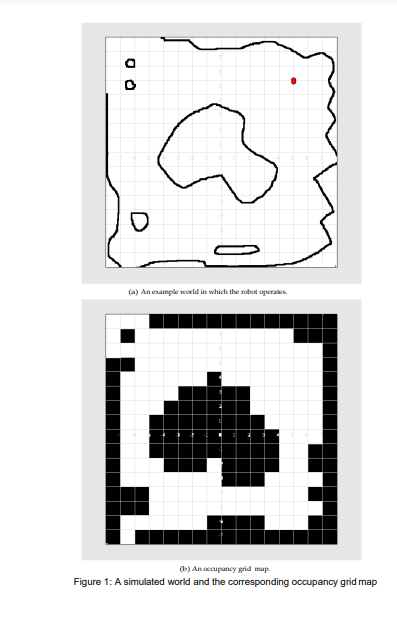
An example map is given in Figure b while Figure a shows the corresponding simulated world
from Stage.
Note that this is NOT the world youll be using in the project though it is probably familiar from
previous projects
In addition, the occupancy grid in Figure b is lower resolution than the map in makeplan.cc
each square is one meter on each side. a An example woeld in which the robot operabes.
b An occupuncy grid map.
Figure : A simulated world and the corresponding occupancy grid map Use the map to plan
The big task for this week is to write a robot controller that can use an occupancy grid to plan a
route through the world represented by the occupancy grid.
The task assumes that you start with an occupancy grid, a set of coordinates that the robot starts
at and a set of coordinates that the robot has to end up at
The task is then to generate a plan that is a sequence of sets of coordinates. The first of these sets
of coordinates is the initial location of the robot, the last set of coordinates is the final location of
the robot, and each intermediate point is a point that the robot should pass through on its way from
the initial location to its final location.
You need to choose the intermediate locations carefully so that the robot can move in a straight line
from one to the next without encountering an obstacle.
A suitable way to create the plan is to use the wavefront planner we discussed in class. You could
also use the A search algorithm, which is considered optimal.
You should use the map that came in makeplan.cc maptxt which corresponds well enough
to the map that worldcfg will load. Please note, the readMap function used in the sample
makeplan.cc reads the map in a way that the lowerleft corner of the grid cell coordinates is
treated as the origin map If you would rather the topleft corner to be the origin, you need
to modify the code slightly. Obviously then you also need to consider the conversion between the
real map coordinates m to m in both x and y coordinates and the grid coordinates to
Please also note that in mapij i represents vertical and j represents horizontal, whereas in
your representation of a point x y in a real map, x represents horizontal and y represents vertical.
Your final program should be able to create a plan from the map and then follow the plan. The
plan following can just be the code you wrote for the last project. A correct plan is worth
points. As the output of your program you need to create a planout.txt file which contains
only the waypoints not all the trail points of your search algorithms output To help me out in
understanding your plan, you should also make use of the provided writeMap function to
output a mapout.txt file, where among other s and s you place the number at the
coordinates where a waypoint should be
The robot actually following the plan is worth point, for which you might need to consider
dilating the obstacle occupancies to plan around the corners.
The start point for the robot is where it starts in the simulation, The end point is
Once your controller can do this, save your working program as yournamesprojcc and
make sure you put your name in the comments.
Youll need to submit the cc file together with the planout.txt and mapout.txt files to me
after you are done with the project
Step by Step Solution
There are 3 Steps involved in it
Step: 1

Get Instant Access to Expert-Tailored Solutions
See step-by-step solutions with expert insights and AI powered tools for academic success
Step: 2

Step: 3
Ace Your Homework with AI
Get the answers you need in no time with our AI-driven, step-by-step assistance
Get Started
Advances In Databases And Information Systems 23rd European Conference Adbis 2019 Bled Slovenia September 8 11 2019 Proceedings Lncs 11695
Authors: Tatjana Welzer ,Johann Eder ,Vili Podgorelec ,Aida Kamisalic Latific
1st Edition
3030287297, 978-3030287290