

Question: 3 / 9 100% + Objective II: Study serial defaults Enter a command on Router that reports the status and parameters of the interface Serial0/0/0.


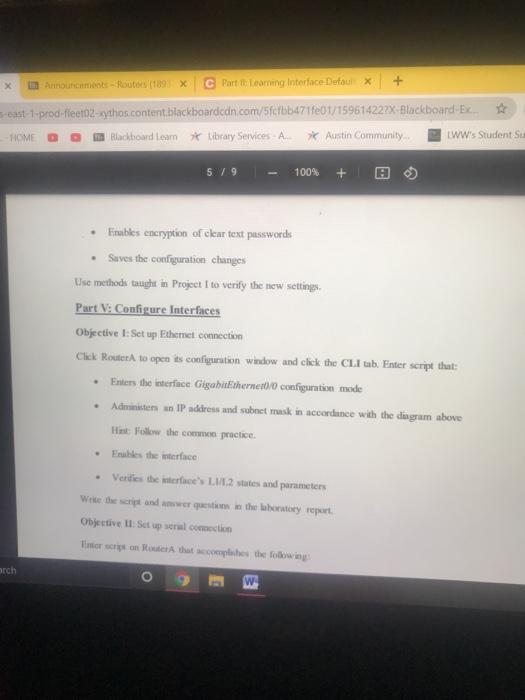
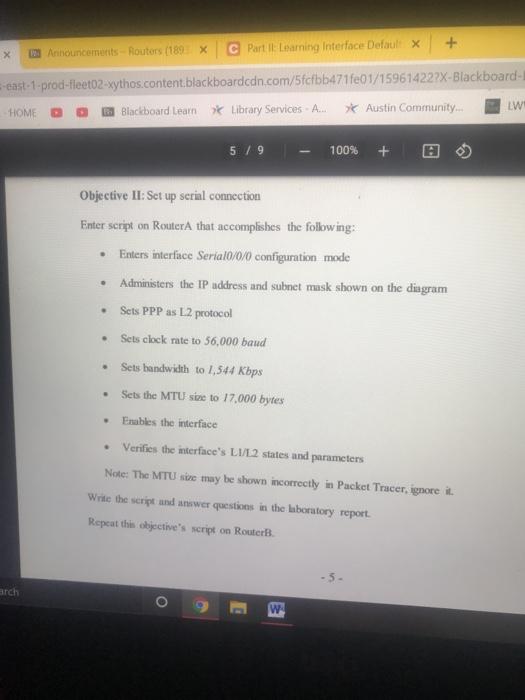
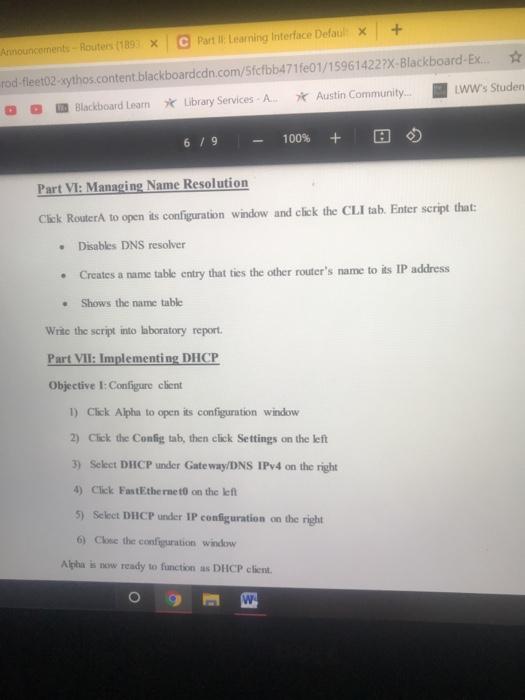
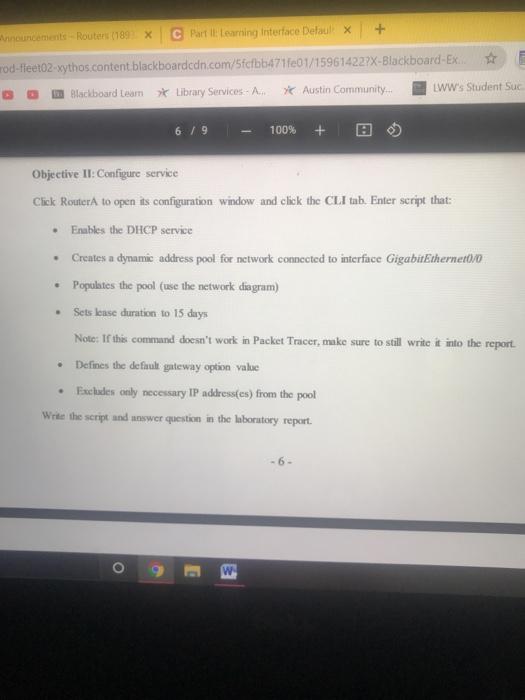

3 / 9 100% + Objective II: Study serial defaults Enter a command on Router that reports the status and parameters of the interface Serial0/0/0. What's the interface's Physical and Data Link layers' state? Is a MAC address shown? What are the IP address and subnet musk? What's the MTU size? What's the interface's bandwidth and delay? What's the default L2 protocol? Write the commund and answer questions in the laboratory report Part Ill: Construct Network Objective: Add second router 1) In the Packet Tracer window, press CAR to select the Network Devices/Routers group >> In the trade den ribbon, click the 1941, then click white space to the Router's iet Cenowrocter to open configuration window Physical scary Search w + Annonces Rotes (189X Partit Laming Interface Delul X prod-fleet 2. vythos content blackboardcdn.com/5fcfbb471001/159614227X-Blackboard-EX Blackboard Learn Library Services - A Austin Community ww's Student Suc 2/9 100% + Part II: Learning Interface Defaults Objective 1: Suudly Fibernet defaults Enter a command on Router that reports the status and parameters of the interface Gigabit Ethernet0/0 What's the interface's Physical and Data Link buyers' default state? Interpret the state shown. Is the MAC address shown? What are the IP address and subnet musk? What's the MTU ? What's the waterface's defa bandwidth and delay? + Announcements - Haters (1897x C Part It Learning Interface Default x -prod-fleet02-xythos.content blackboardcdn.com/5fcfbb471fe01/159614222X-Blackboard-Ex... Austin Community... LWW's Stude Blackboard Learn Library Services - A... 3/9 100% + What's the interface's default bandwidth and delay? Write the command and answer questions in the laboratory report. Objective II: Study serial de faults Enter a command on Router that reports the status and parameters of the interface Serial0/0/0 What's the interface's Physical and Data Link layers' state? Is a MAC address shown? What are the IP address and subnet mask? What's the MTU ? What's the interface's bandwidth and delay? What's the default 1.2 protocoll? Write the command und answer questions in the laboratory report. Part III: Construct Network Objective 1: Add second router 1) In the Packet Tracer window, press Curl AlR to select the Network Devices/Routers ge 2) In the router selection ribbon, click the 1941 icon, then click white space to the Router's W Accetta + cast prod lecto2exythas content blackboardcdn.consibb101168614227X-Blkboard HOME i nacicboard team * tibay Service Austin Community IWW student Sue 3 / 9 100% + Part III: Construct Network Objective 1: Add terul router 1). In the Pocket Tracer window, press CAR to select the Network Devices/Routers group 2) In the router selection ribbon, click the 1941 icon, then click white space to the RouterA's let 3) Click the new router to open is configuration window 4) Click the Physical thi necessary 5 Select HIWIC-2T is the MODULES Isto the left Power the souter down by clicking the power wich on is backride 7) Dagand-drop the module icon to the compty it on the right side 3) Click the power wich to power the router buck on ) Click the Configub, then cuter Router to the Display Nametest The new tow his two were faces and at Chce factory default setting B Parte tarrung interface aux + 1-1-prod-fleet02-xythos.content blackboardcdn.com/5fcfbb471f01/159614227X-Blackboard-Ex OMEO Blackboard * Ubrary Services Austin Community WW's Student Suc 4 / 9 100% + Objective II: Add Alpha 1) in the Packet Tracer window, press Curit AltV to select the End Devices group 2) In the devices ribbon, click the Server icon, then click white space below Router 3) Click the new server to open its configuration Window 4 Click the Config tab, then enter Alpha into the Display Nume textbox The server has a number of wable services, it can be also used as another host on the network Objective III: Comect cables 1) In the Packet Tracer window, preus Cul+Ako to select the Connections group 2) In the cable selection ribbon, click the Copper Cross-Over icon 3) Click Router and select Gigabit Ethernet in the connections list 4) Click Alpha and select Panther 5) in the cable scribbon, click Serial DCE C Router clect Serial000 in the 7) Che Rochers and slot Servin the last O + Announcements Routers (189X C Part II Learning Interface Detaux east-1-prod-fleet02 xythos.content blackboardcdn.com/5fcfbb471e01/159614222X-Blackboard-Ex -HOME 1 Blackboard Learn * Library Services - A * Austin Community... LWW's 4 / 9 100% Objective III: Connect cables 1) In the Packet Tracer window, press Ctrl+AIHO to select the Connections group 2) In the cable selection ribbon, click the Copper Cross-Over icon 3) Click Router und select Gigabit Ethernet0/0 in the connections list 4) Click Alpha and select FastEthernet 5) In the cable selection ribbon, click Serial DCE 6) Click Router and select Serial0/0/0 in the list 7) Click RouterB and select Seria 10/0/0 in the list The network should now look similar to the diagram Part IV: Prepare RouterB Click Router to open is configuration window and click the CLI tab. Enter script that Sets the hostname Router Sets the time to Central Sets the clock to current time Defines the cable password pasword arch w Announcements Routers (169X C Partit Learning Interface Defaulx -1-prod-fileet2-xythos.content blackboardcdn.com/5fcfbb471fe01/159614227X-Blackboard-Ex OME LWW's Student 3 Blackboard Leam * Library Services - A. Austin Community... 4/9 100% + - Part IV: Prepare RouterB Click RouterB to open is configuration window and click the CLI tab. Enter script that: Sets the hostname Router Sets the timezone to Central Sets the clock to current time Defines the enable password password Defines the enable secret password cisco Finters all VTY lines configuration mode Delines password password Tel los to use the locally defined password . O E w x Announcements - Route (189X C Part I: Learning Interface Defaux + s-east-1.prod-fleet02-ythos.content blackboardcdn.com/5fcfbb47fe01/159614227X-Blackboard-Ex HOME DO Blackboard Lear Library Services A * Austin Community WW's Student Su 579 100% + . Fables encryption of ckar text passwords Saves the configuration changes Use methods taught in Project I to verify the new settings Part V: Configure Interfaces Objective 1: Set up themet connection Cliek Router to open its configuration window and click the CLI tab. Enter script that: Enters the interface Gigabit Ethernetto configuration mode Administers an IP address and suboet mask in accordance with the diagram above Hut Follow the common practice. Eres the interface Verifies the interface's L1/L2 states and parameters Wite the script and wer question in the laboratory report Objective 11: Set up scrul cection Tescriton Route that completes the foowing arch W X 120 Announcements - Routers (189X Part 1: Learning Interface Default x + east-1-prod-fleet02-xythos.content.blackboardcdn.com/5fcfbb471fe01/159614227X-Blackboard- LW HOME Blackboard Learn Library Services A Austin Community... 5/9 100% + Objective II: Set up serial connection Enter script on Router that accomplishes the following: Enters interface Serial0/0/0 configuration mode Administers the IP address and subnet musk shown on the diagram Sets PPP as L2 protocol . . Sets clock rate to 56.000 baud . . Sets bandwidth to 1,544 Kbps Sets the MTU size to 17,000 bytes Frables the interface Verifies the interface's L1/L2 states and parameters Note: The MTU size may be shown incorrectly in Packet Tracer, ignore it. Write the script und answer questions in the laboratory report Repeat this objective's script on RouterB. . arch W + C Part I learning Interface Defaulx Announcements - Routers (1893 X rod-fleet02.xythos.content.blackboardcdn.com/5fcfbb471fe01/15961422?X-Blackboard-Ex. * Austin Community... LWW's Studen Blackboard Learn Library Services. A 6 / 9 100% + Part VI: Managing Name Resolution Chek Router to open its configuration window and click the CLI tab. Enter script that: Disables DNS resolver Creates a name table entry that ties the other router's name to its IP address Shows the name table Write the script into laboratory report. Part VII: Implementing DHCP Objective l: Configure client 1) Click Aiphu to open its configuration window 2) Click the Config tab, then click Settings on the left 3) Select DHCP under Gateway/DNS IPv4 on the right 4) Click FastEthernet on the left 5) Select DHCP under IP configuration on the right Close the configuration window Alpha is now ready to function as DHCP client. + announcements - Router (189X C PartleLearning Interface Defaulx rod-fleet02.xythos.content blackboardcdn.com/5fcfbb471701/15961422PX-Blackboard-Ex Blackboard team Library Services in Austin Community. WW's Student Suc 6/9 100% + . Objective II: Configure service Click Router to open its configuration window and click the CLI tab. Enter script that: Frables the DHCP service Creates a dynamic address pool for network connected to interface Gigabit Ethernet0/0 Populates the pool (use the network diagram) Sets leuse duration to 15 duys Note: If this command doesn't work in Packet Tracer, make sure to still write it into the report Defines the default guteway option value Excludes only necessary IP address(es) from the pool Write the script and answer question in the laboratory report. . -6- O 8 W 7 / 9 100% + Objective III: Verify DHCP configuration Enter script that accomplishes this on RouterA: Shows the running configuration to verify the DHCP commands Shows the dynamic pool information Write the script into laboratory report. Objective IV: Initiate an IP address lease 1) Click Alpha to open its configuration window 2) Click the Desktop tab, then click Command Prompt 3) Initinte an address lease by entering ipconfig trenew into the console Note: If Packet Tracer doesn't support this functionality, do steps 4-10 below. 4) Click the Config tab and click Settings on the left 5) Click Static under Gateway/DNS IPv4 on the right if necessary 6) Faster the (proper) router's IP address into the Gateway textbox 7). Click FastEthernet on the left 8) Click Static under IP Configuration on the right if necessary o w 7 / 9 100% + 1) Click Alpha to open its configuration window 2) Click the Desktop tab, then click Command Prompt 3) Initiate an address lease by entering ipconfig trenew into the console Note: If Packet Tracer doesn't support this functionality, do steps 4-10 below. 4) Click the Config tab and click Settings on the left 5) Click Static under Gateway/DNS IPv4 on the right if necessary 6) Enter the proper) router's IP address into the Gateway textbox 7) Click FastEthernet on the left 8) Click Static under IP Configuration on the right if necessary 9) Enter the IP address and subnet mask that Alpha would lease from the DHCP server into the IP Address and Subnet Mask textboxes Hint: This is the IP address following the highest address excluded from the pool Make sure to also write this IP address into laboratory report. 10) Close Alpha's configuration window Answer question in the laboratory report Obiective V: Verify the lease o w 7/9 100% + Hint: This is the IP address following the highest address excluded from the pool Make sure to also write this IP address into laboratory report. 10) Close Alpha's configuration window Answer question in the laboratory report. Objective V: Verify the lease Access Router's configuration window and enter script that accomplishes the following: Shows active DHCP lenses Your workstation's MAC address shoukl be tied to the IP address (no lease will be shown if the IP address was entered manually in the previous objective). o 8 fleet02xythos content blackbo Blackboard Learn Ubrary Services Austin Community LWW's Student Suc. B / 9 100% + Shows the statistics on DHCP messages sent and received Note the Discover, Request, Offer, and Acknowledgement message numbers, If this command doesn't work in Packet Tracer, make sure to still write it into the report. Write the script into laboratory report Part VIII: Verifying Communications In Router's configuration window 1) Use ping to verify that Alpha can be reached Note: the prinje may fall initially the to the ARP litency, repeat the ping if necessary. 23 Une pe to verify that RouterB can be reached Nadly the instructor of a problem. Awer question in the laboratory report Part IX: Backing Up Restoring IOS Images & Configurations security best practice to create backup copies of the router IOS images and configuration such a ey can be wed to quickly restore the router's constien i becomes corrupt or configuro replacement router Coco IOS for lacking up the files to and restoring them from a TFTP server W 101 teet02.xythos.content blackboardcdn.com/5fcfbb471017159614222X-Blackboard Ex a blackboard earn *Ubrary Services All Austin Community LWW's Student Suc 8/9 100% + Part IX: Backing Up/Restoring IOS Images & Configurations li's security best practice to create backup copies of the router IOS images and configuration. Such a copy can be used to quickly restore the router's configuration if it becomes corrupt or configure a replacement router. Cisco IOS allows for backing up the files to and restoring them from a TFTP server. Objective 1: Verify TFTP server 1) Click Alpha to open its configuration window 2) Click the Services tab, then click TFTP under SERVICES on the left 3) Verify that On is selected next to Service on the right Objective II: Back up the configuration 1) Click Router to open is configuration window and click the CLI tab 2) Enter command to copy the nomine configuration to Alpha When prompted, enter Alphus IP address when prompted and accept the definult file name. 3) Cek Alphus to open is configuration window 4) Click the Services tab, then click TFTP under SERVICES on the len Verly the extence of the configuration copy in the file at (scroll down it costary) 9 / 9 100% + Objective III: Restore the configuration In the Router's configuration window, enter a command to replace the startup configuration file with the configuration stored at the TFTP server. Enter the server's IP address when prompted and then enter the file name. Write the command into laboratory report. Objective IV: Back up an tOS image 1) In the RouterA's configuration window, enter a command to list the flash memory contents Note the IOS image's filename: 2) Enter a command to back up an IOS image to a TFTP server When prompted, enter the IOS image's filename for the source filename, then enter the Alpha's IP dress, and then backup image for the destination file name. 3) In Alphas configuration window, click the Services tub, then click TFTP under SERVICES on the leti 4) Verify the existence of the 105 image's copy in the file list (scroll down if necessary) Write the command into wherstory report Objective V Restoran IOS In de configuration window, delete the iOS image from flash by entering the cable mode and delete Musk:/10 mg filename the actual frame noted above) w 9/9 100% + command delete flash:/IOS image filename (use the actual filename noted above) Press Enter to confirm when prompted (may have to press it twice). 2) List the flash memory contents to verify the deletion 3) Enter a command to restore an los mage from a TFTP server When prompted, enter the server's IP address, then enter backup image for the source file name, and then enter the same IOS image's filename as the one deleted. 4) Re-list the flash contents to verify the operation Write the command into laboratory report Part X: Shutting Down 1) Enter copy na start to save the configuration 2) Save the project by clicking the Save button in the Packet Tracer's toober 3) Cine Packet Tracer O B 3 / 9 100% + Objective II: Study serial defaults Enter a command on Router that reports the status and parameters of the interface Serial0/0/0. What's the interface's Physical and Data Link layers' state? Is a MAC address shown? What are the IP address and subnet musk? What's the MTU size? What's the interface's bandwidth and delay? What's the default L2 protocol? Write the commund and answer questions in the laboratory report Part Ill: Construct Network Objective: Add second router 1) In the Packet Tracer window, press CAR to select the Network Devices/Routers group >> In the trade den ribbon, click the 1941, then click white space to the Router's iet Cenowrocter to open configuration window Physical scary Search w + Annonces Rotes (189X Partit Laming Interface Delul X prod-fleet 2. vythos content blackboardcdn.com/5fcfbb471001/159614227X-Blackboard-EX Blackboard Learn Library Services - A Austin Community ww's Student Suc 2/9 100% + Part II: Learning Interface Defaults Objective 1: Suudly Fibernet defaults Enter a command on Router that reports the status and parameters of the interface Gigabit Ethernet0/0 What's the interface's Physical and Data Link buyers' default state? Interpret the state shown. Is the MAC address shown? What are the IP address and subnet musk? What's the MTU ? What's the waterface's defa bandwidth and delay? + Announcements - Haters (1897x C Part It Learning Interface Default x -prod-fleet02-xythos.content blackboardcdn.com/5fcfbb471fe01/159614222X-Blackboard-Ex... Austin Community... LWW's Stude Blackboard Learn Library Services - A... 3/9 100% + What's the interface's default bandwidth and delay? Write the command and answer questions in the laboratory report. Objective II: Study serial de faults Enter a command on Router that reports the status and parameters of the interface Serial0/0/0 What's the interface's Physical and Data Link layers' state? Is a MAC address shown? What are the IP address and subnet mask? What's the MTU ? What's the interface's bandwidth and delay? What's the default 1.2 protocoll? Write the command und answer questions in the laboratory report. Part III: Construct Network Objective 1: Add second router 1) In the Packet Tracer window, press Curl AlR to select the Network Devices/Routers ge 2) In the router selection ribbon, click the 1941 icon, then click white space to the Router's W Accetta + cast prod lecto2exythas content blackboardcdn.consibb101168614227X-Blkboard HOME i nacicboard team * tibay Service Austin Community IWW student Sue 3 / 9 100% + Part III: Construct Network Objective 1: Add terul router 1). In the Pocket Tracer window, press CAR to select the Network Devices/Routers group 2) In the router selection ribbon, click the 1941 icon, then click white space to the RouterA's let 3) Click the new router to open is configuration window 4) Click the Physical thi necessary 5 Select HIWIC-2T is the MODULES Isto the left Power the souter down by clicking the power wich on is backride 7) Dagand-drop the module icon to the compty it on the right side 3) Click the power wich to power the router buck on ) Click the Configub, then cuter Router to the Display Nametest The new tow his two were faces and at Chce factory default setting B Parte tarrung interface aux + 1-1-prod-fleet02-xythos.content blackboardcdn.com/5fcfbb471f01/159614227X-Blackboard-Ex OMEO Blackboard * Ubrary Services Austin Community WW's Student Suc 4 / 9 100% + Objective II: Add Alpha 1) in the Packet Tracer window, press Curit AltV to select the End Devices group 2) In the devices ribbon, click the Server icon, then click white space below Router 3) Click the new server to open its configuration Window 4 Click the Config tab, then enter Alpha into the Display Nume textbox The server has a number of wable services, it can be also used as another host on the network Objective III: Comect cables 1) In the Packet Tracer window, preus Cul+Ako to select the Connections group 2) In the cable selection ribbon, click the Copper Cross-Over icon 3) Click Router and select Gigabit Ethernet in the connections list 4) Click Alpha and select Panther 5) in the cable scribbon, click Serial DCE C Router clect Serial000 in the 7) Che Rochers and slot Servin the last O + Announcements Routers (189X C Part II Learning Interface Detaux east-1-prod-fleet02 xythos.content blackboardcdn.com/5fcfbb471e01/159614222X-Blackboard-Ex -HOME 1 Blackboard Learn * Library Services - A * Austin Community... LWW's 4 / 9 100% Objective III: Connect cables 1) In the Packet Tracer window, press Ctrl+AIHO to select the Connections group 2) In the cable selection ribbon, click the Copper Cross-Over icon 3) Click Router und select Gigabit Ethernet0/0 in the connections list 4) Click Alpha and select FastEthernet 5) In the cable selection ribbon, click Serial DCE 6) Click Router and select Serial0/0/0 in the list 7) Click RouterB and select Seria 10/0/0 in the list The network should now look similar to the diagram Part IV: Prepare RouterB Click Router to open is configuration window and click the CLI tab. Enter script that Sets the hostname Router Sets the time to Central Sets the clock to current time Defines the cable password pasword arch w Announcements Routers (169X C Partit Learning Interface Defaulx -1-prod-fileet2-xythos.content blackboardcdn.com/5fcfbb471fe01/159614227X-Blackboard-Ex OME LWW's Student 3 Blackboard Leam * Library Services - A. Austin Community... 4/9 100% + - Part IV: Prepare RouterB Click RouterB to open is configuration window and click the CLI tab. Enter script that: Sets the hostname Router Sets the timezone to Central Sets the clock to current time Defines the enable password password Defines the enable secret password cisco Finters all VTY lines configuration mode Delines password password Tel los to use the locally defined password . O E w x Announcements - Route (189X C Part I: Learning Interface Defaux + s-east-1.prod-fleet02-ythos.content blackboardcdn.com/5fcfbb47fe01/159614227X-Blackboard-Ex HOME DO Blackboard Lear Library Services A * Austin Community WW's Student Su 579 100% + . Fables encryption of ckar text passwords Saves the configuration changes Use methods taught in Project I to verify the new settings Part V: Configure Interfaces Objective 1: Set up themet connection Cliek Router to open its configuration window and click the CLI tab. Enter script that: Enters the interface Gigabit Ethernetto configuration mode Administers an IP address and suboet mask in accordance with the diagram above Hut Follow the common practice. Eres the interface Verifies the interface's L1/L2 states and parameters Wite the script and wer question in the laboratory report Objective 11: Set up scrul cection Tescriton Route that completes the foowing arch W X 120 Announcements - Routers (189X Part 1: Learning Interface Default x + east-1-prod-fleet02-xythos.content.blackboardcdn.com/5fcfbb471fe01/159614227X-Blackboard- LW HOME Blackboard Learn Library Services A Austin Community... 5/9 100% + Objective II: Set up serial connection Enter script on Router that accomplishes the following: Enters interface Serial0/0/0 configuration mode Administers the IP address and subnet musk shown on the diagram Sets PPP as L2 protocol . . Sets clock rate to 56.000 baud . . Sets bandwidth to 1,544 Kbps Sets the MTU size to 17,000 bytes Frables the interface Verifies the interface's L1/L2 states and parameters Note: The MTU size may be shown incorrectly in Packet Tracer, ignore it. Write the script und answer questions in the laboratory report Repeat this objective's script on RouterB. . arch W + C Part I learning Interface Defaulx Announcements - Routers (1893 X rod-fleet02.xythos.content.blackboardcdn.com/5fcfbb471fe01/15961422?X-Blackboard-Ex. * Austin Community... LWW's Studen Blackboard Learn Library Services. A 6 / 9 100% + Part VI: Managing Name Resolution Chek Router to open its configuration window and click the CLI tab. Enter script that: Disables DNS resolver Creates a name table entry that ties the other router's name to its IP address Shows the name table Write the script into laboratory report. Part VII: Implementing DHCP Objective l: Configure client 1) Click Aiphu to open its configuration window 2) Click the Config tab, then click Settings on the left 3) Select DHCP under Gateway/DNS IPv4 on the right 4) Click FastEthernet on the left 5) Select DHCP under IP configuration on the right Close the configuration window Alpha is now ready to function as DHCP client. + announcements - Router (189X C PartleLearning Interface Defaulx rod-fleet02.xythos.content blackboardcdn.com/5fcfbb471701/15961422PX-Blackboard-Ex Blackboard team Library Services in Austin Community. WW's Student Suc 6/9 100% + . Objective II: Configure service Click Router to open its configuration window and click the CLI tab. Enter script that: Frables the DHCP service Creates a dynamic address pool for network connected to interface Gigabit Ethernet0/0 Populates the pool (use the network diagram) Sets leuse duration to 15 duys Note: If this command doesn't work in Packet Tracer, make sure to still write it into the report Defines the default guteway option value Excludes only necessary IP address(es) from the pool Write the script and answer question in the laboratory report. . -6- O 8 W 7 / 9 100% + Objective III: Verify DHCP configuration Enter script that accomplishes this on RouterA: Shows the running configuration to verify the DHCP commands Shows the dynamic pool information Write the script into laboratory report. Objective IV: Initiate an IP address lease 1) Click Alpha to open its configuration window 2) Click the Desktop tab, then click Command Prompt 3) Initinte an address lease by entering ipconfig trenew into the console Note: If Packet Tracer doesn't support this functionality, do steps 4-10 below. 4) Click the Config tab and click Settings on the left 5) Click Static under Gateway/DNS IPv4 on the right if necessary 6) Faster the (proper) router's IP address into the Gateway textbox 7). Click FastEthernet on the left 8) Click Static under IP Configuration on the right if necessary o w 7 / 9 100% + 1) Click Alpha to open its configuration window 2) Click the Desktop tab, then click Command Prompt 3) Initiate an address lease by entering ipconfig trenew into the console Note: If Packet Tracer doesn't support this functionality, do steps 4-10 below. 4) Click the Config tab and click Settings on the left 5) Click Static under Gateway/DNS IPv4 on the right if necessary 6) Enter the proper) router's IP address into the Gateway textbox 7) Click FastEthernet on the left 8) Click Static under IP Configuration on the right if necessary 9) Enter the IP address and subnet mask that Alpha would lease from the DHCP server into the IP Address and Subnet Mask textboxes Hint: This is the IP address following the highest address excluded from the pool Make sure to also write this IP address into laboratory report. 10) Close Alpha's configuration window Answer question in the laboratory report Obiective V: Verify the lease o w 7/9 100% + Hint: This is the IP address following the highest address excluded from the pool Make sure to also write this IP address into laboratory report. 10) Close Alpha's configuration window Answer question in the laboratory report. Objective V: Verify the lease Access Router's configuration window and enter script that accomplishes the following: Shows active DHCP lenses Your workstation's MAC address shoukl be tied to the IP address (no lease will be shown if the IP address was entered manually in the previous objective). o 8 fleet02xythos content blackbo Blackboard Learn Ubrary Services Austin Community LWW's Student Suc. B / 9 100% + Shows the statistics on DHCP messages sent and received Note the Discover, Request, Offer, and Acknowledgement message numbers, If this command doesn't work in Packet Tracer, make sure to still write it into the report. Write the script into laboratory report Part VIII: Verifying Communications In Router's configuration window 1) Use ping to verify that Alpha can be reached Note: the prinje may fall initially the to the ARP litency, repeat the ping if necessary. 23 Une pe to verify that RouterB can be reached Nadly the instructor of a problem. Awer question in the laboratory report Part IX: Backing Up Restoring IOS Images & Configurations security best practice to create backup copies of the router IOS images and configuration such a ey can be wed to quickly restore the router's constien i becomes corrupt or configuro replacement router Coco IOS for lacking up the files to and restoring them from a TFTP server W 101 teet02.xythos.content blackboardcdn.com/5fcfbb471017159614222X-Blackboard Ex a blackboard earn *Ubrary Services All Austin Community LWW's Student Suc 8/9 100% + Part IX: Backing Up/Restoring IOS Images & Configurations li's security best practice to create backup copies of the router IOS images and configuration. Such a copy can be used to quickly restore the router's configuration if it becomes corrupt or configure a replacement router. Cisco IOS allows for backing up the files to and restoring them from a TFTP server. Objective 1: Verify TFTP server 1) Click Alpha to open its configuration window 2) Click the Services tab, then click TFTP under SERVICES on the left 3) Verify that On is selected next to Service on the right Objective II: Back up the configuration 1) Click Router to open is configuration window and click the CLI tab 2) Enter command to copy the nomine configuration to Alpha When prompted, enter Alphus IP address when prompted and accept the definult file name. 3) Cek Alphus to open is configuration window 4) Click the Services tab, then click TFTP under SERVICES on the len Verly the extence of the configuration copy in the file at (scroll down it costary) 9 / 9 100% + Objective III: Restore the configuration In the Router's configuration window, enter a command to replace the startup configuration file with the configuration stored at the TFTP server. Enter the server's IP address when prompted and then enter the file name. Write the command into laboratory report. Objective IV: Back up an tOS image 1) In the RouterA's configuration window, enter a command to list the flash memory contents Note the IOS image's filename: 2) Enter a command to back up an IOS image to a TFTP server When prompted, enter the IOS image's filename for the source filename, then enter the Alpha's IP dress, and then backup image for the destination file name. 3) In Alphas configuration window, click the Services tub, then click TFTP under SERVICES on the leti 4) Verify the existence of the 105 image's copy in the file list (scroll down if necessary) Write the command into wherstory report Objective V Restoran IOS In de configuration window, delete the iOS image from flash by entering the cable mode and delete Musk:/10 mg filename the actual frame noted above) w 9/9 100% + command delete flash:/IOS image filename (use the actual filename noted above) Press Enter to confirm when prompted (may have to press it twice). 2) List the flash memory contents to verify the deletion 3) Enter a command to restore an los mage from a TFTP server When prompted, enter the server's IP address, then enter backup image for the source file name, and then enter the same IOS image's filename as the one deleted. 4) Re-list the flash contents to verify the operation Write the command into laboratory report Part X: Shutting Down 1) Enter copy na start to save the configuration 2) Save the project by clicking the Save button in the Packet Tracer's toober 3) Cine Packet Tracer O B
Step by Step Solution
There are 3 Steps involved in it

Get step-by-step solutions from verified subject matter experts