Question
5.1 For these exercises, include your completed .java files in the zip archive that you submit for grading. Complete the code in the provided View
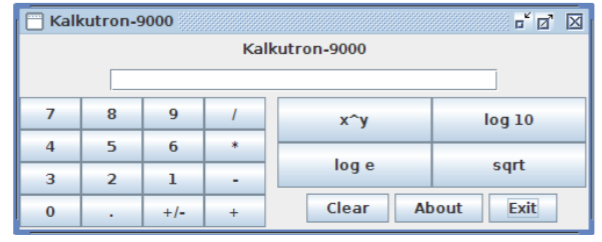
5.1 For these exercises, include your completed .java files in the zip archive that you submit for grading. Complete the code in the provided View class to implement this GUI interface for a calculator. The calculator does not have to be fully functional; the primary objective of the assignment is to implement the GUI.

CODE PROVIDED IN VIEW CLASS:
//************************************************************************************************** // CLASS: View // // DESCRIPTION // Implements the GUI for a calculator. //************************************************************************************************** import java.awt.BorderLayout; import java.awt.Dimension; import java.awt.GridLayout; import java.awt.event.ActionEvent; import java.awt.event.ActionListener; import javax.swing.Box; import javax.swing.BoxLayout; import javax.swing.JButton; import javax.swing.JFrame; import javax.swing.JLabel; import javax.swing.JOptionPane; import javax.swing.JPanel; import javax.swing.JTextField;
/** * Implements the GUI for a calculator. */ public class View extends JFrame implements ActionListener {
public static final int FRAME_WIDTH = 500; public static final int FRAME_HEIGHT = 200;
private JTextField mText;
/** * Default ctor. Does nothing. */ public View() { // Declare and create a JPanel named panelFunctButton. Set the layout manager to GridLayout // with 2 rows and 2 columns. Call addButton() to add buttons labeled "x^y", "log 10", // "log e", and "sqrt". ???
// Declare and create a JPanel named panelSysButton. Use the default FlowLayout layout // manager. Call addButton() to add buttons labeled "Clear", "About", and "Exit". ???
// Declare and create a JPanel named panelFunctSys. Use the BorderLayout layout manager. // Add panelFunctButton to the CENTER region. Add panelSysButton to the SOUTH region. ???
// Declare and create a JPanel named panelKeypad. Use the GridLayout layout manager with // 4 rows and 4 columns. Call addButton() to add the buttons labeled "7", "8", "9", and so // on. ???
// Declare and create a new JPanel named panelBottom. Use the vertical BoxLayout layout // manager. Add panelKeypad. Add a 10-pixel wide rigid area (using Box.createRigidArea()). // Add panelFunctSys. ???
// Declare and create a JPanel named panelTextField. Use the default FlowLayout layout // manager. Create the mText JTextField making it 30 columns wide. Add mText to the // panelTextField panel. ???
// Declare and create a JPanel named panelLabel. Use the default FlowLayout layout manager. // Declare and create a JLabel named label displaying "Kalkutron-9000" or whatever you // want to display. Add label to panelLabel. ???
// Declare and create a JPanel named panelMain. Use the horizontal BoxLayout layout manager. // Add some vertical glue to panelMain (using Box.createVerticalGlue()). Add panelLabel. // Add some more vertical glue. Add panelTextField. Add panelBottom. Add some more vertical // glue. ???
// Set the title bar string of this JFrame. setTitle("Kalkutron-9000");
// Set the width and height of this JFrame. setSize(FRAME_WIDTH, FRAME_HEIGHT);
// Configure this JFrame so the frame will be closed and the application were terminate when // the X button on the title bar is closed. setDefaultCloseOperation(JFrame.EXIT_ON_CLOSE);
// Add panelMain to this JFrame. add(panelMain);
// Make this JFrame visible. setVisible(true); }
/** * Declare and create a JButton object displaying pText. Make this JFrame the action listener * for button events. Add the button to pPanel. */ private void addButton(JPanel pPanel, String pText) { JButton button = new JButton(pText); button.addActionListener(this); pPanel.add(button); }
/** * Implementation of the actionPerformed() method of the ActionListener interface. */ @Override public void actionPerformed(ActionEvent pEvent) { // If the source of the event is a JButton, calling pEvent.getActionCommand() will return // the text displayed on the button face. For example, when the Exit button is clicked, // pEvent.getActionCommand() would return "Exit".
// Write code that determines if the Exit button is the source of the event and if so, // exit the application by calling System.exit(). ???
// Write code that determines if the About button is the source of the event and if so, // display the about dialog using JOptionPane.showMessageDialog(). ??? }
}
5.2 Complete the code in actionPerformed() so when the Exit button is clicked, the application will terminate.
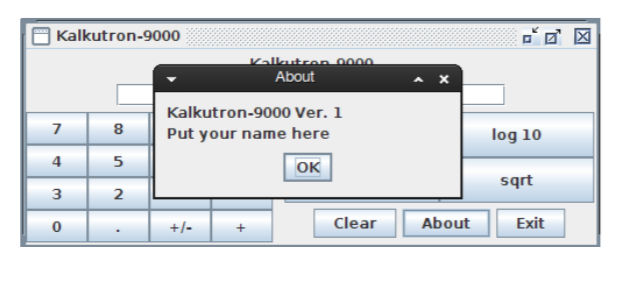
5.3 Complete the code in actionPerformed() so when the About button is clicked, the application will display this about
dialog:

6 Nested Classes
6.1 Explain what an inner class is.
6.2 Explain how a local class differs from an inner class.
6.3 Explain how an anonymous class differs from an inner and local class.
3.16 In a subclass constructor, the superclass default constructor is called automatically before the statements of the subclass constructor begin executing. Suppose we wish to call a different superclass constructor (i.e., not the default constructor) from the subclass constructor. Explain how this is accomplished and give an example.
3.17 Explain how an abstract class differs from a concrete class.
Kalkutron-9000 Kalkutron-9000 7 4 3 0 8 5 2 9 log 10 6 log e sqrt Clear About ExitStep by Step Solution
There are 3 Steps involved in it
Step: 1

Get Instant Access to Expert-Tailored Solutions
See step-by-step solutions with expert insights and AI powered tools for academic success
Step: 2

Step: 3

Ace Your Homework with AI
Get the answers you need in no time with our AI-driven, step-by-step assistance
Get Started


