

Question: (A) ii. Install a virtual machine on your computer to be used as a testing environment iii. For windows, either one of these are fine
(A) ii. Install a virtual machine on your computer to be used as a testing environment
iii. For windows, either one of these are fine
1. VMWare Workstation by VMware (preferred for Windows)
2. Oracle VirtualBox by Oracle
iv. For Mac OS
1. Here is website for a list of options
https://www.digitaltrends.com/computing/best-virtual-machines/
(B). Install OS
i. Install Windows Server 2018 R2 SP1 in the virtual machine you just created.
ii. Feel free to download Windows Server 2018 R2 from your choice of source.
iii. Here is one option
1. https://e5.onthehub.com/WebStore/OfferingsOfMajorVersionList.aspx?pmv=4b523f0e-3adf-e211-9000-f04da23fc520&cmi_mnuMain=bdba23cf-e05e-e011-971f-0030487d8897&ws=7837a0e8-d49b-e011-969d-0030487d8897&vsro=8
(C) Install SQL server 2012
i. Here is the link to Microsoft website for downloading SQL Server 2012
https://www.microsoft.com/en-us/download/confirmation.aspx?id=29066
ii. installation
1. It's the installation using the Wizard
2. 2. Follows to below steps and step 29, when installation is complete take a screenshot of that "Complete" page.
STEPS:
1. If necessary, start your computer and log on using an Administrator account. If you are using a virtual machine to host the installation, you should take a snapshot of the system.
2. Mount the installation image file as a virtual drive or insert the DVD into your DVD drive if using physical media. SQLFULL_ENU is mounted on the E drive.
3. Click the Start button, and then click Computer. Right-click the removable storage device that contains the installation media labeled SQLFULL_ENU, and then click Open. Launch the SQL Server Installation Center by double-clicking the setup application in the root folder. See Figure 2-3. Click the Yes button if prompted by the User Account Control dialog box.
4. In the SQL Server Installation Center window, click Installation in the left-hand navigation pane. Four submenus appear on the right side of the window; you can choose the type of installation you want to perform from the following options:
NewSQLServerstand-aloneinstallationoraddfeaturestoanexistinginstallation
New SQL Server failover cluster installation
Add node to a SQL Server failover cluster
Upgrade from SQL Server 2005, SQL Server 2008, or SQL Server 2008 R2
Click New SQL Server stand-alone installation or add features to an existing installation.
5. The SQL Server 2012 Setup Wizard for a new installation launches, and the Setup Support Rules window opens. Setup Support Rules runs a series of tests against the prerequisites for installing the SQL Server Setup support files. Click Show Details to view a detailed report and verify that all Setup Support Rules show a status of Passed. Review any warnings and follow the instructions given to correct any failures before proceeding to the next step. Click OK.
6. In the Product Key window, you need to either enter a product key for the relevant production edition of SQL Server 2012 or specify that you want to try a free edition such as Evaluation or Express. Select Evaluation from the Specify a free edition list box. See Figure 2-6. The SQL Server 2012 Evaluation license will be valid for 180 days. Click Next.
7. Read the Microsoft Evaluation Software License Terms. Click the I accept the license terms check box to select it. Click Next. The SQL Server Installer checks and downloads any product updates before installing SQL Server 2012.
8. Setup Support Rules completes an additional check for potential problems that may occur when installing the setup support files. Click Show Details to view a detailed report and verify that all setup support rules passed. Review any warnings and follow the instructions given to correct any failures before proceeding to the next step.
A warning was generated by one of the Setup Support Rules because Windows Firewall was enabled. This is not necessarily a problem unless client applications will connect to the SQL Server 2012 instance remotely, in which case the relevant port(s) on the firewall need to be enabled to allow communication between the client and the server. Because this is a warning rather than a failure, it does not have to be corrected to move forward with the installation.
9.Click Next. In the Setup Role window, select the SQL Server Feature Installation option.
10. Click Next to move to the window that allows you to select the individual features and components you want to install.
11. In the Feature Selection window, click the Select All button and keep the default Shared feature directory path.
When an individual feature is highlighted in the Features pane, the two panes to the right of the window display a description of the feature along with installation prerequisites.
12. Click Next. The Installation Rules are a series of tests that check for any issues that may block the installation process. Click Show Details. Review all warnings and correct any failed rules before proceeding.
13. Click Next. The Instance Configuration window allows you to choose either a Default instance or a Named instance. Each host can only support one default instance of SQL Server 2012. If a client establishes a remote connection specifying only the host address, it will be connected to the default instance. To connect to a named instance, the client must use both the host address and the instance name that it wants to connect to in the connection string. Click the Named instance option, click in the Named instance text box, and type SQLSERVERUA as the named instance. Note that an instance name must be unique and must not conflict with a name already assigned.
14. Click Next. Disk Space Requirements check that you have sufficient disk space for installing the selected features. If you do not have sufficient disk space, you need to either allocate additional space by changing the path of the Shared feature directory to a different volume with more space or go back to the Feature Selection window and remove some features.
15. Click Next. The Server Configuration window allows you to assign the accounts that will be used to run the individual services, set the service start-up behavior, and specify a default server collation. On the Service Accounts tab, keep the default service account settings. The virtual service accounts will be created automatically during the installation process. A separate service account will be created for each SQL Server service.
16. On the Collation tab, keep the default Server Collation (SQL_Latin1_General_CP1_ CI_AS). Click Next.
17. The database engine service handles data storage, processing, and access requests. There are three separate tabs in the database engine Configuration window. On the Server Configuration tab, which opens by default, keep the default Windows authentication mode option selected, and click Add Current User. This grants your Windows login the administrative rights to the SQL Server instance. Additional accounts can be added if necessary by clicking the Add button. two accounts have been added as SQL Server administrators.
18. Click the Data Directories tab and review the default settings.
In a production environment, you might need to change these values if you will be using different disk volumes within an installation. For example, it is common to separate data files from log files on different physical disks.
19. Click the FILESTREAM tab, and then click the Enable FILESTREAM for Transact-SQL access check box and the Enable FILESTREAM for file I/O access check box to select them. The Windows share name text box should be populated with the named instance SQLSERVERUA that was added in the Instance Configuration step.
20. Click Next. On the Server Configuration tab, keep the default Server Mode option selected. The server mode specifies the storage engine that Analysis Services uses to query data. Click the Add Current User button to add your user account
Administrators group. Additional users can be added to the Administrators group by clicking the Add button.
21. Click the Data Directories tab to view the default settings. Do not make any changes. Click Next.
22. Next, you will install but not configure Reporting Services; you will complete the configuration in a later chapter. Click the Install only options for the Reporting Services Native Mode and for the Reporting Services SharePoint Integrated Mode.
23. Click Next. Distributed Replay Controller is used to test application compatibility in a number of hardware or software upgrade scenarios. Click Add Current User in order to grant the current user unlimited access to the Distributed Replay Controller Services. Additional users can be added to the Administrators group by clicking the Add button.
24. Click Next. In the Distributed Replay Client window, keep the default settings.
25. Click Next. In the Error Reporting window, specify by clicking the check box whether you want to report errors securely to Microsoft to enable them to improve future re- leases of the product.
26. Click Next. Installation Configuration Rules checks a set of prerequisites to ensure that the installation process will not be blocked. Click Show Details and verify that all rules have passed. Review any warnings and follow instructions to correct failures before proceeding.
27. Click Next. In the Ready to Install window, review the summary of features that will be installed. Note the location of the installation configuration file for future reference.The ConfigurationFile.ini contains the individual parameter settings required for an unattended install using the command-line interface.
28. Click Install. During installation, a blue progress scroll bar provides you with the status of the installation.Wait for the installation to complete. Depending on the performance of the host, the installation process could take over an hour to complete.
29. Once your installation successfully completes, review the installation status of each feature and the summary log file. If prompted, click OK to restart your computer.
30. You have now successfully completed a SQL Server 2012 installation using the wizard. If you are using a virtual machine to host SQL Server, you should take a snapshot of your system.
It should look something like this.
(E) Verification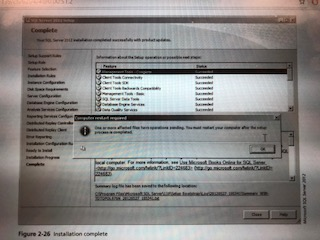
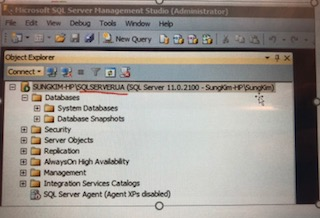
i. Navigate to MS SQL Server 2012 and Click on SQL Server Management Studio.
ii. On the Connect to Server message, verify the information and click Connect.
iii. When it actually connects, take a screenshot of the Object Explorer on the top left, showing SQLSERVERUA.
It should look something like this with your name.
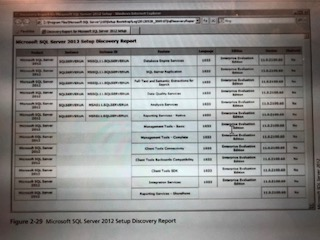
(F) Do the Running the SQL Server Features Discovery Report
i. When step #4, take a screenshot similar.
STEPS:
1. If necessary, start your computer and log on.
2. To launch the SQL Server Installation Center, click the Start button, point to All Programs, click Microsoft SQL Server 2012, click Configuration Tools, and then click SQL Server Installation Center (64-bit). Click Yes if prompted by the User Account Control dialog box.
3. Click Tools in the left-hand navigation pane, and then click Installed SQL Server features discovery report.
4. After a few seconds, a Web browser launches displaying the Discovery Report. For shared features, the report displays the product, installed features, edition, language, clustered flag, and version. For features specific to an instance, the instance name and ID are also displayed.
It should look something like this.
(G) Reviewing System Changes,
i. When you get to step #13, take a screenshot,
STEPS:
1. If necessary, start your computer and log on.
2. To launch SQL Server Configuration Manager, click the Start button, point to All Programs, click Microsoft SQL Server 2012, click Configuration Tools, and then click SQL Server Configuration Manager. See Figure 2-30. Note that because you are only viewing rather than changing settings, you do not need to select Run as administrator when prompted by the User Access Control dialog box.
3. In the SQL Server Configuration Manager window, click SQL Server Services in the left-hand navigation pane. Review the list of services in the right pane. The SQL Server service for the instance that you created in Activity 2-1 is the core service that runs the database engine. Verify that the state of this service is Running (also shown by a green triangular icon next to the service name).
You can right-click on any service name to view the current status, to stop or start the service, and to view the properties that are currently configured.
4. Expand SQL Server Network Configuration by clicking the + icon in the left-hand navigation pane.
5. View the enabled network protocols for the SQLSERVERUA instance by clicking Protocols for SQLSERVERUA.
6. Click SQL Native Client 11.0 Configuration in the left-hand navigation pane and double-click Client Protocols. View the enabled network protocols for client applications installed on the server. Right-click TCP/IP, and then click Properties. Note that the default port for client connections is 1433.
7. To launch the Registry Editor, click the Start button, click Run, click in the Open text box, and type regedit. Click OK and click Yes if prompted by the User Account Control dialog box.
8. Navigate through the tree view in the left-hand navigation pane to Computer \HKEY_LOCAL_MACHINE\SYSTEM\CurrentControlSet\Services \SQLAgent$SQLSERVERUA.
9. SQL Server Agent is the service that enables jobs to be scheduled and monitors activity. Browse through the Registry settings that are associated with the SQL Server Agent.
10. Click the Start button, click Run, click in the Open text box, and type Perfmon to open the Performance Monitor. Click OK.
11. In the left-hand navigation pane, expand Monitoring Tools by clicking the + icon and then clicking Performance Monitor.
By default, Performance Monitor displays CPU usage, although you can add counters by clicking the green + icon on the toolbar to add a new counter (e.g., Memory). To remove an existing counter, click the red X icon on the toolbar.
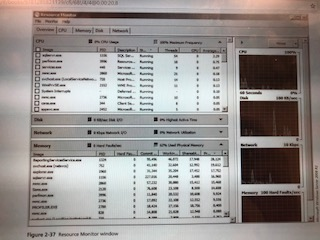
12. Launch Resource Monitor by clicking the Start button, clicking Run, clicking in the Open text box, and then typing Resmon. Click OK.
13. In the upper CPU grid, sort the grid by clicking on the Image column. Scroll down and click the check box next to sqlservr.exe. You are now able to view the CPU, disk, network, and memory related to your SQL Server instance for anomalies.
14. Click the Start button, and then click Computer from the Start menu. Click in the Navigation text box, and then type C:\Program Files\Microsoft SQL Server\. Here you can review the directory structure that was created when you installed SQL Server 2012. The folders 80, 90, 100, and 110 correspond to shared features and components associated with each major version of SQL Server. 110 is the version that corresponds to SQL Server 2012. At the same level, you will see a number of folders ending in an instance name. These correspond to the application data associated with each nonshared component that was installed for the instance. There were three non- shared components installed in the following example for a single instance: Database engine (MSSQL11.SQLSERVERUA), Reporting Services (MSRS11.SQLSERVERUA), and Analysis Services (MSAS11. SQLSERVERUA).
It should look something like this.
Assignment
What you need to submit as Assignment - Include the 4 screenshots taken above, past them in MS Word, and submit/upload it on the Blackboard Assignment
Figure 2-26 Installation complete Figure 2-26 Installation complete
Step by Step Solution
There are 3 Steps involved in it

Get step-by-step solutions from verified subject matter experts