

Question: ACCESS / EXCEL ( backside) please help! please follow instructions and show step by step. will upvote, thanks! requires to be in access. ***required in

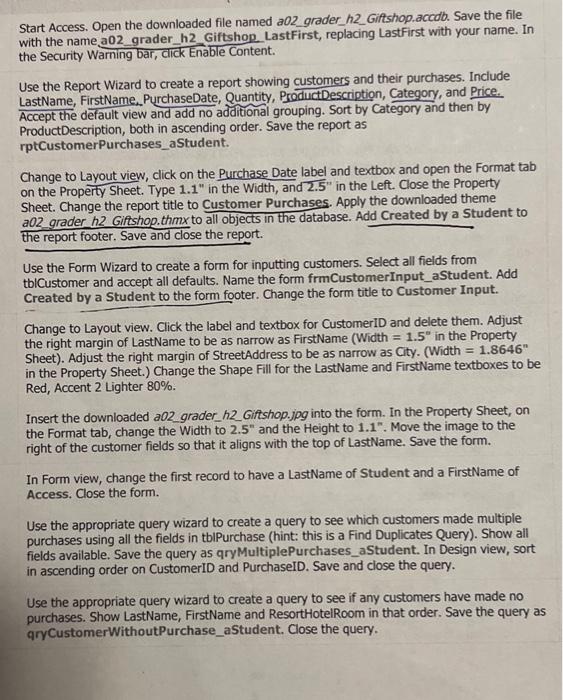
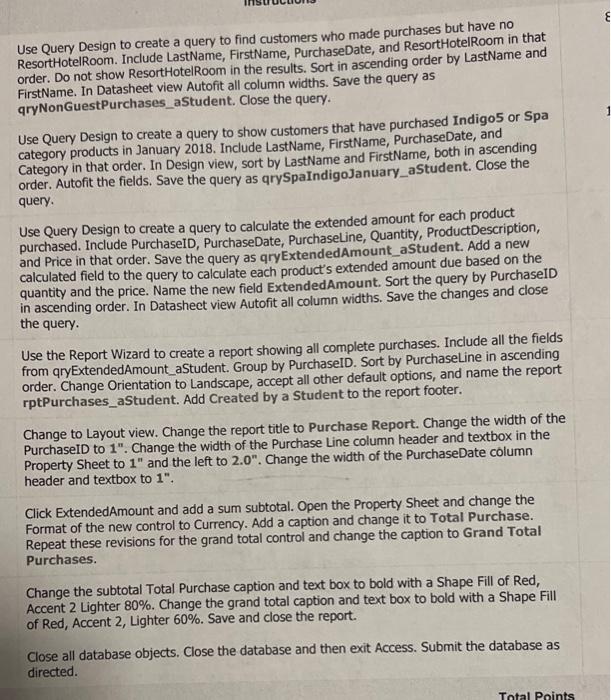
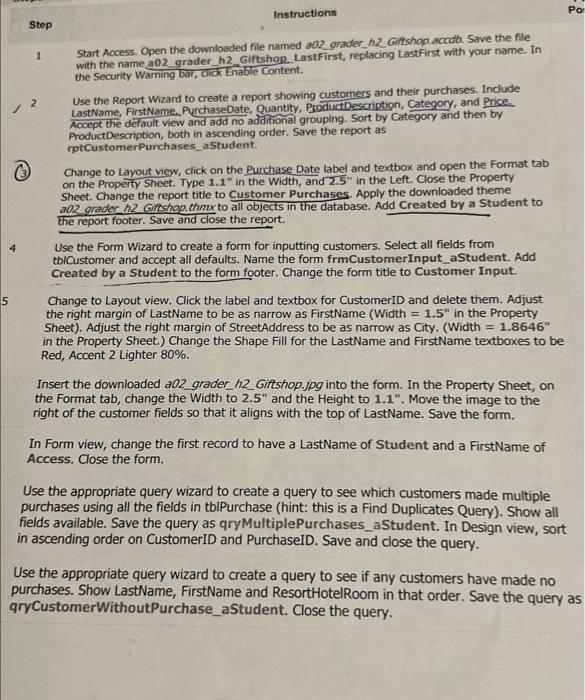
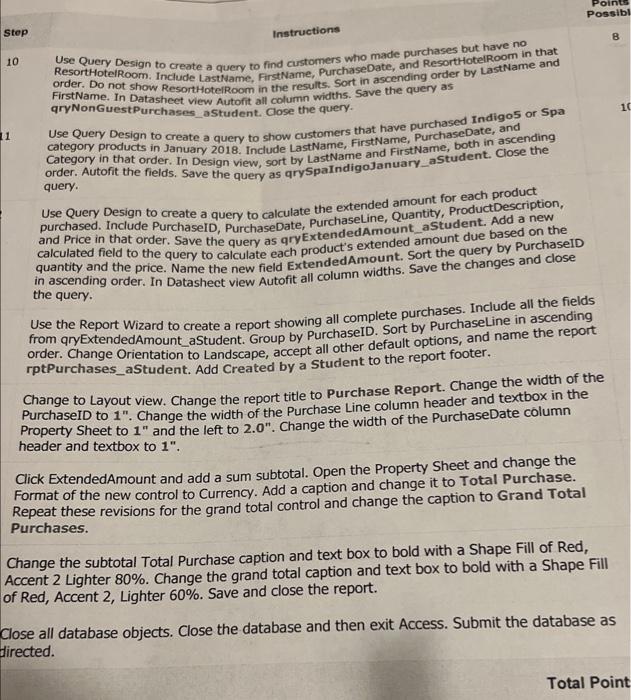
Instructions 9 Change the format for ScheduleDay to Short Date; change the format for StartTime to Medium Time; and change the field size for HoursScheduled to Integer. Assign the best field as the primary key, and then save the new table as tbISchedule. Close the table. Import the Schedule worksheet in the downloaded Excel file a01_grader_a2_HotelEmp.xlsx, appending it to tblSchedule. Do not save the import steps. Open the Relationships window. Add tblSchedule, tblEmployee, and tblHotelAreas to the window. Create a one-to-many relationship between EmployeeID in tblEmployee and EmployeeID in tblSchedule. Enforce referential integrity. Do not cascade update or cascade delete. 2 Create a one-to-many relationship between AreaID in tblHotelAreas and AreaID in tblEmployees. Enforce referential integrity. Do not cascade update or cascade delete. Save the changes. Create a relationship report accepting the default name. Close the report and close the Relationships window. Use the Form tool to create a form for tblEmployee, and then save it as frmEmployeeSchedule. View the form in Form View. Locate the record for the employee named Gabriel Jones. Add a new record to work on 1/3/2018, starting at 8AM and working for 8 hours. Close the form. Use the Simple Query Wizard to create a query. The query results should list AreaID and AreaName from tblHotelAreas, FirstName and LastName from tblEmployee, and ScheduleDay, StartTime, and HoursScheduled from tblSchedule (in that order). Save your query as qryCoffeeshopSchedule and then view the query results. Switch to Design view, and then enter criteria that will only return records with AreaID 4 in the results. Run, and then save the query. Close the query. Create a report using the Report Wizard using fields from qryCoffeeShopSchedule. Add the fields FirstName, LastName, ScheduleDay, StartTime, and HoursScheduled (in that order). View by tblSchedule, and group by ScheduleDay. Click Grouping Options and change Group intervals to Day. Sort in ascending order first by StartTime and then by LastName, and change to Landscape orientation. Name your report rptCoffeeShopSchedule and then finish the wizard. View the report in Layout view. Modify the report title to be Coffee Shop Schedule. Save, and then close the report. Start Access. Open the downloaded file named a02 grader h2_Giftshop.accodb. Save the file with the name, a02 grader_h2 Giftshop. LastFirst, replacing LastFirst with your name. In the Security Warning bar, cick Enable Content. Use the Report Wizard to create a report showing customers and their purchases. Include LastName, FirstName. PurchaseDate, Quantity, ProductDescription, Category, and Price. Accept the default view and add no additional grouping. Sort by Category and then by ProductDescription, both in ascending order. Save the report as rptCustomerPurchases_aStudent. Change to Layout view, click on the Purchase Date label and textbox and open the Format tab on the Property Sheet. Type 1.1 in the Width, and 2.5 in the Left. Close the Property Sheet. Change the report title to Customer Purchases. Apply the downloaded theme a02 grader h2 Giftshop.thm x to all objects in the database. Add Created by a Student to the report footer. Save and close the report. Use the Form Wizard to create a form for inputting customers. Select all fields from tblCustomer and accept all defaults. Name the form frmCustomerInput_aStudent. Add Created by a Student to the form footer. Change the form title to Customer Input. Change to Layout view. Click the label and textbox for CustomeriD and delete them. Adjust the right margin of LastName to be as narrow as FirstName (Width =1.5 in the Property Sheet). Adjust the right margin of StreetAddress to be as narrow as City. (Width =1.8646 in the Property Sheet.) Change the Shape Fill for the LastName and FirstName textboxes to be Red, Accent 2 Lighter 80%. Insert the downloaded a02 grader h2_Giftshop.jpg into the form. In the Property Sheet, on the Format tab, change the Width to 2.5 and the Height to 1.1. Move the image to the right of the customer fields so that it aligns with the top of LastName. Save the form. In Form view, change the first record to have a LastName of Student and a FirstName of Access. Close the form. Use the appropriate query wizard to create a query to see which customers made multiple purchases using all the fields in tbIPurchase (hint: this is a Find Duplicates Query). Show all fields available. Save the query as qryMultiplePurchases_aStudent. In Design view, sort in ascending order on CustomerID and PurchaseID. Save and ciose the query. Use the appropriate query wizard to create a query to see if any customers have made no purchases. Show LastName, FirstName and ResorthotelRoom in that order. Save the query as qryCustomerWithoutPurchase_aStudent. Close the query. Use Query Design to create a query to find customers who made purchases but have no ResortHotelRoom. Include LastName, FirstName, PurchaseDate, and ResorthotelRoom in that order. Do not show ResortHotelRoom in the results. Sort in ascending order by LastName and FirstName. In Datasheet view Autofit all column widths. Save the query as qryNonGuestPurchases_aStudent. Close the query. Use Query Design to create a query to show customers that have purchased Indigo 5 or Spa category products in January 2018. Include LastName, FirstName, PurchaseDate, and Category in that order. In Design view, sort by LastName and FirstName, both in ascending order. Autofit the fields. Save the query as qrySpaIndigoJanuary_aStudent. Close the query. Use Query Design to create a query to calculate the extended amount for each product purchased. Include PurchaseID, PurchaseDate, PurchaseLine, Quantity, ProductDescription, and Price in that order. Save the query as qryExtendedAmount_aStudent. Add a new calculated field to the query to calculate each product's extended amount due based on the quantity and the price. Name the new field ExtendedAmount. Sort the query by PurchaseID in ascending order. In Datasheet view Autofit all column widths. Save the changes and close the query. Use the Report Wizard to create a report showing all complete purchases. Include all the fields from qryExtendedAmount_aStudent. Group by PurchaselD. Sort by PurchaseLine in ascending order. Change Orientation to Landscape, accept all other default options, and name the report rptPurchases_aStudent. Add Created by a Student to the report footer. Change to Layout view. Change the report title to Purchase Report. Change the width of the PurchaseID to 1". Change the width of the Purchase Line column header and textbox in the Property Sheet to 1 and the left to 2.0n. Change the width of the PurchaseDate column header and textbox to 1. Click ExtendedAmount and add a sum subtotal. Open the Property Sheet and change the Format of the new control to Currency. Add a caption and change it to Total Purchase. Repeat these revisions for the grand total control and change the caption to Grand Total Purchases. Change the subtotal Total Purchase caption and text box to bold with a Shape Fill of Red, Accent 2 Lighter 80%. Change the grand total caption and text box to bold with a Shape Fill of Red, Accent 2, Lighter 60%. Save and close the report. Close all database objects. Close the database and then exit Access. Submit the database as directed. Instructions Step 1 Start Access. Open the downloaded file named a02 grader h2 Giftshop.accdb. Save the file with the name a02 grader_h2 Giftshon. LastFirst, replacing LastFirst with your name. In the Security Waming bar, cick Enable Content. 2. Use the Report Wizard to create a report showing customers and their purchases. Include LastName, FirstName. PurchaseDate, Quantity, ProductDescriptign, Category, and Price. Accept the default view and add no additional grouping. Sort by Category and then by ProductDescription, both in ascending order. Save the report as rptCustomerPurchases_astudent. (3) Change to Layout view, click on the Purchase Date label and textbox and open the Format tab on the Property Sheet. Type 1.1" in the Width, and 2.5 in the Left. Close the Property Sheet. Change the report title to Customer Purchases. Apply the downloaded theme a02 grader h2 Gith hop. thm x to all objects in the database. Add Created by a Student to the report footer. Save and close the report. 4 Use the Form Wizard to create a form for inputting customers. Select all fields from tbiCustomer and accept all defaults. Name the form frmCustomerInput_aStudent. Add Created by a Student to the form footer. Change the form title to Customer Input. Change to Layout view. Click the label and textbox for CustomerID and delete them. Adjust the right margin of LastName to be as narrow as FirstName (Width =1.5n in the Property Sheet). Adjust the right margin of StreetAddress to be as narrow as City. (Width =1.8646 in the Property Sheet.) Change the Shape Fill for the LastiName and Firstivame textboxes to be Red, Accent 2 Lighter 80%. Insert the downloaded a02 grader h2_Giftshop.jpg into the form. In the Property Sheet, on the Format tab, change the Width to 2.5 and the Height to 1.1". Move the image to the right of the customer fields so that it aligns with the top of LastName. Save the form. In Form view, change the first record to have a LastName of Student and a FirstName of Access. Close the form. Use the appropriate query wizard to create a query to see which customers made multiple purchases using all the fields in tbIPurchase (hint: this is a Find Duplicates Query). Show all fields available. Save the query as qryMultiplePurchases_aStudent. In Design view, sort in ascending order on CustomerID and PurchaseID. Save and close the query. Use the appropriate query wizard to create a query to see if any customers have made no purchases. Show LastName, FirstName and ResortHotelRoom in that order. Save the query a qryCustomerWithoutPurchase_aStudent. Close the query. Instructions Use Query Design to create a query to find customers who made purchases but have no ResorthotelRoom. Include Lasthame, FirstName, PurchaseDate, and ResorthotelRoom in that order. Do not show ResorthotelRoom in the results. Sort in ascending order by LastName and FirstName. In Datasheet view Autofit all column widths. Save the query as qryNonGuestPurchases_astudent. Cose the query. Use Query Design to create a query to show customers that have purchased Indigo 5 or Spa category products in January 2018. Include LastName, FirstName, PurchaseDate, and Category in that order. In Design view, sort by LastName and FirstName, both in ascending order. Autofit the fields. Save the query as qrySpaIndigoJanuary_aStudent. Close the query. Use Query Design to create a query to calculate the extended amount for each product purchased. Include PurchaseID, PurchaseDate, PurchaseLine, Quantity, ProductDescription, and Price in that order. Save the query as qry ExtendedAmount_a Student. Add a new calculated field to the query to calculate each product's extended amount due based on the quantity and the price. Name the new field ExtendedAmount. Sort the query by PurchaseID in ascending order. In Datashect view Autofit all column widths. Save the changes and close the query. Use the Report Wizard to create a report showing all complete purchases. Include all the fields from qryExtendedAmount aStudent. Group by PurchaseID. Sort by PurchaseLine in ascending order. Change Orientation to Landscape, accept all other default options, and name the report rptPurchases_aStudent. Add Created by a Student to the report footer. Change to Layout view. Change the report title to Purchase Report. Change the width of the PurchaseID to 1"n. Change the width of the Purchase Line column header and textbox in the Property Sheet to 1n and the left to 2.0n. Change the width of the PurchaseDate column header and textbox to 1. Click ExtendedAmount and add a sum subtotal. Open the Property Sheet and change the Format of the new control to Currency. Add a caption and change it to Total Purchase. Repeat these revisions for the grand total control and change the caption to Grand Total Purchases. Change the subtotal Total Purchase caption and text box to bold with a Shape Fill of Red, Accent 2 Lighter 80%. Change the grand total caption and text box to bold with a Shape Fill of Red, Accent 2, Lighter 60%. Save and close the report. lose all database objects. Close the database and then exit Access. Submit the database as irected. Instructions 9 Change the format for ScheduleDay to Short Date; change the format for StartTime to Medium Time; and change the field size for HoursScheduled to Integer. Assign the best field as the primary key, and then save the new table as tbISchedule. Close the table. Import the Schedule worksheet in the downloaded Excel file a01_grader_a2_HotelEmp.xlsx, appending it to tblSchedule. Do not save the import steps. Open the Relationships window. Add tblSchedule, tblEmployee, and tblHotelAreas to the window. Create a one-to-many relationship between EmployeeID in tblEmployee and EmployeeID in tblSchedule. Enforce referential integrity. Do not cascade update or cascade delete. 2 Create a one-to-many relationship between AreaID in tblHotelAreas and AreaID in tblEmployees. Enforce referential integrity. Do not cascade update or cascade delete. Save the changes. Create a relationship report accepting the default name. Close the report and close the Relationships window. Use the Form tool to create a form for tblEmployee, and then save it as frmEmployeeSchedule. View the form in Form View. Locate the record for the employee named Gabriel Jones. Add a new record to work on 1/3/2018, starting at 8AM and working for 8 hours. Close the form. Use the Simple Query Wizard to create a query. The query results should list AreaID and AreaName from tblHotelAreas, FirstName and LastName from tblEmployee, and ScheduleDay, StartTime, and HoursScheduled from tblSchedule (in that order). Save your query as qryCoffeeshopSchedule and then view the query results. Switch to Design view, and then enter criteria that will only return records with AreaID 4 in the results. Run, and then save the query. Close the query. Create a report using the Report Wizard using fields from qryCoffeeShopSchedule. Add the fields FirstName, LastName, ScheduleDay, StartTime, and HoursScheduled (in that order). View by tblSchedule, and group by ScheduleDay. Click Grouping Options and change Group intervals to Day. Sort in ascending order first by StartTime and then by LastName, and change to Landscape orientation. Name your report rptCoffeeShopSchedule and then finish the wizard. View the report in Layout view. Modify the report title to be Coffee Shop Schedule. Save, and then close the report. Start Access. Open the downloaded file named a02 grader h2_Giftshop.accodb. Save the file with the name, a02 grader_h2 Giftshop. LastFirst, replacing LastFirst with your name. In the Security Warning bar, cick Enable Content. Use the Report Wizard to create a report showing customers and their purchases. Include LastName, FirstName. PurchaseDate, Quantity, ProductDescription, Category, and Price. Accept the default view and add no additional grouping. Sort by Category and then by ProductDescription, both in ascending order. Save the report as rptCustomerPurchases_aStudent. Change to Layout view, click on the Purchase Date label and textbox and open the Format tab on the Property Sheet. Type 1.1 in the Width, and 2.5 in the Left. Close the Property Sheet. Change the report title to Customer Purchases. Apply the downloaded theme a02 grader h2 Giftshop.thm x to all objects in the database. Add Created by a Student to the report footer. Save and close the report. Use the Form Wizard to create a form for inputting customers. Select all fields from tblCustomer and accept all defaults. Name the form frmCustomerInput_aStudent. Add Created by a Student to the form footer. Change the form title to Customer Input. Change to Layout view. Click the label and textbox for CustomeriD and delete them. Adjust the right margin of LastName to be as narrow as FirstName (Width =1.5 in the Property Sheet). Adjust the right margin of StreetAddress to be as narrow as City. (Width =1.8646 in the Property Sheet.) Change the Shape Fill for the LastName and FirstName textboxes to be Red, Accent 2 Lighter 80%. Insert the downloaded a02 grader h2_Giftshop.jpg into the form. In the Property Sheet, on the Format tab, change the Width to 2.5 and the Height to 1.1. Move the image to the right of the customer fields so that it aligns with the top of LastName. Save the form. In Form view, change the first record to have a LastName of Student and a FirstName of Access. Close the form. Use the appropriate query wizard to create a query to see which customers made multiple purchases using all the fields in tbIPurchase (hint: this is a Find Duplicates Query). Show all fields available. Save the query as qryMultiplePurchases_aStudent. In Design view, sort in ascending order on CustomerID and PurchaseID. Save and ciose the query. Use the appropriate query wizard to create a query to see if any customers have made no purchases. Show LastName, FirstName and ResorthotelRoom in that order. Save the query as qryCustomerWithoutPurchase_aStudent. Close the query. Use Query Design to create a query to find customers who made purchases but have no ResortHotelRoom. Include LastName, FirstName, PurchaseDate, and ResorthotelRoom in that order. Do not show ResortHotelRoom in the results. Sort in ascending order by LastName and FirstName. In Datasheet view Autofit all column widths. Save the query as qryNonGuestPurchases_aStudent. Close the query. Use Query Design to create a query to show customers that have purchased Indigo 5 or Spa category products in January 2018. Include LastName, FirstName, PurchaseDate, and Category in that order. In Design view, sort by LastName and FirstName, both in ascending order. Autofit the fields. Save the query as qrySpaIndigoJanuary_aStudent. Close the query. Use Query Design to create a query to calculate the extended amount for each product purchased. Include PurchaseID, PurchaseDate, PurchaseLine, Quantity, ProductDescription, and Price in that order. Save the query as qryExtendedAmount_aStudent. Add a new calculated field to the query to calculate each product's extended amount due based on the quantity and the price. Name the new field ExtendedAmount. Sort the query by PurchaseID in ascending order. In Datasheet view Autofit all column widths. Save the changes and close the query. Use the Report Wizard to create a report showing all complete purchases. Include all the fields from qryExtendedAmount_aStudent. Group by PurchaselD. Sort by PurchaseLine in ascending order. Change Orientation to Landscape, accept all other default options, and name the report rptPurchases_aStudent. Add Created by a Student to the report footer. Change to Layout view. Change the report title to Purchase Report. Change the width of the PurchaseID to 1". Change the width of the Purchase Line column header and textbox in the Property Sheet to 1 and the left to 2.0n. Change the width of the PurchaseDate column header and textbox to 1. Click ExtendedAmount and add a sum subtotal. Open the Property Sheet and change the Format of the new control to Currency. Add a caption and change it to Total Purchase. Repeat these revisions for the grand total control and change the caption to Grand Total Purchases. Change the subtotal Total Purchase caption and text box to bold with a Shape Fill of Red, Accent 2 Lighter 80%. Change the grand total caption and text box to bold with a Shape Fill of Red, Accent 2, Lighter 60%. Save and close the report. Close all database objects. Close the database and then exit Access. Submit the database as directed. Instructions Step 1 Start Access. Open the downloaded file named a02 grader h2 Giftshop.accdb. Save the file with the name a02 grader_h2 Giftshon. LastFirst, replacing LastFirst with your name. In the Security Waming bar, cick Enable Content. 2. Use the Report Wizard to create a report showing customers and their purchases. Include LastName, FirstName. PurchaseDate, Quantity, ProductDescriptign, Category, and Price. Accept the default view and add no additional grouping. Sort by Category and then by ProductDescription, both in ascending order. Save the report as rptCustomerPurchases_astudent. (3) Change to Layout view, click on the Purchase Date label and textbox and open the Format tab on the Property Sheet. Type 1.1" in the Width, and 2.5 in the Left. Close the Property Sheet. Change the report title to Customer Purchases. Apply the downloaded theme a02 grader h2 Gith hop. thm x to all objects in the database. Add Created by a Student to the report footer. Save and close the report. 4 Use the Form Wizard to create a form for inputting customers. Select all fields from tbiCustomer and accept all defaults. Name the form frmCustomerInput_aStudent. Add Created by a Student to the form footer. Change the form title to Customer Input. Change to Layout view. Click the label and textbox for CustomerID and delete them. Adjust the right margin of LastName to be as narrow as FirstName (Width =1.5n in the Property Sheet). Adjust the right margin of StreetAddress to be as narrow as City. (Width =1.8646 in the Property Sheet.) Change the Shape Fill for the LastiName and Firstivame textboxes to be Red, Accent 2 Lighter 80%. Insert the downloaded a02 grader h2_Giftshop.jpg into the form. In the Property Sheet, on the Format tab, change the Width to 2.5 and the Height to 1.1". Move the image to the right of the customer fields so that it aligns with the top of LastName. Save the form. In Form view, change the first record to have a LastName of Student and a FirstName of Access. Close the form. Use the appropriate query wizard to create a query to see which customers made multiple purchases using all the fields in tbIPurchase (hint: this is a Find Duplicates Query). Show all fields available. Save the query as qryMultiplePurchases_aStudent. In Design view, sort in ascending order on CustomerID and PurchaseID. Save and close the query. Use the appropriate query wizard to create a query to see if any customers have made no purchases. Show LastName, FirstName and ResortHotelRoom in that order. Save the query a qryCustomerWithoutPurchase_aStudent. Close the query. Instructions Use Query Design to create a query to find customers who made purchases but have no ResorthotelRoom. Include Lasthame, FirstName, PurchaseDate, and ResorthotelRoom in that order. Do not show ResorthotelRoom in the results. Sort in ascending order by LastName and FirstName. In Datasheet view Autofit all column widths. Save the query as qryNonGuestPurchases_astudent. Cose the query. Use Query Design to create a query to show customers that have purchased Indigo 5 or Spa category products in January 2018. Include LastName, FirstName, PurchaseDate, and Category in that order. In Design view, sort by LastName and FirstName, both in ascending order. Autofit the fields. Save the query as qrySpaIndigoJanuary_aStudent. Close the query. Use Query Design to create a query to calculate the extended amount for each product purchased. Include PurchaseID, PurchaseDate, PurchaseLine, Quantity, ProductDescription, and Price in that order. Save the query as qry ExtendedAmount_a Student. Add a new calculated field to the query to calculate each product's extended amount due based on the quantity and the price. Name the new field ExtendedAmount. Sort the query by PurchaseID in ascending order. In Datashect view Autofit all column widths. Save the changes and close the query. Use the Report Wizard to create a report showing all complete purchases. Include all the fields from qryExtendedAmount aStudent. Group by PurchaseID. Sort by PurchaseLine in ascending order. Change Orientation to Landscape, accept all other default options, and name the report rptPurchases_aStudent. Add Created by a Student to the report footer. Change to Layout view. Change the report title to Purchase Report. Change the width of the PurchaseID to 1"n. Change the width of the Purchase Line column header and textbox in the Property Sheet to 1n and the left to 2.0n. Change the width of the PurchaseDate column header and textbox to 1. Click ExtendedAmount and add a sum subtotal. Open the Property Sheet and change the Format of the new control to Currency. Add a caption and change it to Total Purchase. Repeat these revisions for the grand total control and change the caption to Grand Total Purchases. Change the subtotal Total Purchase caption and text box to bold with a Shape Fill of Red, Accent 2 Lighter 80%. Change the grand total caption and text box to bold with a Shape Fill of Red, Accent 2, Lighter 60%. Save and close the report. lose all database objects. Close the database and then exit Access. Submit the database as irected
Step by Step Solution
There are 3 Steps involved in it

Get step-by-step solutions from verified subject matter experts