Question
You are the design engineer. Your company will be manufacturing the cover and base, but will purchase the O-ring. The O-ring must be compressed at
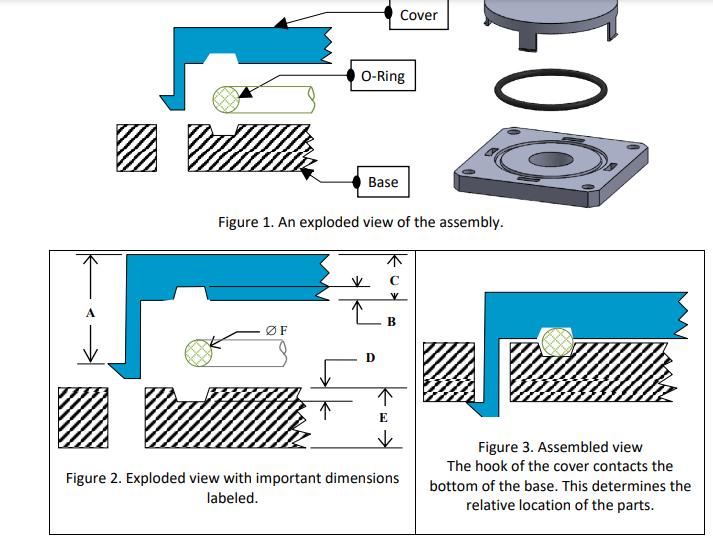
You are the design engineer. Your company will be manufacturing the cover and base, but will purchase the O-ring. The O-ring must be compressed at least .010 to ensure a tight seal, but not more than .060 inches to prevent damage to the O-ring. Figure 1. An exploded view of the assembly. Figure 2. Exploded view with important dimensions labeled. Figure 3. Assembled view The hook of the cover contacts the bottom of the base. This determines the relative location of the parts. Table 1. Detailed information about the dimensions and tolerances. Dim. Nom. Dim. inches Tolerance inches Description A 1.300 +/-.010 Length of snap fit B .100 + .000 - .006 Depth of O-ring groove in the cover C .500 +/-.010 Thickness of the cover D .100 +.000 - .006 Depth of O-ring groove in the base E .750 +/-.010 Thickness of the base F .275 +/-.003 Diameter of the o-ring Æ F D B A C E Cover Base O-Ring Questions 1. What is the key characteristic (typically the critical gap/interference) in this problem? 2. Express the key characteristic as a mathematical inequality. 3. Help create a loop diagram that is easy to understand, including all of the dimensions that affect the key characteristic. Hint: draw the key characteristic as an interference. 4. Create the loop equation. 5. Calculate the nominal value and plus/minus tolerance of the key characteristic using the current dimensions and tolerances. 6. Calculate the limits of the key characteristic using the current dimensions and tolerances. According to your analysis, are the current dimensions and tolerances sufficient to satisfy the key characteristic? 7. If the current tolerances are not sufficient to meet the key characteristic propose new (numeric) dimensions/tolerances. (Remember that smaller tolerances increase the cost of the parts. The goal is to maximize the tolerances while meeting the key characteristic.) Explain your choice and show that your proposed changes numerically satisfy the requirements. Bonus: Propose an alternate solution that will allow for even greater tolerances than found in question 7, while still meeting the key characteristic requirements.

Cover O-Ring Base Figure 1. An exploded view of the assembly. F D E B Figure 2. Exploded view with important dimensions labeled. Figure 3. Assembled view The hook of the cover contacts the bottom of the base. This determines the relative location of the parts.
Step by Step Solution
There are 3 Steps involved in it
Step: 1

Get Instant Access to Expert-Tailored Solutions
See step-by-step solutions with expert insights and AI powered tools for academic success
Step: 2

Step: 3

Ace Your Homework with AI
Get the answers you need in no time with our AI-driven, step-by-step assistance
Get Started


