Answered step by step
Verified Expert Solution
Question
1 Approved Answer
answer question 3, i have provided the steps from the experiment Experimental Procedure: Each student will analyze their assigned Brass sample individunlly, data will be
answer question 3, i have provided the steps from the experiment 


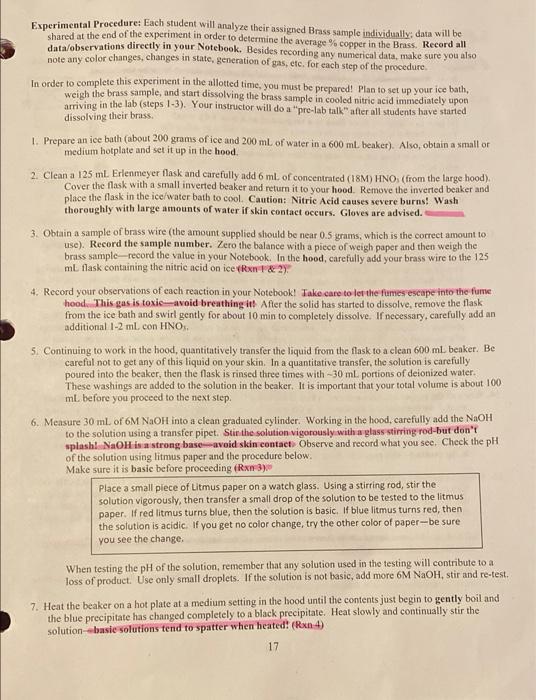
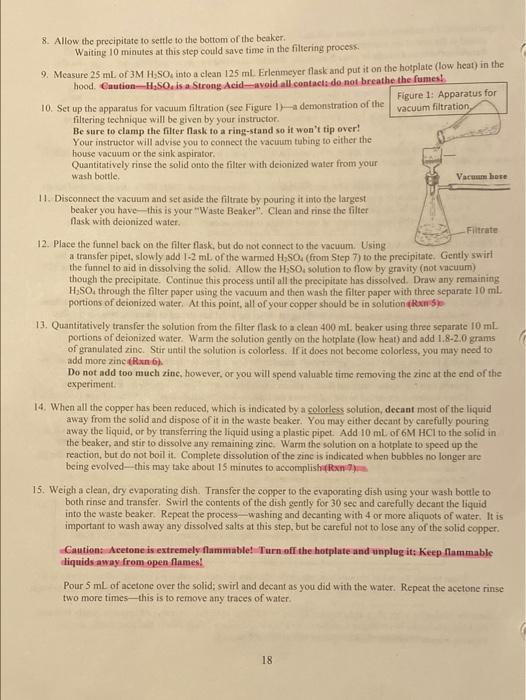
Experimental Procedure: Each student will analyze their assigned Brass sample individunlly, data will be Shared at the end of the experiment in order to determine the average % copper in the Brass. Record all data/observations directly in your Notebook. Besides recording any numerical data, make sure you also note any color changes, changes in state, generation of gas, etc. for each step of the procedure. In order to complete this experiment in the allotted time, you must be prepared! Plan to set up your ice bath, weigh the brass sample, and start dissolving the brass sample in cooled nitric acid immedintely upon arriving in the lab (steps 1-3). Your instructor will do a "pre-lab talk" after all students have started dissolving their brass. 1. Prepare an ice bath (about 200 grams of ice and 200 mL of water in a 600 ml. beaker). Also, obtain a small or medium hotplate and set it up in the hood. 2. Clean a 125 ml Erlenmeyer flask and carefully add 6 ml of concentrated (18M) HNO, (from the large hood) Cover the flask with a small inverted beaker and return it to your hood. Remove the inverted beaker and place the flask in the ice/water bath to cool. Caution: Nitric Acid causes severe burns! Wash thoroughly with large amounts of water if skin contact occurs. Gloves are advised. 3. Obtain a sample of brass wire (the amount supplied should be near 0.5 grams, which is the correct amount to use). Record the sample number. Zero the balance with a piece of weigh paper and then weigh the brass sample-record the value in your Notebook. In the hood, carefully add your brass wire to the 125 ml flask containing the nitric acid on ice Rx & 2 4. Record your observations of each reaction in your Notebook! Take care to let the fumes escape into the fume hood. This gas is toxic-avoid breathing it! After the solid has started to dissolve, remove the flask from the ice bath and swirl gently for about 10 min to completely dissolve. If necessary, carefully add an additional 1-2 ml. con HNO). 5. Continuing to work in the hood, quantitatively transfer the liquid from the flask to a clean 600 ml benker. Be careful not to get any of this liquid on your skin. In a quantitative transfer, the solution is carefully poured into the beaker, then the flask is rinsed three times with -30 ml. portions of deionized water. These washings are added to the solution in the beaker. It is important that your total volume is about 100 ml before you proceed to the next step. 6. Measure 30 ml. of 6M NaOH into a clean graduated cylinder. Working in the hood, carefully add the NaOH to the solution using a transfer pipet. Stinthe solution vigorously with a glass stirring rod but don't splash NaOH is a strong base-avoid skin contact Observe and record what you see. Check the pH of the solution using litmus paper and the procedure below. Make sure it is basic before proceeding (Rxn 3 Place a small piece of Litmus paper on a watch glass. Using a stirring rod, stir the solution vigorously, then transfer a small drop of the solution to be tested to the litmus paper. If red litmus turns blue, then the solution is basic. I blue litmus turns red, then the solution is acidic. If you get no color change, try the other color of paper-be sure you see the change. When testing the pH of the solution, remember that any solution used in the testing will contribute to a loss of product. Use only small droplets. If the solution is not basic, add more 6M NaOH, stir and re-test. 7. Heat the beaker on a hot plate at a medium setting in the hood until the contents just begin to gently boil and the blue precipitate has changed completely to a black precipitate. Heat slowly and continually stir the solution-basie solutions tend to spatter when heated! (Rxn 4) 17 8. Allow the precipitate to settle to the bottom of the beaker Waiting 10 minutes at this step could save time in the filtering process 9. Measure 25 mL of 3M H:SO, into a clean 125 ml. Erlenmeyer flask and put it on the botplate (low heat) in the hood. Caution-H.SO. Is a Strong Acid-avoid all contact do not breathe the fames! Figure 1: Apparatus for 10. Set up the apparatus for vacuum filtration (see Figure 1)-a demonstration of the vacuum filtration filtering technique will be given by your instructor Be sure to clamp the filter flask to a ring-stand so it won't tip over! Your instructor will advise you to connect the vacuum tubing to either the house vacuum or the sink aspirator. Quantitatively rinse the solid onto the filter with deionized water from your wash bottle Vacuum hore 11. Disconnect the vacuum and set aside the filtmate by pouring it into the largest beaker you have this is your "Waste Benker". Clean and rinse the filter flask with deionized water Filtrate 12. Place the funnel back on the filter flask, but do not connect to the vacuum. Using a transfer pipet, slowly add 1-2 ml of the warmed H.SO (from Step 7) to the precipitate. Gently swirl the funnel to aid in dissolving the solid. Allow the H.SO solution to flow by gravity (not vacuum) though the precipitate. Continue this process until all the precipitate has dissolved. Draw any remaining H.SO. through the filter poper using the vacuum and then wash the filter paper with three separate 10 ml. portions of deionized water. At this point, all of your copper should be in solution camp 13. Quantitatively transfer the solution from the filter flask to a clean 400 ml beaker using three separate 10 ml portions of deionized water. Warm the solution gently in the hotplate (low heat) and add 1.8-2.0 grams of granulated zino. Stir until the solution is colorless. If it does not become colorless, you may need to add more zinc Run 6). Do not add too much zinc, however, or you will spend valuable time removing the zinc at the end of the experiment. 14. When all the copper has been reduced, which is indicated by a colorless solution, decant most of the liquid away from the solid and dispose of it in the waste beaker. You may either decant by carefully pouring away the liquid, or by transferring the liquid using a plastic pipet. Add 10 ml. of GM HCl to the solid in the beaker, and stir to dissolve any remaining zinc. Warm the solution on a hotplate to speed up the reaction, but do not boil it. Complete dissolution of the zinc is indicated when bubbles no longer are being evolved--this may take about 15 minutes to accomplishini 15. Weigh a clean, dry evaporating dish. Transfer the copper to the evaporating dish using your wash bottle to both rinse and transfer. Swirl the contents of the dish gently for 30 sec and carefully decant the liquid into the waste beaker. Repeat the process-washing and decanting with 4 or more aliquots of water. It is important to wash away any dissolved salts at this step, but be careful not to lose any of the solid copper. Cautione Acetone is extremely flammablet Turn off the hotplate and unplug it: Keep flammable liquids away from open fames! Pour 5 mL of acetone over the solid, swirl and decant as you did with the water. Repeat the acetone rinse two more times this is to remove any traces of water. 18 3. Indicate how each of the following would affect the % copper in this experiment (increase or decrease) and support your answer with a brief explanation: a) If there wasn't enough NaOH added in Step 6 to make the solution basic. b) If, after adding the zinc in Step 13, the solution did not become colorless. c) If there wasn't enough HCI added in Step 14 to dissolve all the zinc. are in un croun. Discuss 


Step by Step Solution
There are 3 Steps involved in it
Step: 1

Get Instant Access to Expert-Tailored Solutions
See step-by-step solutions with expert insights and AI powered tools for academic success
Step: 2

Step: 3

Ace Your Homework with AI
Get the answers you need in no time with our AI-driven, step-by-step assistance
Get Started


