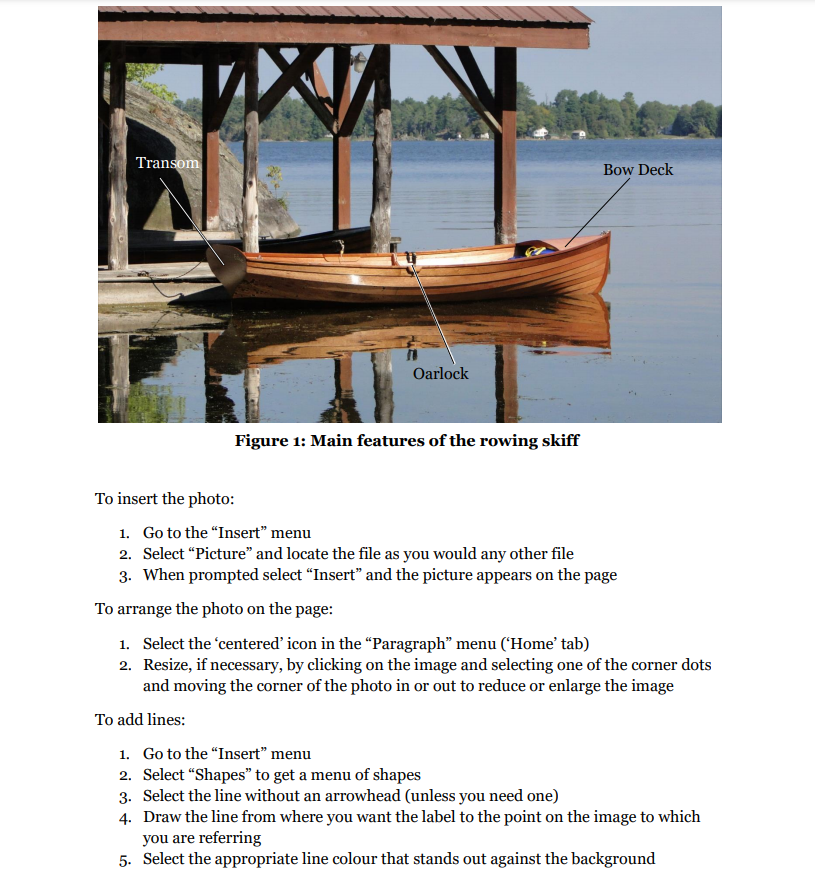
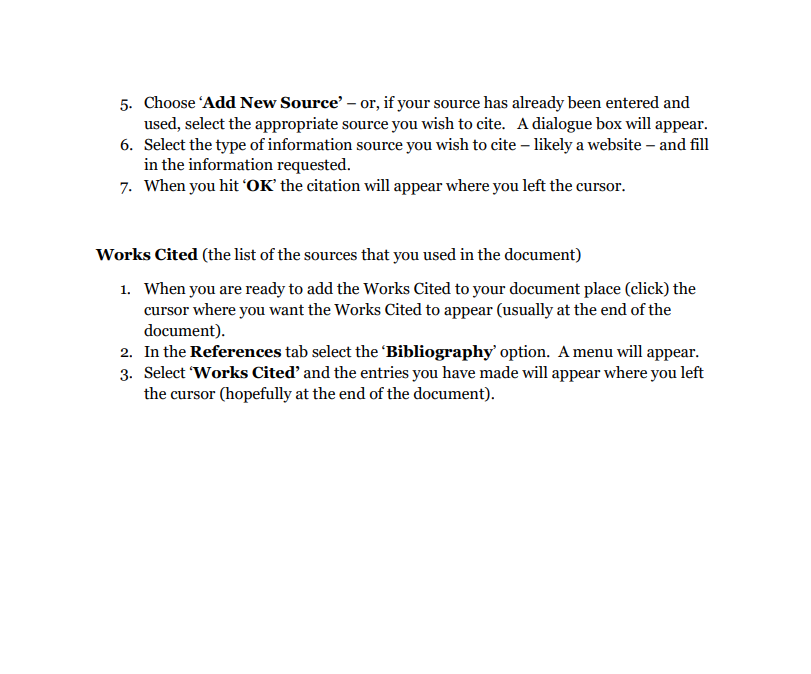
Assignment guide for the illustration The idea of this assignment is to transfer your thoughts into a form that can be shared electronically. This process will consist of three steps: coming up with an idea (thinking) sketching the idea on paper (planning) creating a professional-looking illustration that can be shared electronically (executing) Step 1 Think of something you know well (and of which you can name the parts). Do not look for an image online first Step 2 Create a sketch (with a pencil or pen on a piece of paper) of the object and label three or four main parts of the item. Add a figure number and a caption under the illustration as a reminder to do that on the final version. Step 3 Recreate your sketch as a professional looking illustration in MSWord. It should look like what you drew in terms of detail, page orientation, labels and caption. You may borrow images from the internet - but you will have to cite them (in a works cited using IEEE 2006 style) or you may create your own (which need no citation). It is recommended that you select or create an image with a clean background so that your labels appear clearly. Your labels must respect the margins on the page (imagine a 3cm border or white space all around the page and the illustration will look better). You may create a line drawing in CAD or any other illustration software (Illustrator for example) for this purpose. DO NOT select an image with existing labels - you need to add your own. Transom Bow Deck Oarlock Figure 1: Main features of the rowing skiff To insert the photo: 1. Go to the "Insert" menu 2. Select Picture and locate the file as you would any other file 3. When prompted select Insert" and the picture appears on the page To arrange the photo on the page: 1. Select the "centered' icon in the "Paragraph menu ('Home' tab) 2. Resize, if necessary, by clicking on the image and selecting one of the corner dots and moving the corner of the photo in or out to reduce or enlarge the image To add lines: 1. Go to the "Insert" menu 2. Select Shapes to get a menu of shapes 3. Select the line without an arrowhead (unless you need one) 4. Draw the line from where you want the label to the point on the image to which you are referring 5. Select the appropriate line colour that stands out against the background To add labels: 1. Go to the "Insert" menu 2. Select Text box use the first simple' textbox option NOTE: I have found that using the "draw textbox" option works faster and avoids some alignment issues with MS Word 3. Type in the label 4. Reduce the size of the textbox to contain the type 5. Move the textbox (if you didn't use the "draw textbox function) to where you want it by hovering over the box and, when the cross-pointer appears, grab the box and move it into position To eliminate the background of the text box and the border: 1. Select (click on) the text box and the "drawing tools menu appears at the top of the screen 2. Select the "drawing tools menu tab 3. Select the "Shape fill menu (just to the right of the tab) 4. Choose "no fill" 5. Select the "shape outline" tab 6. Choose "no outline" To add the caption: 1. Right click on the image 2. Select Insert caption" on the menu that appears 3. Type in the label you want to appear below the image 4. Select "Enter" You may want to change the size and colour of the caption (I would like the captions to be black, bold and 12 point). You can do this by selecting the text (click, hold and drag) and changing the size and colour as you would any text in your document. You can do this in text boxes as well once they are established. To add a works cited please read the guide to documenting your sources. Documenting visual information (Illustrations) At Algonquin College if you are in the Faculty of Technology and Trades you will use IEEE 2006 style for documenting your sources of facts, illustrations and other borrowed information in documents that you create. The good news for those who hate recording bibliographic information is that IEEE 2006 is very user-friendly - it is mostly automated and uses information fields to guide you through entering the information. In visual information To get started let's look at documenting the source for an illustration (a commonly borrowed bit of information from the internet). Every illustration should have a figure number and a caption below it. At the end of the caption the source of the illustration should be referenced to its source. For example: Figure 1: Main Elements of a Racing Oarlock adapted from [1] or Figure 1: Main Elements of a Racing Oarlock source [1] In the example above there are two different source notations: adapted from to indicate that the illustration was modified by you somehow (labelled, cropped, coloured or otherwise changed); and, 'source' to indicate that the illustration appears exactly as it does in the source material How to add the citations and works cited Citations (the marker that links the work to the Works Cited) 1. Place the cursor at the end of a caption. 2. In the menu bar at the top of the page locate the References tab - click on it. 3. In the Style tab (just to the right of the References tab marker) select IEEE2006 option. 4. Click on the 'Insert Citation' button. 5. Choose 'Add New Source' - or, if your source has already been entered and used, select the appropriate source you wish to cite. A dialogue box will appear. 6. Select the type of information source you wish to cite - likely a website - and fill in the information requested. 7. When you hit 'OK' the citation will appear where you left the cursor. Works Cited (the list of the sources that you used in the document) 1. When you are ready to add the Works Cited to your document place (click) the cursor where you want the Works Cited to appear (usually at the end of the document) 2. In the References tab select the 'Bibliography' option. A menu will appear. 3. Select 'Works Cited' and the entries you have made will appear where you left the cursor (hopefully at the end of the document). Assignment guide for the illustration The idea of this assignment is to transfer your thoughts into a form that can be shared electronically. This process will consist of three steps: coming up with an idea (thinking) sketching the idea on paper (planning) creating a professional-looking illustration that can be shared electronically (executing) Step 1 Think of something you know well (and of which you can name the parts). Do not look for an image online first Step 2 Create a sketch (with a pencil or pen on a piece of paper) of the object and label three or four main parts of the item. Add a figure number and a caption under the illustration as a reminder to do that on the final version. Step 3 Recreate your sketch as a professional looking illustration in MSWord. It should look like what you drew in terms of detail, page orientation, labels and caption. You may borrow images from the internet - but you will have to cite them (in a works cited using IEEE 2006 style) or you may create your own (which need no citation). It is recommended that you select or create an image with a clean background so that your labels appear clearly. Your labels must respect the margins on the page (imagine a 3cm border or white space all around the page and the illustration will look better). You may create a line drawing in CAD or any other illustration software (Illustrator for example) for this purpose. DO NOT select an image with existing labels - you need to add your own. Transom Bow Deck Oarlock Figure 1: Main features of the rowing skiff To insert the photo: 1. Go to the "Insert" menu 2. Select Picture and locate the file as you would any other file 3. When prompted select Insert" and the picture appears on the page To arrange the photo on the page: 1. Select the "centered' icon in the "Paragraph menu ('Home' tab) 2. Resize, if necessary, by clicking on the image and selecting one of the corner dots and moving the corner of the photo in or out to reduce or enlarge the image To add lines: 1. Go to the "Insert" menu 2. Select Shapes to get a menu of shapes 3. Select the line without an arrowhead (unless you need one) 4. Draw the line from where you want the label to the point on the image to which you are referring 5. Select the appropriate line colour that stands out against the background To add labels: 1. Go to the "Insert" menu 2. Select Text box use the first simple' textbox option NOTE: I have found that using the "draw textbox" option works faster and avoids some alignment issues with MS Word 3. Type in the label 4. Reduce the size of the textbox to contain the type 5. Move the textbox (if you didn't use the "draw textbox function) to where you want it by hovering over the box and, when the cross-pointer appears, grab the box and move it into position To eliminate the background of the text box and the border: 1. Select (click on) the text box and the "drawing tools menu appears at the top of the screen 2. Select the "drawing tools menu tab 3. Select the "Shape fill menu (just to the right of the tab) 4. Choose "no fill" 5. Select the "shape outline" tab 6. Choose "no outline" To add the caption: 1. Right click on the image 2. Select Insert caption" on the menu that appears 3. Type in the label you want to appear below the image 4. Select "Enter" You may want to change the size and colour of the caption (I would like the captions to be black, bold and 12 point). You can do this by selecting the text (click, hold and drag) and changing the size and colour as you would any text in your document. You can do this in text boxes as well once they are established. To add a works cited please read the guide to documenting your sources. Documenting visual information (Illustrations) At Algonquin College if you are in the Faculty of Technology and Trades you will use IEEE 2006 style for documenting your sources of facts, illustrations and other borrowed information in documents that you create. The good news for those who hate recording bibliographic information is that IEEE 2006 is very user-friendly - it is mostly automated and uses information fields to guide you through entering the information. In visual information To get started let's look at documenting the source for an illustration (a commonly borrowed bit of information from the internet). Every illustration should have a figure number and a caption below it. At the end of the caption the source of the illustration should be referenced to its source. For example: Figure 1: Main Elements of a Racing Oarlock adapted from [1] or Figure 1: Main Elements of a Racing Oarlock source [1] In the example above there are two different source notations: adapted from to indicate that the illustration was modified by you somehow (labelled, cropped, coloured or otherwise changed); and, 'source' to indicate that the illustration appears exactly as it does in the source material How to add the citations and works cited Citations (the marker that links the work to the Works Cited) 1. Place the cursor at the end of a caption. 2. In the menu bar at the top of the page locate the References tab - click on it. 3. In the Style tab (just to the right of the References tab marker) select IEEE2006 option. 4. Click on the 'Insert Citation' button. 5. Choose 'Add New Source' - or, if your source has already been entered and used, select the appropriate source you wish to cite. A dialogue box will appear. 6. Select the type of information source you wish to cite - likely a website - and fill in the information requested. 7. When you hit 'OK' the citation will appear where you left the cursor. Works Cited (the list of the sources that you used in the document) 1. When you are ready to add the Works Cited to your document place (click) the cursor where you want the Works Cited to appear (usually at the end of the document) 2. In the References tab select the 'Bibliography' option. A menu will appear. 3. Select 'Works Cited' and the entries you have made will appear where you left the cursor (hopefully at the end of the document)