Answered step by step
Verified Expert Solution
Question
1 Approved Answer
; ; clockupdate.asm: ECE 266 Lab 3 Starter code, spring 2023 ; ; Assembly code for updating the 7-seg to show a running clock ;

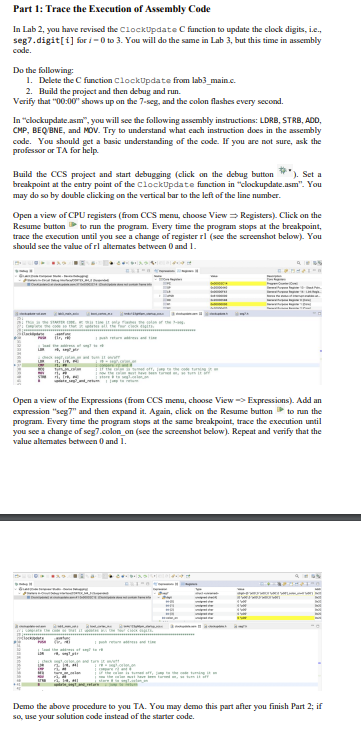
; ; clockupdate.asm: ECE 266 Lab 3 Starter code, spring 2023 ; ; Assembly code for updating the 7-seg to show a running clock ; ; ; include C header file .cdecls "clockupdate.h" .text ; Declaration for a pointer to external variable seg7 seg7_ptr .field seg7 ClockUpdate_ptr .field ClockUpdate ;************************************************************************************ ; Task 1: Update the clock ; ; C prototype: void ClockUpdate(uint32_t time) ; ; This is the ClockUpdate callback function in assembly. It replaces the ; same function in your lab2_main.c. ; ; This is the STARTER CODE. At this time it only flashes the colon of the 7-seg. ; Complete the code so that it updates all the four clock digits. ;************************************************************************************ .global ClockUpdate .asmfunc ClockUpdate PUSH {lr, r0} ; push return address and time ; load the address of seg7 to r0 LDR r0, seg7_ptr ; check seg7.colon_on and turn it on/off LDRB r1, [r0, #4] ; r1 = seg7.colon_on CMP r1, #0 ; compare r1 and 0 BEQ turn_on_colon ; if equal, jump to turn on the colon MOV r1, #0 ; r1 = 0, for turning off the colon STRB r1, [r0, #4] ; seg7.colon_on = 0 B update_seg7_and_return ; jump to return turn_on_colon MOV r1, #1 ; r1 = 1, for turning on the colon STRB r1, [r0, #4] ; seg7.colon_on = 1 ;************************************************************** ; YOUR CODE STARTS HERE ;************************************************************** ;************************************************************** ; YOUR CODE ENDS HERE ;************************************************************** update_seg7_and_return ; Physically update the 7-seg ; Call Seg7Update(&seg) BL Seg7Update ; note that r0 = &seg7 at this time ; Schedule a callback after 0.5 seconds: ; Call ScheduleCallback(ClockUpdate, time + 500); LDR r0, ClockUpdate_ptr ; r0 = ClockUpdate POP {r1} ; r1 = time ADD r1, #500 ; r1 += 500 BL ScheduleCallback POP {pc} ; return .endasmfunc Part 1: Trace the Execution of Assembly Code In Lab 2, you have revised the Clockupdate C function to update the clock digits, i.c., seg7.digit [i] for i=0 to 3. You will do the same in Lab 3, but this time in assembly code. Do the following: 1. Delete the C function ClockDpdate from lab3_main.s. 2. Build the project and then debag and run. Verify that "00:00" shows up on the 7 seseg, and the colon flashes every second. In "clockupdatc.asm", you will see the following assembly instructions: LDRB, STRB, ADO, CMP, BEQ eNE, and MOV. Try to understand what each instruction does in the assembly code. You should get a basic understanding of the code. If you are not sure, ask the professor or TA for help. Build the CCS project and start debugging (click on the debag button "). Set a breakpoint at the entry point of the ClockDpdate function in "clockupdate.asm". You may do so by double clicking on the vertical bar to the left of the line number. Open a view of CPU registers (from CCS menu, choose View Registers). Click on the Resume button to run the program. Every time the program stops at the breakpoint, trace the execution until you see a change of register rl (see the screenshot below). You should see the value of rl aliemates between 0 and 1 . Open a view of the Expressions (from CCS menu, choose View =s Expressions). Add an expression "seg?" and then expand it. Again, click on the Resume button to to run the program. Every time the program stops at the same breakpoint, trace the execution until you see a change of seg7.colon on (see the screenshot below). Repeat and verify that the value altemates between 0 and 1 . Demo the above procedure to you TA. You may demo this part after you finish Part 2; if so, use your solution code instead of the starter code Step by Step Solution
There are 3 Steps involved in it
Step: 1

Get Instant Access to Expert-Tailored Solutions
See step-by-step solutions with expert insights and AI powered tools for academic success
Step: 2

Step: 3

Ace Your Homework with AI
Get the answers you need in no time with our AI-driven, step-by-step assistance
Get Started


