

Question: ***CODE IN C++*** Overview This assignment is designed to test your ability to use classes (polymorphism). As well as develop good programming practices and briefly
***CODE IN C++***
Overview This assignment is designed to test your ability to use classes (polymorphism). As well as develop good programming practices and briefly use the c++ container class: forward_list. You may freely use code from my lecture slides and from the code folder in OWL. Your program will take command line arguments and interpret them to produce a bitmap drawing image. NO error checking is required assume the command line arguments are well formed according to the specifications! Submission Requirements * Submission MUST be done through OWL. * See the syllabus for late penalties. * You will be submitting the following 2 files, named exactly: assn3.cpp Drawable.h * You may include any non-container standard c++ header files (ie. cstdlib). * Submission files will NEVER be zipped. * If your code does not run as-is in Microsft Visual Studio 2017, you will lose the majority of your marks. * You will not receive any marks for following these instructions, but marks will be deducted for not following them. * ANY resubmission after the due date will incur the appropriate late penalty, even if your original submission was before the due due. Project Setup I recommend creating a Empty Project as you did in lab 2, and create your assn3.cpp file as you did in the same lab. Unlike assignment 1, you MUST require the user to input a character to keep the window open after the output has been produced. The assn3.cpp file will contain your main function. You may create additional helper functions within assn3.cpp. You will create a single header file named: Drawable.h. You will be putting 4 classes into this single file: DrawObject, Point, Line, Shape. All functions will be inline, even if they are a line or 2 more than the rule of 2 lines. The reason we are breaking our rule of 1 class/1 file and the rule of thumb that only methods of 1 or 2 lines will be coded inline, is simply for marking and submission convenience.
Create a class named Drawing. Copy and paste the code for Drawing.cpp and Drawing.h files and add it to your project. (Note: Class declarations included in Drawing.h code, and member function definitions included in Drawing.cpp code)
I strongly recommend you write a simple program to create a bitmap file with some drawings on it to test the class first!
// Drawing.h
//assn3.exe test.bmp 200 100 127 127 127 S 255 0 0 4 10 10 10 190 90 190 90 10 S 0 255 0 3 50 100 55 105 55 95 L 0 0 255 60 30 80 100 L 0 0 255 80 100 60 170 P 0 0 0 25 70 P 0 0 0 25 130 #pragma once #include#define CHANNELS 3 //RGB colour object typedef struct { unsigned char rgb[CHANNELS]; } COLOUR; //Row-column coordinate object typedef struct { int row; int col; } COORD; class Drawing { private: unsigned w; unsigned h; unsigned char *pixels; public: Drawing(unsigned width, unsigned height, COLOUR clr = { 0,0,0 }); ~Drawing() { delete[] pixels; } bool saveBMP(std::string file_name); void setPixel(COORD coord, COLOUR clr); void drawLine(COORD start,COORD end, COLOUR clr); };
// Drawing.cpp
#include "Drawing.h" #include#include using namespace std; Drawing::Drawing(unsigned width, unsigned height, COLOUR clr) : w(width), h(height), pixels(nullptr) { pixels = new unsigned char[w * h * CHANNELS]; for (unsigned r = 0; r ds) { s1 = &start.row; c1 = &start.col; s2 = &end.row; c2 = &end.col; ds = abs(end.row - start.row); dc = abs(end.col - start.col); } else { s1 = &start.col; c1 = &start.row; s2 = &end.col; c2 = &end.row; } //check whether calc axis is negative int calcIncr = (*c2 Main Program Flow (Understand/code the classes before trying to write main!) These are the steps your main function must perform in sequential order: 1. Create a Drawing object based on the program arguments. 2. Create as many specific DrawObjects (Line,Point,Shape) as are requested by the program arguments, and store each of them in a single forward_list. 3. Print out the number of Shapes that were created, using the static function you coded. 4. Call the draw function for each DrawObject, remove it from the forward_list, and free the object memory. 5. Save your image using the file name specified in the arguments, print out a message if it was successful or not. 6. Print out the number of Shapes that remain, using the static function you coded. 7. Prompt the user for a character before closing. HINT: Creating helper functions to parse object or colour or coordinate information from the argument array can greatly reduce the size and complexity of your main program!
Drawing Information A typical drawing surface is represented by a 2 dimensional array of pixels. The origin (Row=0,Col=0) is the top left corner, and the pixel located at (Height-1,Width-1) is at the bottom right corner. Use the COORD struct to reference pixel coordinates. A pixel can have a colour that is represented by a combination of (red,green,blue) values. Each colour component (RGB) is a number from 0-255. Black=(0,0,0), White=(255,255,255), Pure Red=(255,0,0). Use the COLOUR struct to specify pixel colour. A bitmap is a format for storing image information. Files stored in this format normally have the .bmp extension. If you open the file that was produced by your program, your operating system should chose a default program to view the image. Command Line Arguments The user of your program will supply command line arguments in the following format. You do not need to verify that they follow this format. The TA will not be entering in garbage to mark your assignment. 1. The file name to store the bmp that your program creates 2. Width in pixels of the image 3. Height in pixels of the image 4,5,6. The R G B values to be used as the background colour of the image After these argments will appear from 0 to any number of drawing object information. Each object will use its own set of argument formats. You must test the first argument to determine which object to create. DrawOject (Point) 1. P 2,3,4. The R G B values to be used as the pixel colour of the point. 5,6. The ROW and COL coordinate values for the point. DrawOject (Line) 1. L 2,3,4. The R G B values to be used as the pixel colour of the line. 5,6. The ROW and COL coordinate values for the start of the line. 7,8. The ROW and COL coordinate values for the end of the line. DrawOject (Shape) 1. S 2,3,4. The R G B values to be used as the pixel colour of the line. 5. The number of ROW,COL coordinates to follow (1 means a single row/col pair to follow) 6-??. The ROW and COL coordinate value for 1 vertex of the shape, repeated as many times as was specified by argument 5. *** Use the sample input and output image to follow how to use these arguments ***
forward_list The C++ standard templated container, forward_list, provides similar functionality to the Vector/vector class we have been using. Refer to http://www.cplusplus.com/reference/forward_list/forward_list/ for class and method documentation. You will need the following methods for this assignment: * forward_list::forward_list - The empty constructor * forward_list::empty * forward_list::push_front * forward_list::front * forward_list::pop_front You may use any other functions from this class, so long as you ensure the program specifications are met.
DrawObject Hierarchy Everything in this section will be placed in your Drawable.h file. DrawObject The base class of your heirarchy will be an abstract class named DrawObject. It will have a private COLOUR member and a protected vector. You will create a single constructor which accepts a COLOUR. You will add a public getter method for the COLOUR. You will add a pure virtual draw method which returns void and accepts a reference to a Drawing object. Do not forget to include Drawing.h, and implement any other required functions for having a pure virtual function (see lecture slides). Point Point will be a derived class of DrawObject. It will have a single constructor which accepts a COLOUR and a COORD for the point. The only other method will implement the pure virtual base class member:draw. This method will set the pixel at first COORD to the COLOUR using the base class getter. Line Line will be a derived class of DrawObject. It will have a single constructor which accepts a COLOUR and 2 COORDs for the start and end points of the line. The only other method will implement the pure virtual base class member:draw. This method will draw a line from the first COORD to the second COORD using COLOUR from the base class getter. Shape Shape will be a derived class of DrawObject. It will have a single constructor which accepts a COLOUR for the lines of the shape. You will implement the pure virtual base class member:draw. This method will draw a line from each COORD to the next COORD, and then draw a line from the last COORD to the first COORD, using COLOUR from the base class getter. You will also add a public method which accepts a COORD object and adds it to the base class vector. You will add a static counter to Shape so that you can ensure there are no memory leaks in your program. Add a private static int for the count of Shapes. Initialize the variable in the same file, but after the class declaration (see lecture slides if youve forgotten). Add a public static function to get the number of Shapes in existence (this will be called from main). Modify the Shape constructor and destructor to update the number of Shapes.
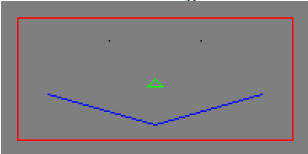
Sample input output Command line arguments shown if your executable is named assn3.exe: assn3.exe test.bmp 200 100 127 127 127 S 255 0 0 4 10 10 10 190 90 190 90 10 S 0 255 0 3 50 100 55 105 55 95 L 0 0 255 60 30 80 100 L 0 0 255 80 100 60 170 P 0 0 0 25 70 P 0 0 0 25 130 * You may cut and paste this from the top of the Drawing.h file comment (pdf cut and paste does not always work correctly)
cout statements: Number of shapes:2 Number of shapes:0 test.bmp saved successfully
Produces a test.bmp file which looks like the following:
Step by Step Solution
There are 3 Steps involved in it

Get step-by-step solutions from verified subject matter experts