Computer science. Centos report one Question. Experiment 8.
#linux Experiment 8(install and manage DNS server) #task 1: Using hosts file to resolve domain name. 1. Use the ifconfig command to view the local address [root@localhost -]# ifconfig ens 32: flags=4163
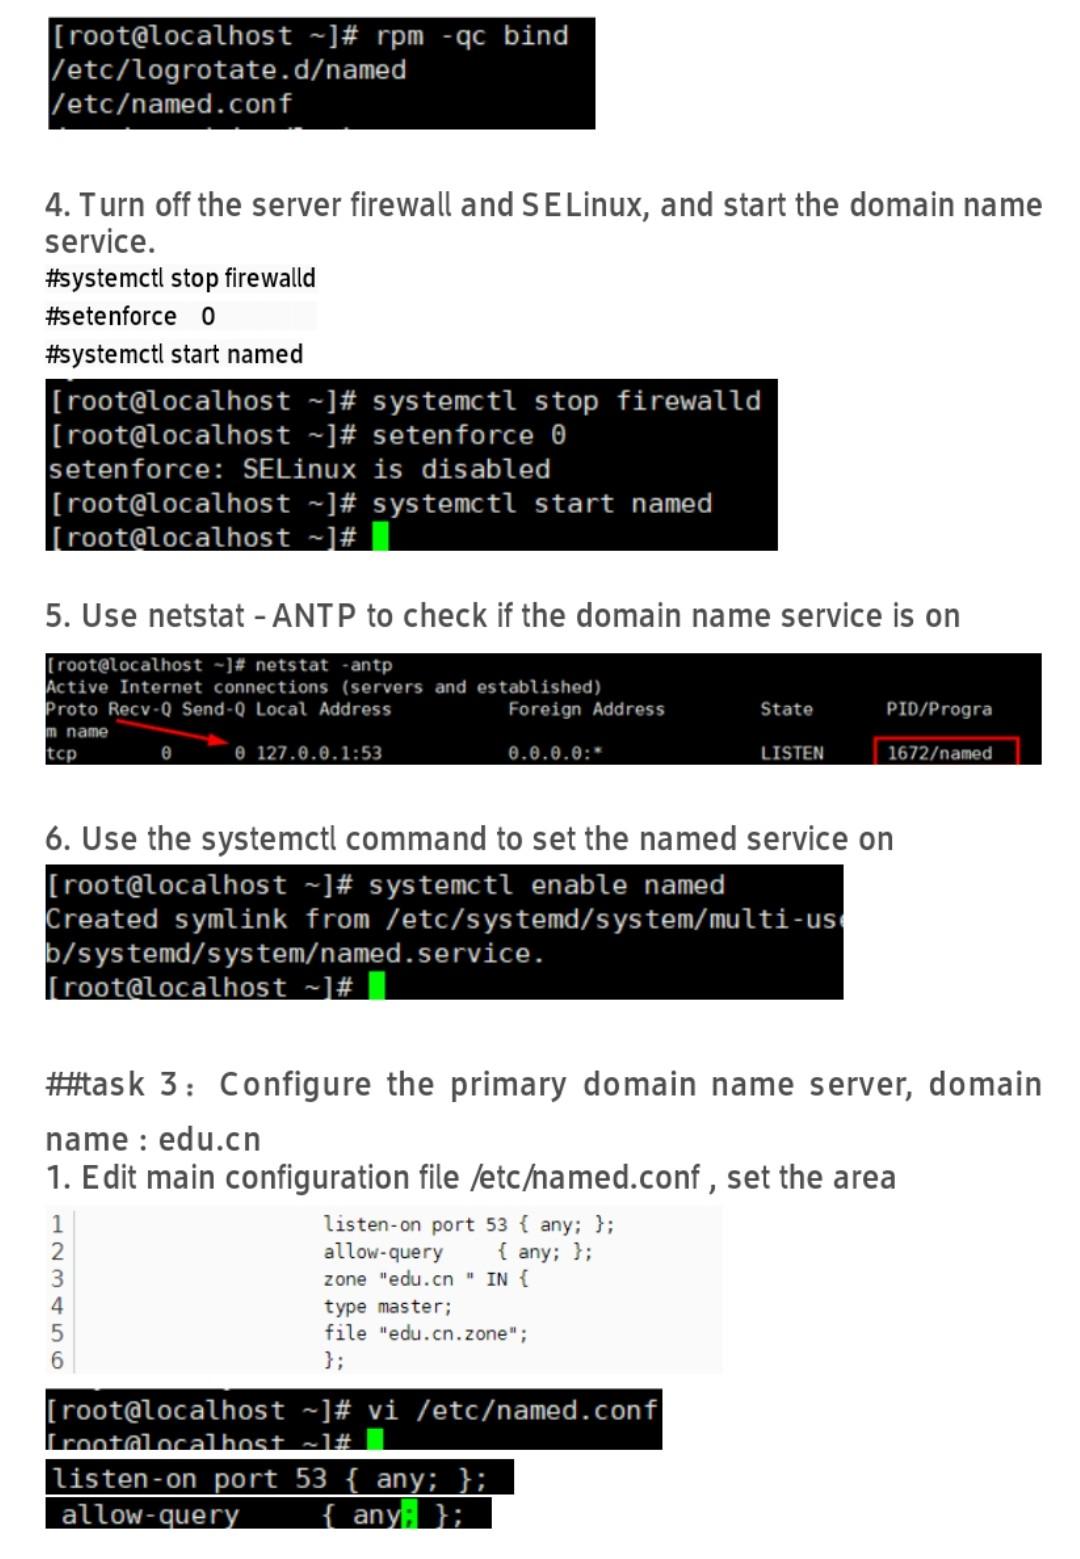
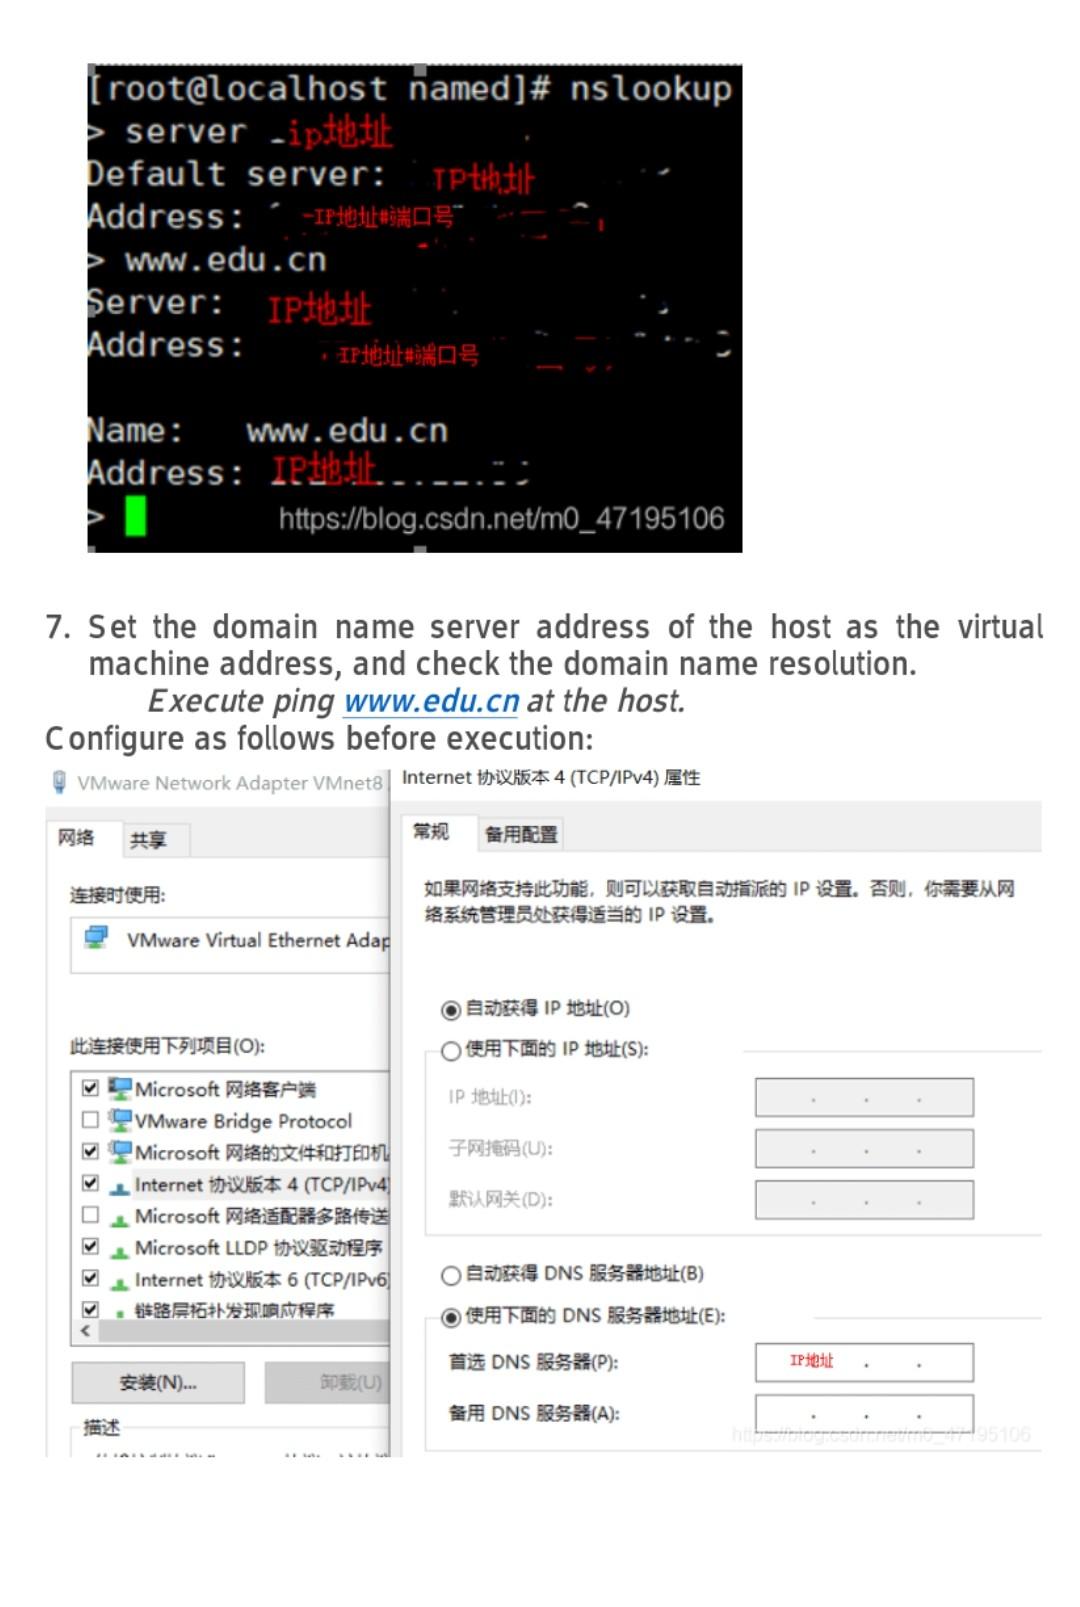
mtu 1500 inet 19... netmask 255.255.255.0 broadcast 1.255 2. Edit the /etc/hosts file, write the following line and save it local_host_ip www.edu.cn DE 127.0.0.1 ::1 localhost localhost.localdomain localhost localhost.localdomain 3. Check domain name resolution ping www.edu.cn [root@localhost ~]# ping www.edu.cn PING www.edu.cn ise. 21 56(84) bytes of data. 64 bytes from www.edu.cn (ise .): icmp_seq=1 ttl=64 time=0.016 ms --- www.edu.cn ping statistics --- 1 packets transmitted, 1 received, 0% packet loss, time Oms rtt min/avg/max/mdev = 0.016/0.016/0.016/0.000 ms #task 2: Install bind package 1. Use RPM - qa|grep bind to check whether the bind package have been installed. If yes, uninstall it [root@localhost ~]# rpm -qa grep bind 2. Using Yum to install bind package [root@localhost -]# yum install bind 25o: fastestmirror Loading mirror speeds from cached hostfile 3. Use RPM - QL bind to check the included files and find the main configuration file and zone files storage directory [root@localhost ~]# rpm -qc bind /etc/logrotate.damed Vetcamed.conf 4. Turn off the server firewall and SE Linux, and start the domain name service. #systemctl stop firewalld #setenforce o #systemctl start named [root@localhost ~]# systemctl stop firewalld [root@localhost - ]# setenforce o setenforce: SELinux is disabled [root@localhost -]# systemctl start named [root@localhost ~]# 5. Use netstat - ANTP to check if the domain name service is on [root@localhost -]# netstat antp Active Internet connections (servers and established) Proto Recv-Q Send - Local Address Foreign Address State PID/Progra tcp o 127.0.0.1:53 0.0.0.0:* LISTEN 1672amed m name 6. Use the systemctl command to set the named service on [root@localhost ~]# systemctl enable named Created symlink from /etc/systemd/system/multi-us b/systemd/systemamed.service. [root@localhost -# #task 3: Configure the primary domain name server, domain name : edu.cn 1. Edit main configuration file /etcamed.conf, set the area listen-on port 53 { any; }; allow-query { any; }; 1 2 3 4 5 6 zone "edu.cn " IN { type master; file "edu.cn.zone"; [root@localhost -]# vi /etcamed.conf frontalocalhost ~]# listen-on port 53 { any; }; allow-query { any: }; zone IN { type hint; file "named.ca"; }; zone "edu.cn" IN { type master; file "edu.cn.zone"; 2. Edit area file paramed/edu.cn.zone (copy named.localhost file to edit) NONOOOO $TTL (Time To Live, #) ir SOA (Start Of Authority, iz NSUS 88 (Name Server) iar MX(Mail Exchange) (Address) , CNAMES (Canonical Name) i $TTL 10 @ IN SOA edu.cn. admin.edu.cn. ( ; serial 20 ; refresh 1 ; retry iw ; expire ) ; minimum IN NS ns1.edu.cn. ns1 IN A IP www IN A IP @ IN MX 10 mail.edu.cn. mail IN CNAME Www 10 11 12 13 14 15 16 17 18 [root@localhost named]# cp named.localhost edu.cn.zone HIT WWW mail A CNAME 2010 WWW 3. Change zone file group chown root:named Naramed/edu.cn.zone [root@localhost named]# chown root:named edu.cn.zone 4. Use named checkconf and named checkzone to check the main configuration file and zone file [root@localhost named]# named-checkconf [root@localhost named]# named-checkzone edu.cn edu.cn.zone zone edu.cn/IN: loaded serial 0 OK [root@localhost named]# 5. services named restart: Restart the named service 6. NSLOOKUP verifies the server configuration (server address) [root@localhost named]# nslookup > server .iptete pefault server: TP Hit Address: -IPASHE > www.edu.cn Server: IP Address: T Name: www.edu.cn Address: IPE. https://blog.csdn.net/mo_47195106 7. Set the domain name server address of the host as the virtual machine address, and check the domain name resolution. Execute ping www.edu.cn at the host. Configure as follows before execution: VMware Network Adapter VMnetInternet thixka 4 (TCP/IPv4) Et! : ,IP ,, IP VMware Virtual Ethernet Adap 0IP(O) (O): 0IP(S): IP BED): (U): Microsoft VMware Bridge Protocol Microsof Internet Wit 4 (TCP/IPv4 Microsof Microsoft LLDP Internet W 6 (TCP/IPv6 (D): 1 0DNS :(8) 0DNS (E); DE DNS RS(P): IP (N)... MU) DNS (A): - 5105