Question
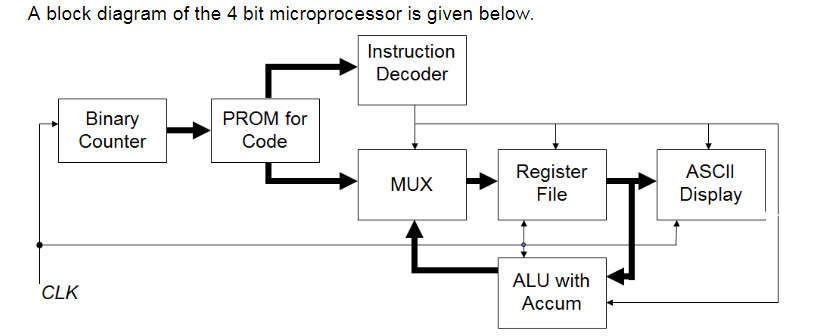
design a 4 bit microprocessor Much of the design for this microprocessor will be given here, but you must fill in some of the blanks
design a 4 bit microprocessor
Much of the design for this microprocessor will be given here, but you must fill in some of the "blanks" and make it work

The following is one procedure that might be used when designing your microprocessor.
1. Construct the ALU block:
a. Look at the ALU lab done previously
b. Design the output selection logic
c. Design the accumulator (ALU register)
d. Wire the circuitry for the two selector inputs:
i. ADD = 00
ii. OR = 01
iii. AND = 10
iv. XOR = 11
2. Test the ALU with several input combinations:
a. Ensure the selector pins choose the correct function
b. Ensure the accumulator stores the value when the write enable is asserted
3. Construct the 2 word x 4-bit register file:
a. Look at the register lab done previously
b. Design the input selection logic
4. Test the register file:
a. Use input pins (Logisim) to input data into the
register file
b. Input several different bit patterns into each register
5. Hook up an ASCII display to the outputs of the
register file:
a. Put data into register file
b.Use a switch to enable the display
c. Ensure data is printed properly on the ASCII dis
play
6. Build the decoder using a 16x8 ROM (16 locations that each hold 8 bits).
7. Add the Program PROM and counter.
8. Hook everything together as per the block diagram and the description above.
9. Test your circuit per Phase 1Testing given be low.
10. After everything is working properly, implement the hardware subtract. This means adding a new instruction to the instruction set given previously, adding a little bit of
hardware to the ALU, and an additional control line
going into the ALU.
Step by Step Solution
There are 3 Steps involved in it
Step: 1

Get Instant Access to Expert-Tailored Solutions
See step-by-step solutions with expert insights and AI powered tools for academic success
Step: 2

Step: 3

Ace Your Homework with AI
Get the answers you need in no time with our AI-driven, step-by-step assistance
Get Started


