Question
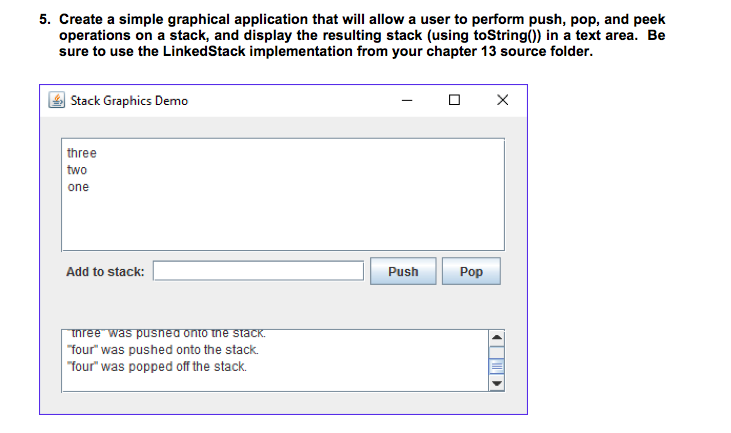
driver class StackDemo2.java is already provided and compelete the StackDemoGUI2.java just follow the comments and complete so that can have the gui appeared as shown

driver class StackDemo2.java is already provided and compelete the StackDemoGUI2.java just follow the comments and complete so that can have the gui appeared as shown in the photo.
/** * @author Lewis and Chase * * Solution to Programming Project 4.4 */ public class StackDemo2 { /** * Stack push/pop graphical demo. * @param args array of Strings */ public static void main(String[] args) { StackDemoGUI2 gui = new StackDemoGUI2();//create a new object call the StackDemoGUI2() gui.display(); } }
//end of StackDemo2.java
import java.awt.*; import java.awt.event.*; import javax.swing.*;
/** * @author Lewis and Chase * * Solution to Programming Project 4.4. */ public class StackDemoGUI2 extends JPanel { private JButton pushButton, pushButtonBottom; private JButton popButton; private JTextArea currentStack; private JLabel inputLabel; private JTextField currentInput; private JTextArea currentAction; private JPanel panel; /* * Sets up the GUI. */ public StackDemoGUI2() { pushButton = new JButton("Push"); pushButton.addActionListener(new PushListener()); pushButtonBottom = new JButton("PushBottom"); popButton = new JButton("Pop"); popButton.addActionListener(new PopListener()); inputLabel = new JLabel("Add to stack: "); currentInput = new JTextField(18); currentInput.setEditable(true); currentStack = new JTextArea(6, 20); currentStack.setMargin(new Insets(5,5,5,5)); currentStack.setEditable(false); currentAction = new JTextArea(3,20); currentAction.setMargin(new Insets(5,5,5,5)); currentAction.setEditable(false); currentAction.setText(""); panel = new JPanel(); panel.add(inputLabel); panel.add(currentInput); panel.add(pushButton); panel.add(pushButtonBottom); panel.add(popButton); setLayout(new BorderLayout()); add(new JScrollPane(currentStack), BorderLayout.NORTH); add(panel, BorderLayout.CENTER); add(new JScrollPane(currentAction), BorderLayout.SOUTH); setBorder(BorderFactory.createEmptyBorder(20, 20, 20, 20)); } /** * Creates and displays the main application frame. */ public void display() { JFrame frame = new JFrame("Stack Graphics Demo"); frame.setDefaultCloseOperation(JFrame.EXIT_ON_CLOSE); frame.setContentPane(this); frame.pack(); frame.setVisible(true); }
/** * Represents an action listener for the push button. */ private class PushListener implements ActionListener { /** * Adds the contents of the user entry text field to the * top of this stack. * @param event incoming event */ public void actionPerformed (ActionEvent event) { //get the input from the textfield and assign to a variable //push item onto the stack //append item to the jtextarea //display current status of the stack in the appropriate textarea // currentStack.setCaretPosition( 0 ); // forces scroll up //clear the input textfield } }
/** * Represents an action listener for the pop button. */ private class PopListener implements ActionListener { /** * removes the element at the * top of this stack. * @param event incoming event */ public void actionPerformed (ActionEvent event) { //listener code for popping an item //use code similar to pushListener above } } }
// the end of StackDemoGUI2.java
operations on a stack, and display the resulting stack (using toString)) in a text area. Be sure to use the LinkedStack implementation from your chapter 13 source folder. ish Stack Graphics Demo three two one Add to stack: Push Pop inree was pusned onto une stack four" was pushed onto the stack. four" was popped off the stackStep by Step Solution
There are 3 Steps involved in it
Step: 1

Get Instant Access to Expert-Tailored Solutions
See step-by-step solutions with expert insights and AI powered tools for academic success
Step: 2

Step: 3

Ace Your Homework with AI
Get the answers you need in no time with our AI-driven, step-by-step assistance
Get Started


