Answered step by step
Verified Expert Solution
Link Copied!

Question

1 Approved Answer

Exercise 2.8 (pp. 61) For this programming assignment, you will create a project in Visual Studio and a Design and Testing Document. Always create a

Exercise 2.8 (pp. 61)

For this programming assignment, you will create a project in Visual Studio and a Design and Testing Document. Always create a new project for each assignment. Complete the assignment, then use Windows Explorer to navigate to the folder holding your work on your computer's hard drive. Visual Studio will create a folder for every project you create - make sure you know where this folder is on your hard drive. You must compress this folder, including your Design and Testing Document, and post it to the appropriate assignment link (Assignment Submission - Written Assignments).

  • The easiest way to compress the folder is right click on the folder, click on send to, then click on "compressed (zipped) folder".
  • Please test it during this first week by sending the assignment through email to yourself and see if you can open it.
  • Once you understand this process, compress the entire project into a single compressed file and name it with your name and name of the assignment.
    • Example: First_Last_Exercise_2_7_Homework_Two.zip.
  • Once you have compressed the folder then you simply have to upload this file to the corresponding assignment link.

Notes:

  • The Design and Testing Document Example is posted in the Syllabus - Rubric post.
  • Assignments 2 & 3 require you to create a Windows Form application. (Future assignments require you to create a console application.)
  • For assignments 2 & 3, in your Design and Testing Document, simplify the descriptions of the Processing Logic (algorithims), Data (Input/Outpu), and Components (Variables, Classes, etc.)
  • See below for an example:

Exercise 2.8

PROCESSING LOGIC

  • The Visual Studio Form Template is used to produce a simple for.

DATA

  • Input: This program accept input form the keyboard.
  • Desired Output: Whatever is typed in by the user should be displayed in the rich text box.

COMPONENTS

  • Form, Menustrip and Rich Text Boximage text in transcribed
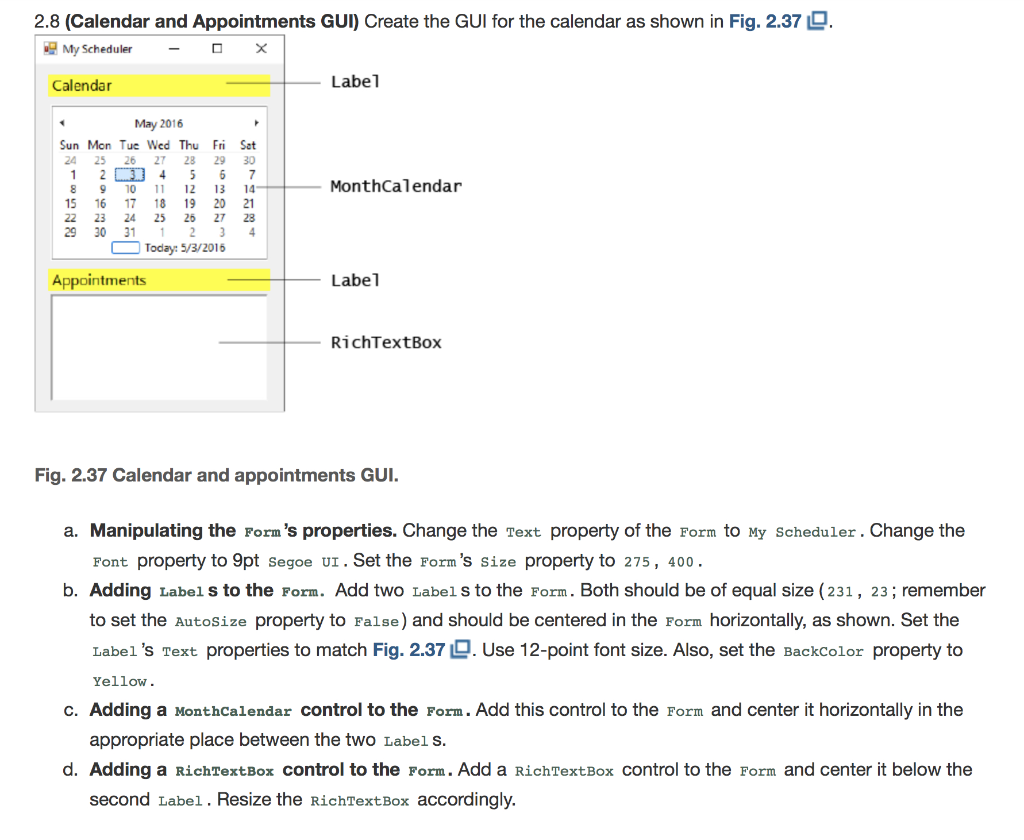
2.8 (Calendar and Appointments GUI) Create the GUI for the calendar as shown in Fig. 2.37 0. My Scheduler - 0 X Calendar Label 6 7 May 2016 Sun Mon Tue Wed Thu Fri Sat 24 25 26 27 28 29 30 1 2 3 4 5 6 8 9 10 11 12 13 14 15 16 17 18 19 20 21 22 23 24 25 26 27 28 29 30 31 1 2 3 4 O Today: 5/3/2016 MonthCalendar Appointments Label RichTextBox Fig. 2.37 Calendar and appointments GUI. a. Manipulating the Form's properties. Change the Text property of the Form to My Scheduler. Change the Font property to 9pt Segoe UI. Set the Form's Size property to 275, 400. b. Adding Labels to the Form. Add two Labels to the Form. Both should be of equal size (231, 23; remember to set the AutoSize property to False) and should be centered in the Form horizontally, as shown. Set the Label's Text properties to match Fig. 2.37 9. Use 12-point font size. Also, set the Backcolor property to Yellow. c. Adding a MonthCalendar control to the Form. Add this control to the Form and center it horizontally in the appropriate place between the two Label S. d. Adding a RichTextBox control to the Form. Add a RichTextBox control to the Form and center it below the second Label. Resize the RichTextBox accordingly. 2.8 (Calendar and Appointments GUI) Create the GUI for the calendar as shown in Fig. 2.37 0. My Scheduler - 0 X Calendar Label 6 7 May 2016 Sun Mon Tue Wed Thu Fri Sat 24 25 26 27 28 29 30 1 2 3 4 5 6 8 9 10 11 12 13 14 15 16 17 18 19 20 21 22 23 24 25 26 27 28 29 30 31 1 2 3 4 O Today: 5/3/2016 MonthCalendar Appointments Label RichTextBox Fig. 2.37 Calendar and appointments GUI. a. Manipulating the Form's properties. Change the Text property of the Form to My Scheduler. Change the Font property to 9pt Segoe UI. Set the Form's Size property to 275, 400. b. Adding Labels to the Form. Add two Labels to the Form. Both should be of equal size (231, 23; remember to set the AutoSize property to False) and should be centered in the Form horizontally, as shown. Set the Label's Text properties to match Fig. 2.37 9. Use 12-point font size. Also, set the Backcolor property to Yellow. c. Adding a MonthCalendar control to the Form. Add this control to the Form and center it horizontally in the appropriate place between the two Label S. d. Adding a RichTextBox control to the Form. Add a RichTextBox control to the Form and center it below the second Label. Resize the RichTextBox accordingly

Step by Step Solution

There are 3 Steps involved in it

Step: 1

blur-text-image

Get Instant Access to Expert-Tailored Solutions

See step-by-step solutions with expert insights and AI powered tools for academic success

Step: 2

blur-text-image

Step: 3

blur-text-image

Ace Your Homework with AI

Get the answers you need in no time with our AI-driven, step-by-step assistance

Get Started

Students also viewed these Databases questions