

Question
Gosu_shapes.rb require 'rubygems' require 'gosu' require './circle' # The screen has layers: Background, middle, top module ZOrder BACKGROUND, MIDDLE, TOP = *0..2 end class DemoWindow
Gosu_shapes.rb
require 'rubygems'
require 'gosu'
require './circle'
# The screen has layers: Background, middle, top
module ZOrder
BACKGROUND, MIDDLE, TOP = *0..2
end
class DemoWindow
def initialize
super(640, 400, false)
end
def draw
# see www.rubydoc.info/github/gosu/gosu/Gosu/Color for colours
draw_quad(0, 0, 0xff_ffffff, 640, 0, 0xff_ffffff, 0, 400, 0xff_ffffff, 640, 400, 0xff_ffffff, ZOrder::BACKGROUND)
draw_quad(5, 10, Gosu::Color::BLUE, 200, 10, Gosu::Color::AQUA, 5, 150, Gosu::Color::FUCHSIA, 200, 150, Gosu::Color::RED, ZOrder::MIDDLE)
draw_triangle(50, 50, Gosu::Color::GREEN, 100, 50, Gosu::Color::GREEN, 50, 100, Gosu::Color::GREEN, ZOrder::MIDDLE, mode=:default)
draw_line(200, 200, Gosu::Color::BLACK, 350, 350, Gosu::Color::BLACK, ZOrder::TOP, mode=:default)
# draw_rect works a bit differently:
Gosu.draw_rect(300, 200, 100, 50, Gosu::Color::BLACK, ZOrder::TOP, mode=:default)
# Circle parameter - Radius
img2 = Gosu::Image.new(Circle.new(50))
# Image draw parameters - x, y, z, horizontal scale (use for ovals), vertical scale (use for ovals), colour
# Colour - use Gosu::Image::{Colour name} or .rgb({red},{green},{blue}) or .rgba({alpha}{red},{green},{blue},)
# Note - alpha is used for transparency.
# drawn as an elipse (0.5 width:)
img2.draw(200, 200, ZOrder::TOP, 0.5, 1.0, Gosu::Color::BLUE)
# drawn as a red circle:
img2.draw(300, 50, ZOrder::TOP, 1.0, 1.0, 0xff_ff0000)
# drawn as a red circle with transparency:
img2.draw(300, 250, ZOrder::TOP, 1.0, 1.0, 0x64_ff0000)
end
end
DemoWindow.new.show
Circle.rb
require "rubygems"
require "gosu"
class Circle
attr_reader :columns, :rows
def initialize(radius)
@columns = @rows = radius * 2
clear, solid = 0x00.chr, 0xff.chr
lower_half = (0...radius).map do |y|
x = Math.sqrt(radius ** 2 - y ** 2).round
right_half = "#{solid * x}#{clear * (radius - x)}"
right_half.reverse + right_half
end.join
alpha_channel = lower_half.reverse + lower_half
# Expand alpha bytes into RGBA color values.
@blob = alpha_channel.gsub(/./) { |alpha| solid * 3 + alpha }
end
def to_blob
@blob
end
end
Bezier_curve.rb
# - By Mathew Wakefield @ Swinburne University(2020)
## Adapted from Sandeep Verma (2018) https://programmerbay.com/c-program-to-draw-bezier-curve-using-4-control-points/
## ..and Emad Elsaid (2014) https://dzone.com/articles/draw-moving-line-mouse-using
#
# PARAMETERS
# start_x, start_y - The start coordinates of the curve.
# end_x, end_y - The end coordinates of the curve.
# cp_start_x, cp_start_y - The control point for the start of the curve.
# cp_end_x, cp_end_y - The control point for the end of the curve.
# z - The layer.
# colour - A Gosu Color.
# thickness - The thickness of the line in the x plane.
def draw_curve(start_x, start_y, end_x, end_y, cp_start_x, cp_start_y, cp_end_x, cp_end_y, z, colour, thickness)
i = 0
while i
t = 0.0
points = []
while t
px = (((1 - t) ** 3) * start_x) + (3 * t * ((1 - t) ** 2) * cp_start_x) + (3 * t * t * (1 - t) * cp_end_x) + ((t ** 3) * end_x)
py = (((1 - t) ** 3) * start_y) + (3 * t * ((1 - t) ** 2) * cp_start_y) + (3 * t * t * (1 - t) * cp_end_y) + ((t ** 3) * end_y)
points
t += 0.001
end
points.inject(points[0]) do |last, point|
draw_line last[0],last[1], colour,
point[0],point[1], colour,
z
point
end
i += 1
start_x += 1
end_x += 1
cp_start_x += 1
cp_end_x += 1
end
end
Curves_gosu.rb
require 'rubygems'
require 'gosu'
require './bezier_curve'
# The screen has layers: Background, middle, top
module ZOrder
BACKGROUND, MIDDLE, TOP = *0..2
end
class DemoWindow
def initialize
super(400, 400, false)
self.caption = "Curves Example"
end
def needs_cursor?
true
end
def draw
draw_curve(150, 25, 150, 75, 100, 25, 200, 75, 2, Gosu::Color::YELLOW, 5)
draw_curve(100, 25, 100, 75, 50, 25, 150, 75, 2, Gosu::Color::YELLOW, 5)
draw_curve(200, 25, 200, 75, 150, 25, 250, 75, 2, Gosu::Color::YELLOW, 5)
draw_curve(100, 100, 100, 150, 75, 100, 75, 150, 2, Gosu::Color::BLUE, 10)
draw_curve(100, 100, 100, 150, 125, 100, 125, 150, 2, Gosu::Color::BLUE, 10)
draw_curve(200, 100, 200, 150, 175, 100, 175, 150, 2, Gosu::Color::BLUE, 10)
draw_curve(200, 100, 200, 150, 225, 100, 225, 150, 2, Gosu::Color::BLUE, 10)
draw_curve(100, 200, 200, 200, 125, 250, 175, 250, 2, Gosu::Color::RED, 10)
end
end
DemoWindow.new.show
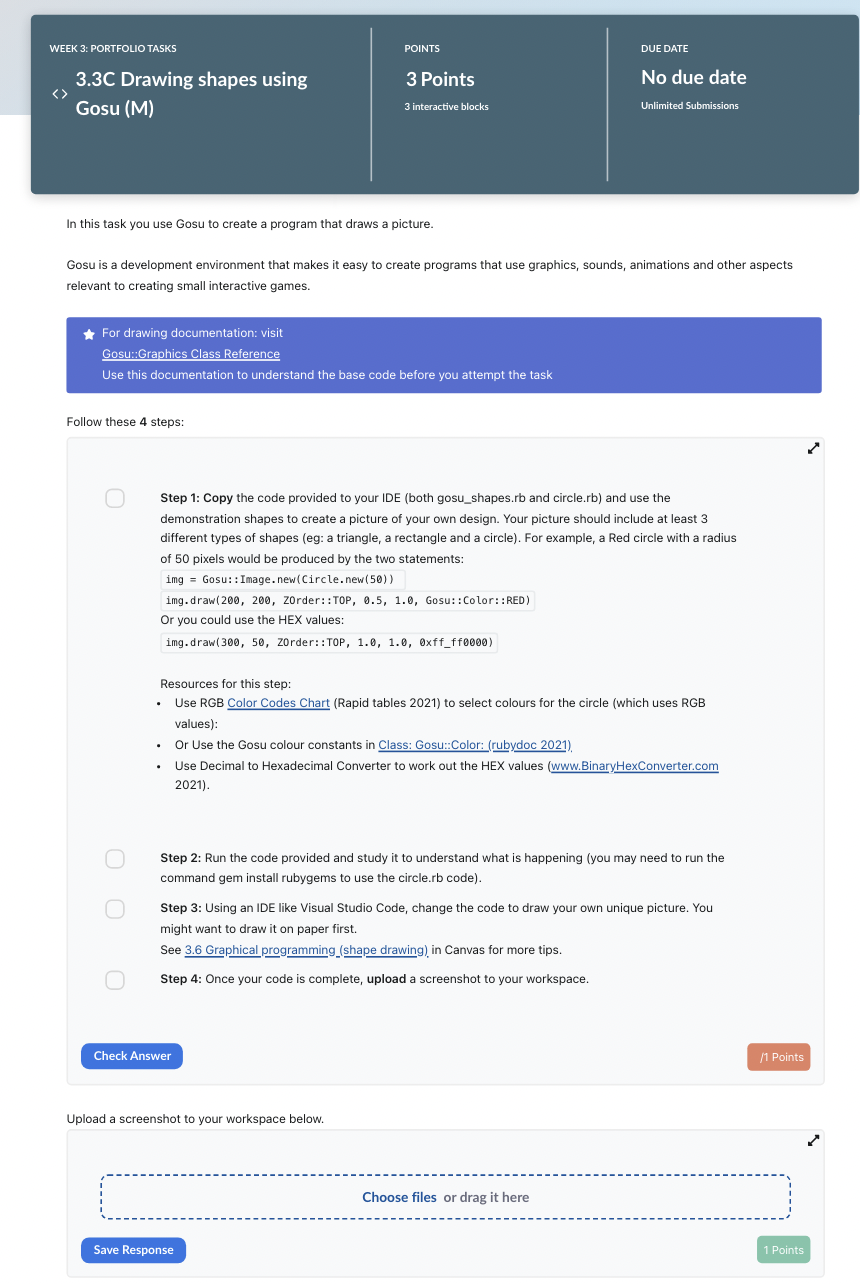
In this task you use Gosu to create a program that draws a picture. Gosu is a development environment that makes it easy to create programs that use graphics, sounds, animations and other aspects relevant to creating small interactive games. Follow these 4 steps: Step 1: Copy the code provided to your IDE (both gosu_shapes.rb and circle.rb) and use the demonstration shapes to create a picture of your own design. Your picture should include at least 3 different types of shapes (eg: a triangle, a rectangle and a circle). For example, a Red circle with a radius of 50 pixels would be produced by the two statements: img=Gosu::Image.new(Circle.new(50))img.draw(200,200,Zorder::TOP,0.5,1.0,Gosu::Color::RED) Or you could use the HEX values: \[ \text { img.draw( } 300,50 \text {, Zorder::T0P, 1.0, 1.0, 0xff_ff0000) } \] Resources for this step: - Use RGB Color Codes Chart (Rapid tables 2021) to select colours for the circle (which uses RGB values): - Or Use the Gosu colour constants in Class: Gosu::Color: (rubydoc 2021). - Use Decimal to Hexadecimal Converter to work out the HEX values (www. Binary HexConverter.com 2021). Step 2: Run the code provided and study it to understand what is happening (you may need to run the command gem install rubygems to use the circle.rb code). Step 3: Using an IDE like Visual Studio Code, change the code to draw your own unique picture. You might want to draw it on paper first. See 3.6 Graphical programming__(shape drawing) in Canvas for more tips. Step 4: Once your code is complete, upload a screenshot to your workspace. Upload a screenshot to your workspace below
Step by Step Solution
There are 3 Steps involved in it
Step: 1

Get Instant Access to Expert-Tailored Solutions
See step-by-step solutions with expert insights and AI powered tools for academic success
Step: 2

Step: 3
Ace Your Homework with AI
Get the answers you need in no time with our AI-driven, step-by-step assistance
Get Started
Learning MySQL Get A Handle On Your Data
Authors: Seyed M M Tahaghoghi
1st Edition
0596529465, 9780596529468