

Question: HEADER FILES BmpProcessor.h Source Code: struct BMP_Header { char signature[2]; // ID Field int size; // Size of the BMP File int offset; // Offset
![HEADER FILES BmpProcessor.h Source Code: struct BMP_Header { char signature[2]; //](https://dsd5zvtm8ll6.cloudfront.net/si.experts.images/questions/2024/09/66f57b48a2c3c_91266f57b48176a0.jpg)

 HEADER FILES
BmpProcessor.h Source Code:
struct BMP_Header { char signature[2]; // ID Field int size; // Size of the BMP File int offset; // Offset where the pixel array can be found short reserved1; // Program specific short reserved2; // Program specific 2 };
struct DIB_Header{ int size; // Number of bytes in the DIB header int img_width; // The width of the bitmap (in pixels) int img_height; // The height of the bitmap (in pixels) short num_color_planes; // The number of color planes being used short num_bits_per_pixel; // The number of bits per pixel int compression; // The compression mode being used int size_img_data; // The size of the raw bitmap data int pixels_per_meter_x; // The numbers of pixels in a meter, x int pixels_per_meter_y; // The numbers of pixels in a meter, y int palette_color_count; // The number of colors in the palette int color_table_color_count; // The number of colors in the color table int important_colors; // The number of important colors used, typically 0 };
struct DIB_Header{ int size; // Number of bytes in the DIB header int width; // The width of the bitmap (in pixels) int height; // The height of the bitmap (in pixels) int num_color_planes; // The number of color planes being used int num_bits_per_pixel; // The number of bits per pixel short compression; // The compression mode being used short size_raw_data; // The size of the raw bitmap data int print_res_horizontal;// The resolution of the image should it be printed int print_res_vertical; int palette_color_count;// The number of colors in the palette int important_colors; // The number of important colors used, typically 0 };
/** * read BMP header of a file. Useful for converting files from PPM to BMP. * * @param file: A pointer to the file being read or written * @param header: Pointer to the destination BMP header */ void readBMPHeader(FILE* file, struct BMP_Header* header);
/** * write BMP header of a file. Useful for converting files from PPM to BMP. * * @param file: A pointer to the file being read or written * @param header: The header made by makeBMPHeader function */ void writeBMPHeader(FILE* file, struct BMP_Header* header);
/** * read DIB header from a file. Useful for converting files from PPM to BMP. * * @param file: A pointer to the file being read or written * @param header: Pointer to the destination DIB header */ void readDIBHeader(FILE* file, struct DIB_Header* header);
/** * write DIB header of a file. Useful for converting files from PPM to BMP. * * @param file: A pointer to the file being read or written * @param header: The header made by makeDIBHeader function */ void writeDIBHeader(FILE* file, struct DIB_Header* header);
/** * make BMP header based on width and height. * The purpose of this is to create a new BMPHeader struct using the information * from a PPMHeader when converting from PPM to BMP. * * @param header: Pointer to the destination DIB header * @param width: Width of the image that this header is for * @param height: Height of the image that this header is for */ void makeBMPHeader(struct BMP_Header* header, int width, int height);
/** * Makes new DIB header based on width and height. Useful for converting files from PPM to BMP. * * @param header: Pointer to the destination DIB header * @param width: Width of the image that this header is for * @param height: Height of the image that this header is for */ void makeDIBHeader(struct DIB_Header* header, int width, int height);
/** * read Pixels from BMP file based on width and height. * * @param file: A pointer to the file being read or written * @param pArr: Pixel array of the image that this header is for * @param width: Width of the image that this header is for * @param height: Height of the image that this header is for */ void readPixelsBMP(FILE* file, struct Pixel** pArr, int width, int height);
/** * write Pixels from BMP file based on width and height. * * @param file: A pointer to the file being read or written * @param pArr: Pixel array of the image that this header is for * @param width: Width of the image that this header is for * @param height: Height of the image that this header is for */ void writePixelsBMP(FILE* file, struct Pixel** pArr, int width, int height);
PpmProcessor.h Source Code:
struct PPM_Header{ char magic_number[2]; // The ppm image magic number int width; // The width of the ppm image int height; // The height of the ppm image int maximum_color; // The maximum color value char whitespace[1]; // Whitespace storage };
/** * read PPM header of a file. Useful for converting files from BMP to PPM. * * @param file: A pointer to the file being read or written * @param header: Pointer to the destination PPM header */ void readPPMHeader(FILE* file, struct PPM_Header* header);
/** * write PPM header of a file. Useful for converting files from BMP to PPM. * * @param file: A pointer to the file being read or written * @param header: The header made by makePPMHeader function */ void writePPMHeader(FILE* file, struct PPM_Header* header);
/** * make PPM header based on width and height. Useful for converting files from BMP to PPM. * * @param header: Pointer to the destination PPM header * @param width: Width of the image that this header is for * @param height: Height of the image that this header is for */ void makePPMHeader(struct PPM_Header* header, int width, int height);
/** * read Pixels from PPM file based on width and height. * * @param file: A pointer to the file being read or written * @param pArr: Pixel array of the image that this header is for * @param width: Width of the image that this header is for * @param height: Height of the image that this header is for */ void readPixelsPPM(FILE* file, struct Pixel** pArr, int width, int height);
/** * write Pixels from PPM file based on width and height. * * @param file: A pointer to the file being read or written * @param pArr: Pixel array of the image that this header is for * @param width: Width of the image that this header is for * @param height: Height of the image that this header is for */ void writePixelsPPM(FILE* file, struct Pixel** pArr, int width, int height);
PixelProcessor.h Source Code:
typedef unsigned char U8;
struct Pixel{ //TODO:Finish struct U8 rgbred; U8 rgbgreen; U8 rgbblue; U8 token; };
/** * Shift color of Pixel array. The dimension of the array is width * height. The shift value of RGB is * rShift, gShiftbShift. Useful for color shift. * * @param pArr: Pixel array of the image that this header is for * @param width: Width of the image that this header is for * @param height: Height of the image that this header is for * @param rShift: the shift value of color r shift * @param gShift: the shift value of color g shift * @param bShift: the shift value of color b shift */ void colorShiftPixels(struct Pixel** pArr, int width, int height, int rShift, int gShift, int bShift);
I NEED HELP WITH THE .c programs of the following
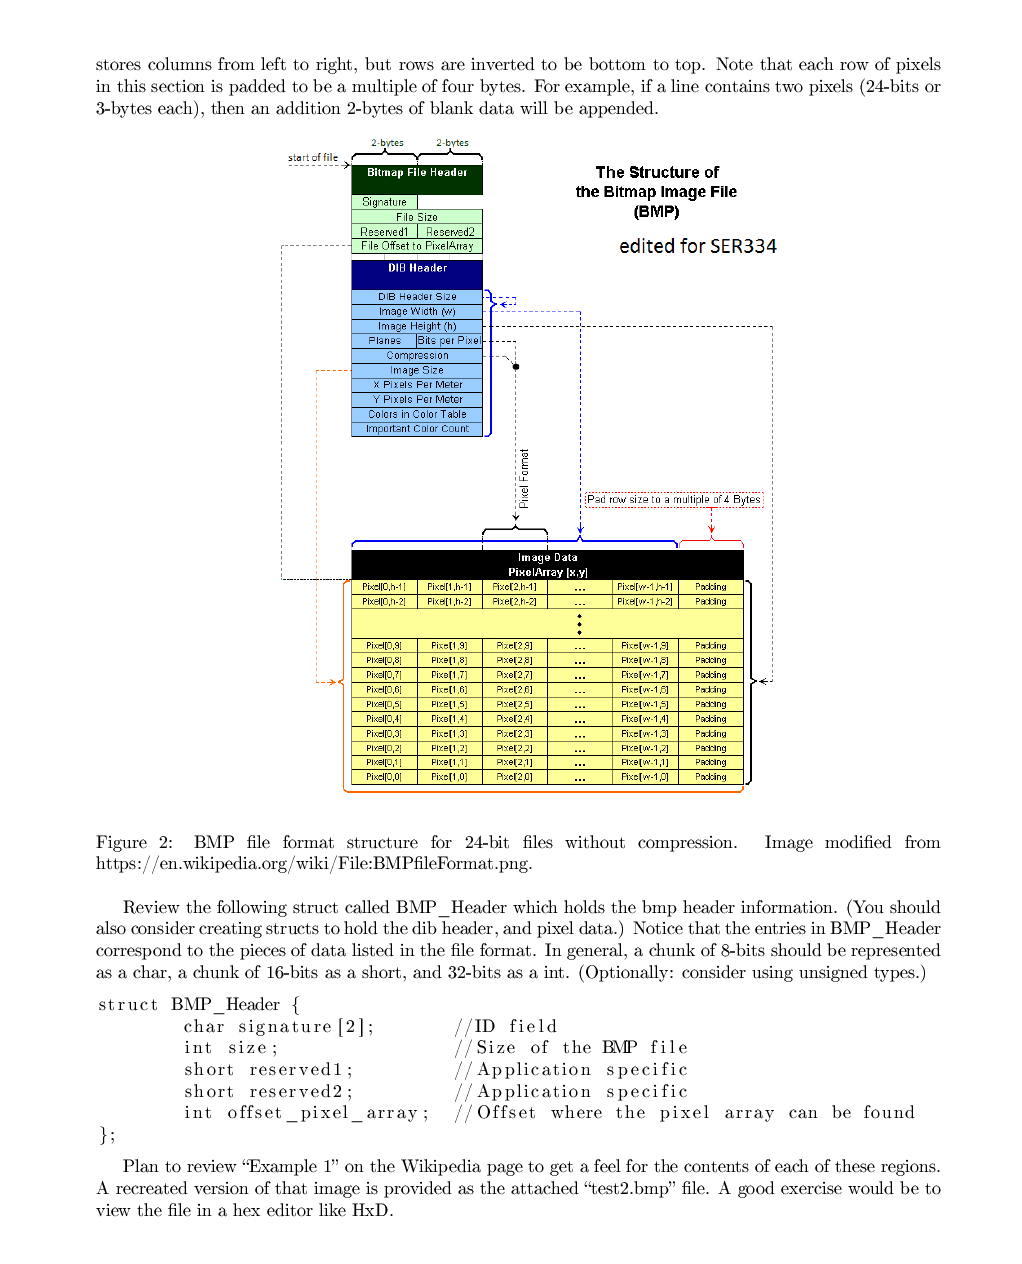
Image Processing Summary: In this homework, you will be implementing a program that loads an image file, applies a simple filter to it, and saves it back to disk. You will also learn how to read and write real-world binary file formats, specifically BMP and PPM. 1 Background In this assignment you will write a program that applies a filter to an image. The image will be loaded from a local BMP or PPM file, specified by the user, and then be transformed using a color shift also specified by the user. The resulting file will be saved back to a BMP or PPM file that can be viewed on the host system. This document is separated into four sections: Background, Requirements, Loading Binary Files, Include Files, and Submission. You have almost finished reading the Background section already. In Requirements, we will discuss what is expected of you in this homework. In Loading Binary Files, we will discuss the BMP and PPM file formats and how to interact with binary files. Lastly, Submission discusses how your source code should be submitted on Canvas. 2 Requirements (36 points] Your program needs to implement loading a binary BMP or PPM file, applying a color shift to its pixel data, and saving the modified image back into a BMP or PPM file. The width and height may be of any size, but you can assume that you will be capable of storing the image data in memory. Assume that all BMP files are 24-bit uncompressed files" (i.e., compression method is BI_RGB), which have a 14-bit bmp header, a 40-bit dib header, and a variable length pixel array. This is shown in Figure 1] PPM files will also be in 24-bit. For testing, please only use the PPM and BMP files attached to the assignment. As a base requirement, your program must compile and run under Xubuntu (or another variant of Ubuntu) 18.04. Sample output for this program is shown in Figure 1 Specific Requirements: BMP Headers IO: Create structures for the headers of a BMP file (BMP header struct and DIB header struct) and functions which read and write them. [4 Points] PPM Headers 10: Create structures for the headers of a PPM file (PPM header struct) and functions which read and write them. [4 Points] Pixel 10: Create a structure which represents a single pixel (24-bit pixel struct) and the functions for reading and writing all pixels in both PPM and BMP files. [4 Point] Input and output file names: Read the input file name and output file name from the command line arguments. The user should be required to enter the input file name and this should be the first argument. The output file name is an "option," it is not required and it can be in any place in the option list. If an output filename is not provided, then you should create a default file called result, whose extension is based on the input file. The output file option is specified by -0" followed by the output file name. Validate that the input file exists and that both files are of the correct type (either bmp or ppm). [4 Points] * Commands might look like "./ImageProcessor ttt.bmp-r 56 -b 78 -g 45 -o nehoy menoy.ppm". * The input file is the file to read and copy. In case you think this is making the assignment unrealistic, think again: this is the default Windows 10 BMP file format. * The output file name is the file to write to and copy to the new file created). - RGB Color Shift input: Accept options for red, green, or blue color shift. These are specified by"-1" "-" or "-b" followed by an integer. Validate that these are integers. Like the "-o" option described above, these can come in any order in the option list and are optional for the user to enter. [4 Points) * Note: "0" "-" "-8" and "b" are all options. All for of these can come in any order (-1 -g -o -b, for example) and none of them are required. Copy images: Correctly copy images from a BMP file to a new BMP file and from a PPM file to a new PPM file. [4 Points) - Convert images: Correctly copy images from a BMP file to a new PPM file and from a PPM file to a new BMP file. [4 Points] - Color Shift calculation: Shift the color of the new image before saving it, according to the options the user entered. [4 Points] * Color shift refers to increasing or decreasing the color in a pixel by the specified amount. So, if the user entered "-b-98" all of the blue values in a pixel would be decreased by 98. * If no color shift option was entered for a color, do not shift it. * After color shift, color should be clamped to 0 255. For example, color R = 100, shift = 200. The color R after shift should be 255 (300 clamped to 255). - Modular Programming: Use the provided header files correctly and create corresponding C files, along with a main file. You do not have to create any more header files or C files than this but you may if it helps you. Do not modify the header files given except to fill in any TODOS (4 Points) Figure I shows an example of how the finished program should function. nehoymenoy.ppm Figure 1: Example of running the program with example output. 3 Loading Binary Files 3.1 The BMP File Format For reference, use the BMP specification on Wikipedia: https://en.wikipedia.org/wiki/BMP_file_format In Figure 2 a graphical overview of a BMP file's layout is shown. The layout is literally the meaning of the bits/bytes in the file starting at 0 and going to the end of the file. The first (green) region shows the BMP header information in 14 bytes: 2 for the signature, 4 for the file size, 2 for reservedi, 2 for reserved 2, and 4 for file offset. Details on each of these (such as their data format, and contents) can be found on the Wikipedia page. For example, the area labeled "Signature" should contain the characters BM to confirm that the file is in BMP format. The second (blue region) shows the DIP header information in 40 bytes: 4 for header size, 4 for width, 4 for height, and so on. The last region (yellow) forms a 2D array of pixels. It 2 stores columns from left to right, but rows are inverted to be bottom to top. Note that each row of pixels in this section is padded to be a multiple of four bytes. For example, if a line contains two pixels (24-bits or 3-bytes each), then an addition 2-bytes of blank data will be appended. 2 bytes 2-bytes start of file Bitmap File Header Signature File Size Reserved1 | Reserved File Offset to PixelArray The Structure of the Bitmap Image File (BMP) edited for SER334 DIB Header DB Header Size Image Width W) Image Height (h) Planes Bits per Pixel Compression Image Size x Pixels Per Meter Y Pixels Per Meter Colors in Color Table Important Color Count Pixel Format Pad row size to a multiple of 4 Bytes Image Data PixelArray xyl Pixel 2 h-1] Pixel 2.1-2] Pixel[0,1-11 Pixel[1,1-1] Pixel[0,1-21 Pixe[1.1-2] Pixe[w-1)-11 Pixe[w.1-21 Padding Packing . --- II. Pixel 0,9 Pixel0,81 Pixel(0,71 Pixel(0.61 PIO.SI Pixel [0,41 Pixel(0,31 Pixel 0,21 Pixel 0,11 Pixel 0,01 Pise[1.9) Pixe[1,8) | Pixe[17] Piselt 61 Fire 1.5 Pist[14] Pixe[13] Pire[1,2] Pixe[1,1) Pixel1.01 Pize[29] Pixelza] Pixol2.7 Pizel26) Pixel 251 Pixel 2 41 Pixel231 Pixel 22) Pixe[2,1) Pixel 2 01 ] Fise[w-191 Fixe[w.1,81 Pixow-1,7) Fisely-1.61 Fixe[w.1,91 Pixelw-1.41 Fixe[w-1.31 FireW-1,2 FixeW-1,1] Fixe[w-1,01 Packing Padding Padling Padding Packing Packing Padding Packing Padling Padling I. II. II. Image modified from Figure 2: BMP file format structure for 24-bit files without compression. https://en.wikipedia.org/wiki/File:BMPfileFormat.png. Review the following struct called BMP_Header which holds the bmp header information. (You should also consider creating structs to hold the dib header, and pixel data.) Notice that the entries in BMP_Header correspond to the pieces of data listed in the file format. In general, a chunk of 8-bits should be represented as a char, a chunk of 16-bits as a short, and 32-bits as a int. (Optionally: consider using unsigned types.) struct BMP_Header { char signature [2]; //ID field int size; // Size of the BMP file short reserved1; // Application specific short reserved 2 ; // Application specific int offset _pixel_array; // Offset where the pixel array can be found }; Plan to review "Example 1" on the Wikipedia page to get a feel for the contents of each of these regions. A recreated version of that image is provided as the attached "test2.bmp" file. A good exercise would be to view the file in a hex editor like HxD. Image Processing Summary: In this homework, you will be implementing a program that loads an image file, applies a simple filter to it, and saves it back to disk. You will also learn how to read and write real-world binary file formats, specifically BMP and PPM. 1 Background In this assignment you will write a program that applies a filter to an image. The image will be loaded from a local BMP or PPM file, specified by the user, and then be transformed using a color shift also specified by the user. The resulting file will be saved back to a BMP or PPM file that can be viewed on the host system. This document is separated into four sections: Background, Requirements, Loading Binary Files, Include Files, and Submission. You have almost finished reading the Background section already. In Requirements, we will discuss what is expected of you in this homework. In Loading Binary Files, we will discuss the BMP and PPM file formats and how to interact with binary files. Lastly, Submission discusses how your source code should be submitted on Canvas. 2 Requirements (36 points] Your program needs to implement loading a binary BMP or PPM file, applying a color shift to its pixel data, and saving the modified image back into a BMP or PPM file. The width and height may be of any size, but you can assume that you will be capable of storing the image data in memory. Assume that all BMP files are 24-bit uncompressed files" (i.e., compression method is BI_RGB), which have a 14-bit bmp header, a 40-bit dib header, and a variable length pixel array. This is shown in Figure 1] PPM files will also be in 24-bit. For testing, please only use the PPM and BMP files attached to the assignment. As a base requirement, your program must compile and run under Xubuntu (or another variant of Ubuntu) 18.04. Sample output for this program is shown in Figure 1 Specific Requirements: BMP Headers IO: Create structures for the headers of a BMP file (BMP header struct and DIB header struct) and functions which read and write them. [4 Points] PPM Headers 10: Create structures for the headers of a PPM file (PPM header struct) and functions which read and write them. [4 Points] Pixel 10: Create a structure which represents a single pixel (24-bit pixel struct) and the functions for reading and writing all pixels in both PPM and BMP files. [4 Point] Input and output file names: Read the input file name and output file name from the command line arguments. The user should be required to enter the input file name and this should be the first argument. The output file name is an "option," it is not required and it can be in any place in the option list. If an output filename is not provided, then you should create a default file called result, whose extension is based on the input file. The output file option is specified by -0" followed by the output file name. Validate that the input file exists and that both files are of the correct type (either bmp or ppm). [4 Points] * Commands might look like "./ImageProcessor ttt.bmp-r 56 -b 78 -g 45 -o nehoy menoy.ppm". * The input file is the file to read and copy. In case you think this is making the assignment unrealistic, think again: this is the default Windows 10 BMP file format. * The output file name is the file to write to and copy to the new file created). - RGB Color Shift input: Accept options for red, green, or blue color shift. These are specified by"-1" "-" or "-b" followed by an integer. Validate that these are integers. Like the "-o" option described above, these can come in any order in the option list and are optional for the user to enter. [4 Points) * Note: "0" "-" "-8" and "b" are all options. All for of these can come in any order (-1 -g -o -b, for example) and none of them are required. Copy images: Correctly copy images from a BMP file to a new BMP file and from a PPM file to a new PPM file. [4 Points) - Convert images: Correctly copy images from a BMP file to a new PPM file and from a PPM file to a new BMP file. [4 Points] - Color Shift calculation: Shift the color of the new image before saving it, according to the options the user entered. [4 Points] * Color shift refers to increasing or decreasing the color in a pixel by the specified amount. So, if the user entered "-b-98" all of the blue values in a pixel would be decreased by 98. * If no color shift option was entered for a color, do not shift it. * After color shift, color should be clamped to 0 255. For example, color R = 100, shift = 200. The color R after shift should be 255 (300 clamped to 255). - Modular Programming: Use the provided header files correctly and create corresponding C files, along with a main file. You do not have to create any more header files or C files than this but you may if it helps you. Do not modify the header files given except to fill in any TODOS (4 Points) Figure I shows an example of how the finished program should function. nehoymenoy.ppm Figure 1: Example of running the program with example output. 3 Loading Binary Files 3.1 The BMP File Format For reference, use the BMP specification on Wikipedia: https://en.wikipedia.org/wiki/BMP_file_format In Figure 2 a graphical overview of a BMP file's layout is shown. The layout is literally the meaning of the bits/bytes in the file starting at 0 and going to the end of the file. The first (green) region shows the BMP header information in 14 bytes: 2 for the signature, 4 for the file size, 2 for reservedi, 2 for reserved 2, and 4 for file offset. Details on each of these (such as their data format, and contents) can be found on the Wikipedia page. For example, the area labeled "Signature" should contain the characters BM to confirm that the file is in BMP format. The second (blue region) shows the DIP header information in 40 bytes: 4 for header size, 4 for width, 4 for height, and so on. The last region (yellow) forms a 2D array of pixels. It 2 stores columns from left to right, but rows are inverted to be bottom to top. Note that each row of pixels in this section is padded to be a multiple of four bytes. For example, if a line contains two pixels (24-bits or 3-bytes each), then an addition 2-bytes of blank data will be appended. 2 bytes 2-bytes start of file Bitmap File Header Signature File Size Reserved1 | Reserved File Offset to PixelArray The Structure of the Bitmap Image File (BMP) edited for SER334 DIB Header DB Header Size Image Width W) Image Height (h) Planes Bits per Pixel Compression Image Size x Pixels Per Meter Y Pixels Per Meter Colors in Color Table Important Color Count Pixel Format Pad row size to a multiple of 4 Bytes Image Data PixelArray xyl Pixel 2 h-1] Pixel 2.1-2] Pixel[0,1-11 Pixel[1,1-1] Pixel[0,1-21 Pixe[1.1-2] Pixe[w-1)-11 Pixe[w.1-21 Padding Packing . --- II. Pixel 0,9 Pixel0,81 Pixel(0,71 Pixel(0.61 PIO.SI Pixel [0,41 Pixel(0,31 Pixel 0,21 Pixel 0,11 Pixel 0,01 Pise[1.9) Pixe[1,8) | Pixe[17] Piselt 61 Fire 1.5 Pist[14] Pixe[13] Pire[1,2] Pixe[1,1) Pixel1.01 Pize[29] Pixelza] Pixol2.7 Pizel26) Pixel 251 Pixel 2 41 Pixel231 Pixel 22) Pixe[2,1) Pixel 2 01 ] Fise[w-191 Fixe[w.1,81 Pixow-1,7) Fisely-1.61 Fixe[w.1,91 Pixelw-1.41 Fixe[w-1.31 FireW-1,2 FixeW-1,1] Fixe[w-1,01 Packing Padding Padling Padding Packing Packing Padding Packing Padling Padling I. II. II. Image modified from Figure 2: BMP file format structure for 24-bit files without compression. https://en.wikipedia.org/wiki/File:BMPfileFormat.png. Review the following struct called BMP_Header which holds the bmp header information. (You should also consider creating structs to hold the dib header, and pixel data.) Notice that the entries in BMP_Header correspond to the pieces of data listed in the file format. In general, a chunk of 8-bits should be represented as a char, a chunk of 16-bits as a short, and 32-bits as a int. (Optionally: consider using unsigned types.) struct BMP_Header { char signature [2]; //ID field int size; // Size of the BMP file short reserved1; // Application specific short reserved 2 ; // Application specific int offset _pixel_array; // Offset where the pixel array can be found }; Plan to review "Example 1" on the Wikipedia page to get a feel for the contents of each of these regions. A recreated version of that image is provided as the attached "test2.bmp" file. A good exercise would be to view the file in a hex editor like HxD
Step by Step Solution
There are 3 Steps involved in it

Get step-by-step solutions from verified subject matter experts