Question: Hi, please help me with this problem. please code in C++. because the question refers to a previous problem , i am attaching the screen
Hi, please help me with this problem. please code in C++. because the question refers to a previous problem, i am attaching the screen shots of the previous problem code along with this question. Thank you in advance.
the code that i provided is belong to the first part of this question which was without using any function. This question asks the same conditions but with FUNCTIONS. In order to be more clear i am attaching the screenshots of of the first part of this question which i wrote without functions. Once again, the problem is the same as previous but, we should use functions for our conditions. I attached the conditions at the end of this problem. Also not to forget that (-1) which ends the program was not included in the first part code. Thanks
// THE PREVIOUS PROJECT CODE.:
// THIS IS THE CONDITIONS WHICH THE CODE WILL BE TESTED WITH
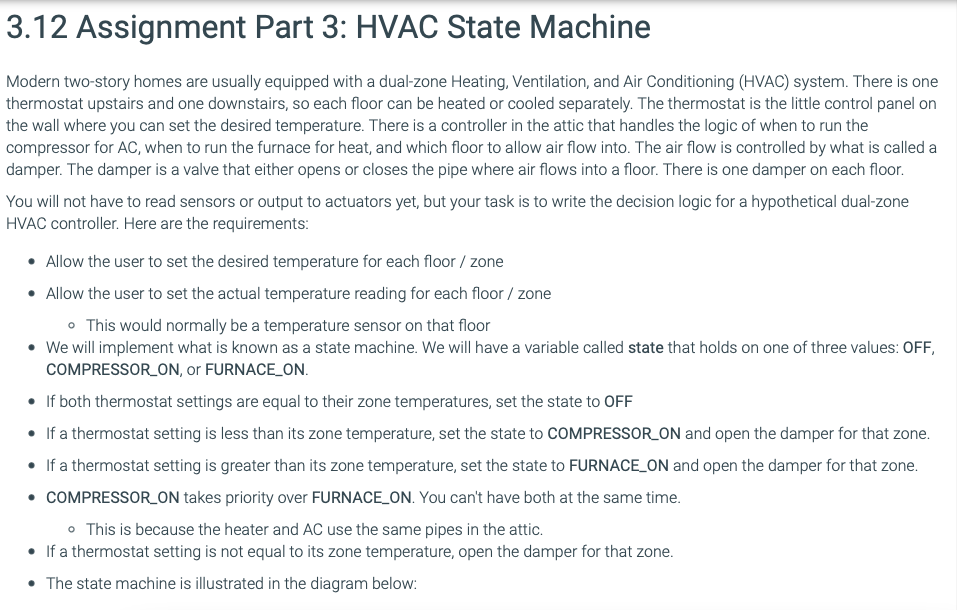
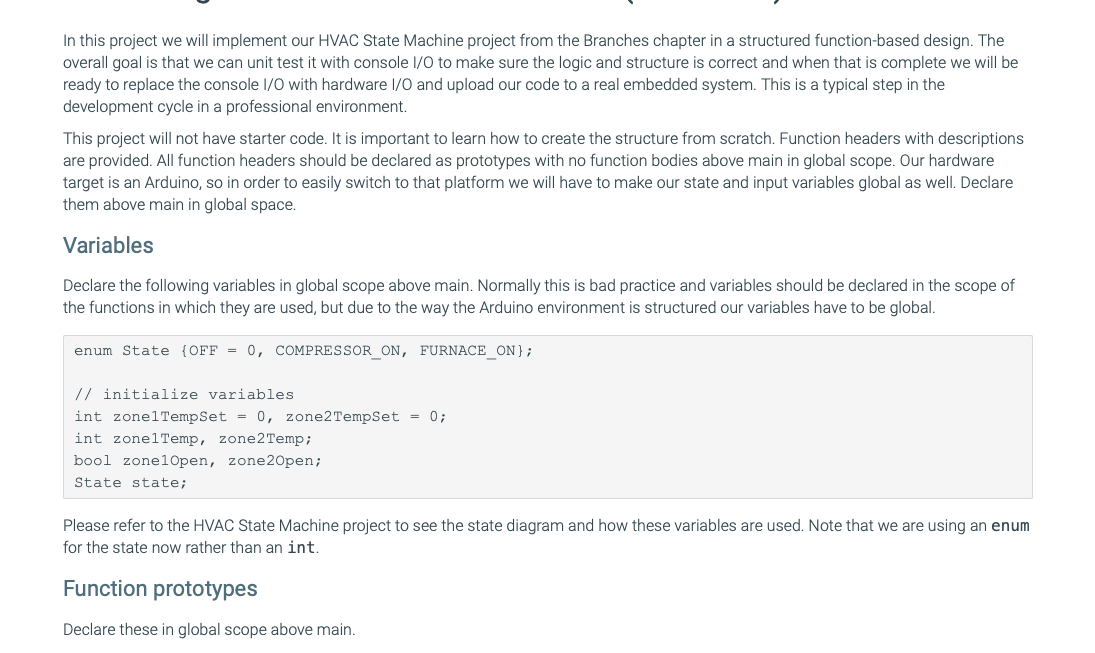
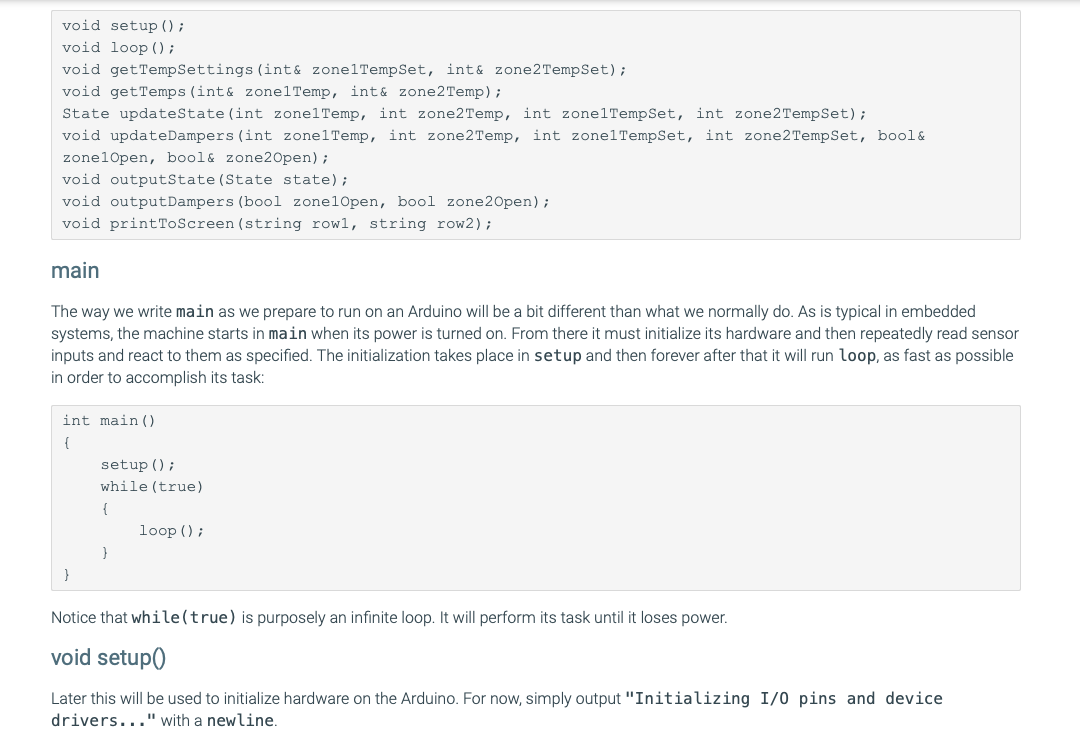
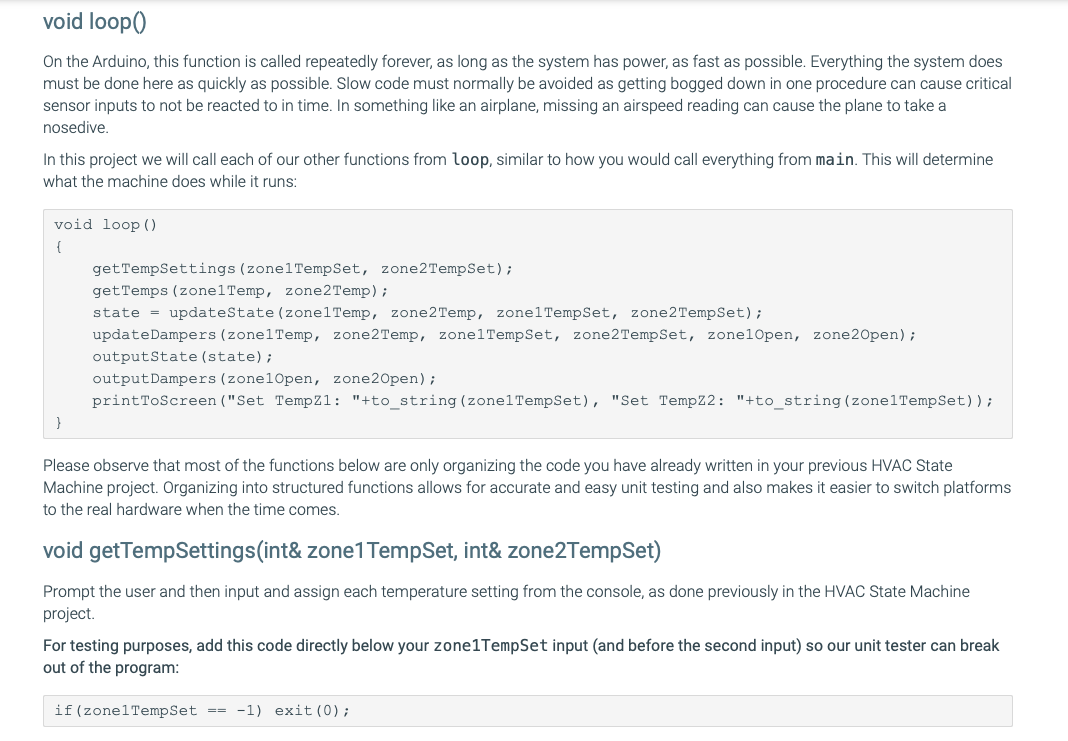
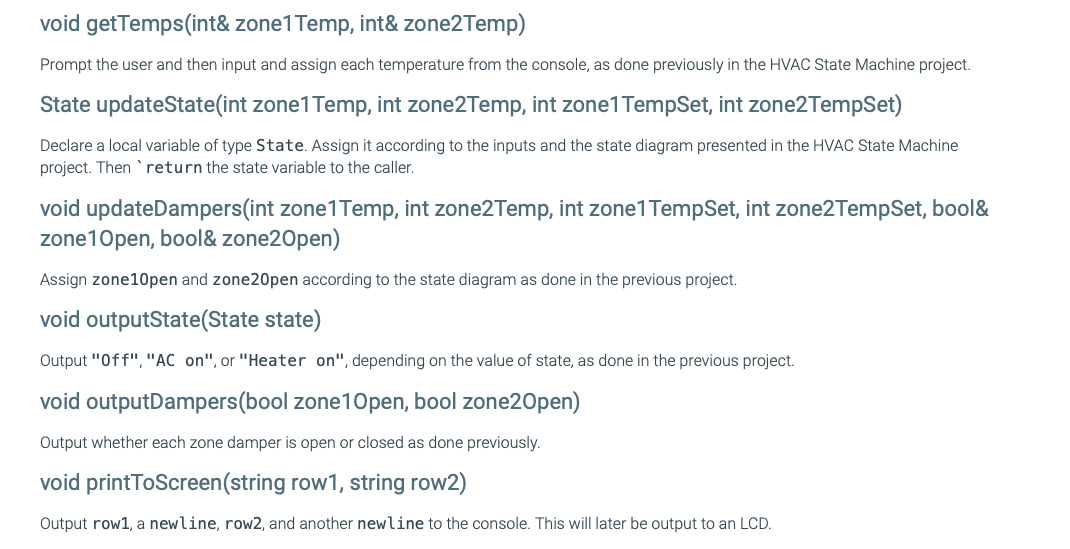
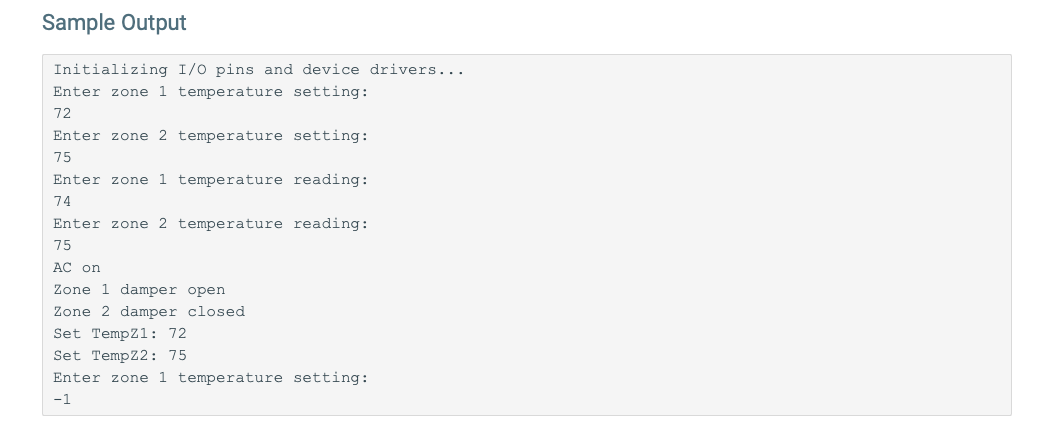
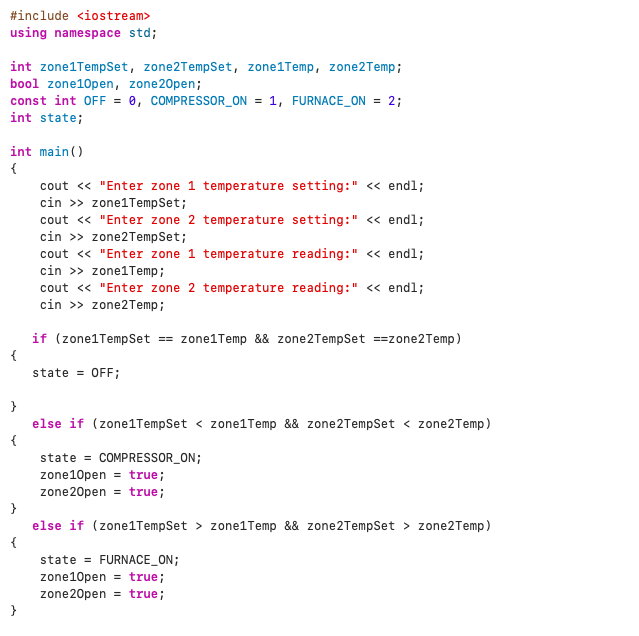
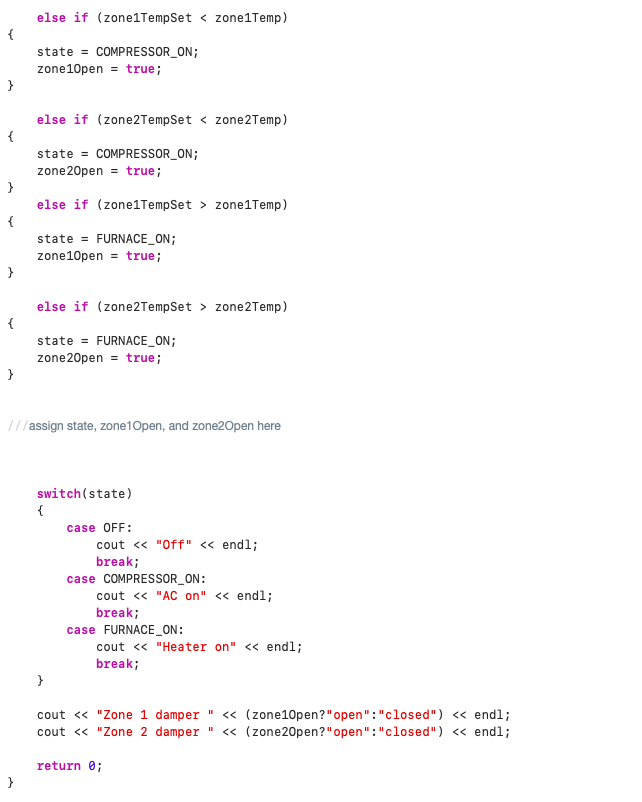
In this project we will implement our HVAC State Machine project from the Branches chapter in a structured function-based design. The overall goal is that we can unit test it with console I/O to make sure the logic and structure is correct and when that is complete we will be ready to replace the console 1/0 with hardware 1/0 and upload our code to a real embedded system. This is a typical step in the development cycle in a professional environment. This project will not have starter code. It is important to learn how to create the structure from scratch. Function headers with descriptions are provided. All function headers should be declared as prototypes with no function bodies above main in global scope. Our hardware target is an Arduino, so in order to easily switch to that platform we will have to make our state and input variables global as well. Declare them above main in global space. Variables Declare the following variables in global scope above main. Normally this is bad practice and variables should be declared in the scope of the functions in which they are used, but due to the way the Arduino environment is structured our variables have to be global. enum State {OFF = 0, COMPRESSOR ON, FURNACE_ON}; // initialize variables int zonel TempSet = 0, zone2 TempSet = 0; int zonel Temp, zone2 Temp; bool zonel Open, zone2Open; State state; Please refer to the HVAC State Machine project to see the state diagram and how these variables are used. Note that we are using an enum for the state now rather than an int. Function prototypes Declare these in global scope above main. void setup(); void loop(); void get Temp Settings (int& zonel TempSet, int& zone2 TempSet); void get Temps (int & zonel Temp, int& zone2 Temp); State updateState(int zonel Temp, int zone2 Temp, int zonel Temp Set, int zone2 TempSet); void updateDampers (int zonel Temp, int zone2 Temp, int zonel TempSet, int zone2 TempSet, bool& zonel Open, bool& zone2Open); void outputState (State state); void outputDampers (bool zonelopen, bool zone2Open); void printToScreen (string rowl, string row2); main The way we write main as we prepare to run on an Arduino will be a bit different than what we normally do. As is typical in embedded systems, the machine starts in main when its power is turned on. From there it must initialize its hardware and then repeatedly read sensor inputs and react to them as specified. The initialization takes place in setup and then forever after that it will run loop, as fast as possible in order to accomplish its task: int main() { setup(); while(true) { loop(); } } Notice that while(true) is purposely an infinite loop. It will perform its task until it loses power. void setup() Later this will be used to initialize hardware on the Arduino. For now, simply output "Initializing I/O pins and device drivers..." with a newline. void loop() On the Arduino, this function is called repeatedly forever, as long as the system has power, as fast as possible. Everything the system does must be done here as quickly as possible. Slow code must normally be avoided as getting bogged down in one procedure can cause critical sensor inputs to not be reacted to in time. In something like an airplane, missing an airspeed reading can cause the plane to take a nosedive. In this project we will call each of our other functions from loop, similar to how you would call everything from main. This will determine what the machine does while it runs: void loop() { get TempSettings (zonel TempSet, zone2 TempSet); get Temps (zonel Temp, zone2 Temp); state = updateState (zonel Temp, zone2 Temp, zonel TempSet, zone2 TempSet); updateDampers (zonel Temp, zone2 Temp, zonel Temp Set, zone2 Temp Set, zonelopen, zone2Open); outputState (state); output Dampers (zonel Open, zone2Open); printToScreen ("Set Temp21: "+to_string (zonel TempSet), "Set Temp22: "+to_string (zonel Temp Set)); Please observe that most of the functions below are only organizing the code you have already written in your previous HVAC State Machine project. Organizing into structured functions allows for accurate and easy unit testing and also makes it easier to switch platforms to the real hardware when the time comes. void getTempSettings(int& zone1 TempSet, int& zone2TempSet) Prompt the user and then input and assign each temperature setting from the console, as done previously in the HVAC State Machine project. For testing purposes, add this code directly below your zone1TempSet input (and before the second input) so our unit tester can break out of the program: if (zonel TempSet == -1) exit(0); void getTemps(int& zone1 Temp, int& zone2Temp) Prompt the user and then input and assign each temperature from the console, as done previously in the HVAC State Machine project. State updateState(int zone1 Temp, int zone2Temp, int zone1 TempSet, int zone2TempSet) Declare a local variable of type State. Assign it according to the inputs and the state diagram presented in the HVAC State Machine project. Then 'return the state variable to the caller. void updateDampers(int zone1 Temp, int zone2Temp, int zone1 TempSet, int zone2TempSet, bool& zone10pen, bool& zone2Open) Assign zone10pen and zone20pen according to the state diagram as done in the previous project. void outputState(State state) Output "Off", "AC on", or "Heater on", depending on the value of state, as done in the previous project. void outputDampers(bool zone10pen, bool zone2Open) Output whether each zone damper is open or closed as done previously void printToScreen(string row1, string row2) Output row1, a newline, row2, and another newline to the console. This will later be output to an LCD. Sample Output Initializing I/O pins and device drivers... Enter zone i temperature setting: 72 Enter zone 2 temperature setting: 75 Enter zone i temperature reading: 74 Enter zone 2 temperature reading: 75 AC on Zone 1 damper open Zone 2 damper closed Set Temp21: 72 Set Temp22: 75 Enter zone i temperature setting: -1 #include using namespace std; int zone1TempSet, zone2TempSet, zonelTemp, zone2Temp; bool zone10pen, zone2Open; const int OFF = 0, COMPRESSOR_ON = 1, FURNACE_ON = 2; int state; int main() { cout > zone1Temp Set; cout > zone2Temp Set; cout > zone1 Temp; cout > zone2Temp; if (zone1Temp Set == zone1Temp && zone2TempSet ==zone2Temp) { state = OFF; } else if (zone 1TempSet zonelTemp && zone2TempSet > zone2Temp) { state = FURNACE_ON; zone 10pen = true; zone2Open true; } 3.12 Assignment Part 3: HVAC State Machine Modern two-story homes are usually equipped with a dual-zone Heating, Ventilation, and Air Conditioning (HVAC) system. There is one thermostat upstairs and one downstairs, so each floor can be heated or cooled separately. The thermostat is the little control panel on the wall where you can set the desired temperature. There is a controller in the attic that handles the logic of when to run the compressor for AC, when to run the furnace for heat, and which floor to allow air flow into. The air flow is controlled by what is called a damper. The damper is a valve that either opens or closes the pipe where air flows into a floor. There is one damper on each floor. You will not have to read sensors or output to actuators yet, but your task is to write the decision logic for a hypothetical dual-zone HVAC controller. Here are the requirements: Allow the user to set the desired temperature for each floor / zone Allow the user to set the actual temperature reading for each floor / zone This would normally be a temperature sensor on that floor We will implement what is known as a state machine. We will have a variable called state that holds on one of three values: OFF, COMPRESSOR_ON, or FURNACE_ON. If both thermostat settings are equal to their zone temperatures, set the state to OFF If a thermostat setting is less than its zone temperature, set the state to COMPRESSOR_ON and open the damper for that zone. If a thermostat setting is greater than its zone temperature, set the state to FURNACE_ON and open the damper for that zone. COMPRESSOR_ON takes priority over FURNACE_ON. You can't have both at the same time. This is because the heater and AC use the same pipes in the attic. If a thermostat setting is not equal to its zone temperature, open the damper for that zone. The state machine is illustrated in the diagram below: In this project we will implement our HVAC State Machine project from the Branches chapter in a structured function-based design. The overall goal is that we can unit test it with console I/O to make sure the logic and structure is correct and when that is complete we will be ready to replace the console 1/0 with hardware 1/0 and upload our code to a real embedded system. This is a typical step in the development cycle in a professional environment. This project will not have starter code. It is important to learn how to create the structure from scratch. Function headers with descriptions are provided. All function headers should be declared as prototypes with no function bodies above main in global scope. Our hardware target is an Arduino, so in order to easily switch to that platform we will have to make our state and input variables global as well. Declare them above main in global space. Variables Declare the following variables in global scope above main. Normally this is bad practice and variables should be declared in the scope of the functions in which they are used, but due to the way the Arduino environment is structured our variables have to be global. enum State {OFF = 0, COMPRESSOR ON, FURNACE_ON}; // initialize variables int zonel TempSet = 0, zone2 TempSet = 0; int zonel Temp, zone2 Temp; bool zonel Open, zone2Open; State state; Please refer to the HVAC State Machine project to see the state diagram and how these variables are used. Note that we are using an enum for the state now rather than an int. Function prototypes Declare these in global scope above main. void setup(); void loop(); void get Temp Settings (int& zonel TempSet, int& zone2 TempSet); void get Temps (int & zonel Temp, int& zone2 Temp); State updateState(int zonel Temp, int zone2 Temp, int zonel Temp Set, int zone2 TempSet); void updateDampers (int zonel Temp, int zone2 Temp, int zonel TempSet, int zone2 TempSet, bool& zonel Open, bool& zone2Open); void outputState (State state); void outputDampers (bool zonelopen, bool zone2Open); void printToScreen (string rowl, string row2); main The way we write main as we prepare to run on an Arduino will be a bit different than what we normally do. As is typical in embedded systems, the machine starts in main when its power is turned on. From there it must initialize its hardware and then repeatedly read sensor inputs and react to them as specified. The initialization takes place in setup and then forever after that it will run loop, as fast as possible in order to accomplish its task: int main() { setup(); while(true) { loop(); } } Notice that while(true) is purposely an infinite loop. It will perform its task until it loses power. void setup() Later this will be used to initialize hardware on the Arduino. For now, simply output "Initializing I/O pins and device drivers..." with a newline. void loop() On the Arduino, this function is called repeatedly forever, as long as the system has power, as fast as possible. Everything the system does must be done here as quickly as possible. Slow code must normally be avoided as getting bogged down in one procedure can cause critical sensor inputs to not be reacted to in time. In something like an airplane, missing an airspeed reading can cause the plane to take a nosedive. In this project we will call each of our other functions from loop, similar to how you would call everything from main. This will determine what the machine does while it runs: void loop() { get TempSettings (zonel TempSet, zone2 TempSet); get Temps (zonel Temp, zone2 Temp); state = updateState (zonel Temp, zone2 Temp, zonel TempSet, zone2 TempSet); updateDampers (zonel Temp, zone2 Temp, zonel Temp Set, zone2 Temp Set, zonelopen, zone2Open); outputState (state); output Dampers (zonel Open, zone2Open); printToScreen ("Set Temp21: "+to_string (zonel TempSet), "Set Temp22: "+to_string (zonel Temp Set)); Please observe that most of the functions below are only organizing the code you have already written in your previous HVAC State Machine project. Organizing into structured functions allows for accurate and easy unit testing and also makes it easier to switch platforms to the real hardware when the time comes. void getTempSettings(int& zone1 TempSet, int& zone2TempSet) Prompt the user and then input and assign each temperature setting from the console, as done previously in the HVAC State Machine project. For testing purposes, add this code directly below your zone1TempSet input (and before the second input) so our unit tester can break out of the program: if (zonel TempSet == -1) exit(0); void getTemps(int& zone1 Temp, int& zone2Temp) Prompt the user and then input and assign each temperature from the console, as done previously in the HVAC State Machine project. State updateState(int zone1 Temp, int zone2Temp, int zone1 TempSet, int zone2TempSet) Declare a local variable of type State. Assign it according to the inputs and the state diagram presented in the HVAC State Machine project. Then 'return the state variable to the caller. void updateDampers(int zone1 Temp, int zone2Temp, int zone1 TempSet, int zone2TempSet, bool& zone10pen, bool& zone2Open) Assign zone10pen and zone20pen according to the state diagram as done in the previous project. void outputState(State state) Output "Off", "AC on", or "Heater on", depending on the value of state, as done in the previous project. void outputDampers(bool zone10pen, bool zone2Open) Output whether each zone damper is open or closed as done previously void printToScreen(string row1, string row2) Output row1, a newline, row2, and another newline to the console. This will later be output to an LCD. Sample Output Initializing I/O pins and device drivers... Enter zone i temperature setting: 72 Enter zone 2 temperature setting: 75 Enter zone i temperature reading: 74 Enter zone 2 temperature reading: 75 AC on Zone 1 damper open Zone 2 damper closed Set Temp21: 72 Set Temp22: 75 Enter zone i temperature setting: -1 #include using namespace std; int zone1TempSet, zone2TempSet, zonelTemp, zone2Temp; bool zone10pen, zone2Open; const int OFF = 0, COMPRESSOR_ON = 1, FURNACE_ON = 2; int state; int main() { cout > zone1Temp Set; cout > zone2Temp Set; cout > zone1 Temp; cout > zone2Temp; if (zone1Temp Set == zone1Temp && zone2TempSet ==zone2Temp) { state = OFF; } else if (zone 1TempSet zonelTemp && zone2TempSet > zone2Temp) { state = FURNACE_ON; zone 10pen = true; zone2Open true; } 3.12 Assignment Part 3: HVAC State Machine Modern two-story homes are usually equipped with a dual-zone Heating, Ventilation, and Air Conditioning (HVAC) system. There is one thermostat upstairs and one downstairs, so each floor can be heated or cooled separately. The thermostat is the little control panel on the wall where you can set the desired temperature. There is a controller in the attic that handles the logic of when to run the compressor for AC, when to run the furnace for heat, and which floor to allow air flow into. The air flow is controlled by what is called a damper. The damper is a valve that either opens or closes the pipe where air flows into a floor. There is one damper on each floor. You will not have to read sensors or output to actuators yet, but your task is to write the decision logic for a hypothetical dual-zone HVAC controller. Here are the requirements: Allow the user to set the desired temperature for each floor / zone Allow the user to set the actual temperature reading for each floor / zone This would normally be a temperature sensor on that floor We will implement what is known as a state machine. We will have a variable called state that holds on one of three values: OFF, COMPRESSOR_ON, or FURNACE_ON. If both thermostat settings are equal to their zone temperatures, set the state to OFF If a thermostat setting is less than its zone temperature, set the state to COMPRESSOR_ON and open the damper for that zone. If a thermostat setting is greater than its zone temperature, set the state to FURNACE_ON and open the damper for that zone. COMPRESSOR_ON takes priority over FURNACE_ON. You can't have both at the same time. This is because the heater and AC use the same pipes in the attic. If a thermostat setting is not equal to its zone temperature, open the damper for that zone. The state machine is illustrated in the diagram below


