Hi! The files are located here: https://drive.google.com/drive/folders/10YaiNbDPKLlLKZQW6tV0Q9Ni0BHtuodl?usp=sharing Please write in c++ This assignment is divided into several parts as described below. Each part builds on
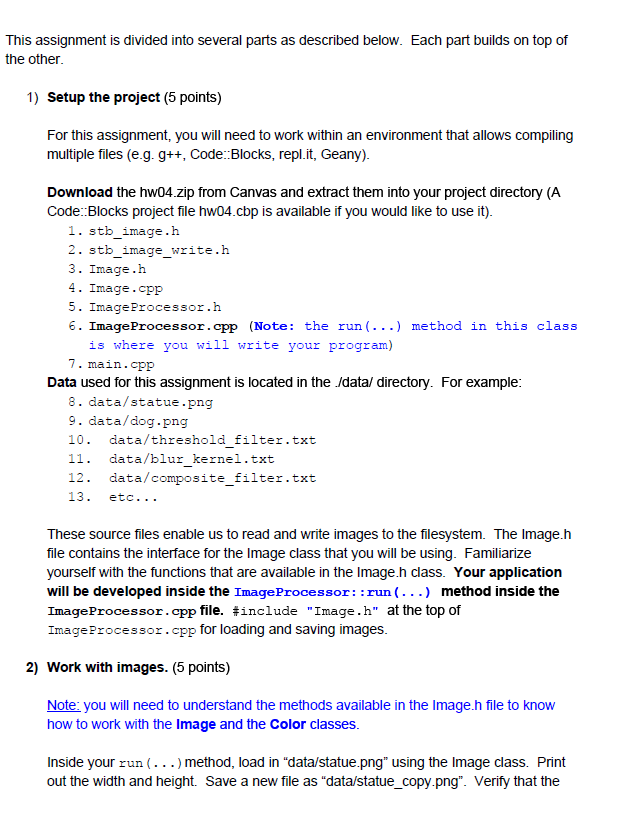
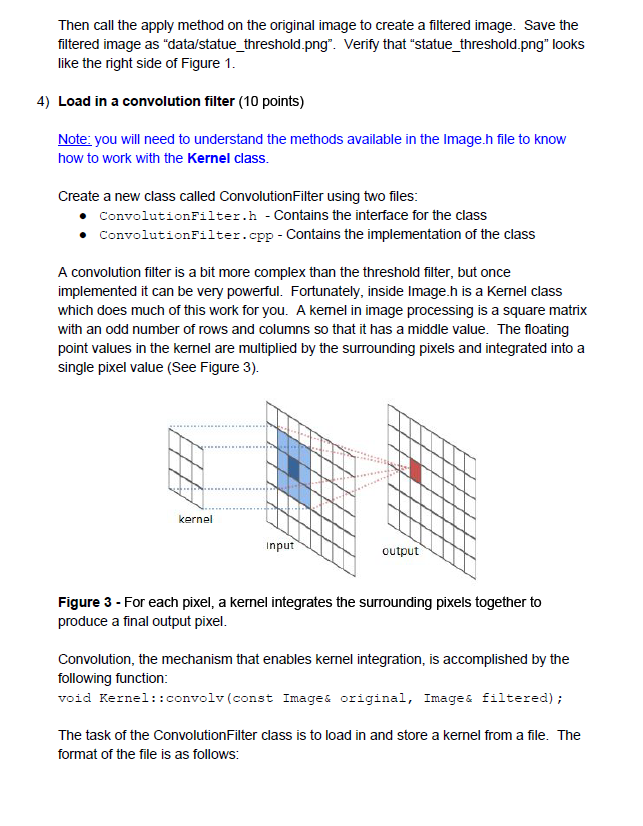
This assignment is divided into several parts as described below. Each part builds on top of the other. 1) Setup the project (5 points) For this assignment, you will need to work within an environment that allows compiling multiple files (e.g. g++, Code_:Blocks, repl.it, Geany). Download the hw04.zip from Canvas and extract them into your project directory (A Code::Blocks project file hw04.cbp is available if you would like to use it). 1. stb_image . h 2. stb_image_write. h 3. Image . h 4. Image . opp 5. ImageProcessor. h 6. ImageProcessor . opp (Note: the run (. . .) method in this class is where you will write your program) 7. main . opp Data used for this assignment is located in the /data/ directory. For example: 8. data/statue . png 9. data/dog . png 10. data/threshold filter. txt 11. data/blur_kernel . txt 12. data/ composite_filter . txt 13. etc . . . These source files enable us to read and write images to the filesystem. The Image.h file contains the interface for the Image class that you will be using. Familiarize yourself with the functions that are available in the Image.h class. Your application will be developed inside the ImageProcessor: : run ( . . .) method inside the ImageProcessor . opp file. #include "Image.h" at the top of Image Processor . epp for loading and saving images. 2) Work with images. (5 points) Note: you will need to understand the methods available in the Image.h file to know how to work with the Image and the Color classes. Inside your run (. . . ) method, load in "data/statue.png" using the Image class. Print out the width and height. Save a new file as "data/statue_copy.png". Verify that thenew image is a copy of the old one. Next create a new image by specifying the width = 256 and height = 256 in the constructor. Set each pixel color to Color(1, 0, 0, 1), which is red. Save the image as "data/red.png". Verify that the image created is completely red. Finally, create a gradient image from left to right (width = 256, height = 32) that increases the green intensity. So at the left the intensity is black and the right it is green. Save the image as "data/green_gradient.png". Verify the image looks similar to the following gradient: 3) Apply a threshold filter (10 points) Create a new class called ThresholdFilter using two files: ThresholdFilter . h - Contains the interface for the class ThresholdFilter . epp - Contains the implementation of the class Add a constructor for the Filter class that accepts a filename (e.g. "data/threshold_filter.txt"). Inside the constructor, read the floating point value stored in the file into a member variable. Create a method in the ThresholdFilter class called apply as follows: . void apply (const Image& original, Image& filtered) ; The apply method does the following steps to threshold an image: 1. Copy the original image into the filtered image. This allows us to make changes to the filtered image without changing the original image. 2. Loop through all the pixels and apply the following logic: if the luminance of the pixel value is less than the threshold value from the file: set the filtered pixel value to black [Color(0,0,0,1)] else set the filtered pixel value to white [Color(1, 1,1,1)] In the run() function in ImageProcessor.cpp, load in the "data/statue.png" image. Then create a ThresholdFilter by passing in "data/threshold_filter.txt" into the constructor.Then call the apply method on the original image to create a filtered image. Save the filtered image as "data/statue_threshold.png". Verify that "statue_threshold.png" looks like the right side of Figure 1. 4) Load in a convolution filter (10 points) Note: you will need to understand the methods available in the Image.h file to know how to work with the Kernel class. Create a new class called ConvolutionFilter using two files: . ConvolutionFilter . h - Contains the interface for the class . ConvolutionFilter . epp - Contains the implementation of the class A convolution filter is a bit more complex than the threshold filter, but once implemented it can be very powerful. Fortunately, inside Image.h is a Kernel class which does much of this work for you. A kemel in image processing is a square matrix with an odd number of rows and columns so that it has a middle value. The floating point values in the kernel are multiplied by the surrounding pixels and integrated into a single pixel value (See Figure 3). kernel Input output Figure 3 - For each pixel, a kernel integrates the surrounding pixels together to produce a final output pixel. Convolution, the mechanism that enables kernel integration, is accomplished by the following function: void Kernel: : convolv (const Images original, Images filtered) ; The task of the ConvolutionFilter class is to load in and store a kernel from a file. The format of the file is as follows:Format: kernel size matrix rows and columns separated by spaces and new lines Example: 3 0.1 0.1 0.1 0.1 0.2 0.1 0.1 0.1 0.1 Create a constructor inside ConvolutionFilter that reads in a file like the ThresholdFilter. The ConvolutionFilter reads in a kemel (e.g. data/blur_kernel.txt) and stores the kernel as a member variable. Inside the ConvolutionFilter create an apply method just like the ThresholdFilter. Inside the apply, the ConvolutionFilter should copy the original image to the filtered image and call the kernel's convolv (. . . ) method. Finally, use the ConvolutionFilter to apply a blur kernel ("data/blur_kernel.txt") to the "data/dog.png" image and save the filtered image as "data/dog_blur.png". Verify that the "data/dog_blur.png" looks similar to Figure 2. 5) Make the program dynamic based on command line arguments. (10 points) If no arguments are passed into the program from the command line, then execute all of the steps above. However, we want to be able to apply filters by passing in images and filters. Have another mode where users can pass in an image, filter information, and an output image. This mode is enabled if there are command line arguments as follows: Command line usage (Note: "/main" will be the name of your compiled program - which may be different across compilers): . /main
Step by Step Solution
There are 3 Steps involved in it
Step: 1
Get Instant Access to Expert-Tailored Solutions
See step-by-step solutions with expert insights and AI powered tools for academic success
Step: 2
Step: 3
Ace Your Homework with AI
Get the answers you need in no time with our AI-driven, step-by-step assistance