Answered step by step
Verified Expert Solution
Link Copied!

Question

1 Approved Answer

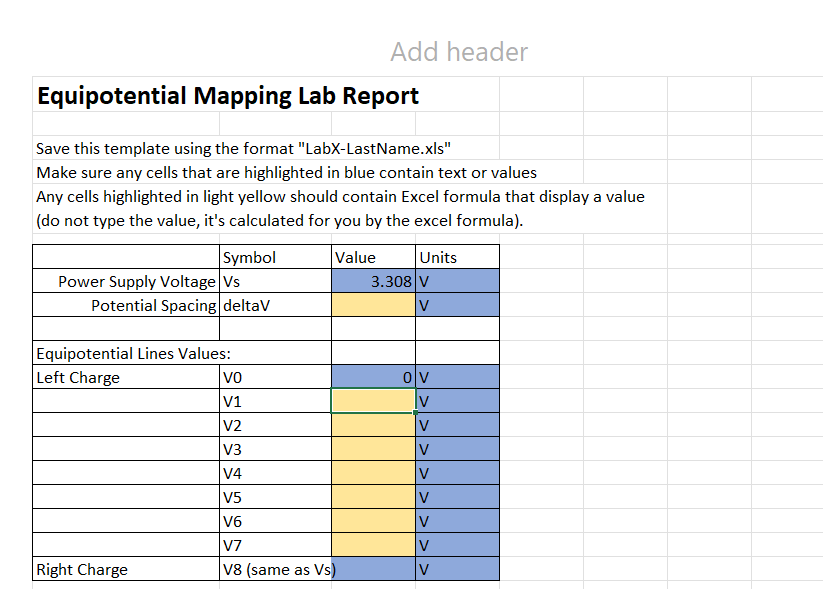
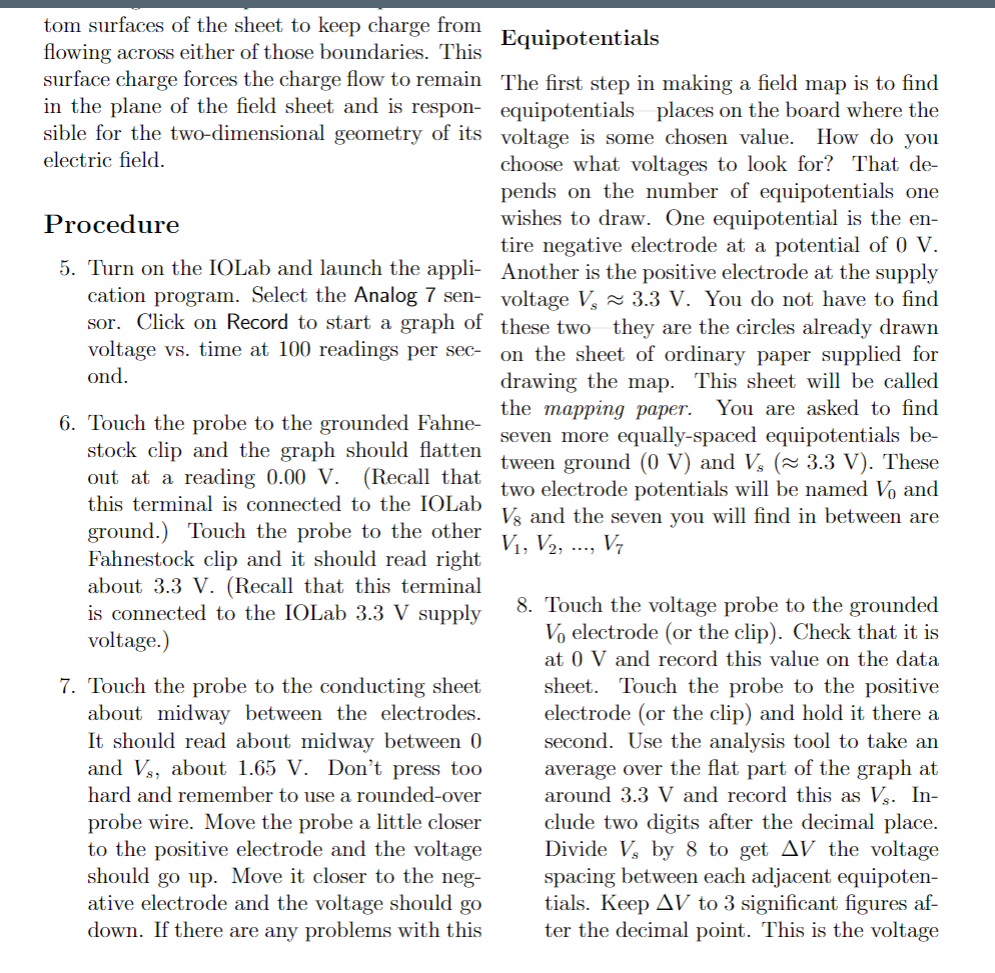
I don't Understand what formula I'm supposed to put into those yellow cells Open the Excel Workbook to prepare to begin the lab. Record your

I don't Understand what formula I'm supposed to put into those yellow cells

image text in transcribedimage text in transcribedimage text in transcribed
Open the Excel Workbook to prepare to begin the lab. Record your data and answer the comprehension questions as you work through the lab document above. Cells are color coded according to the type of data they should contain. Cells in blue should contain text or numbers. Cells shaded yellow should contain a formula that references other cells. and as a result display a calculated value based on those referenced cells. To write and store a formula in a cell, begin by typing = and click on other cells you want to reference when building a formula. Add header Equipotential Mapping Lab Report Save this template using the format "LabXLastName.xls" Make sure any cells that are highlighted in blue contain text or values Any cells highlighted in light yellow should contain Excel formula that display a value (do not type the value, it's calculated for you by the excel formula}. Symbol Value Units Power Supply Voltage Vs Potential Spacing deltaV Equipotential Lines Values: Left Charge VD V1 V2 V3 V4 V5 V6 V? Right Charge V3 (same as V tom surfaces of the sheet to keep charge from flowing across either of those boundaries. This Equipotentials surface charge forces the charge flow to remain The first step in making a field map is to find in the plane of the field sheet and is respons equipotentials places on the board where the sible for the two-dimensional geometry of its voltage is some chosen value. How do you electric field. choose what voltages to look for? That de- pends on the number of equipotentials one Procedure wishes to draw. One equipotential is the en- tire negative electrode at a potential of 0 V. 5. Turn on the IOLab and launch the appli- Another is the positive electrode at the supply cation program. Select the Analog 7 sen- voltage Vs ~ 3.3 V. You do not have to find sor. Click on Record to start a graph of these two they are the circles already drawn voltage vs. time at 100 readings per sec- on the sheet of ordinary paper supplied for ond. drawing the map. This sheet will be called 6. Touch the probe to the grounded Fahne- the mapping paper. You are asked to find stock clip and the graph should flatten seven more equally-spaced equipotentials be- out at a reading 0.00 V. (Recall that tween ground (0 V) and Vs (~ 3.3 V). These this terminal is connected to the IOLab two electrode potentials will be named Vo and ground.) Touch the probe to the other V's and the seven you will find in between are Fahnestock clip and it should read right V1, V2 , ..., V7 about 3.3 V. (Recall that this terminal is connected to the IOLab 3.3 V supply 8. Touch the voltage probe to the grounded voltage.) Vo electrode (or the clip). Check that it is at 0 V and record this value on the data 7. Touch the probe to the conducting sheet sheet. Touch the probe to the positive about midway between the electrodes. electrode (or the clip) and hold it there a It should read about midway between 0 second. Use the analysis tool to take an and Vs, about 1.65 V. Don't press too average over the flat part of the graph at hard and remember to use a rounded-over around 3.3 V and record this as Vs. In- probe wire. Move the probe a little closer clude two digits after the decimal place. to the positive electrode and the voltage Divide Vs by 8 to get AV the voltage should go up. Move it closer to the neg- spacing between each adjacent equipoten- ative electrode and the voltage should go tials. Keep AV to 3 significant figures af- down. If there are any problems with this ter the decimal point. This is the voltage

Step by Step Solution

There are 3 Steps involved in it

Step: 1

blur-text-image

Get Instant Access to Expert-Tailored Solutions

See step-by-step solutions with expert insights and AI powered tools for academic success

Step: 2

blur-text-image

Step: 3

blur-text-image

Ace Your Homework with AI

Get the answers you need in no time with our AI-driven, step-by-step assistance

Get Started

Recommended Textbook for

Introductory Classical Mechanics

Authors: David Morin

1st edition

9780511808951, 521876222, 978-0521876223

More Books

Students also viewed these Physics questions