

Question
I have included my current code below from what I have done so far. Please edit the code shown in bold font. Task 1 of
I have included my current code below from what I have done so far. Please edit the code shown in bold font.
Task 1 of 2 has been done. Task 2 is where I am having issues. Please read the screenshots to understand what I need to achieve in Task 2.
Please explain the steps and what they do.
/** * Add an image entry to the page * @param key Key of item in local storage * @param data Data URL of image data */ function addImageEntry(key, data) { // Create a image element var imgElement = new Image(); imgElement.alt = "Photo entry";
// Load the image imgElement.src = data;
// Add a section to the page containing the image addSection(key, imgElement); }
/** * Function to handle Add text button 'click' event */ function addEntryClick() { // Add an empty text entry, using the current timestamp to make a key var key = "diary" + Date.now(); var initialText = ""; var isNewEntry = true; addTextEntry(key, initialText, isNewEntry); }
/** * Function to handle Add photo button 'click' event */ function addPhotoClick() { // Trigger the 'click' event of the hidden file input element // (as demonstrated in Block 3 Part 4) var inputElement = document.querySelector("#image input"); inputElement.click(); }
/** * Function to handle file input 'change' event * @param inputChangeEvent file input 'change' event data */ function processFile(inputChangeEvent) { console.log("processFile called with arguments:", { inputChangeEvent, });
// Create a function to add an image entry using a data URL function addImage(data) { console.log("addImage called with arguments:", { data, });
// Add a new image entry, using the current timestamp to make a key var key = "diary" + Date.now(); addImageEntry(key, data);
// TODO: Task 1 of 2 // Make an image item using the given data URL // Store the item in local storage using the given key var imageData = data; var item = makeItem("image", imageData); localStorage.setItem(key, item); }
// Add a 'dummy' image entry addImage(window.DUMMY_DATA_URL);
// TODO: Task 2 of 2 // Complete this function to read a file when it is selected: // (imgElement and messageElement do not exist in this app so remove that code) // ...then call addImage using the data URL you obtain // ...and comment out line above using window.DUMMY_DATA_URL
// Clear the file selection (allows selecting the same file again) inputChangeEvent.target.value = ""; }
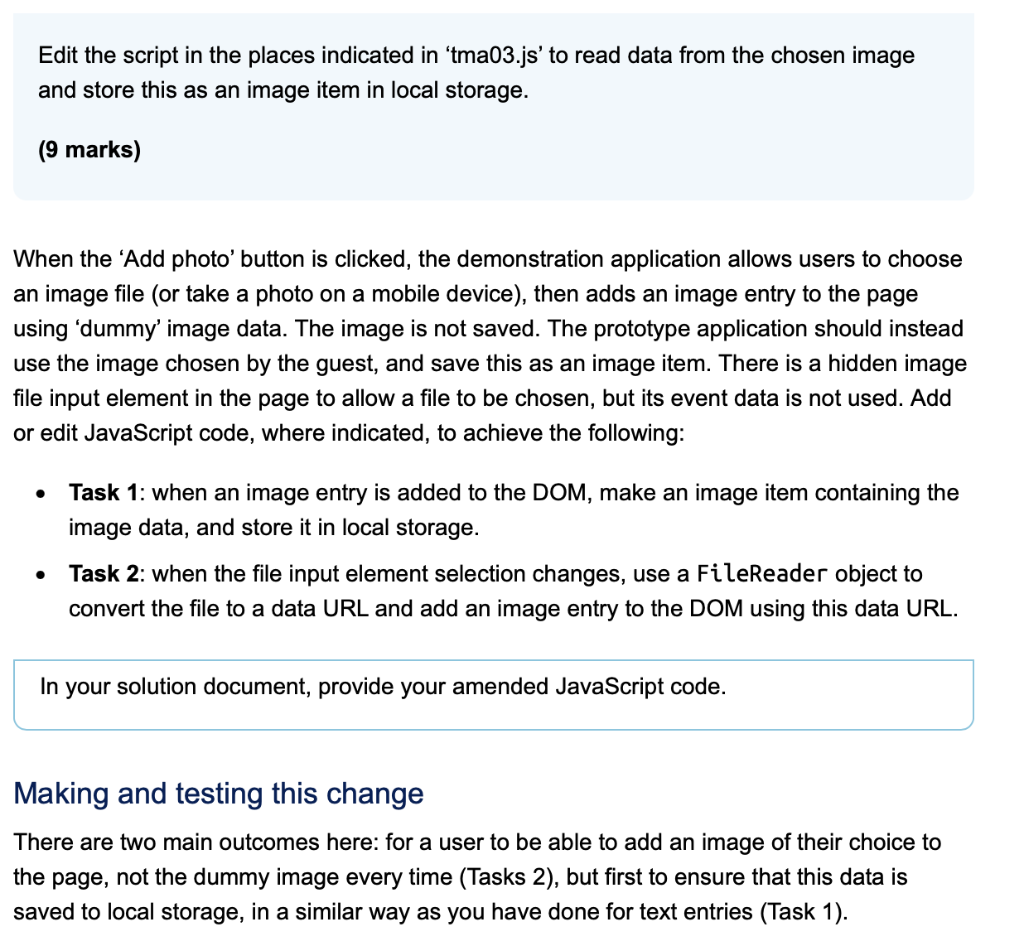
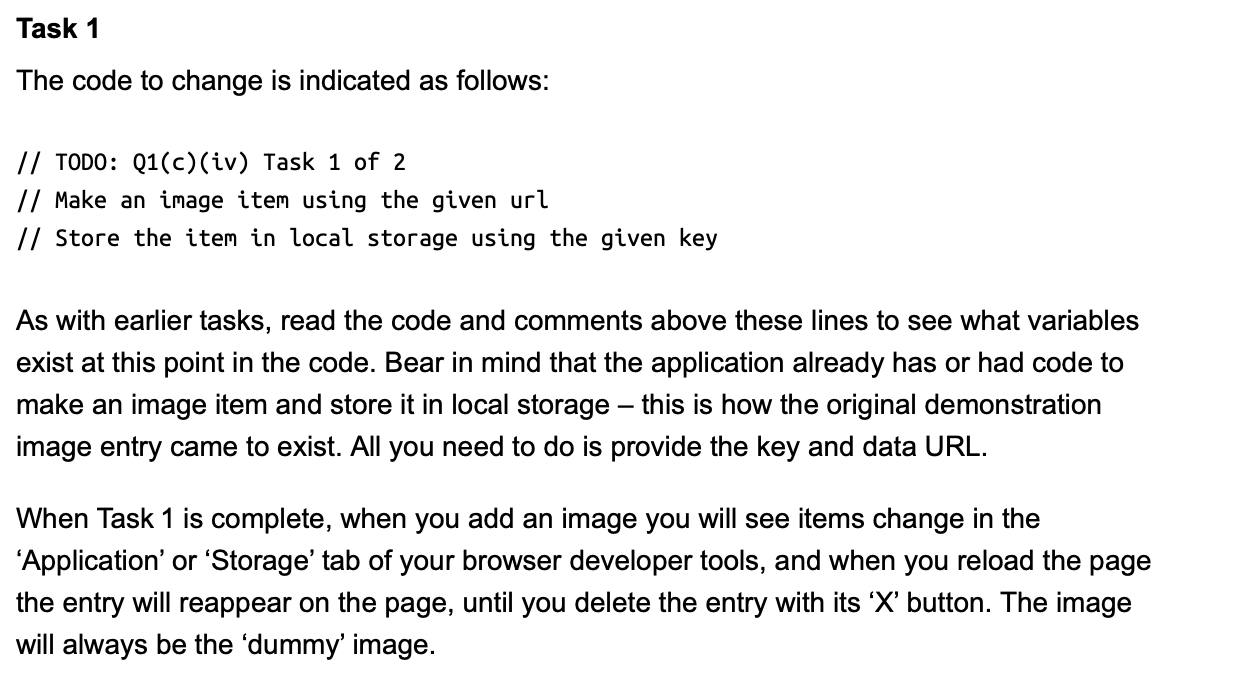
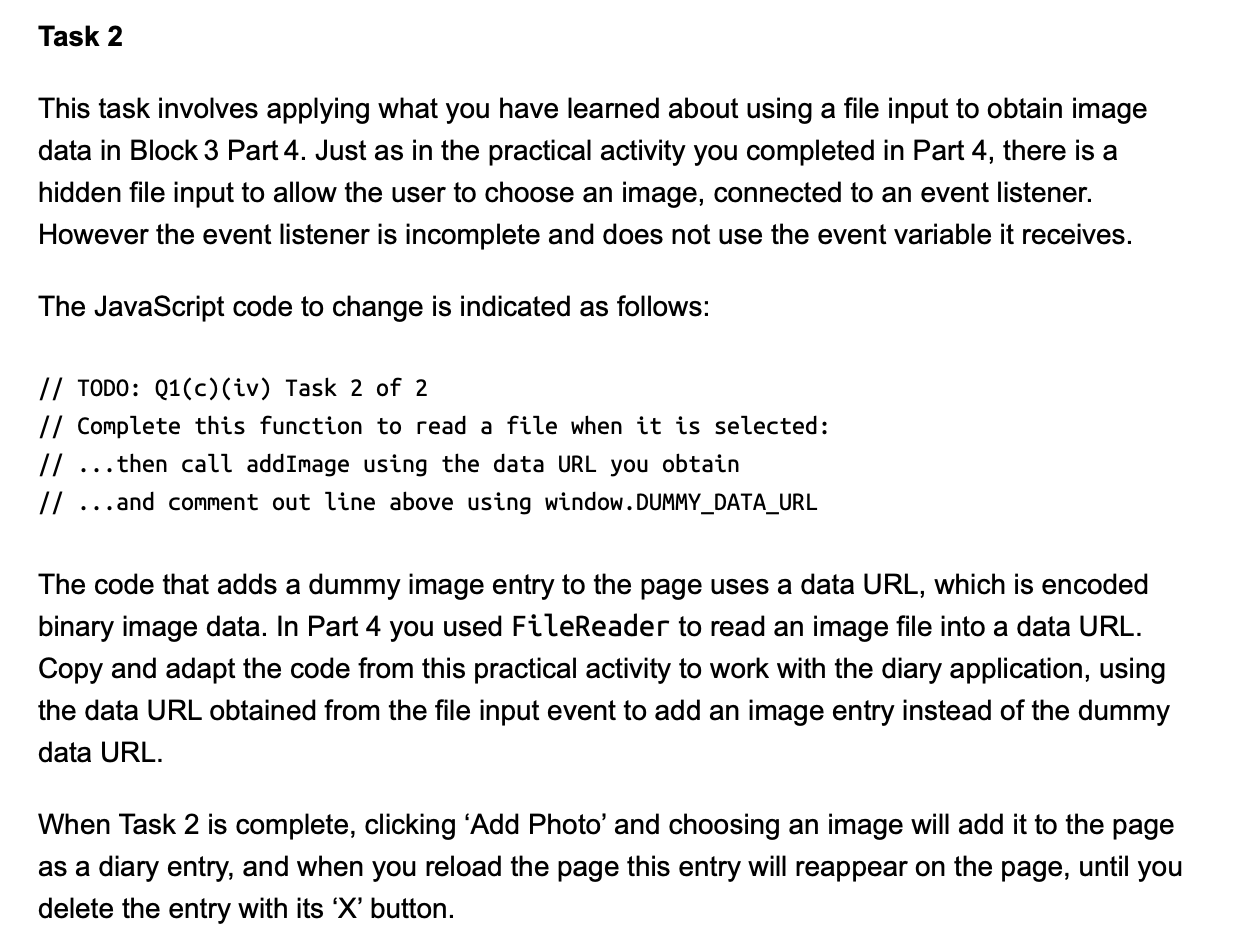
Edit the script in the places indicated in 'tma03.js' to read data from the chosen image and store this as an image item in local storage. (9 marks) When the 'Add photo' button is clicked, the demonstration application allows users to choose an image file (or take a photo on a mobile device), then adds an image entry to the page using 'dummy' image data. The image is not saved. The prototype application should instead use the image chosen by the guest, and save this as an image item. There is a hidden image file input element in the page to allow a file to be chosen, but its event data is not used. Add or edit JavaScript code, where indicated, to achieve the following: - Task 1: when an image entry is added to the DOM, make an image item containing the image data, and store it in local storage. - Task 2: when the file input element selection changes, use a FileReader object to convert the file to a data URL and add an image entry to the DOM using this data URL. In your solution document, provide your amended JavaScript code. Making and testing this change There are two main outcomes here: for a user to be able to add an image of their choice to the page, not the dummy image every time (Tasks 2), but first to ensure that this data is saved to local storage, in a similar way as you have done for text entries (Task 1). The code to change is indicated as follows: // TODO: Q1(c)(iv) Task 1 of 2 // Make an image item using the given url // Store the item in local storage using the given key As with earlier tasks, read the code and comments above these lines to see what variables exist at this point in the code. Bear in mind that the application already has or had code to make an image item and store it in local storage - this is how the original demonstration image entry came to exist. All you need to do is provide the key and data URL. When Task 1 is complete, when you add an image you will see items change in the 'Application' or 'Storage' tab of your browser developer tools, and when you reload the page the entry will reappear on the page, until you delete the entry with its ' X ' button. The image will always be the 'dummy' image. This task involves applying what you have learned about using a file input to obtain image data in Block 3 Part 4. Just as in the practical activity you completed in Part 4, there is a hidden file input to allow the user to choose an image, connected to an event listener. However the event listener is incomplete and does not use the event variable it receives. The JavaScript code to change is indicated as follows: // TOD0: Q1 (c)(iv) Task 2 of 2 // Complete this function to read a file when it is selected: // ...then call addImage using the data URL you obtain // ... and comment out line above using window.DUMMY_DATA_URL The code that adds a dummy image entry to the page uses a data URL, which is encoded binary image data. In Part 4 you used FileReader to read an image file into a data URL. Copy and adapt the code from this practical activity to work with the diary application, using the data URL obtained from the file input event to add an image entry instead of the dummy data URL. When Task 2 is complete, clicking 'Add Photo' and choosing an image will add it to the page as a diary entry, and when you reload the page this entry will reappear on the page, until you delete the entry with its ' X ' buttonStep by Step Solution
There are 3 Steps involved in it
Step: 1

Get Instant Access to Expert-Tailored Solutions
See step-by-step solutions with expert insights and AI powered tools for academic success
Step: 2

Step: 3
Ace Your Homework with AI
Get the answers you need in no time with our AI-driven, step-by-step assistance
Get Started
Ontologies Based Databases And Information Systems First And Second Vldb Workshops Odbis 2005/2006 Trondheim Norway September 2005 Seoul Korea September 2006 Revised Papers Lncs 4623
Authors: Martine Collard
2007th Edition
3540754733, 978-3540754732