Question: I need full code for this project. All the resources are found here. The code for lab 3 is: -) https://ucsb csB.github.io/w19 matni/lab/project01/ Goal and
I need full code for this project. All the resources are found here.




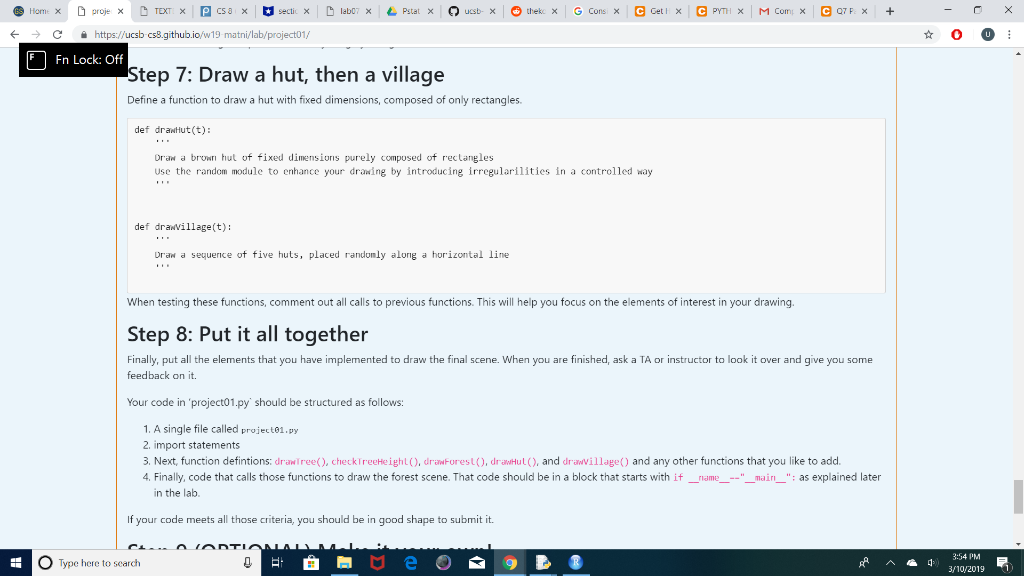
The code for lab 3 is:
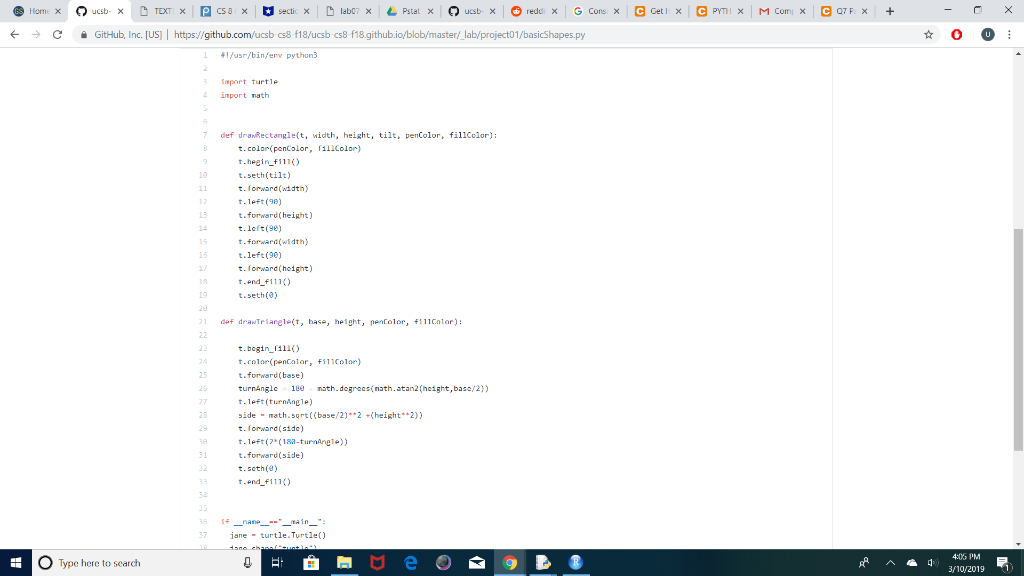
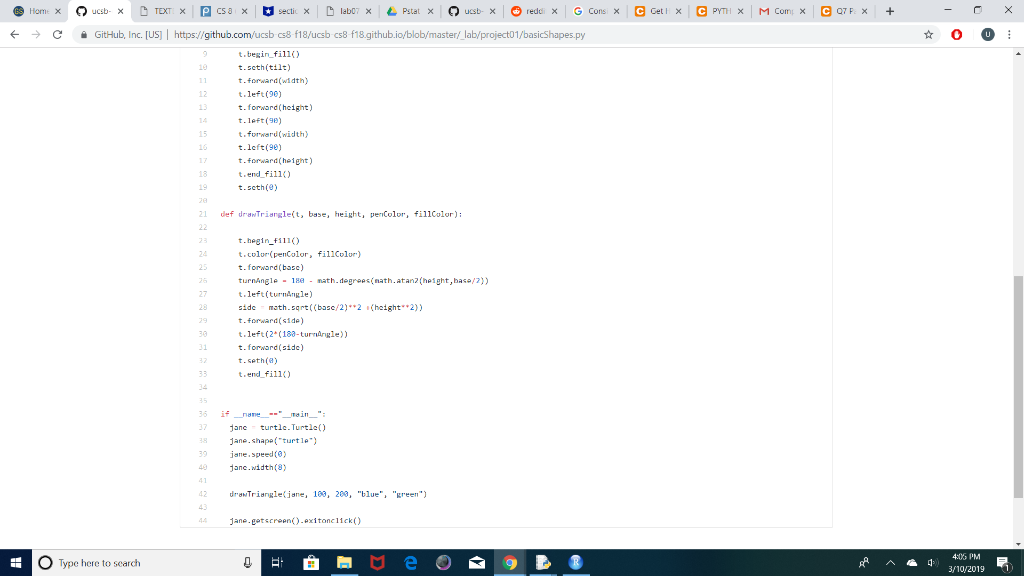
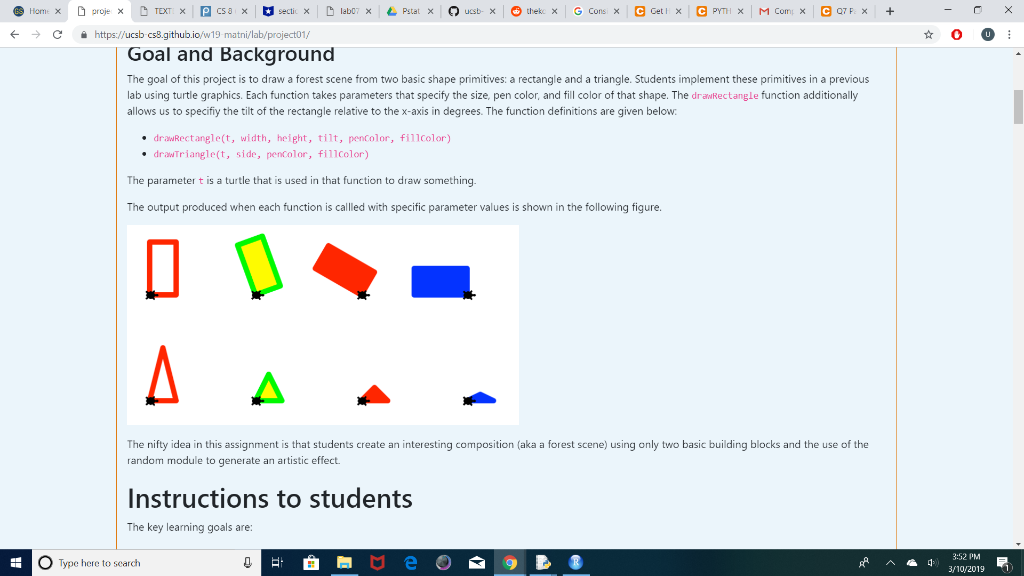
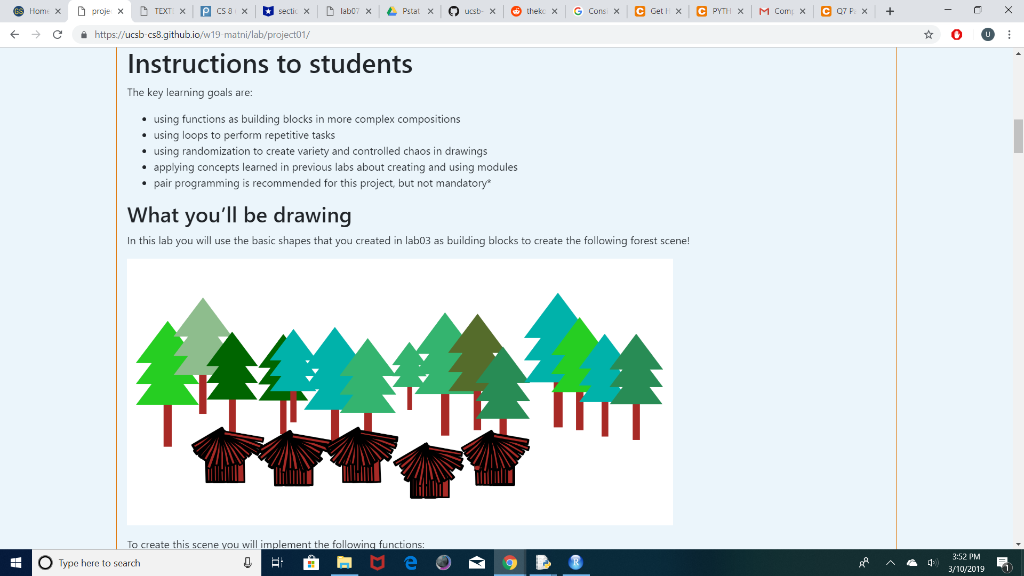
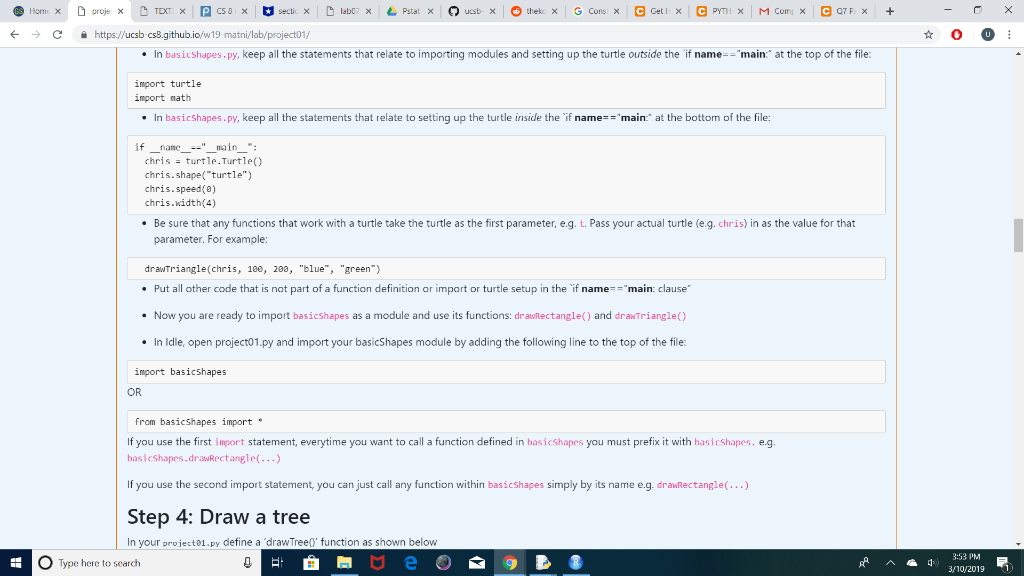
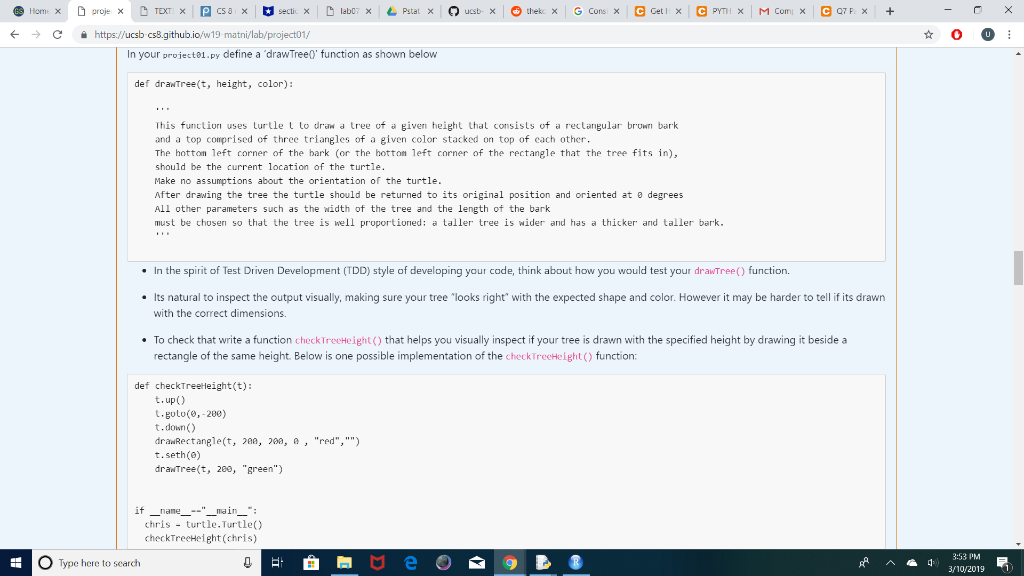
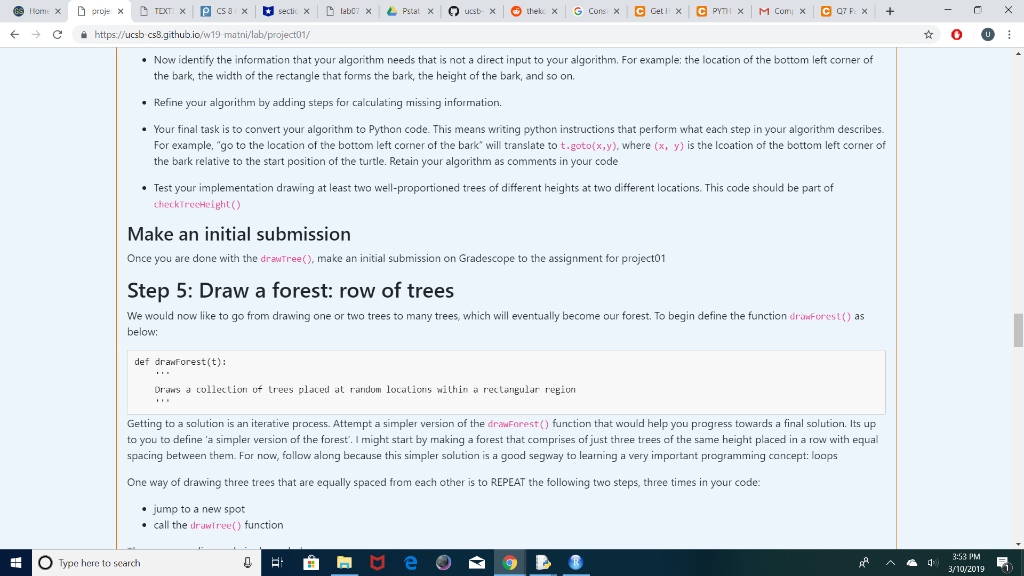
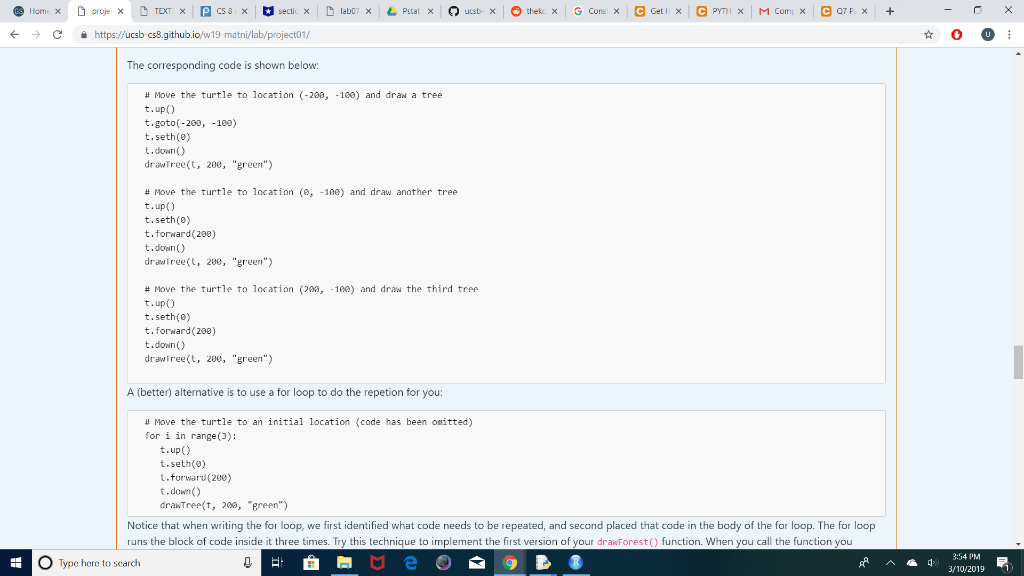
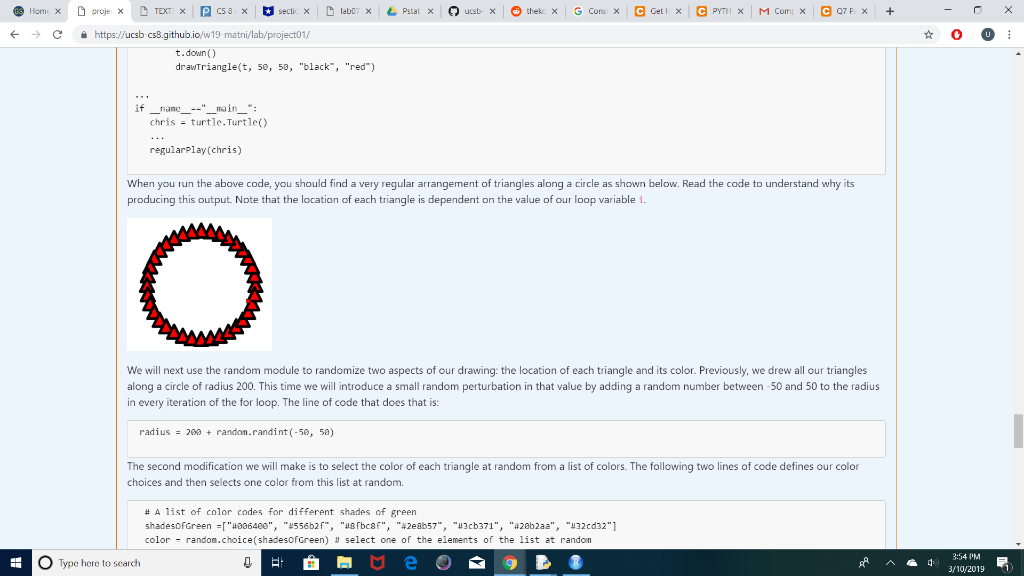
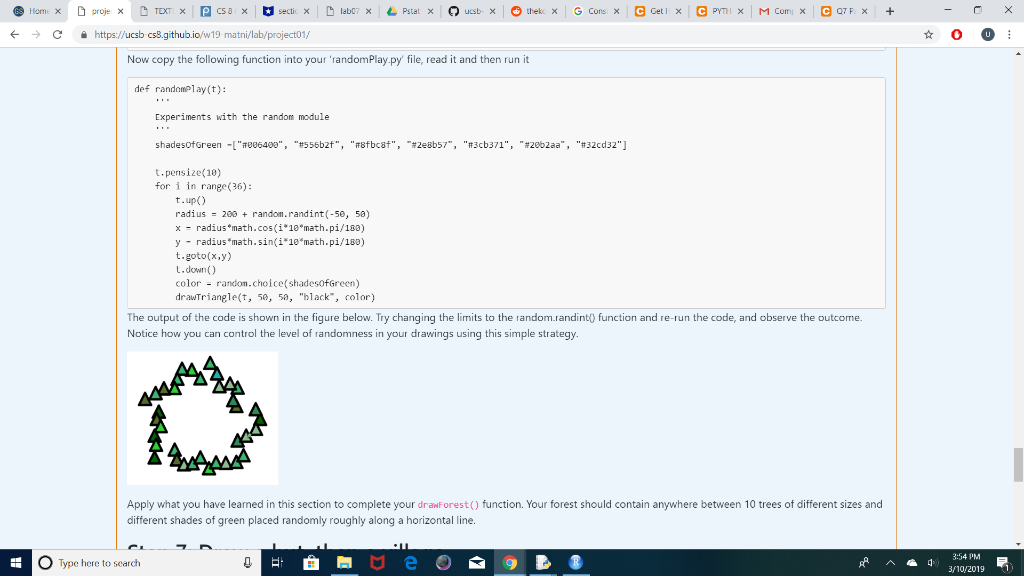
-) https://ucsb csB.github.io/w19 matni/lab/project01/ Goal and Background The goal of this project is to draw a forest scene from two basic shape primitives: a rectangle and a triangle. Students implement these primitives in a previous lab using turtle graphics. Each function takes parameters that specify the size, pen color, and fill color of that shape. The drawRectangle function additionally allows us to specifiy the tilt of the rectangle relative to the x-axis in degrees. The function definitions are given below drawRectangle(t, width, height, tilt, pencolor, fillcolor) drawTriangle(t, side, pencolor, fillcolor) The parameter t is a turtle that is used in that function to draw something. The output produced when each function is callled with specific parameter values is shown in the following figure The nifty idea in this assignment is that students create an interesting composition (aka a forest scene) using only two basic building blocks and the use of the random module to generate an artistic effect Instructions to students The key learming goals are: O Type here to search 3:52 PM 3/10/2019 41. -) https://ucsb csB.github.io/w19 matni/lab/project01/ Instructions to students The key learning goals are: e using functions as building blocks in more complex compositions e using loops to perform repetitive tasks e using randomization to create variety and controlled chaos in drawings e applying concepts leamed in previous labs about creating and using modules e pair programming is recommended for this project, but not mandatory* What you'll be drawing In this lab you will use the basic shapes that you created in lab03 as building blocks to create the follawing forest scene! reate this scene you will implement the following funct O Type here to search 3:52 PM 3/10/2019 41. https://ucsb csB.github.io/w19 matni/lab/project01/ To create this scene you will implement the following functions drawTree) draws a tree comprised of only rectangles and triangles (as shown above) using the basic shape functions from lab03 drawForest): draws a row of trees with different shades of green placed randomly along a row dralut(O: draws a hut (as shown above) comprising only of rectangles reusing the basic rectangle function from labo3 dravillage(): draws a collection of huts placed randomly along a row drawScene(): draws the final scene as shown above using the drawforest) and drawwillage() functions Extra credit: Add your own touch to this scene by writing new functions and calling them within drawscene() Files for submission basic shapes , py projectol.py * The programming part Step 1: Create a project01 directory under your cs8 directory Create a directory called-/cs8/project01 for a file we are going to call projectelgy, If you don't recall the commands, you may refer to any of the previous labs Step 2: Open idle3 and create project01. py Open up idle3 and select the menu option File-> New File to create a new file. Save this file as project01 .py In this file, put this code (but put your name instead of "your name goes here") # project01.py, your name goes here f name"main " O Type here to search 3:53 PM 3/10/2019 -) https://ucsb csB.github.io/w19 matni/lab/project01/ The if test for nanemn is where everthing in your program shauld go except for import statements . function definitions Save this, and run it. You should see Inside mein of projecto1.py printed to screen. Don't set up the turtle in this file. We will reuse the turtle setup from lab03 Step 3: Create a basicShapes module from your lab03.py Use the nkdir command to make a directory calledm/css/projecte Assuming your labas-py from lab03 is in a directory calledfcs8/labe3, you can use this command to copy it into your new directory and rename it as basicshapes.py all in one step: cp-/cs8/1ab03/1ab83.py-/cs8/project01/basicShapes. If you were not able to finish lab03.py, you may use the solution available at this link: lab03-solution as your basicshapes.py file If necessary, modify the code in basicshapes.py so that you can import the code as a module. That is, everything except import statements, and function definitions should be inside the "main block", the part that is indented inside the code: if nane-" main # code goes here If you don't know what this idiom does or why we are using it, consult this page: Explanation of the it name-main" If you still are unclear, ask one of the course TA or the instructor for help. Here are some hints: e In basicshapes.py, keep all the statements that relate to importing modules and setting up the turtle outside the if name-main:" at the top of the file O Type here to search 3:53 PM 3/10/2019 -) https://ucsb csB.github.io/w19 matni/lab/project01/ e In basicshapes.py, keep all the statements that relate to importing modules and setting up the turtle outside the if name- "main: at the top of the file: import turtle import math . In basicshapes.py, keep all the statements that relate to setting up the turtle inside the 'if name-:'main, at the bottom of the file: if nane"main chris -turtle.Turtle() chris.shape( turtle") chris.speed(e) chris.width(4) Be sure that any functions that work with a turtle take the turtle as the first parameter, e.g. t. Pass your actual turtle (e.g. chris) in as the value for that parameter. For example drawTriangle(chris, 180, 203, "blue" "green) . Put all other code that is not part of a function definition ar import or turtle setup in theif name--"main: clause. Now you are ready to import basicshapes as a module and use its functions: drawRectangle() and dranTriangle(O In Idle, open project01.py and import your basicShapes module by adding the following line to the top of the file: import basicshapes OR from basicshapes import If you use the first import statement, everytime you want to call a function defined in basicshapes you must prefix it with hasicshapes. e.g. basicShapes.drawRectangle(..) If you use the second import statement, you can just call any function within basicshapes simply by its name e.g. drawRectangle(..) Step 4: Draw a tree In your project81.py define a 'drawTree0 function as shown below O Type here to search 3:53 PM 3/10/2019 -) https://ucsb csB.github.io/w19 matni/lab/project01/ In your project1.py define a 'drawTree0' function as shown below def dranTree(t, height, color): This function uses turtle L to draw tree of a given height Lhal consists of a retangular bruw bark and a top comprised of three triangles of a given color stacked on top of each other The hottom left corner of the bark (or the hotton left corner of the rectangle that the tree fits in), should be the current location of the turtle Make no assumptions about the orientation of the turtle After drawing the tree the turtle should be returned to its original position and oriented at 8 degrees All other parameters such as the width of the tree and the length of the bark must be chosen so that the tree is well proportioned; taller tree is wider and has a thicker and taller bark In the spirit of Test Driven Development (TDD) style of developing your code, think about how you would test your drawTree() function Its natural to inspect the output visually, making sure your tree "looks right" with the expected shape and color. However it may be harder to tell if its drawn with the correct dimensions. To check that write a function check TreeHeight) that helps you visually inspect if your tree is drawn with the specified height by drawing it beside a rectangle of the same height. Below is one possible implementation of the checkTreeHeight ()function: def checkTreeHeight(t): t.up() L.guto(e,-200) t.down() drawRectangle(t, ee, , e , "red","" t.seth(e) dranTree(t, 20, "green") if _nane"ma in_ chris -turtle.Turtle) checkTreeHeight (chris) O Type here to search 3:53 PM 3/10/2019 41. -) https://ucsb csB.github.io/w19 matni/lab/project01/ If you ran the above code with a correct implementation of drawTree) you should see that the top of the tree coincide with the top side of the rectangle as shown in the following output: Come up with an algorithm to draw a tree Your next task to come up with a recipe (algorithm) to draw a tree. Think about the steps involved and write them out. Your algorithm should look something like this Inputs: height of the tree (height), color of the tree top (color) Step 1: Draw the bark o Step 1a: Go to the location of the bottom left corner of the bark o Step 1b: Draw a rectangle of width , height .. Step 2: Draw the tree top Step 2a: o Step 2b:. Step 3: Return to the initial location of the turtle Your algorithm should be similar but more complete. Write your algorithm as comments inside your draTree) function. Now identify the information that your algorithm needs that is not a direct input to your algorithm. For example: the location of the bottom left corner of the bark, the width of the rectangle that forms the bark, the height of the bark, and so on. Refine your algorithm by adding steps for calculating missing information. O Type here to search 3:53 PM 3/10/2019 -) https://ucsb csB.github.io/w19 matni/lab/project01/ Now identify the information that your algorithm needs that is not a direct input to your algorithm. For example: the location of the bottom left corner of the bark, the width of the rectangle that forms the bark, the height of the bark, and so on your algorithm by adding steps for calcula missing information. Your final task is to convert your algorithm to Python code. This means writing python instructions that perform what each step in your algorithm describes. For example, "go to the location of the bottom left corner of the bark will translate to t.goto(x,y), where (x, y) is the lcoation of the bottom left corner of the bark relative to the start position of the turtle. Retain Igorithm as comments in your c ode Test your implementation drawing at least two well-proportioned trees of different heights at two different locations. This code should be part of checkTreegt) Make an initial submission Once you are done with the drawTree(), make an initial submission on Gradescope to the assignment for project01 Step 5: Draw a forest: row of trees We would now like to go from drawing one or two trees to many trees, which will eventually become our forest. To begin define the function drawForest() as below def dranForest(t) Oraws a ollection uf trees placed at random locations within rectangular region Getting to a solution is an iterative process. Attempt a simpler version of the drawForest function that would help you progress towards a final solution. Its up to you to define 'a simpler version of the forest.I might start by making a forest that comprises of just three trees of the same height placed in a row with equal spacing between them. For now,fallow along because this simpler solution is a good segway to learning a very important programming concept: loops One way of drawing three trees that are equally spaced from each other is to REPEAT the following two steps, three times in your code: e jump to a new spot call the drawIree() function O Type here to search 3:53 PM 3/10/2019 https://ucsb csB.github.io/w19 matni/lab/project01/ The corresponding code is shown below: # Move the turtle to location (-200, -100) and draw a tree t.up() t.goto(-2, -180) t.seth(e) t.down() drawTree(t, 200, "gre" # Move the turtle to location (e, -100) and draw another tree t.up) t.seth(8) t.forward(200) t.downC) drawTree(L, 20, "gree") # Move the turtle to location (208, -100) and draw the third tree t.up) t.seth(8) t.forward (298) t.down() drawiree(t, 2, "green") A (better) alternative is to use a for loop to do the repetion for you: Move the turtle to an initial location (code has been onitted) for i in range(3): t.up) t.seth(o) L.furward(2e0) t.down() drawTree(t, 200, "green") Notice that when writing the for loop, we first identified what code needs to be repeated, and second placed that code in the body of the for loop. The for loop runs the block of code inside it three times. Try this technique to implement the first version of your drawForest) function. When you call the function you 3:54 PM O Type here to search https://ucsb csB.github.io/w19 matni/lab/project01/ t.down() drawTriangle(t, 50, 58, "black, "red) if nane-" main chris - turtle.Turtle() regularPlay(chris) When you run the above code, you should find a very regular arrangement of triangles along a circle as shown below. Read the cade to understand why its producing this output. Note that the location of each triangle is dependent on the value of our loop variable i. We will next use the random module to randomize two aspects of our drawing: the location of each triangle and its color. Previously, we drew all our triangles along a circle of radius 200. This time we will introduce a small random perturbation in that value by adding a random number between-50 and 50 to the radius in every iteration of the for loop. The line of code that does that is: radius 2randon.randint-50, 5a) The second modification we will make is to select the color of each triangle at random from a list of colors. The following two lines of code defines our color choices and then selects one color from this list at random. # A list of color codes for different shades of green shadesOfGreen-["006400", "#556b2f", "usfbc8f", "a2e8b57", "#3cb371", "a2eb2aa", "#32cd32 " color -random . choice(shades0fcreen) select one of the elements of the list at random 3:54 PM O Type here to search 41. -) https://ucsb csB.github.io/w19 matni/lab/project01/ Now copy the following function into your 'randomPlay py' file, read it and then run it def randomPlay(t): Experiments with the random module shadesotGreen -["#806400", "#556b2f", t.pensize(10) "#8fbc8f", "#2e8b57", "#3cb371", "#20b2aa", "#32cd32"] fori in range 36): t.up) radius 200 random.radint -5e, 5a) x-radius"math.cos("10"math.pi/180) y - radius*math.sin(i 10 math.pi/1sa) t.goto(x,y) t.down() color- random.choice(shadesofGreen) drawTriangle(t, 55 "black, color) The output of the code is shown in the figure below. Try changing the limits to the random.randint0 function and re-run the code, and observe the outcome Notice how you can control the level of randomness in your drawings using this simple strategy Apply what you have leamed in this section to complete your dranForest() function. Your forest should contain anywhere between 10 trees of different sizes and different shades of green placed randomly roughly along a horizontal line. 3:54 PM O Type here to search 41. -) https://ucsb csB.github.io/w19 matni/lab/project01/ F Fn Lock: Off Step 7: Draw a hut, then a village Define a function to draw a hut with fixed dimensions, composed of only rectangles. def dranHut(t): Oraw a bron hut of fixed dimensions purely composed o rectangles use the random module to enhance your drawing by introducing irregularilities in a controlled way def dranwillage(t): Draw a sequernce ot five huts, placed randomly along a horizontal line When testing these functions, comment out all calls to previous functions. This will help you focus on the elements of interest in your drawing. Step 8: Put it all together Finally, put all the elements that you have implemented to draw the final scene. When you are finished, ask a TA or instructor to look it over and give you some feedback on it. Your code in project01.py should be structured as follows: 1. A single file called project01.py 2. import statements 3. Next, function defintions: dranTree(), checkTreeHeight), drawForesL), draHul), and dravillage( and any other functions that you like to add 4. Finally, code that calls those functions to draw the forest scene. That code should be in a block that starts with if ame"mai" as explained later in the lab. If your code meets all those criteria, you should be in good shape to submit it. 3:54 PM O Type here to search 41. GitHub, Inc. [US] ! https://github.com/ucsb cs8 f1 8/ucsb csB f18.g labyproject01/basicShapes.py t.begin fillo t.scthitil:) t. forward (width t.left(90) t. forward(height) t.1Ft (9e) t.forward(width t.lcft(9e) t.forward(heiht) t end fill) t.scth(9) 12 15 18 1 def dranTriglet, base, height, peColor,fillcolor) t.hegin fl1o t.colom penColor fillcolur t. forward(basc) turnngle-188ath.dogroos(nath.atan2(height, basa/7)) t.left(turnAngle) sidc math.sqrt(bosc/2)2 (height2)) t.forward(side) t.left(2 (188-turmAngle) t. forward(sidc) t.seth(a) t end fill) 27 35 if -name----'-main'-'"- anc turtic.Turtle ane.sha turtl) jsne.speed) ane.width(8) 42 draTrianglejane, 1, 20, "blue "green 4 Jane.gotscroxitoncl1ck() 4:05 PM O Type here to search -) https://ucsb csB.github.io/w19 matni/lab/project01/ Goal and Background The goal of this project is to draw a forest scene from two basic shape primitives: a rectangle and a triangle. Students implement these primitives in a previous lab using turtle graphics. Each function takes parameters that specify the size, pen color, and fill color of that shape. The drawRectangle function additionally allows us to specifiy the tilt of the rectangle relative to the x-axis in degrees. The function definitions are given below drawRectangle(t, width, height, tilt, pencolor, fillcolor) drawTriangle(t, side, pencolor, fillcolor) The parameter t is a turtle that is used in that function to draw something. The output produced when each function is callled with specific parameter values is shown in the following figure The nifty idea in this assignment is that students create an interesting composition (aka a forest scene) using only two basic building blocks and the use of the random module to generate an artistic effect Instructions to students The key learming goals are: O Type here to search 3:52 PM 3/10/2019 41. -) https://ucsb csB.github.io/w19 matni/lab/project01/ Instructions to students The key learning goals are: e using functions as building blocks in more complex compositions e using loops to perform repetitive tasks e using randomization to create variety and controlled chaos in drawings e applying concepts leamed in previous labs about creating and using modules e pair programming is recommended for this project, but not mandatory* What you'll be drawing In this lab you will use the basic shapes that you created in lab03 as building blocks to create the follawing forest scene! reate this scene you will implement the following funct O Type here to search 3:52 PM 3/10/2019 41. https://ucsb csB.github.io/w19 matni/lab/project01/ To create this scene you will implement the following functions drawTree) draws a tree comprised of only rectangles and triangles (as shown above) using the basic shape functions from lab03 drawForest): draws a row of trees with different shades of green placed randomly along a row dralut(O: draws a hut (as shown above) comprising only of rectangles reusing the basic rectangle function from labo3 dravillage(): draws a collection of huts placed randomly along a row drawScene(): draws the final scene as shown above using the drawforest) and drawwillage() functions Extra credit: Add your own touch to this scene by writing new functions and calling them within drawscene() Files for submission basic shapes , py projectol.py * The programming part Step 1: Create a project01 directory under your cs8 directory Create a directory called-/cs8/project01 for a file we are going to call projectelgy, If you don't recall the commands, you may refer to any of the previous labs Step 2: Open idle3 and create project01. py Open up idle3 and select the menu option File-> New File to create a new file. Save this file as project01 .py In this file, put this code (but put your name instead of "your name goes here") # project01.py, your name goes here f name"main " O Type here to search 3:53 PM 3/10/2019 -) https://ucsb csB.github.io/w19 matni/lab/project01/ The if test for nanemn is where everthing in your program shauld go except for import statements . function definitions Save this, and run it. You should see Inside mein of projecto1.py printed to screen. Don't set up the turtle in this file. We will reuse the turtle setup from lab03 Step 3: Create a basicShapes module from your lab03.py Use the nkdir command to make a directory calledm/css/projecte Assuming your labas-py from lab03 is in a directory calledfcs8/labe3, you can use this command to copy it into your new directory and rename it as basicshapes.py all in one step: cp-/cs8/1ab03/1ab83.py-/cs8/project01/basicShapes. If you were not able to finish lab03.py, you may use the solution available at this link: lab03-solution as your basicshapes.py file If necessary, modify the code in basicshapes.py so that you can import the code as a module. That is, everything except import statements, and function definitions should be inside the "main block", the part that is indented inside the code: if nane-" main # code goes here If you don't know what this idiom does or why we are using it, consult this page: Explanation of the it name-main" If you still are unclear, ask one of the course TA or the instructor for help. Here are some hints: e In basicshapes.py, keep all the statements that relate to importing modules and setting up the turtle outside the if name-main:" at the top of the file O Type here to search 3:53 PM 3/10/2019 -) https://ucsb csB.github.io/w19 matni/lab/project01/ e In basicshapes.py, keep all the statements that relate to importing modules and setting up the turtle outside the if name- "main: at the top of the file: import turtle import math . In basicshapes.py, keep all the statements that relate to setting up the turtle inside the 'if name-:'main, at the bottom of the file: if nane"main chris -turtle.Turtle() chris.shape( turtle") chris.speed(e) chris.width(4) Be sure that any functions that work with a turtle take the turtle as the first parameter, e.g. t. Pass your actual turtle (e.g. chris) in as the value for that parameter. For example drawTriangle(chris, 180, 203, "blue" "green) . Put all other code that is not part of a function definition ar import or turtle setup in theif name--"main: clause. Now you are ready to import basicshapes as a module and use its functions: drawRectangle() and dranTriangle(O In Idle, open project01.py and import your basicShapes module by adding the following line to the top of the file: import basicshapes OR from basicshapes import If you use the first import statement, everytime you want to call a function defined in basicshapes you must prefix it with hasicshapes. e.g. basicShapes.drawRectangle(..) If you use the second import statement, you can just call any function within basicshapes simply by its name e.g. drawRectangle(..) Step 4: Draw a tree In your project81.py define a 'drawTree0 function as shown below O Type here to search 3:53 PM 3/10/2019 -) https://ucsb csB.github.io/w19 matni/lab/project01/ In your project1.py define a 'drawTree0' function as shown below def dranTree(t, height, color): This function uses turtle L to draw tree of a given height Lhal consists of a retangular bruw bark and a top comprised of three triangles of a given color stacked on top of each other The hottom left corner of the bark (or the hotton left corner of the rectangle that the tree fits in), should be the current location of the turtle Make no assumptions about the orientation of the turtle After drawing the tree the turtle should be returned to its original position and oriented at 8 degrees All other parameters such as the width of the tree and the length of the bark must be chosen so that the tree is well proportioned; taller tree is wider and has a thicker and taller bark In the spirit of Test Driven Development (TDD) style of developing your code, think about how you would test your drawTree() function Its natural to inspect the output visually, making sure your tree "looks right" with the expected shape and color. However it may be harder to tell if its drawn with the correct dimensions. To check that write a function check TreeHeight) that helps you visually inspect if your tree is drawn with the specified height by drawing it beside a rectangle of the same height. Below is one possible implementation of the checkTreeHeight ()function: def checkTreeHeight(t): t.up() L.guto(e,-200) t.down() drawRectangle(t, ee, , e , "red","" t.seth(e) dranTree(t, 20, "green") if _nane"ma in_ chris -turtle.Turtle) checkTreeHeight (chris) O Type here to search 3:53 PM 3/10/2019 41. -) https://ucsb csB.github.io/w19 matni/lab/project01/ If you ran the above code with a correct implementation of drawTree) you should see that the top of the tree coincide with the top side of the rectangle as shown in the following output: Come up with an algorithm to draw a tree Your next task to come up with a recipe (algorithm) to draw a tree. Think about the steps involved and write them out. Your algorithm should look something like this Inputs: height of the tree (height), color of the tree top (color) Step 1: Draw the bark o Step 1a: Go to the location of the bottom left corner of the bark o Step 1b: Draw a rectangle of width , height .. Step 2: Draw the tree top Step 2a: o Step 2b:. Step 3: Return to the initial location of the turtle Your algorithm should be similar but more complete. Write your algorithm as comments inside your draTree) function. Now identify the information that your algorithm needs that is not a direct input to your algorithm. For example: the location of the bottom left corner of the bark, the width of the rectangle that forms the bark, the height of the bark, and so on. Refine your algorithm by adding steps for calculating missing information. O Type here to search 3:53 PM 3/10/2019 -) https://ucsb csB.github.io/w19 matni/lab/project01/ Now identify the information that your algorithm needs that is not a direct input to your algorithm. For example: the location of the bottom left corner of the bark, the width of the rectangle that forms the bark, the height of the bark, and so on your algorithm by adding steps for calcula missing information. Your final task is to convert your algorithm to Python code. This means writing python instructions that perform what each step in your algorithm describes. For example, "go to the location of the bottom left corner of the bark will translate to t.goto(x,y), where (x, y) is the lcoation of the bottom left corner of the bark relative to the start position of the turtle. Retain Igorithm as comments in your c ode Test your implementation drawing at least two well-proportioned trees of different heights at two different locations. This code should be part of checkTreegt) Make an initial submission Once you are done with the drawTree(), make an initial submission on Gradescope to the assignment for project01 Step 5: Draw a forest: row of trees We would now like to go from drawing one or two trees to many trees, which will eventually become our forest. To begin define the function drawForest() as below def dranForest(t) Oraws a ollection uf trees placed at random locations within rectangular region Getting to a solution is an iterative process. Attempt a simpler version of the drawForest function that would help you progress towards a final solution. Its up to you to define 'a simpler version of the forest.I might start by making a forest that comprises of just three trees of the same height placed in a row with equal spacing between them. For now,fallow along because this simpler solution is a good segway to learning a very important programming concept: loops One way of drawing three trees that are equally spaced from each other is to REPEAT the following two steps, three times in your code: e jump to a new spot call the drawIree() function O Type here to search 3:53 PM 3/10/2019 https://ucsb csB.github.io/w19 matni/lab/project01/ The corresponding code is shown below: # Move the turtle to location (-200, -100) and draw a tree t.up() t.goto(-2, -180) t.seth(e) t.down() drawTree(t, 200, "gre" # Move the turtle to location (e, -100) and draw another tree t.up) t.seth(8) t.forward(200) t.downC) drawTree(L, 20, "gree") # Move the turtle to location (208, -100) and draw the third tree t.up) t.seth(8) t.forward (298) t.down() drawiree(t, 2, "green") A (better) alternative is to use a for loop to do the repetion for you: Move the turtle to an initial location (code has been onitted) for i in range(3): t.up) t.seth(o) L.furward(2e0) t.down() drawTree(t, 200, "green") Notice that when writing the for loop, we first identified what code needs to be repeated, and second placed that code in the body of the for loop. The for loop runs the block of code inside it three times. Try this technique to implement the first version of your drawForest) function. When you call the function you 3:54 PM O Type here to search https://ucsb csB.github.io/w19 matni/lab/project01/ t.down() drawTriangle(t, 50, 58, "black, "red) if nane-" main chris - turtle.Turtle() regularPlay(chris) When you run the above code, you should find a very regular arrangement of triangles along a circle as shown below. Read the cade to understand why its producing this output. Note that the location of each triangle is dependent on the value of our loop variable i. We will next use the random module to randomize two aspects of our drawing: the location of each triangle and its color. Previously, we drew all our triangles along a circle of radius 200. This time we will introduce a small random perturbation in that value by adding a random number between-50 and 50 to the radius in every iteration of the for loop. The line of code that does that is: radius 2randon.randint-50, 5a) The second modification we will make is to select the color of each triangle at random from a list of colors. The following two lines of code defines our color choices and then selects one color from this list at random. # A list of color codes for different shades of green shadesOfGreen-["006400", "#556b2f", "usfbc8f", "a2e8b57", "#3cb371", "a2eb2aa", "#32cd32 " color -random . choice(shades0fcreen) select one of the elements of the list at random 3:54 PM O Type here to search 41. -) https://ucsb csB.github.io/w19 matni/lab/project01/ Now copy the following function into your 'randomPlay py' file, read it and then run it def randomPlay(t): Experiments with the random module shadesotGreen -["#806400", "#556b2f", t.pensize(10) "#8fbc8f", "#2e8b57", "#3cb371", "#20b2aa", "#32cd32"] fori in range 36): t.up) radius 200 random.radint -5e, 5a) x-radius"math.cos("10"math.pi/180) y - radius*math.sin(i 10 math.pi/1sa) t.goto(x,y) t.down() color- random.choice(shadesofGreen) drawTriangle(t, 55 "black, color) The output of the code is shown in the figure below. Try changing the limits to the random.randint0 function and re-run the code, and observe the outcome Notice how you can control the level of randomness in your drawings using this simple strategy Apply what you have leamed in this section to complete your dranForest() function. Your forest should contain anywhere between 10 trees of different sizes and different shades of green placed randomly roughly along a horizontal line. 3:54 PM O Type here to search 41. -) https://ucsb csB.github.io/w19 matni/lab/project01/ F Fn Lock: Off Step 7: Draw a hut, then a village Define a function to draw a hut with fixed dimensions, composed of only rectangles. def dranHut(t): Oraw a bron hut of fixed dimensions purely composed o rectangles use the random module to enhance your drawing by introducing irregularilities in a controlled way def dranwillage(t): Draw a sequernce ot five huts, placed randomly along a horizontal line When testing these functions, comment out all calls to previous functions. This will help you focus on the elements of interest in your drawing. Step 8: Put it all together Finally, put all the elements that you have implemented to draw the final scene. When you are finished, ask a TA or instructor to look it over and give you some feedback on it. Your code in project01.py should be structured as follows: 1. A single file called project01.py 2. import statements 3. Next, function defintions: dranTree(), checkTreeHeight), drawForesL), draHul), and dravillage( and any other functions that you like to add 4. Finally, code that calls those functions to draw the forest scene. That code should be in a block that starts with if ame"mai" as explained later in the lab. If your code meets all those criteria, you should be in good shape to submit it. 3:54 PM O Type here to search 41. GitHub, Inc. [US] ! https://github.com/ucsb cs8 f1 8/ucsb csB f18.g labyproject01/basicShapes.py t.begin fillo t.scthitil:) t. forward (width t.left(90) t. forward(height) t.1Ft (9e) t.forward(width t.lcft(9e) t.forward(heiht) t end fill) t.scth(9) 12 15 18 1 def dranTriglet, base, height, peColor,fillcolor) t.hegin fl1o t.colom penColor fillcolur t. forward(basc) turnngle-188ath.dogroos(nath.atan2(height, basa/7)) t.left(turnAngle) sidc math.sqrt(bosc/2)2 (height2)) t.forward(side) t.left(2 (188-turmAngle) t. forward(sidc) t.seth(a) t end fill) 27 35 if -name----'-main'-'"- anc turtic.Turtle ane.sha turtl) jsne.speed) ane.width(8) 42 draTrianglejane, 1, 20, "blue "green 4 Jane.gotscroxitoncl1ck() 4:05 PM O Type here to search
Step by Step Solution
There are 3 Steps involved in it

Get step-by-step solutions from verified subject matter experts


